So, did anyone want to see how my Jingle quilt turned out? Ta da! Woot woot! Bring on the eggnog and pop the champagne! Party in the streets!!! Before getting into this, I want to give credit to pattern designer Erin Russek for creating this beautiful patchwork and appliqué design, for teaching me how to applique through her clear, well-written pattern instructions and tutorials, and for releasing this pattern as a mystery Block of the Month back in 2012 so I wouldn't know what I was getting into until I was too far in to give up! Erin's blog is called One Piece At a Time and that's pretty much how she walks you through this quilt. First we're going to make one leaf. Then we're going to make one little bird... If you just focus on learning one piece at a time, you can do anything, right? Erin's Jingle pattern is now available in book form from C&T Publishing and you can get it directly from the publisher here or on Amazon here (this post contains affiliate links to defray the cost of the thousands of yards of thread that went into this quilt, wink wink). Erin has lots of great applique tutorials and free projects currently available on her blog here and I can't recommend her patterns more highly, especially if you're someone like I was who admired appliqué but thought it would be "too hard."
Without further ado, here's my finished Jingle quilt:
 |
| 68 x 68 Ars Longa, Vita Brevis (Jingle) Totally Finished |
Here's the Rear View, where you can really see the amount of quilting that went into this beast:
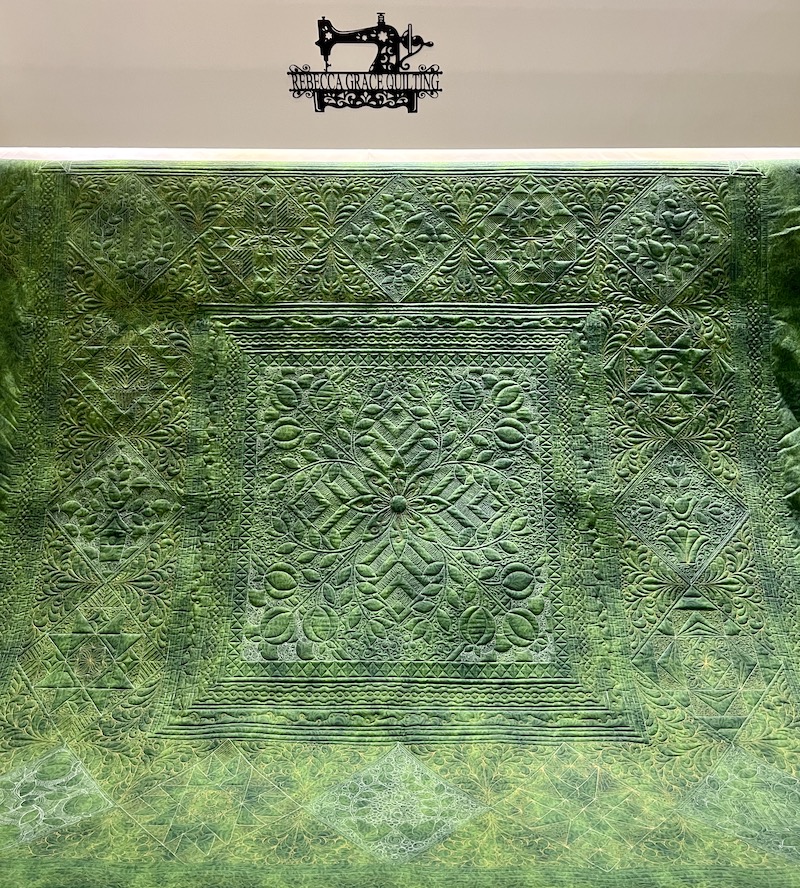 |
| DANG, That's a Lot of Quilting!! |
There's a fine line between Quilting it to Life and Quilting it to Death; hopefully I didn't cross that line! I match my bobbin thread color to my top thread; that's what's giving the back of the quilt that color washed effect where some areas are heavily stitched in gold thread over the green and other areas (where I have off white appliqué backgrounds on the front) are stitched in cream thread. The dramatic texture you're seeing comes from double batting this quilt with Quilters Dream 80/20 Cotton/Poly blend on the bottom topped with Quilters Dream Wool. This is going to be a long post with lots of photos and an extra helping of my blah-blah-blah, so if you need to take a quick bathroom break and grab some refreshments before you settle in, I'll wait for you. (You can also just skim through my torrent of text today and enjoy the photos, if you prefer. I won't know the difference and my feelings won't get hurt -- a lot of the information that goes into my blog posts is for my own documentation because I always lose my notebooks and sticky notes, but even I can't manage to misplace the whole Internet!) 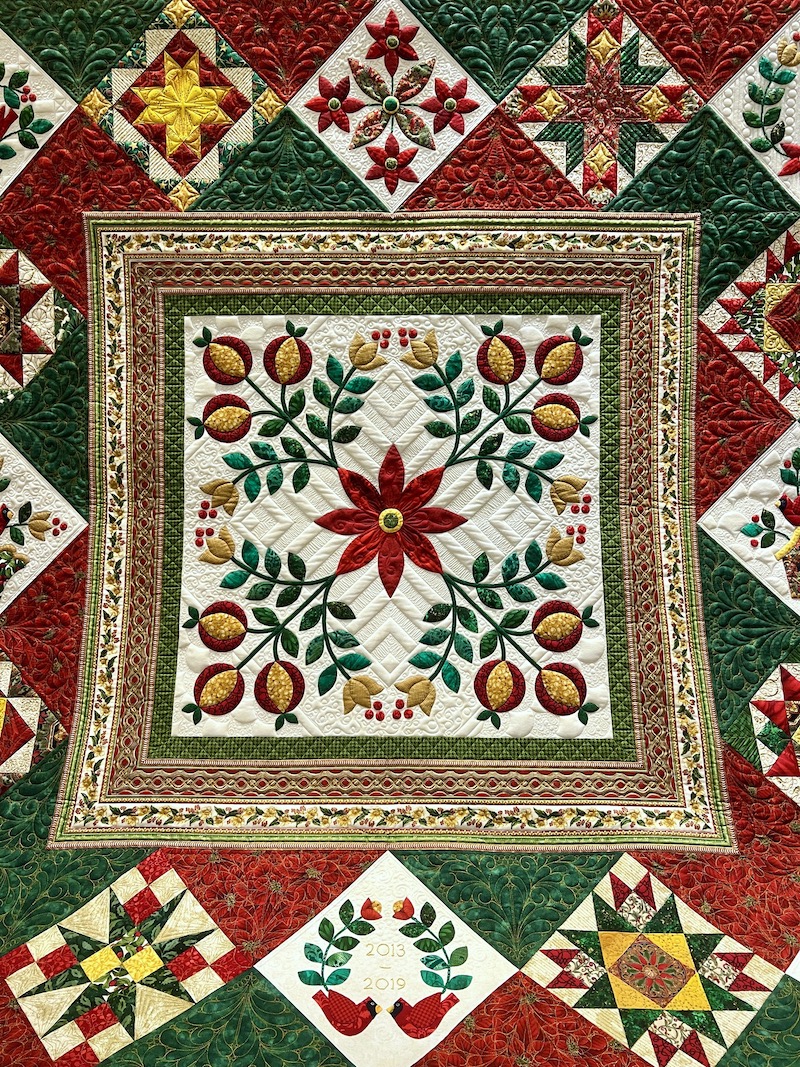 |
| Double Batting Creates Amazing Texture |
All in all, counting the time back in July as well as the time in November-December, Jingle was on my frame for a total of 36 days. That doesn't mean I was actually quilting all of those days -- there were days where I'd just walk into the studio and stare at the quilt, trying to decide what to quilt in the next area, pulling out a bunch of books and/or pulling up Pinterest on my iPad to look for inspiration. There were other days when I spent more time ripping out stitches than I spent putting stitches into the quilt. And of course, there were other days when life's other demands kept me out of the studio altogether. Also, to be clear, I physically cannot do hand guided quilting in stretches longer than 3-4 hours before my neck and shoulders are aching, my back is getting stiff and my brain is fried and I'm about to sew over my own fingers! But still, 36 days of taking up space on my long arm and preventing anyone's edge-to-edge quilting from happening. My quilting clients need not worry, though -- I have made zero progress on my next appliqué quilt (FrankenWhiggish Rose) so that one won't be hogging the frame until late next year at the earliest.  |
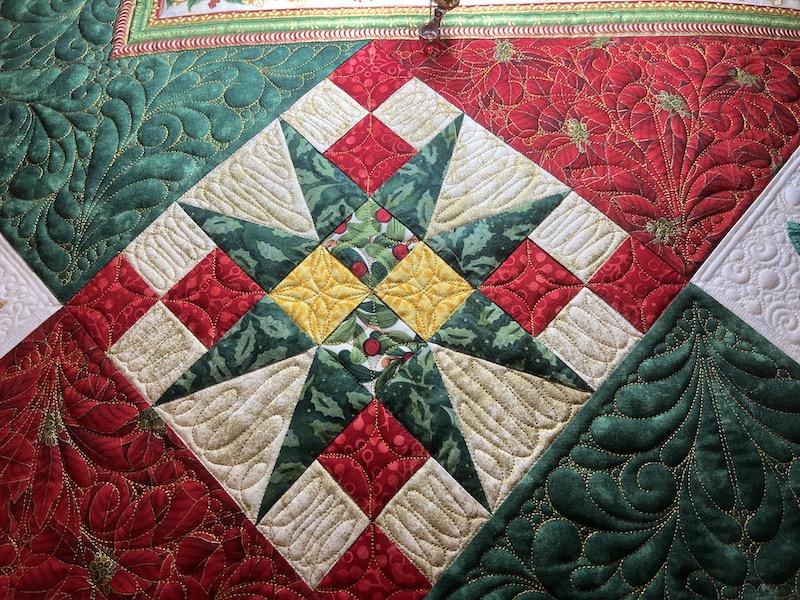
| SID, Digital Design Plus Ruler Work |
I thought you all might like to see how I combined a digital design with hand guided ruler work in this star block. In the photo below, I've stitched in the ditch with invisible monofilament thread along all of the block seam lines (except the seams within the yellow star, which I wanted to deemphasize). The design in the center yellow square is a digital design by Karlee Porter made up of straight lines that I could have quilted by hand with a ruler, but I would have had to measure and mark for all of those lines and it would have been easy to get confused while I was quilting it and mess it up. Quilting that part digitally made sense. But all of the additional quilting you see in the top photo that isn't in the bottom photo was done hand guided, using rulers, without any marking on the quilt. I used one of Lisa Calle's awesome Pro Line rulers to do the evenly spaced matchstick quilting in the cream triangles and the rounded ends of a couple different sizes of her Pro Pebbles rulers to quilt those continuous curves in the gold squares, the scallops in the red poinsettia fabric, and the additional quilting in the yellow star. Now the block looks "done" to me, and the subtle irregularities of the areas I quilted by hand soften and enhance the rigid precision of the computer quilting (to my eyes, anyway) and the end result feels more "my own" rather than just stamping Karlee Porter's design down and calling it a day. (Not that there's anything wrong with doing that -- some of her designs are so gorgeous that I want to design and make quilts just to show off her quilting designs!)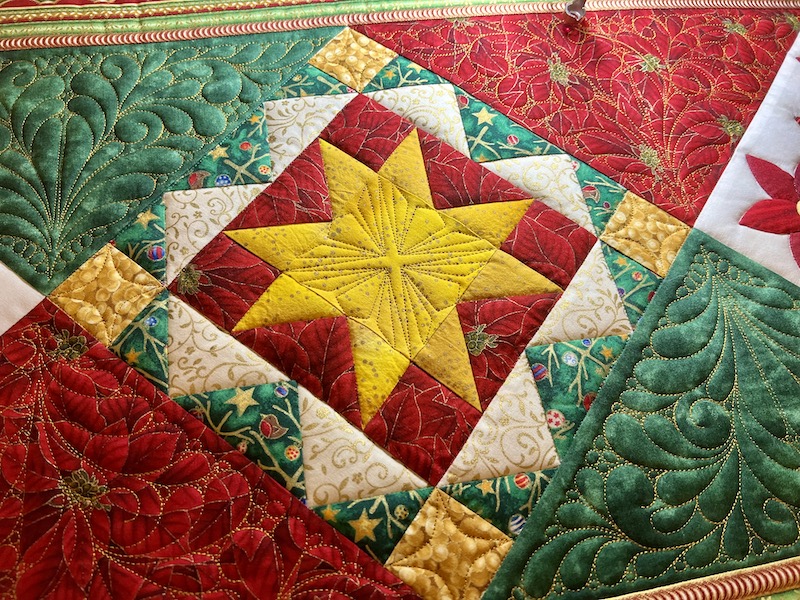 |
| Ruler Work SID and Digital Design Alone |
This is one of my favorite appliqué blocks. I have double straight(ish) lines framing all of my appliqué blocks. That's because, on the very first block, I made a mistake eyeballing the distance between the edge of my ruler and where my needle actually stitches, and I decided to just go around the block twice rather than picking out a few inches of misplaced stitches to have a single 1/4" frame as originally intended. Penny wise, pound foolish... I used So Fine matte 50 weight polyester thread for my background quilting in the appliqué blocks paired with 60 weight Glide in my bobbin.
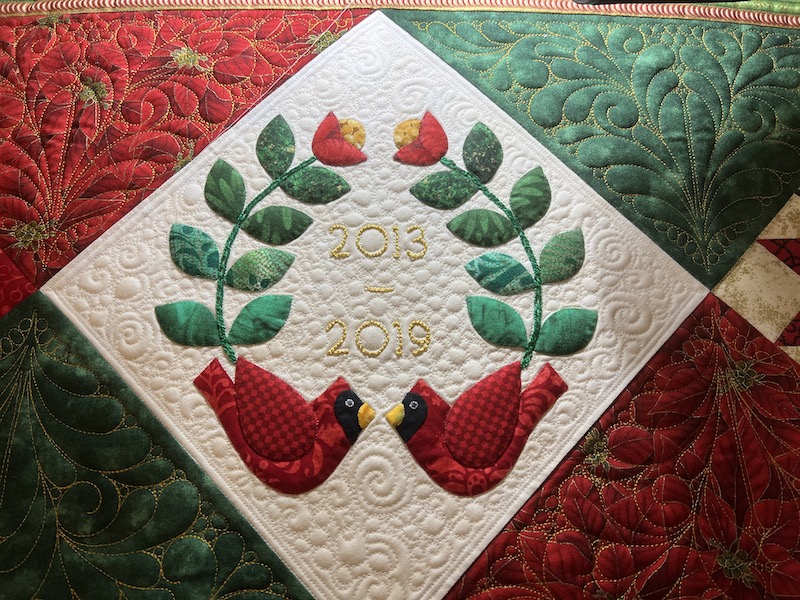 |
| 2013-2019, Six Years to Piece and Appliqué the Quilt Top |
Hey, I don't want those dates to scare anyone off from making this quilt. I finished this quilt top six years after I started making it, but I wasn't working on it constantly for all of that time! It's been on again, off again, and I've made so many other quilts and other projects in the meantime. My son Anders has been nagging me about this quilt for years: "You STILL haven't finished that Jingle quilt?!!!" Hahaha! The Pot of Procrastination is calling his mother a Kettle, or something like that...
And now, I will show you the UGLY block that was not permitted to live:
 |
| First Try, Sacrificed to the Seam Ripper |
That's the first pieced block I started quilting and I was nervous to start, worried I'd ruin the quilt with poor decisions or poorly executed quilting, and decided to just GO FOR IT. Well, YUCK! It turns out, those "simple cursive loops" are not so easy to start off with freehand when you're rusty and out of practice and you have to stitch them diagonally instead of vertically and horizontally. Blech! (The continuous curve quilting in the red and yellow squares was done with the curved end of my Pro Pebbles ruler and the SID was done with a straight edge ruler). Well, I left that ugly quilting in and moved on to the next block, deciding that I'd rip and redo it if it still bothered me once the other blocks were finished.
Um, yes -- it still bothered me VERY MUCH! It took me at least two hours to rip out those loops that I probably quilted in less than 5 minutes, because I unpicked the stitches one at a time to avoid any chance of ripping or marring the quilt fabric, but it was totally worth it because the block looks SO much better now!! The new quilting in the small cream squares and equilateral triangles feature digital block designs by Karlee Porter -- again, these designs are totally doable by hand with rulers, but would have required a lot of careful measuring and marking of each little square and triangle.
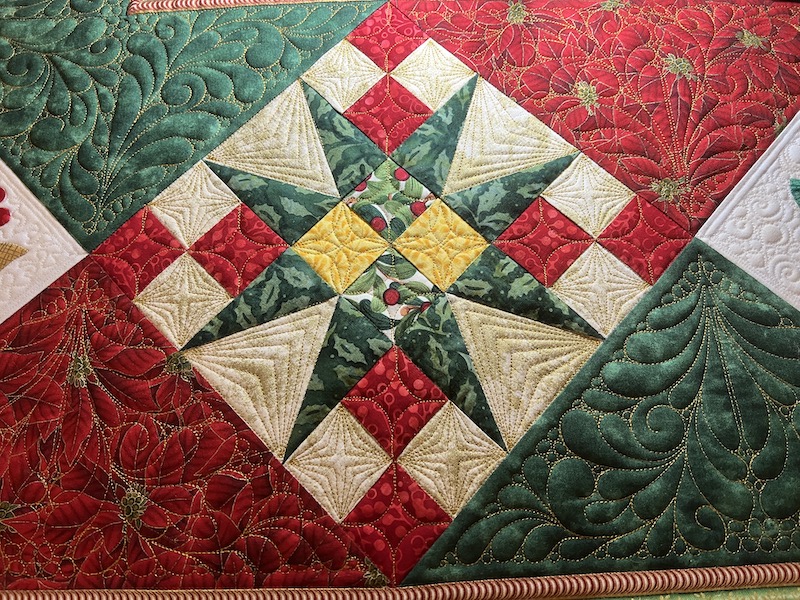 |
| No Regrets - SO Much Better! |
Seriously, everyone is always telling me "don't rip it out, no one will know, no one but you will ever see it," but I never, ever regret ripping out stitching that I'm not happy with so I can do it over. My seam ripper is named Grace (my middle name) because as long as I have a seam ripper, I don't ever have to worry about getting it right the first time. I can try again, and again, and again, messing up over and over and know that none of those sins will count against me -- I only have to get it right the last time! See? Seam rippers aren't vicious serial murderers (Jack the Ripper!). Seam rippers are agents of never ending Grace! That judgmental blind dude who goes galloping past quilts on horseback can go make his own quilts. The only person who needs to be satisfied with my quilts is me.
By the way, it's not just the subpar execution of my initial loop quilting that drove me to rip it out. I like to have contrast between curvy, flowing lines of quilting and more geometric straight line designs. I think it's more interesting and it does a better job of emphasizing the patchwork that I worked so hard on. If you compare the two photos, you can see that the straight line geometric quilting I ended up with really accentuates my crisp star points and does a much better job of setting off those gorgeous digital feather motifs in the surrounding red and green setting triangles. I am much more pleased with the second version. For those who will ask, I used 40 weight Glide trilobal polyester embroidery thread in Honey Gold for all of the quilting in the setting triangles as well as in the pieced blocks, in both my needle and in the bobbin.
I did get smoother and more confident with my free motion quilting by the end of the quilt, though. I left most of the appliqué unquilted except for the large poinsettia in the center medallion, to which I added some freehand loops and swirls at the very end. I used 40 weight Glide for this but switched to Candy Apple Red to keep it subtle:
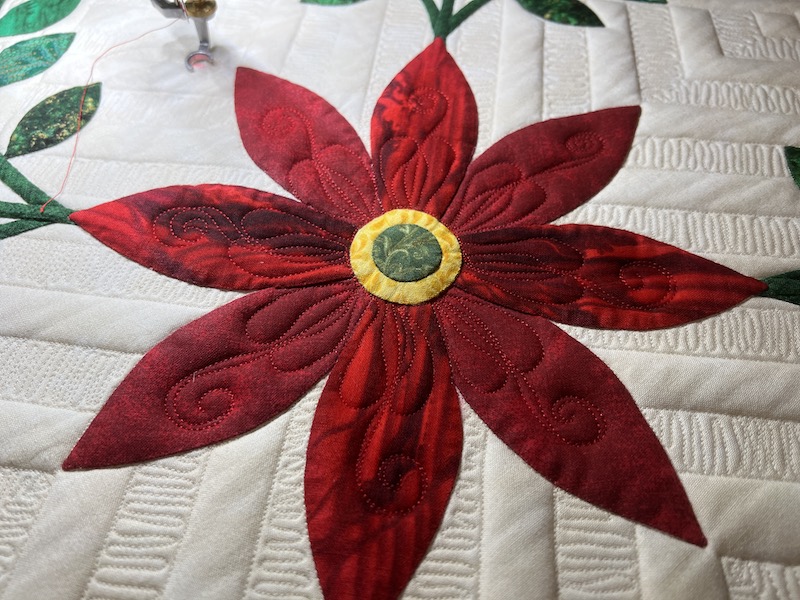 |
| Free Motion Detailing on Medallion Poinsettia |
Not bad, for a girl who runs her machine by computer most of the time! One thing I can say for sure is that free motion quilting takes time and practice, like learning any other skill. I saw huge improvement in my control and confidence over the course of just this one quilt, and I'm sure I would get a lot better at free motion quilting if I worked on it consistently.
19th Century Aesthetic Movement/Arts & Crafts Inspiration
And now, the bit where you're invited to step into my cluttered brain (watch your step!) and see what has been influencing my design decisions throughout the making of this quilt. Please ignore the skeletons and the dust bunnies. 😉
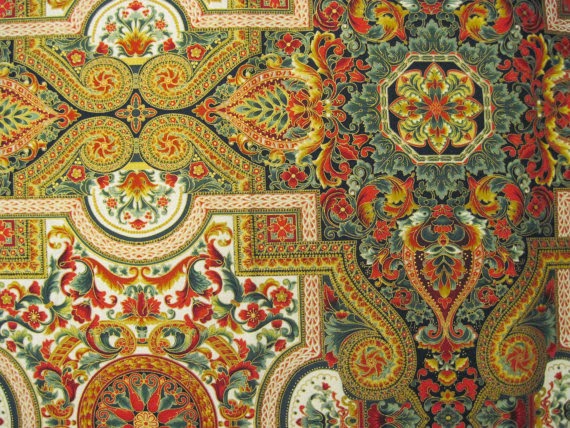
I started out with these ornately detailed metallic Florentine prints (either Hoffman or Robert Kaufman, not sure which) that had been marinating in my stash for a couple years even before I started this block-of-the-month in 2013:
 |
| Ancient "Florentine" Stash Fabric for Fussy Cutting |
I had great fun selecting and carefully fussy-cutting lots of different motifs from this lavish red, green and gold print and I used it in 5 out of 8 pieced blocks as well as for the birdhouse in one of my appliqué blocks. My border stripe fabrics may have been from the same collection, or else they were holiday prints from subsequent years that coordinated. Fussy-cutting to deliberately position the fabric print the way I wanted it in each patch makes some of these simple patchwork blocks appear much more complex than they really are.
The other thing that happened when I chopped up the large scale Florentine print into individual motifs is that the resulting blocks started to remind me less of Italian Renaissance and more of the Victorian Arts & Crafts movement led by William Morris that developed into Art Nouveau by the turn of the century. You know, that Victorian mashup of idealized, romanticized Medieval Good Old Days that Morris and his pals were nostalgic about in their distress and disgust with the rapid changes (and abundant ugliness) that came with Industrialization. I didn't set out to interpret Erin Russek's pattern through this lens, but it's a connection I made as it was coming together that guided subsequent decisions for the quilt.
I found a couple of late 19th century Christmas cards to give you an idea of what I mean if you're not familiar with Arts & Crafts or Art Nouveau. Notice the gilding, the elaborately detailed backgrounds with botanical designs drawn from nature:
 |
| Probably French, Late 19th Century Art Nouveau |
My apologies; I don't have any more information about either of these. I can tell you that the top one is probably French and the bottom one Spanish, only because of the French and Spanish text on the cards. The bottom card especially reminds me of how my fussy-cut Florentine fabric jazzed up my simple patchwork designs: |
| Probably Spanish, Late 19th Century Art Nouveau |
Here's one more to whet your appetite for decorative excess, the Morris Room at the Victoria & Albert Museum (formerly known as the Green Dining Room), decorated by William Morris and his colleagues in 1866. All of that ornamentation was done by hand:
That metallic gold on ivory ceiling reminds me of my metallic gold on ivory fabrics. Pattern layered upon pattern, the interplay between the strict geometric confines of the architectural detailing and the free-flowing botanical patterns, the circular light fixtures and ceiling motifs paired with the straight lines and right angles in the carpentry... That's the vibe I was starting to get as I completed more and more of the blocks and had them up on the wall.
Even though I only used small bits and pieces of the Florentine fabric in my quilt, I feel like that fabric had an outsize influence, making my version of Jingle feel a bit more formal. Also, I have a lot going on (too much?) -- and that reminds me the excessive visual "busyness" of this era as well.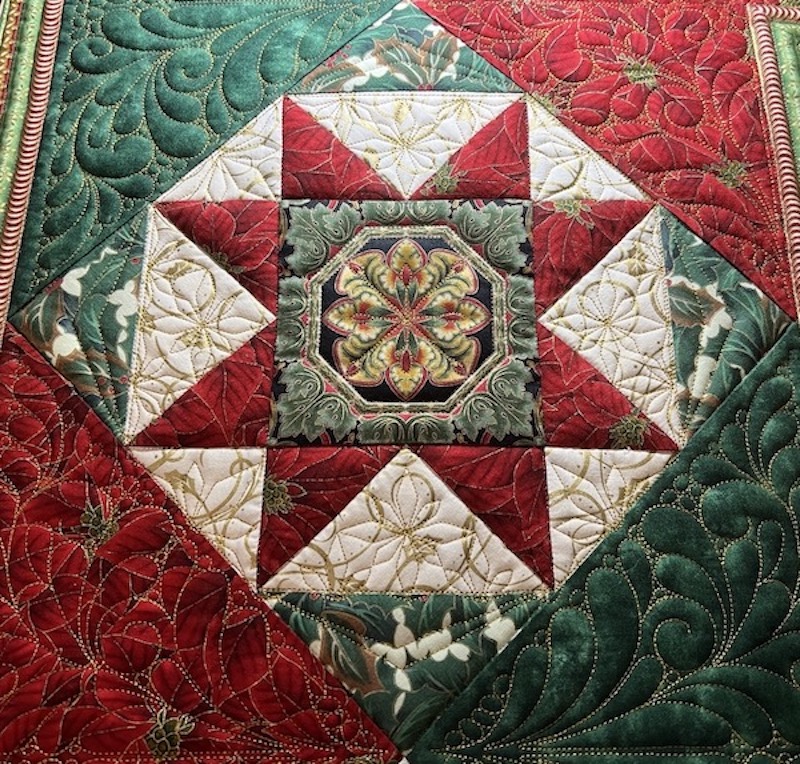 |
| Plain Old Sawtooth Star with Fancy Florentine Fabric Fussy-Cut for Center Square |
I think a lot of us who enjoy creating with our hands today can relate to how the designers, artists, poets and philosophers were looking around them with dismay at the changes wrought by the Industrial Revolution in Britain from the mid-18th century. They were comparing the new iron and steel to traditional materials like wood and stone, comparing mass-produced, machine-made factory goods to one of a kind textiles that had been handmade by skilled craftsmen and women in previous centuries, and felt like something of significant value was being lost in the name of progress.
Erin Russek's Jingle pattern calls for the central medallion to be set on point with large, plain setting triangles, as you see in her cover quilt:
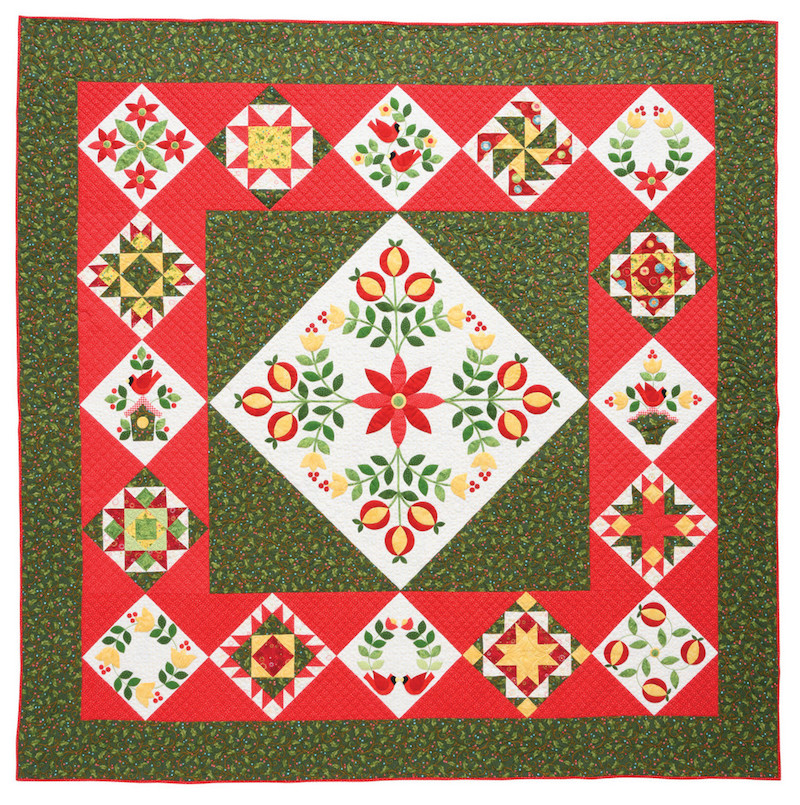 |
| Erin Russek's Jingle Quilt, Pattern Available here |
With her colors and fabric, the setting is perfect, but when I laid my own blocks out that way on the design wall it just wasn't clicking for me. (You know, because my quilt wanted to be as Victorian as my Christmas caroling costume... I have a habit of getting carried away). Anyway, the pattern layout didn't feel right to me with my fabrics, and that's why I set the center medallion straight and filled in the gaps with a series of borders that I meant to mimic architectural moulding or picture frames. In the photo below, I've drawn lines where I planned the diagonal elements of the central medallion quilting to repeat the diamond shape of the diagonally set border blocks. How did I come up with those proportions? Just trial and error on my iPad, drawing lines in different places and erasing them again until it looked balanced to me.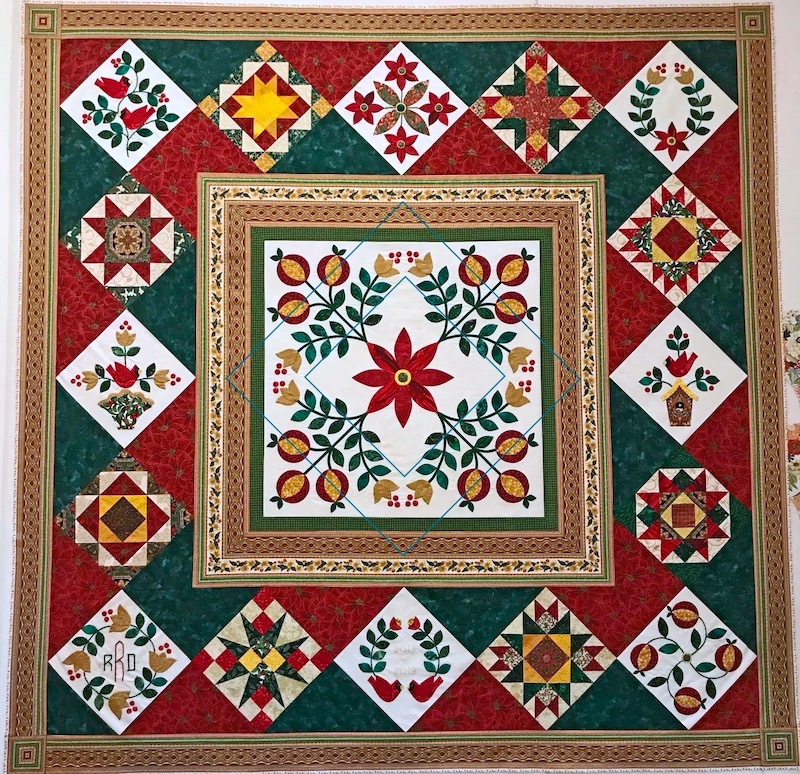 |
| My 72 x 72 Jingle Quilt Top Before Quilting, with Design Lines on Center Medallion |
Figuring out how to incorporate those mitered framing borders -- selecting, cutting, and planning elements of several different fabrics to get the right finished width and the right visual effect, and making sure it all fit together nice and flat like a pancake, was one of the many tangents that slowed me down in this quilt. Those corner blocks in the outer border look nice, don't they? Should we pretend I meant to do that, or shall I come clean and confess that I cut those borders too short, didn't have enough of the long discontinued fabric to cut new ones, and came up with the corner block idea after a good cry and a good night's sleep? Talk about a happy accident!
 |
| Ars Longa, Vita Brevis: Learning New Skills Takes Time |
I have learned so much over the nine years that I've been working on this quilt. That Hoffman Poinsettia print and the green dye in my embroidery floss turned out to be bleeders, and I had to learn how to use Dawn dishwashing liquid to save all the blocks before I could even sew the quilt top together. This quilt is my first-ever attempt at appliqué (Erin's awesome tutorials made it so easy) so all of that was new for me to learn -- cutting out the little shapes, making templates from heat resistant plastic, using starch and a hot iron to shape the seam allowance around the edges of those templates, using the light box and Roxanne's Glue Baste It to position all of the little pieces for stitching... The simple chain stitch embroidery used for the skinny stems and the monogram I added (using an Arts & Crafts font, since my quilt told me it wanted to be Arts & Crafts inspired) was a new skill that I learned from Erin's pattern, too. Oh my gosh, this hand stitching can be addictive! I had so much fun making these blocks and I can see a big improvement from the first appliqué block I stitched (the two cardinals in the upper left corner) to the central medallion that I finished last.
I started making the blocks for this quilt three years before purchasing my first long arm and at that time I never dreamed I'd be able to accomplish anything anywhere near what I've done with the custom quilting on this quilt. Don't get me wrong, I see every wobble and "opportunity for improvement" in the quilting and don't consider myself an expert custom quilter by any means, but I do feel like WOW, look how far I've come from quilting straight lines with a walking foot on my domestic machine!
Which brings me to the Latin aphorism that titles this blog post and which I'm planning to embroider on my quilt label, "Ars longa, vita brevis."
This phrase is engraved above a fireplace at Red House, William Morris's Medieval-inspired home where he and his friends worked out their back-to-handmade, return-to-beauty decorating style that would go on to have a huge impact on art and design. Literally, it means "Art is long, life is short" and it's usually translated as something along the lines of "Life is short, but Art endures." However, the phrase originates from the ancient Greek Hippocrates and the Greek word for art meant something more like craft or technical skill -- Hippocrates was the "father of medicine," after all, not the "father of decorating." So really, what he was saying in his introduction to the Aphorismi (used as a medical text into the 19th century) is that it takes a very long time to master and perfect one's craft (in his case, medicine), but we only have a short amount of time to use those skills. Which sums up my feelings about this quilt perfectly -- it takes a long time to learn a craft, so the best time to start learning something new is always today.
Alright, this post has grown way too long even by my standards. Quilt labels don't embroider themselves, and with all of those snooping Elves on Shelves out there Santa didn't see fit to send even one Binding Elf to assist me in the studio! I'll be linking up this post with the December OMG (One Monthly Goal) linkup at the end of the month as well as with my other favorite link parties as listed on my left blog sidebar. Thanks for indulging me today. Happy holidays and happy quilting!
Want to read even more about my Jingle quilt project from start to finish? I use keyword "labels" on all of my blog posts to make older posts on the same topic easy to find. You can see those labels at the bottom of every blog post where it says "Filed Under" (see screen shot below).
Clicking on any of those labels at the bottom of a post will bring up every single blog post I've ever written containing that subject, in reverse chronological order. You can also find older blog posts on topics I post about frequently (like Applique, Long Arm Quilting, Client Projects etc) by clicking the links under the "Hot Topics" list located on the upper right hand side of my blog's home page.


34 comments:
Jingle is BEAUTIFUL!!!!! Your quilting is perfect! Enjoy hugging her this Christmas season! Happy stitching, Happy Christmas!
I probably should have taken a potty break and made myself a fresh cup of tea, but I did get to the end. What an amazing journey this quilt has been for you! I now feel guilty thinking about finishing my son's wedding quilt quickly and getting it long armed edge to edge. It has the most ornate Jinny Beyer border print dh ever made/ So, now I will rethink where I am going with it. I am not about to go out and buy a long arm anytime soon, but I did give it some thought a few years back.
Congratulations on a job well done.
Jingle is beautiful! WOW! Definitely, you've quilted it to life!
It turned out beautiful! Thanks for sharing all of the detail. Also thanks for sharing the things you learned the hard way and the hours with the seam ripper. That was really worth the effort for design change.
Oh my, Rebecca Grace! Words just don't come to me to tell you how gorgeous I think your quilt is! Every decision you made, "accidental" or on purpose has contributed to an amazing heirloom! Congratulations on finishing it in time for Christmas, and I suspect there will be a couple of sons who will beg to have this now and in future years. Merry Christmas!
it looks so lovey. You spent so much on this quilt to get it perfect and I'm so glad that you are now happy with the end results. Your quilting looks perfect on it - not over done considering it is a wall quilt. you learned a lot with quilting through the process of this quilt didn't you and it is well worth it - now your boys will look at the wall this Christmas and say mom you finished it!! It has been a pleasure watching this quilt grow from over the years being put away in frustration and then taken back out to finish again
Rebecca, this quilt is absolutely stunning! There is so much love quilted into this quilt and it has indeed been a journey but the end result is so worth it. I really enjoyed reading through your thought process in choosing the quilting for each block, and oh my ripping that one block - but I agree, I love what you did the second time. I really love how you changed the center medallion and how you quilted it. The little corner blocks add so much to the borders, in my opinion! Custom quilting does take a lot of practice. Before I got my ProStitcher, I was getting there, but since then, I tend to use the computer more than my rulers. Though I do try to combine when able. Congratulations on your gorgeous finish!! Now enjoy it through the holidays. Merry Christmas!
What an amazing quilt! I love all the details - the intentionally well done and the intentionally make it work. I think you are always right about when to rip and when not to. I often wait, and then see if it bugs me still. The end result on that block was entirely perfect. I think combining the computerized and the hand guided quilting mix is the best of all worlds. I will do some more hand guided in the coming year to improve on that skill...I am a bit out of practice. Of course, I have design software too, so sometimes I use that. You should really be proud of this masterpiece and so great that you can enjoy it this season! TGIFF is on my blog through Saturday night if you feel like linking up!
Just gorgeous!!! The quilting is wonderful and enhances the gorgeous quilt. Great adventure reading about it!
Even though this quilt was years in the making, the end result is simply stunning! What an heirloom keepsake. Big smiles for you!
You have performed a miracle in turning a basic quilt pattern into a complete work of art! Ripping is part of making the quilt blocks that make of the quilt, ripping when things do not match to make them perfect, and ripping quilting the quilt when something just does not look right is difficult, but oh so REWARDING with a perfect finish! I purchased the pattern last year and have not touched it. Maybe in 2023. I do not use the glue method of applique - I am a needle turn idiot refusing to use the glue. But things come out the same no matter which technique is used!
You need to really pat yourself on the back, enter this beauty in a quilt show and enjoy the Ribbon you will received. You have come a long way baby (as they say). Hugs
Jingle is gorgeous, Rebecca! And I like your take on seam rippers, one which I will think on each time I spend time with mine. Much better than thinking of it so negatively! I needed that William Morris quote before I set up house (sigh). Enjoy Jingle - it certainly has put the holiday spirit in high gear! Happy holidays to you and your family!
Wow!!!! It’s beautiful, amazing, very Christmassy…… I love the colours you’ve chosen for your version, and especially your quilting which suits it so well. You must be thrilled to finally have it finished. Congratulations.
GORGEOUS!!
Worth every minute of work, learning, thinking, and ripping out.
I tell myself that ripping out stitches is part of learning. I parents call that sort of learning character building?
I remember your angst when dealing with the mitered borders. And the redone center medallion is definitely so much better. Worth the time it took to rip. Now you can enjoy the fruits of your labor. Sad though that it will only be displayed for a few weeks. Maybe you should consider practicing Christmas in July. Happy Holidays. Enjoy your family time with your sons.
Pat
I've so enjoyed every post about this quilt, and every word of this post. There's so much to see, absorb and appreciate! I'm glad you took the time to get it to this point. The comparison between the original and your beautiful finish is stark. Your choice of fabrics makes your quilt shine and your quilting is stunning. Brava! And Merry Christmas to you,
Wow, such gorgeous work! Your quilt is just stunning. Time and patience!
Stunning! I love your blog. Thank you for sharing.
Cynthia
And, thanks for linking up to the TGIFF party!
As fellow bring to quilt to life excessive quilter and hope I don't over do it, I was particularly entranced by all your quilting choices. What also struck me was your more vibrant fabric choices than the original. Jingle will be cherished for years.
Magnifique ! Your quilt is gorgeous, I love everything in it! The quilting is just amazing, and I love to read about your decisions and choices.
Thank you so much for sharing, and linking up ;)
Wonderful! So glad you finished it! I am halfway through another of Erin's patterns, "Mimi's Bloomers", maybe your finish will give me a push to finish mine! I have been working on it, off and on, for years, and I too can see an improvement in my stitches as I go. Well done, Rebecca, another wonderful finish!
That IS alot of quilting and the project is totally gorgeous!
Oh, it’s so merry and intricate! Thank you for sharing Jingle!
A true Masterpiece - and the story is perfect for documenting the history of this stunner!!
I would DEFINITLY be popping the cork on the champagne!!! A true celebration!!!!
Jingle is gorgeous, Rebecca! I can definitely see how just working on one little part at a time could make you feel like you could do this, and you did! The change to the center that you made fits your vision, and your quilting on it is amazing. Beautiful finish!
Jingle is amazing, what a work of art, no wonder a big celebration for its finish and at just the right time too. Gorgeous quilting too.
Rebecca your posts are so much fun to read - I was transported! First of all, beautiful doesn't begin to describe your quilt. It is a joy to view it, the eye travels from one block to another, and the quilting just makes every piece pop. I'm so glad you renamed it from Jingle which doesn't quite fit - lol! The art history is quite interesting. You should write a quilt book! Hopefully your son (the Pot) is happy now. Thank you so much for sharing your beauty with To Do Tuesday, and I'm glad you get to enjoy Merry Christmas with your precious quilt.
Hi Rebecca! Jingle is truly a labor of love, and it was so worth all of the time invested in it. The center medallion is stunning on its own but the surrounding blocks and quilting designs you've chosen just bring the whole piece over the top. To fabulous! I'm so glad you shared the back and explained the differences in thread color. That is worthy of a showing on its own - one day, just reverse the quilt and enjoy the beauty of a whole cloth in lovely green! HAHA - Pot of Procrastination calling his mother a Kettle. I think it's the apple doesn't fall far from the tree . . . I have to agree with you on the ripped out stitches - so much better. I enjoyed all the details about Jingle, and thank you for sharing them! Merry Christmas to you and your family. Keep an eye on those Elves. {{Hugs}} ~smile~ Roseanne
Lovely quilt and awesome quilting decisions throughout. Especially love how you quilted the center block. Thanks for sharing on Wednesday Wait Loss, my weekly show and tell.
It’s breathtaking! You really, really should enter it in a major show. Congratulations on a fabulous finish. And thanks for including all the details.
Congratulations and Merry Christmas, Rebecca! You really made the pattern shine with your impeccable work. Your quilt is QUITE the masterpiece!
Oh my! Absolutely gorgeous! I think you have totally mastered applique, and have set it off so well with beautiful quilting. This is definitely a show quality quilt!
Rebecca, this quilt is phenomenal. I love everything about it. The fabric choices, layout, appliqué and the quilting. You are very talented.
Post a Comment