Showing posts with label Client Projects. Show all posts

Saturday, February 28, 2026

End of February, Hello March: One Monthly Goal + Carrie's 2024 Philadelphia Temperatures Quilt Finish

Good morning, my lovelies!  It's the last day of February, time to take stock of what I did and didn't accomplish last month and make plans for the fresh, clean month ahead of me.  First, I'd like to share the quilt that I longarm quilted for my client Carrie.  This is the one I was having issues with thread breaking and shredding, prompting me to spend three days ripping out stitches and then requilt with a different kind of thread and a different quilting design, so I'm extremely relieved that it's done, off my plate, out of my house, and returned to Carrie:


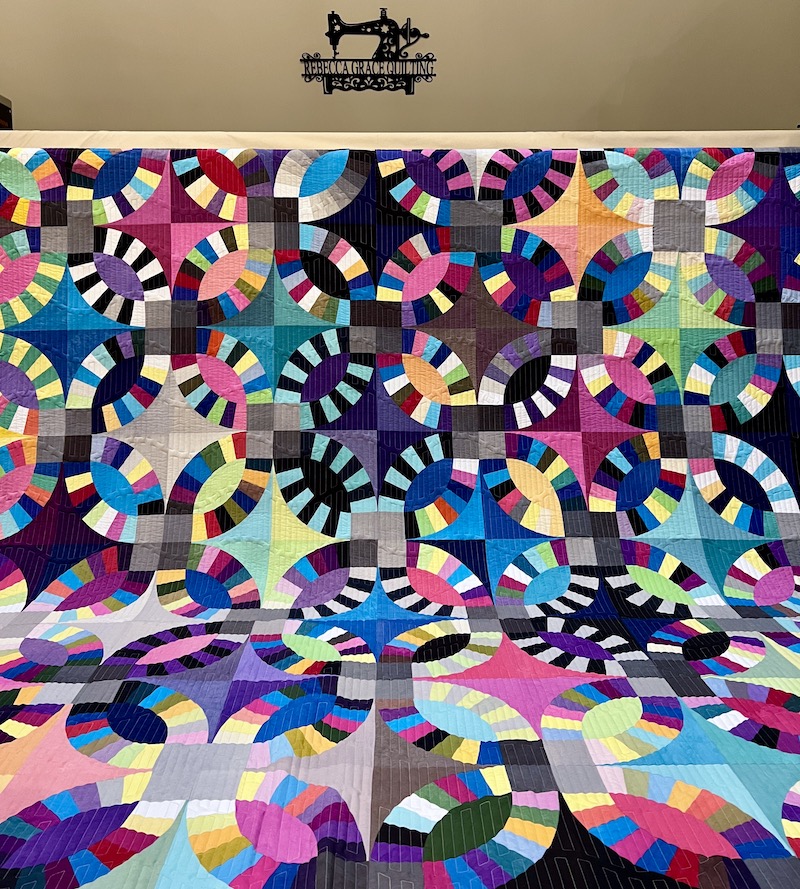
Carrie's 60 x 76 Philadelphia Temperatures Quilt


If you're not familiar with "temperature quilts," the concept is to select fabrics across the color spectrum and assign one fabric color to each temperature range in a particular location, from the coldest temperatures of the year (the blues in Carrie's quilt) to the hottest temperatures (represented by the reds in this example).  Carrie has also used white and a silvery gray to represent snow or rain.  The edge-to-edge quilting design I used on this quilt was Whitney's Pearls Simple, which yields a similar look to the Raindrops On Water design we had originally selected, but without any backtracking quilting stitches that needed to stitch precisely over previously stitched lines of quilting.  Quilters Dream Wool batting is creating that beautiful dimensional texture without weight, making this a soft and snuggly quilt for cuddling despite the density of the quilting.  I used So Fine thread in color Genoa Gray.


Carrie Machine Embroidered Her Temperature Key At the Bottom


Carrie used foundation paper piecing to create the top border titling her quilt and machine embroidered her temperature key on the bottom border.  The many thick, overlapping seam allowances in the FPP top border may have been a contributing factor to the thread breaking constantly, but it wasn't the only culprit as the issue continued throughout the quilt.  I'm going to have my Bernina dealer out to check my hook for burrs before I attempt to quilt anything else.  

Saturday, February 14, 2026

Happy Valentine's Day! I Love You More...

Happy Valentine's Day!  Y'all, I have been holding onto photos of this quilt for over a year because I wanted to use it for a timely Valentine's Day post, and then I forgot all about it last Valentine's Day.  Then I forgot about it again this year, until I was drinking my coffee this morning and realized that Valentine's Day is already NOW.  No time like the present, no day like today, and here we go --

My friend Marybeth made this sweet 36" x 36" Valentine's Day table topper quilt and I quilted it for her in September of 2024 using Karlee Porter's "I Love You More" edge-to-edge quilting design to really lean into the holiday theme and make the quilt feel like a Valentine.


36 x 36 Valentine's Day Table Topper Quilt Made by Marybeth, Quilted by Moi


This is one of those quilting designs that looks scary busy when you're looking at a black and white line drawing of the design, but as you can see here, the quilting can still be quite subtle if you use the right thread.  I used one of my favorite "supporting actress" quilting threads here, So Fine 50 wt matte polyester thread in color Blizzard from Superior Threads (this blog post contains affiliate links).  Notice in the photo below that even though Blizzard is a bright white matched to Marybeth's white background fabric, the thinness of So Fine thread causes the stitching to "take on" a lot of the color from the other fabrics.  So on those pink triangle patches, the white thread looks like it's the exact same shade of pink, and even where the white thread crosses dark red fabric, the contrast isn't drastic because the white thread looks more pink there than pure white.  


So Fine Thread Disappears Into the Fabrics


So Fine is a matte (not shiny) polyester thread that resembles cotton.  In fact, in lighter colors, the look of So Fine is indistinguishable from cotton in my opinion.  However, polyester is a lot stronger than cotton thread of a comparable weight would be, so even though this is a very fine, skinny thread, it's still plenty strong even for quilts that will be heavily used and frequently laundered.  These qualities would also make So Fine thread a great choice for English paper piecing or for hand or machine appliqué projects.  

Wednesday, November 26, 2025

Vintage Grandmother's Flower Garden Quilt Finish for Brad + New Studio Update

Good Morning and Happy "Thanksgiving Eve" to all who are celebrating in the United States this week!  Our moving truck delivered all of our furniture and boxes to our new home in North Carolina a little over a week ago, and I'm feeling thankful that my family is together again and that (so far) we have not discovered any major damage sustained in the move from Florida.  I still have a ways to go before I will be able to get back to my sewing projects (I'll share an update on the new studio at the tail end of today's blog post).  But first, I want to share this unusual vintage quilt finish that I completed for a client about two years ago and never got around to writing up on the blog.  


95 x 100 Vintage Grandmother's Flower Garden Quilt Finish


My client Brad reached out to me about this beautifully hand pieced Grandmother's Flower Garden quilt top that was made by his great-aunt in the late 1960s or early 1970s.  I could tell from the photos he sent that the quilt top was well-made and in excellent condition.


Beautiful, Even, Hand Stitched Patchwork Seams


Saturday, November 8, 2025

Patchwork Tile For My Laundry Room, RTW Quilted Jacket Inspiration, and NO, I'm Not Packed Yet

Shhh!!!  No one tell Bernie that I'm on the Internet writing a blog post right now while I'm supposed to be packing my sewing room!  🙊  I can't stand it; I have to show you guys the mosaic tile backsplash I found for my laundry room in the new house:


This Mosaic Tile Says "A Quilter Lives Here!" 


What do me and my quilter peeps see when we look at this tile?  We see a patchwork quilt, English Paper Piecing, diamonds, kites and squares!! 💕  Tra-la-la-la-LAAAA!!!!!  I am powerless to resist.   

Meanwhile, I have been packing -- just at the same slothful pace of my sewing projects.  The moving truck comes in three TWO days.  😰. And yet this blog post continues...


The Long Arm Studio is All Packed Up


The night before last, I managed to get my Bernina B990 sewing machine, its embroidery module, and my Babylock Triumph serger packed up in their original manufacturer's shipping cartons, thank goodness for YouTube "unboxing" videos that helped me remember what goes where.  I still need to pack my AccuQuilt machine and die collection, my acrylic cutting rulers, embroidery hoops, WIP project boxes, the rest of my quilting fabric stash, my hand embroidery and beading supplies...  My sewing paraphernalia is definitely the biggest packing category, and the one I'm least likely letting the movers assist with.  To heck with my clothes and my dishes, as long as my sewing goodies survive the move!

Tuesday, September 30, 2025

Sarah's Scrappy Double 4-Patch Quilt + Plotting and Scheming My Next Stonefields Blocks

Happy Monday Tuesday morning, Friends!  Well, I’m delighted to report that I’ve finished all the stitch-in-the-ditch quilting on my Deco quilt, but alas — it doesn’t look any different than the last time I showed it to you.  Because, you know, invisible thread…

So I thought I’d show you this lovely double 4-patch quilt that I quilted for Sarah over a year ago, with a Baptist Fan quilting design that you CAN see.


Sarah's Double 4-Patch Quilt with Baptist Fan E2E 


I love Sarah’s carefully planned scrappy palette of fabrics, with such wonderful value contrast that makes the red and blue chain seem to shimmer.  And she had the sweetest fussy cut vintage fabrics like this little one with the children waving flags:


Baptist Fab Quilting Detail


Meanwhile, as we say in the South, I’ve been “FIXING” to start my next Stonefields Quilt blocks.  

Thursday, August 21, 2025

Reckless Quilting: What If I Rip My Custom Quilt Off the Frame, Dump It On the Pool Table, and Try to Put It Back On Later?

Reckless driving is driving with a "willful or wanton disregard for the safety of people or property," as defined by Florida Statute 316.192. Examples include high-speed driving, swerving, unsafe lane changes, and fleeing a law enforcement officer.  Reckless QUILTING is deciding on a whim to conduct an experiment on a quilt that you've been working on (and striving for perfection on) for nearly four years.  Friends, I admit it: I am a Reckless Quilter, guilty as charged.

When one of my longtime clients reached out to me recently to ask whether I could possibly quilt this 40" x 42" baby quilt in time for her granddaughter's birthday, I had already loaded my Deco quilt for custom quilting but I was procrastinating getting started.  I actually agreed to do this baby quilt for Carrie in order to "light a fire under my behind" and force myself to get my Deco quilt either finished, or lightly quilted from top to bottom with enough stabilization and basting to secure all three layers so I could safely zip it off my frame (my Bernina long arm frame has zippered leaders for just this purpose) and zip on another set of leaders for the baby quilt.  


Carrie's 40 x 42 Strawberries Baby Quilt


But alas -- the time came when I needed to get the baby quilt on the frame and, since I had indulged myself by doing some decorative quilting as I went along instead of sticking to boring stitch in the ditch as planned, my Deco quilt only had quilting securing the three layers for the top third of the quilt, with the quilt top, batting and backing loose for the bottom two thirds of the quilt.  What would happen if I took the quilt off the frame just the way it was, I wondered?  Would I be able to get it loaded again afterwards and complete the custom quilting without any issues?  I consulted the Internet, and the Internet had no answers for me.

HYPOTHESIS: 

If a custom quilt in progress is attached to a long arm quilting frame with zipper leaders, and if it is possible to remove and reattach a basted quilt using these zipper leaders, then I should be able to remove and reattach a partially quilted, UNbasted quilt with the zipper leaders.

So I unzipped all three leaders, carried the monster quilt-in-progress over to the pool table in the room next to my studio, and dumped it there for about four or five hours while I loaded and quilted the little baby quilt with an edge-to-edge design.


Yes, I Ripped My Deco Quilt Off the Frame and Dumped It On the Pool Table


Sunday, May 25, 2025

Worth Finishing: Marybeth's circa 1984 Hand Pieced Sampler, Custom Quilted by Yours Truly

Good morning, friends!  I am shocked to be able to share this finish with you today, because I was fiercely procrastinating coming back to it.  I decided to load it up on the frame, fire up the long arm machine and JUST DO IT.  Behold, my friend Marybeth's oldest UFO, a hand pieced sampler quilt that she started in 1984 for her (now adult) son's "Big Boy Bed."  When Marybeth showed me the blocks a year or two ago I begged her to finish the project and promised that, if she put the blocks into a quilt top, I would custom quilt it for her.


Marybeth's circa 1984 Sampler Quilt, Custom Quilting Completed


Not gonna lie; this project was a challenge for me.  I've quilted hundreds and hundreds of quilts with edge to edge, allover quilting, but less than a dozen custom quilts on my long arm machine.  This one was a combination of digital computerized designs, hand guided ruler work quilting, and free motion quilting, and I quickly realized that I have a lot to learn when it comes to quilting computerized designs in borders and sashing.  Knowing that this quilt was really special to Marybeth and irreplaceable, I got into my own head too much with the Analysis Paralysis...  I am ashamed to confess that I have had this quilt for EIGHT MONTHS before finally finishing it and sending it back to Marybeth!


Wish I'd Used More Contrasting Thread


I've got a lot of Woulda, Shoulda, Coulda notes for this quilt.  Like, I wish I'd used the pale straw yellow thread in that green dotted fabric patch in the photo above, so you could see the quilting motifs in the "lawn" patch.  I wish I'd done a better job of keeping the amount of quilting more consistent throughout the quilt, too -- notice how the quilting lines in the red and blue block below the house are so much farther apart than in the house block, for instance.  If this had been my own quilt, I would have gone back in and added more quilting to the red and blue block to solve that issue, but I know that Marybeth prefers the look and feel of LESS quilting and I'm already worried that I may have "overquilted" it for her preferences.  

Thursday, March 27, 2025

Quick DIY Apple Pencil Holder + Progress on 1984 Sampler Custom Quilting

 Oh my gosh, you guys!  I completed a whole sewing project from start to finish last night in under an hour!  This is what it must feel like to own a sewing machine but NOT be a quilter!!  


A Sewing Project Completed Start to Finish in Under an Hour!


This is something I’ve been “fixing to do” for a couple of years now, just “waiting to get a round tuit” that never arrived…  No pattern; just eyeballed an old, stretched out elastic contraption that needed replacing and replicated it with some purple elastic from my garment supply stash and a little piece of jacquard ribbon to make it pretty.  This elastic strap slips on and off over my iPad case quickly and easily and has a channel stitched to securely hold my Apple Pencil.

I even used one of the high tech gizmos on the new B 990 sewing machine.  When top stitching my ribbon in place with Edgestitch Foot #10D, I turned on the laser that shows exactly where my needle is positioned to stitch on my project; see that red dot below on the black ribbon?


B 990 Laser Helps Position Edge Stitching


On previous machines, I would have tried out different out of center needle positions one click at a time, lowering the needle to see how far I was about to stitch from the edge, but it was faster (and more fun) to just turn on the red laser dot.  One, two clicks to the left, looks perfect, GO!  I only turned the laser on to select my needle position; did not leave it on for sewing.  I used two different utility stitches, the three step zigzag stitch to overcast the raw cut edges of my elastic to prevent fraying with use, and the triple straight stitch around my ribbon flower and along the edges of the long, skinny pocket for holding the Apple Pencil.  I used Mettler Metrosene all-purpose polyester thread and a Schmetz Stretch needle in size 90.  I wish I had a closer thread color match to the color of my elastic, but I wanted a strong poly thread for durability and I don’t have anywhere near the stash of colors in all purpose poly that I have for quilting, appliqué, embroidery etc.  This was an impulse project chosen primarily so I could procrastinate packing for my trip.  

Maybe I should do more projects that don’t take 6 years to finish?  

Speaking of projects that take years to finish…  I did get a bit more quilting done on Marybeth’s 1984 WIP sampler quilt this week.  I added some hand guided ruler work quilting to the three blocks that I quilted with computerized designs the last time I posted about this project:


Continuous Curves Ruler Quilting Added Around Digital Block Design


My hand guided quilting is nowhere near as nice as the computerized design but the block looked unfinished to me before.  I’m doing the best I can but it’s a learning process and if I keeping stopping to rip out quilting and redo it, I’ll never get the quilt back to Marybeth!  

Thursday, September 26, 2024

Sharon's La Passacaglia Millefiori Quilt, Laundry Room Makeover + My Workshop Project Pivot

Good morning and Happy Thursday, coming to you from the Severe Weather Epicenter of Hurricane Helene!  Okay, so I’m not exactly in the epicenter of the storm…  But this is our first hurricane since moving to Florida and it’s very nerve-wracking for me!  I bought a bunch of bottled water, stocked up on nonperishables, and now I’m biting my nails, listening to howling winds outside and getting nervous every time the power blips the lights off for a couple of seconds.  We’re nowhere near where storm surges or flooding or houses getting swept into the ocean is expected, but I still worry about losing power (Air conditioning — it’s still really hot here!  And refrigeration for our food!  And being able to cook!  And omigosh, why didn’t I think of asking my husband to hook my espresso machine up to an old treadle machine or something?).  EEK!!!  But the power and the air conditioning is on right now, my son is baking brownies and they smell amazing, my dog is snoring peacefully, and my husband is watching some football show on the television.   All is well in this moment and we’ll deal with anything tomorrow brings when it gets here.  So instead of watching the weather channel, I’ve decided to share a beautiful La Passacaglia Millefiori quilt with you that I quilted for my client Sharon last December, one of the last quilts before disassembling my long arm for the move to Florida.  

Sharon used the pattern from Willyne Hammerstein's Millefiori Quilts book available on Amazon here (this post contains affiliate links).  La Passacaglia and the other Millefiori quilts in the book have been very popular, and I found both acrylic templates for traditional hand piecing and foundation papers for English paper piecing this quilt on both Amazon and on Etsy.  


Sharon's 70 x 81 La Passacaglia Millefiori Quilt


What really intrigued me about Sharon's version of La Passacaglia is her restrained palette of neutrals and how that gives the quilt a completely different look from the brightly multicolored quilts many others have made with this pattern.  Her fabrics remind me of sandy beaches strewn with pale peach and cream seashells and sand dollars and I thought it was spectacular.  I loved the quilt top immediately, but Sharon thought her finished quilt top was a little bland for her taste, not as exciting as she'd envisioned it.  That's why I always ask clients what they like best about their quilt and whether there's anything they wish they had done differently or could change.  Knowing how Sharon felt about her quilt, I suggested an elaborate clamshell quilting design to inject textural drama into her quilt.  I used Quilter's Dream Wool batting for several reasons: it's very lightweight so it prevents a heavily pieced and weighty quilt top like La Passacaglia from turning into a super heavy quilt, the additional loft helps ease in the fullness that can be common with hand pieced quilts, and the loft of wool creates maximal dimension and texture.  I quilted it with matte, thin So Fine thread in color Pearl to ensure the quilting stitches would blend into her fabrics without upstaging the intricate piecing.  


Detail of Faceted Clams E2E in So Fine Thread, Color Pearl


By the way, fairly heavy quilting like this is not just for looks -- there's a functional benefit.  Hand pieced seams aren't always as strong as machine pieced seams, but heavy quilting secures and reinforces the patchwork seams, protecting them from stress damage throughout the life of the quilt.  Whenever someone grabs or tugs at a quilt with heavy quilting, they are pulling on all three layers of the quilt together (pieced top, batting and backing).  When someone grabs or tugs at a minimally quilted or hand tied quilt, they often grab hold of just the quilt top layer, causing those fabrics to wear and tear and the patchwork seams to pop prematurely.  Heavy quilting doesn't need to result in a stiff quilt as long as the batting is soft and supple and you use a thin, pliable thread for the quilting.

Tuesday, September 10, 2024

Nanette's Irish Mist Quilt with Gothic Feather Quilting + Kicking Off Maria Shell Workshop

The other day, when I was writing about the formal feather quilting designs by Donna Kleinke that I'm considering using on my FrankenWhiggish quilt, I wanted to link back to my earlier blog post showing an edge-to-edge formal feather quilting design by Kleinke that I'd used on a client's quilt.  When I searched my blog for that post and came up empty handed, I realized that I never actually DID share this one with you.  Shame on me!


Nanette's 73 x 84 Irish Mist Quilt with Gothic Feathers 2 E2E Quilting

Okay, so this gorgeous quilt is called Irish Mist and it was pieced by Nanette who blogs at Do It Right Quilter.  You can read back through all of Nanette's blog posts documenting her journey in making this quilt top here.  Nanette is a very meticulous piecer and, when she realized something was off midway through making the quilt in 2014, she ordered more fabric and started all over again.  Can you imagine that level of commitment to not only finishing a quilt that was really giving you grief, but actually starting over so you could finish it to the absolute best of your ability?  And I can assure you, the finished (second version!) quilt top she sent me for quilting was pieced to absolute perfection.


Quilting Detail, Pieced Backing of Irish Mist, MagnaGlide 60 Thread in Hawaiian Blue


Irish Mist is the cover quilt for the book Six Halves Make a Whole Lot More by The Quilt Branch, and you can find both new and used copies of this book on Amazon here if you'd like to make one of your own (this post contains affiliate links).  

Wednesday, August 14, 2024

FrankenWhiggish Rosebuds, Michele's Log Cabin Stars Quilt, Laundry Room Makeover, Swedish Pancakes + A 21st Birthday Celebration

Good Morning, Quilty Peeps!  As you can see by my way-too-long blog post title, I have lots of ground to cover today.  First things first, I am happy to report that I've finished prepping ALL of the remaining broderie perse rosebuds for my FrankenWhiggish Rose blocks, they are all glue-basted in position on the blocks, and the hand stitching to secure them is in progress.  That's right; I have a portable hand stitching project again FINALLY!

All FrankenWhiggish Rosebuds Are Prepped and Ready for Stitching!

In case anyone is interested in what's in my portable hand stitching "toolbox" for this project:

  • YLI 100 wt silk thread in color 256, matched to the rosebud fabric
  • Bohin size 12 Appliqué Needles (these are the only ones I've tried that don't bend or break on me)
  • Colonial Needle Company Leather Thimble Pad stickers (I use one on my right pointer finger to help grab the needle and pull it through the fabric, or to protect my fingertip when I need to exert a little pressure on the back end of the needle to force it through a spot where the glue dried stiff)
  • Thread Heaven (no longer available) or Thread Magic thread conditioner to help prevent snarling and knotting -- I don't need it when I'm using silk thread, but I have it in my hand stitching kit because it's a big help when I'm hand stitching quilt bindings with cotton thread
  • My new 2.75 magnification sewing glasses from Warby Parker, so I can thread the eye of my needle and see how many threads of fabric I'm grabbing with each stitch
  • That nail file in my kit is actually for my fingernails, because often I'll discover some little scratchy spot at the edge of a fingernail while stitching when the thread gets hung up on it
  • Not pictured, I also have a tube of Neutrogena Hand Cream in my hand sewing kit and another one in the drawer next to my sewing machine.  I like this kind because it's not greasy, has no fragrance or dye, and a tiny drop goes a long way to just barely moisten my fingertips so I can get a better grip on what I'm stitching without gooking it up with lotion
  • Either my Apliquick 4" Microserrated Scissors (pictured) or my Gingher Spring Action Thread Nippers (preferred if I'm just clipping thread and not trimming needle turn appliqué shapes while stitching).  If I'm planning to take my hand stitching kit on an airplane, I'll swap out for a cheap thread clipper (in case Airport Security confiscates it and throws it away) with a pack of dental floss that I could use as a backup thread trimmer in a pinch


(Those are affiliate links, by the way).   You probably won't see much of FrankenWhiggish for a couple weeks while I'm stitching the rosebuds to the blocks because, if you've seen one of my blocks get rosebuds, you've seen them all!  My Seven Sisters pattern and templates finally arrived from Australia and I'm planning to start on that project in September.

Instead of sharing FrankenWhiggish, I thought I might share some of the backlog of long arm quilting clients' quilts that I haven't posted about before, like Michele's version of Emily Dennis's Log Cabin Stars quilt.  Here's a teaser to whet your appetite; we'll return to this quilt later in today's blog post:

Michele's Log Cabin Stars Quilt, Pattern Available here


Tuesday, July 9, 2024

Bernina Mending Magic Strikes Again + Mildred's Tarnished Star Quilt

I know mending is boring, but it's way more boring to my neighbors and to random people I approach in the grocery store than it is to the people who read my blog.  (Tip: You can scroll past my mending adventures and skip ahead to the pretty quilt at the end if you want to -- I will never even know!)

I had a ridiculously fun time reacquainting myself with some of the features of my Bernina B 790+ sewing machine yesterday while saving two of my favorite pairs of shorts, and I had to tell SOMEBODY about it.  I picked YOU!  Do you see signs of mending in the photo below?  No, you don't, because it turned out perfect!

Left Tushie Pocket of My Favorite Shorts, After Repair


These are my favorite shorts because they have an elastic drawstring in the waist so I can cinch it in just enough to avoid Back Waistband Gaposis that plagues me so much in ready to wear clothing, but also because they are made of a very lightweight and breathable fabric that doesn't get all hot and sticky in the muggy Florida summer like most of my other shorts.  They came from REI several years ago and I bought three pairs of the same style, the khaki ones pictured here as well as a light gray pair and a dusty blue green color.  I've been wearing them a lot more since I moved to Florida in February, and the buttons on the left back pocket ripped right through   the fabric on the blue pair and the khaki pair.  How do you reattach a button when there's a hole through the shorts fabric in the place the button needs to be sewn?


Mending Program 22 Stitched in Aurifil 50/2 Cotton Mako Thread

I needed to darn the hole and reinforce the area around the hole before reattaching the button, so I grabbed some Steam A Seam 2 double-stick fusible web from my appliqué supplies, fused it to the back of this pink scrap of tightly woven cotton batik fabric and cut out a circle about the size of a quarter, and fused it to the wrong side of the pocket, carefully coaxing the loose threads surrounding the tear back into place to fill the hole on the right side.  

Tuesday, December 19, 2023

Advent Parade of the Christmas Quilts, 2023!

Happy Hanukkah to my Jewish friends and Happy Final Week of Advent to my Christian friends!  Have you finished your shopping yet?  I've shopped, wrapped, packed, and shipped all the gifts that need shipping, but still have some shopping left to do for my husband my sons.  I've finished the client quilts in my queue that had holiday deadlines so now I can officially switch gears into Santa Mode!  Meanwhile, in keeping with the holiday spirit, I thought everyone might like to see a few of the Christmas quilts I've worked on this year.

Anna's Frosted Pines Tree Skirt

Up first is a Christmas tree skirt that I quilted for my client Anna.  Anna used the Frosted Pines Tree Skirt pattern by Stacey Day for Windham Fabrics, available as a FREE PDF download here.  I just love her fabric choices!

Anna's 48" Frosted Pines Christmas Tree Skirt

Quilting something round on a long arm frame is a little trickier than doing a square or rectangular quilt.  This was one of the rare times that I "floated" the quilt top, since there is no straight edge along the bottom to pin to my leader canvas.  A lot more extra backing and batting are needed, the same amounts as if the quilt top had been a 48" square instead of a circle, and it took a little longer to trim each row of the quilting design at an angle each time I advanced the quilt on the frame to ensure that the quilting fully covered the circular quilt top without wasting too much time and thread quilting beyond the edges of the skirt and onto the batting.  I used the Angle Trim feature that had just been released with an update to my Bernina QMatic software a few weeks before this quilt went on my frame.

Tuesday, December 12, 2023

Custom Deco Quilt Palette for 2024 + QAL Week 4, 108 Weeks Behind Schedule

56 x 68 Deco Throw Quilt, PANTONE Pairings Palette for 2024

This is the time of year for sleigh bells, twinkling lights, caroling... and complaining on social media about how much we disagree with the design industry's color forecasters' predictions for Color of the Year.  PANTONE Europe's Color of the Year for 2024 is Peach Fuzz:


And Robert Kaufman's Kona Solid Color of the Year for 2024 is a pale aqua they're calling Julep: 


Looking at these two "new" color trend predictions side-by-side, many of us are getting flashbacks of  Margo and Todd's bedroom decor from the 1989 holiday movie National Lampoon's Christmas Vacation.  

Pantone Peach Fuzz Walls with Kona Julep Vase and Window Blinds

"Why is the floor all wet, Todd?"

"I don't know, Margo!!"  

"Why does Pantone think our 1989 bedroom set will be the embodiment of global lifestyle trends at the macro level in 2024?"

"I DON'T KNOW, MARGO!!!" 😆

Thursday, November 30, 2023

Mary's Turquoise Stars Quilt, Preeti's Syzygy Quilt + December Quilting Goals

Good morning, quilting friends!  I have a folder on my computer desktop containing a huge backlog of gorgeous clients' quilts waiting to be shared with you, and every time I open that folder I waste at least 45 minutes trying to decide which quilts deserve to be chosen for their moment in the spotlight.  When I started long arm quilting for clients I was really good about posting each finish right away, but either I quilt too fast (not!) or I write too slow (more likely!) and at this points I have photos of at least 150 quilts in that folder and more photos of more quilts get getting added every week...

The quilts I'm sharing today were both quilted quite awhile ago and I can't believe I never wrote about them because I LOVE them so much.  Without further ado:

Mary's Turquoise Stars

Mary is one of my favorite clients to quilt for -- she ships her quilt tops to me all the way from New Mexico even though there must be a thousand long arm quilters closer to her, she chooses striking, modern patterns and beautiful fabrics, and she often reinterprets the pattern creatively to create something fresh and unique, as she did with her Turquoise Stars quilt, shown below.  Mary used the star block from the Chevron Star Quilt pattern by Lee Heinrich Designs (formerly known as Freshly Pieced, available here on Etsy (this pot contains affiliate links).  

Mary's 67 x 87 Turquoise Stars Quilt with Billowy Combo E2E Quilting

One reason I didn't share this quilt immediately is that I was frustrated with my inability to get accurate color representation in my photos -- I was probably taking these shots late at night and trying to color correct in software, with limited success.  Mary's fabrics for this quilt are Art Gallery PURE Solids, and her background fabric is a deep, muted navy blue with a gray undertone called Night Sea.  The color is a little better in the photo below, but it's still too vivid and royal blue looking: 

Billowy Combo Custom Layout E2E Quilting

More to love about Mary: She lets me do fun things with the quilting!  Instead of just picking one allover E2E ("edge-to-edge") quilting design for Turquoise Stars, I combined nine different design motifs from Karlee Porter's "Billowy" collection, setting them up to alternate in three separate rows.  It took a lot longer to set that up in the computer, but it essentially created a larger scale design repeat, exceeding the depth of the throat of my long arm machine even, that creates more interest in the vast negative space of Mary's quilt than we would have if we'd chosen just one of these motifs to repeat over and over again across the entire surface of the quilt.

Thursday, November 9, 2023

Carrie's Modern Baby Quilt with Mister Marbles E2E + Quilting Inspo from the Interior Design World

My quilting clients bring me the best quilts!  Seriously!  I am so inspired by this 40" x 40" baby quilt that I quilted for my client Carrie recently:


Mister Marbles E2E Quilting in King Tut 40 wt Cotton Thread, Color Temple


I love this quilt because it's so striking, modern, and abstract, making it a perfect choice for new  parents who prefer to avoid gender stereotypes in their nursery themes.  I also love that this baby quilt looks so sophisticated and artsy, yet the construction is simple and straightforward, ideal when the shower is next week and you're scrambling to come up with a gift.  All you need is an assortment of black and white print fabrics paired with a solid, sew a total of 64 HST (half square triangle) units that all have one solid color triangle sewn to one black and white print, and then you rearrange those units on your design wall until you have a fabulous layout like Carrie's...  And before you know it, you're done and it looks amazing.  I have quite a few black and white prints in my stash, so I'm tucking this idea away for the next time I need to make a baby quilt.

I quilted this for Carrie using my Mister Marbles design, using a heavier 40 weight King Tut cotton thread in color Temple (White) to ensure the quilting design would stand out so nicely against the solid green fabric -- I knew the quilting design would disappear in those busy black and white prints (this post contains affiliate links).  I like the energy and movement of those wiggly, ripply lines and circles in the quilting for this quilt.  The batting is Quilters Dream Bamboo, a blend of bamboo, silk, cotton, and Tencel that is my absolute favorite for baby quilts, so I stock it in the 60" wide bolts.  

Here's the whole quilt again in all of its fabulousness:

Carrie's 40 x 40 Baby Quilt with Mister Marbles E2E


Sunday, October 15, 2023

Halloween Quilts for Paula and Mary + Broderie Perse Rosebud Secrets Rediscovered

Part One: The Halloween Quilts!

I recently had the pleasure of quilting a couple of really cute Halloween wallhangings for clients that I thought my readers would enjoy.  First up is Mr. Bones, an adorable machine appliqué project made by my client Paula.  This is a pattern from the Quilt Factory that is available on Etsy here (this post contains affiliate links).  

Paula's 32 x 60 Mr. Bones Wallhanging with Spider Spinners B2B

Wouldn't this be perfect to display on your front door on Halloween night, or in your entryway to greet trick-or-treaters?!  This pattern calls for some embellishments that you're not seeing in these photos -- fortunately, Paula knew to wait and add the buttons etc. after having her project long arm quilted.

We chose the Spider Spinners B2B design to play up the whimsy of the appliqué design.  I liked that it had playful spirals and spiders hanging down instead of just cobwebs alone, and I envisioned the whole quilt as an illustration in a children's book as I scaled the digital quilting design, trying to size the spiders and the cobwebs proportionately to the skeleton and Jack-O-Lantern the way they would be if the whole scene had been drawn by a single illustrator.  The perfect thread color turned out not to be gray, silver or white, but a true orange shade of Glide called -- what else? -- Halloween!  

Detail of Spider Spinners B2B Stitched in Glide Thread, Color Halloween

I'm so glad Paula trusted me on the orange thread!  If I'd used gray, silver, or white thread, the cobwebs would have blended in and disappeared against the gray background fabrics and the white and gray skeleton fabrics.  I really wanted those spiders and cobwebs to be "part of the scene" and visible in those areas, and I love how it turned out.  We used Quilters Dream Cotton Deluxe loft batting for that extra oomph to the quilting texture.

Sunday, September 24, 2023

Graffiti Quilting on Jan's Bear Tracks Quilt + DIY Bernina Mastery Classes

HAPPY FALL, everyone!  Time to get snuggly with this wool-batted bear paw quilt made with beautiful jewel-toned batik fabrics!

Graffiti 13 E2E on Jan's 69 x 69 Bear Tracks Quilt

Jan used the Bear Tracks Quilt pattern from Island Batik Ambassador Jackie O'Brien, available as a FREE PDF download on her web site here.  When Jan brought this quilt top to me for quilting, she had seen pictures of the bear paw quilt "Color Outside the Lines" I made a couple years ago that I quilted with one of Karlee Porters digital Graffiti edge-to-edge designs, and Jan requested something similar for her quilt.

Graffiti 13 E2E with Fantastico Variegated Thread, Color Molokini

For an even bolder impact on Jan's quilt, we chose Superior's Fantastico variegated trilobal polyester thread in color Molokini (this post contains affiliate links).  On my own bear paw quilt, I'd used a very thin, 60 weight thread in a pale silvery color that blended and disappeared into my fabrics.  One isn't better than the other, but they give very different looks.

Thursday, September 14, 2023

Cheryl's Modern Double Wedding Ring Quilt, Final Reveal

Good morning, quilters!  I need to stop giving "sneak peeks" of customer quilts on the blog because I keep forgetting to follow up and show you the whole thing once the quilt has been delivered to its owner.  Take this stunning modern Double Wedding Ring quilt made by my client Cheryl -- I couldn't resist including a teaser close up shot of the quilting back in July, but then I never got around to showing you the whole thing.  Well, here it is in all of its magnificence and glory!

Cheryl's 98 x 122 Modern Double Wedding Ring Quilt, Pattern by Tara Faughnan

I actually can't show you a photo of the entire quilt, because it was too large for me to get the whole thing in the camera frame.  This king size quilt measured a whopping 98" x 122" -- that was a LOT of curved piecing, y'all, and Cheryl did a fantastic job.  She used Tara Faughnan's Double Wedding Ring pattern and Cherrywood hand dyed solid fabrics.  (This post contains affiliate links). 

Detail of Roller Coaster Ties Quilting in YLI 40 Tex Cotton Variegated Pastels

Sometimes the perfect quilting design is really simple, like this Roller Coaster Ties design.  It's a similar effect to the "just-straight-lines" quilting that we see on so many modern quilts, but that subtle wavy movement is a wonderful complement to the curved piecing and I love the way the quilting moves the viewer's eye across the surface of the quilt without upstaging the piecing design.

Wednesday, August 16, 2023

Progress on My Scandi Deco Quilt + Florida Deco Quilt Finish for Megan

No, I don't have a 100% finished Halo quilt to show you yet.  I'm still working on hand stitching the binding.  Meanwhile, though, I've finished piecing the first sixteen "Block One" log cabin blocks for my Scandi Deco bed quilt.  Look how cute they look, lined up in crooked rows on my design wall!  The Kona Solids colors I'm using for these blocks are Copen, Indigo, Leprechaun and Kale.

All 16 Blue/Green Log Cabin Blocks Completed!

In my custom coloring from EQ8 (below), you can see that these are the blue and green log cabin blocks needed for the center row of my bed size quilt.  I still need to make the four half blocks that go at the row ends, and then I need to make 32 full blocks and eight half blocks for the ends of the top and bottom rows.

My 102 x 102 Scandi Deco Plan in Kona Solids

Deco Quilt is a pattern by Brittany Lloyd of Lo & Behold Stitchery and it's available in three sizes: Baby, Throw, and Bed.  The pattern is available to purchase as an instant PDF download directly from the pattern designer on Etsy here (this post contains affiliate links).  Brittany's Deco pattern includes instructions for either a 2-color version or a 5-color version, and -- because I like to make my life difficult -- my version of the quilt is made up of 12 different Kona Solid colors: Indigo for the background with Willow, Cactus, Amber, Thistle, Citrus, Tangerine, Magenta, Hyacinth, Leprechaun, Kale, and Copen for the blocks.  I should note that the pattern directions would have been much, MUCH easier to follow if I'd limited myself to either two or five colors.  Brittany gives yardage requirements and cutting charts for both of those options, but my rogue plan of twelve different colors meant I was on my own to calculate yardage for each color and to figure out how many of each shape needed to be cut from each color.  Do as I say, not as I do...  😉.  I am a willfully disobedient quilter who doesn't follow all of the directions anyway, so I'll be pressing my seams to the side instead of open and disregarding some of Brittany's instructions (which are geared toward frugal use of fabric and ease/speed of construction) in favor of wasting more fabric and time (personal preference!).

I've actually quilted two versions of this Deco quilt already, for two different clients.  My client Liz made a two-color baby sized Deco quilt back in 2021 (see that one here), and my client Megan recently made a multicolor throw sized Deco quilt inspired by the vibrant pastel Art Deco buildings in historic Florida neighborhoods.  That's the finished quilt I'm sharing with you today.