
Showing posts with label Quilt Repair. Show all posts

Sunday, January 16, 2022

The Velveteen Rabbit, Quilters' Edition: A Quilt Becomes Real, and Then Becomes Whole Again

Good morning, Quilty Peeps!  Instead of the "snowstorm" promised by the weatherman, I'm looking out my window at a sloppy mix of ice and sleet.  But at least the sky looks like winter even if the ground looks like a mess!  

On Becoming Real, from The Velveteen Rabbit

One of my favorite books when I was a child was The Velveteen Rabbit by Margery Williams, first published in 1922.  This year marks its 100th anniversary!  Reading the Skin Horse's description of how toys become Real, I realized that Becoming Real is exactly what happens to a treasured family quilt that has been loved and tattered until it's falling to pieces.  A quilt whose binding is worn through and falling off, with threadbare spots where the batting is coming out and split seams and holes and tears and stains "can't be ugly, except to people who don't understand."  Real is what happens to a quilt when someone loves it for a long, long time.  It's the Real quilts, the ones that have been truly loved, that their owners can't bear to part with no matter how shabby they have become.

Although I'm no longer accepting vintage quilts for repair, I still have a couple more waiting in my queue, like this one that I finished last night for a gentleman in Minnesota:  
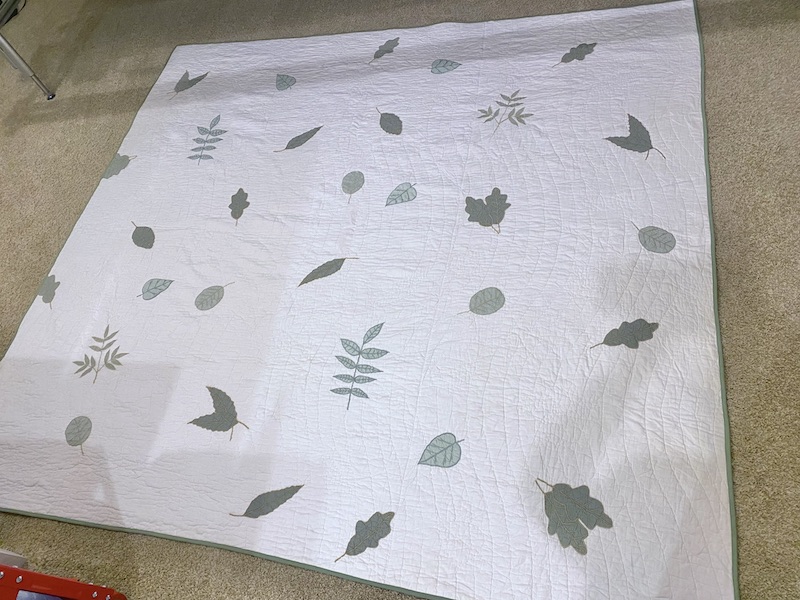
91 x 87 Vintage Quilt, After Repair/Restoration

Monday, July 19, 2021

Vintage Economy Quilt is Headed Home: The One About the Super-Wide Binding

Good Monday Morning, Quilt Lovers!  This vintage Economy Block quilt is finally all stitched up and ready to ship back to its owner this morning.  I really love how modern and fresh this 80+-year-old quilt looks after all these years, and I'm glad to have extended its useful life so the granddaughter of the original quilt maker can continue to enjoy it.

Vintage Economy Quilt Repaired, Ready to Go Home

Although there's another, more familiar quilt block named Economy, I identified this quilt block as the Economy pattern that was first published in the Kansas City Star in 1933 using Barbara Brackman's definitive Encyclopedia of Pieced Quilt Patterns, 3rd Ed.

Economy Block, First Published in the Kansas City Star  (1933)

I think this quilt was made sometime during the 1930s-1940s, based on the the date the block pattern was published, the color scheme, and clues from the construction methods and materials used in the quilt.  It was well cared for by its owner and looks great for its age. 

Monday, July 12, 2021

Vintage Quilt Repairs Continue + Millie Goes Home to Minnesota

Good Monday morning!  I'm still working on that vintage quilt repair that I wrote about last week (here).  At this point, I've finished all of the hand stitched repair work in the quilt's interior and all I have left is the binding.  This is a hand pieced quilt that had open seams to be stitched shut in almost every block, as well as a few other minor holes and one serious hole where something acidic had spilled on the quilt and eaten through the cotton fibers.  When deciding how to deal with this hole, I tried to address it the way the original quilt maker might have done, so I looked to the repairs on this antique Oak Leaf and Reel quilt for inspiration:

75.75 x 69 Oak Leaf and Reel Quilt, circa 1860


I photographed this quilt at the Paducah museum in 2019, when it was the inspiration quilt for a New Quilts from an Old Favorite challenge.  This hand pieced, hand appliquéd antique quilt is part of The Richardson Collection belonging to the Kentucky Museum at Western Kentucky University.  

What really fascinated me about this quilt was the way it had been repaired long ago:

Sunday, July 4, 2021

The High-Tech, Low-Tech, Good News and Bad News Update

Happy Sunday, Happy Independence Day to those of you in the United States, and Happy July, everyone!  Today's post will be a smorgasbord of high-tech and low-tech excitement that has accumulated over the past week.

The Charlotte Modern Quilt Guild hosted a Zoom lecture with Canadian quilter Libs Elliott a few days ago, which was fabulous!  Libs is best known for her use of computer code to generate random geometric designs for modern quilting.  She shared that her parents were antique dealers and that she'd discovered and fallen in love with old quilts at auctions and estate sales.  As she related her journey from trying to replicate traditional patchwork with hardly any instruction through creating ideas of her own on paper and then trying to figure out how to make a quilt that looked like her sketches, I really appreciated her spirit of adventure and the way her style and her process have evolved over time.

Enjoying Libs Elliott's Lecture on Quilt Design with Computer Code

I got some good news last week, and I got some bad news.  Good news first!  I found a buyer for my APQS machine, a quilter from Northern Minnesota who was delightful to talk to on the phone.  She will be driving over 1,300 miles come and pick up the machine this week, and I wish her a safe and smooth journey!

Bad news: I already sold the IntelliQuilter computer robotics that I had on my APQS Millennium, because my Q-Matic computer robotics for the Bernina was supposed to be here at the end of June.  Well, guess what?  The Q-Matic is now pushed back until at least August, due to the global shortage in microchips.  😧 Yikes!  That means I can't stitch any digital edge-to-edge quilts for another month!  My Bernina dealer, Creative Sewing & Vacuum, has graciously offered to let me use their demo Q24 machine at the store for computerized quilts that  I need to get done in the meantime.  The only catch there is that, to conserve floor space in the shop, their demo Q24 is set up on the smallest 8' frame and the widest quilt that will fit that frame is about 71".  Not big enough for the queen quilts in my queue!  I had a customer's baby quilt that needed to get done, though, so I brought it over to quilt it with Q-Matic at the store.  I can't show you this quilt quite yet -- the client is picking it up on Wednesday -- but I'm hosting TGIFF Thank Goodness It's Finished Friday this week and I'll show it to you then, okay?  Pinky promise!  For now you just get this little tantalizing glimpse:

Borrowing My Bernina Dealer's Demo Q24 with Q-Matic

Tuesday, June 15, 2021

Vintage Corn and Beans Quilt Repairs, Part 3

I made some more progress on the vintage Corn and Beans quilt repair project.  The second of the two blocks that needed to be completely remade and patched over has now been made, attached to the quilt, and requilted.  In case anyone is curious, it took me two and a half hours to piece each of these corn and beans blocks from start to finish, including cutting and pressing the blocks.

Two Blocks Replaced and Requilted

The turquoise and pale blue block was the one that my client's dog had chewed through.  The block next to it needed replacement because both of the fabrics in the original block were disintegrating:

Original Block with Disintegrating Fabrics

I could not find exact matches for these fabrics, but I did the best I could to replicate the look and feel of this block with new fabrics.

Saturday, June 5, 2021

Vintage Corn and Beans Repair, Part Deux: How to Patch a Giant, Gaping Hole in the Middle of a Quilt

You guys, I was so proud of myself at the end of the day's work on this vintage quilt repair yesterday.  I managed to patch the gaping hole in the quilt backing, fill in the missing cotton batting from the right side, and then patch the giant hole in the front of the quilt with my recreated block -- and I did it all by machine so the repair is strong enough to stand the test of time.  Moreover, the quilt lays perfectly flat through the repaired section and there are no unwanted tucks or pleats around the repair on either the front or the backing side.  WHEW!  Fools like me rush in where angels fear to tread...

More Obvious Than I'd Like, but Better Than the Gaping Hole

There was some damage to parts of the sashing beyond the edges of the missing block and there was also a good bit of distortion of the quilt around the chewed area, such that a perfectly square block would not work as a patch by itself.  The adjacent blocks in the quilt measure about 12 1/4" finished -- who knows what size they were originally, as they have probably shrunk over the years.  

Thursday, June 3, 2021

Rebecca vs the Cavalier King Charles Spaniel: A Corn and Beans Vintage Quilt Repair In Progress

Just as I was about to type "Good Morning, Lovelies," my grandfather clock struck noon...  Ah, well -- good afternoon, then!  Today I'm sharing the first chapter of a vintage Corn and Beans quilt repair that I'm working on for a client.  

Client's Vintage Corn and Beans Quilt, With "Window" Added By Her Dog


Why, yes -- OF COURSE I can fix that!  😂. I am such a glutton for punishment, aren't I?!

This vintage Corn & Beans quilt is actually in pretty good shape overall, except for worn binding, a few small holes/open seams here and there...  and a giant window chewed right through the middle of it by my client's Cavalier King Charles Spaniel!  It's machine pieced and quilted by machine (minimally, by today's standards) and I've been mulling over how to fix it for awhile now, knowing it was coming up in my queue.

My Replacement Block, Next to the Original


When working on a vintage repair for a client, I'm charging by the hour and trying to stick as closely as possible to the agreed-upon estimate, so I start with the absolute worst damage first and try to work as efficiently as possible.  This area of the quilt needs to be completely reconstructed through all three layers, so that's where I chose to begin.

Thursday, January 21, 2021

Odds and Ends: All the Amazing Things I Forgot to Tell You This Week

 Hello, my lovelies, and Happy Friday!  We made it to the end of another week!  Yay!

So, you know that drawer in your house, probably in your kitchen, that is full of random things that don't belong anywhere else?  That is your frame of reference for today's blog post.  I have a "junk drawer" full of loose ideas in my head that I meant to share with you in earlier posts.  For instance:

A Ball of Feed Sack String, Next to a Golf Ball

Feed Sack String!!!

In a recent post about a vintage quilt repair that I was working on for a client, I shared this photo of the hand piecing seams that the original quilt maker stitched in a very thick, heavy thread:

This Quilt was Hand Pieced with Feed Sack String!

I shared the same photo in a Vintage Quilting group that I belong to on Facebook, and several members identified the mystery thread as feed sack string that they remember being carefully removed from the seams of feed sacks, flour sacks etc., rolled into balls (one of the group members sent me the above photo of her own ball of feed sack string), and reused for everything from tying quilts to wrapping packages.  As someone who will get in her car and drive 30 minutes away to get exactly the right fiber, weight, and color thread for a project, that level of thrift and resourcefulness is just awe-inspiring.

Saturday, January 16, 2021

Textile Archaeology: Exploring a Vintage Quilt Through Dissection and Repair

 Yesterday morning, while drinking my latte, I read through a string of National Geographic articles about recently discovered hominid remains in the Rising Star cave system of South Africa.  On my giant desktop monitor, I clicked through slide shows of exploration scientists cramming themselves and their equipment into narrow channels of rock as they gingerly worked to free fragile, ancient fossils that would shed new light on our understanding of early human history.

Client's Vintage Summer Quilt, Prior to Repair

And then, I headed up to my studio, and began a delicate excavation of my own, the beginning of a vintage quilt repair that I'm undertaking on behalf of a client.  Although I've never thought about it this way before, I'm sure that a big part of what attracts me to these fraught and often tedious vintage quilt projects is the opportunity they afford for a bit of textile archaeology.  And yes -- that's actually a thing!  

"As fiber folk, we all know the feeling. You look at a handmade textile and you see not just a pretty object, but the hours at the loom or knitting needles, the fiber drafting at the wheel, the alchemy at the dye pot, even the shepherds with their flocks. You can see all the steps and decisions that went into creating that object, all the places where one path or another was chosen. Archaeologists are constantly trying to trace back those paths, to see those moments when a decision had to be made and why. The whys are how we learn about culture in the distant past."


         -- Christina Pappas, Textile Archaeologist 


Friday, April 5, 2019

Mission Impossible: 24 Blocks Completed -- Halfway There!

Okay, you guys -- I just set a timer for 30 minutes because I don't want to fritter the day away writing a novel (again).  However, my mom and I reached my week's goal of finishing half of the blocks for Lars's Mission Impossible: Graduation 2019 quilt yesterday and I couldn't wait to show you how cool those blocks look up on my design wall:


24 Out of 48 -- We're Halfway There!
SQUEAL!!!!  I included the messy ironing board and step ladder in that photo as scale references, so you can appreciate the impact of those big 12" blocks.  (When I sew four blocks together to make an X or an O, each of those will measure 24".)

None of these blocks are sewn together yet, but it's exciting to see them filling up more and more of the design wall.  What you're looking at is the top half of a quilt that will finish at 72" x 96" before quilting.


Twenty-Four Lars-of-Ours Actual, Physical Quilt Blocks On My Design Wall
Although, and this is what I adore about my EQ8 design software -- the computerized design rendering is such an accurate depiction that it's difficult for me to tell which images on my computers are the software design renderings and which ones are photographs of the actual completed blocks on my design wall.  That is an awesome thing, since I'm estimating that the construction of the quilt top alone will come in around 175 hours of labor, without even factoring in the time it takes me to load it onto the longarm frame, quilt it, and bind it.  It is really a blessing to be able to use technology to be 100% certain about my design choices BEFORE investing all of that time and money into a project.


My EQ8 Computerized Design Rendering of Mission Impossible
See what I mean?  No surprises ever again with a finished quilt not looking like I expected when I planned it out at the beginning.  It's a glorious thing.  I've said it before and I'll say it a thousand times again -- EQ8 is the most important tool I use for quilting besides my sewing machine, and worth more than all of my other notions and gadgets combined.  


At this point, all 48 of those foundation paper pieced flying geese arcs have been completed.  In addition to the 24 totally completed blocks on the design wall, another 11 of the outer curve pieces have been sewn and are just awaiting the machine appliquéd inner curve piece.  Yesterday afternoon, when I saw that we were going to hit my weekly goal a few days early, I picked apart the first machine appliquéd block, the one where I attempted to appliqué the geese to the purple background rather than appliquéing the purple piece to the geese, and I redid that block so it's just as lovely as all the others now -- and now all of the seam allowances are pressed towards the purple in every block, too.

Of course, in order to lay these blocks out on my design wall, I had to take down the vintage quilt top that is currently mid-repair.  That one has been percolating in the back of my brain while I was sewing these Mission Impossible blocks together, and my plan has been revised.  

Vintage Quilt Top Repair In Progress
I took the vintage top off the wall thinking that I would use fusible seam tape to hold tears in the existing loosely attached foundation fabric together during "reconstruction" and requilting, but when I got it off the wall and looked at the backside again I decided that it was in such bad shape that it was causing more problems than it was solving.  I started removing it.

Foundation Backing of Vintage Quilt Top
I'm calling it a foundation backing because this white fabric was between the quilt top and the batting in the original tied quilt and the quilt top is attached to this fabric intermittently and irregularly, with seams that are about 4-6" apart in some places but in other places the backing is loose for 12-14" without any connection to the quilt top.  It's not a single piece of fabric, but appears to be several different items sewn together, like an old dress shirt, an old apron, and an old flour sack cloth maybe?  The white fabrics are not the same weight, weaves are different, and I suspect that there is a polyester blend in one of them because the quilt top has shrunk much more than the backing fabric throughout most of the quilt, resulting in these areas where the backing has deep creases and pleats.  Moreover, the quiltmaker did not remove the seams and hems from these cast-off garments before sewing them into the quilt backing, so there are bulky seams in odd places in the backing/foundation fabric that do not correspond to seams in the quilt top itself.  Those would be unpleasant surprises every time I ran into one of them while quilting, and so I started carefully clipping away as much of the backing fabric as I could with my duck billed appliqué scissors, the same ones I use to remove the backing fabric beneath completed appliqué.  Since SOME of these seams are holding the quilt top together, I'm just snipping as close to the seam lines as I can without cutting the thread of the seams themselves.

No Going Back Now...  Removing the Foundation Backing
But I'll have to tell you about how that's going another time, because my timer just went off and my 30 minutes of blog post writing is up!  Time to get back to sewing Mission Impossible blocks!
I'm linking up today's post with:

FRIDAY

·      Whoop Whoop Fridays at www.confessionsofafabricaddict.blogspot.com
·      Finished Or Not Friday at http://busyhandsquilts.blogspot.com/

SUNDAY

·      Oh Scrap! at Quilting Is More Fun Than Housework http://quiltingismorefunthanhousework.blogspot.com

MONDAY

·      Design Wall Monday at Small Quilts and Doll Quilts http://smallquiltsanddollquilts.blogspot.com 
·      Main Crush Monday at Cooking Up Quilts http://www.cookingupquilts.com/
·      Monday Making at Love Laugh Quilt http://lovelaughquilt.blogspot.com/
·      Moving it Forward at Em’s Scrap Bag: http://emsscrapbag.blogspot.com.au/
·      BOMs Away at Katie Mae Quilts: https://www.katiemaequilts.com/blog/ 

Wednesday, February 27, 2019

Something(s) to Show For Myself: Geese Arcs, Vintage Quilt Repair, and Clam Shells

Hello, my lovelies, and Happy Wednesday!  I've been "distracted" by work and a series of minor but mildly disabling medical maintenance over the past week or so, but I was finally able to get back to my projects a few days ago and have some progress to report.


Two Arcs Completed, Forty-Six Arcs to Go...
First and foremost, I have actually begun piecing my son Lars's Geese In Circles graduation quilt!  This needs to be completed, as in bound, labeled, and delivered to the church office, no later than May 26th.  I've paper pieced two of the flying geese arcs so far, which leaves 46 more to be pieced and then all of the cutting and curved piecing that needs to happen to the dark purple background fabric to complete the blocks.  

I Love How the Darker Colors Recede Into the Background Fabric!!
As soon as I'd finished piecing the first arc, I laid it on the background fabric to make sure the colors are working the way I want them to against the dark purple.  I was super hesitant about some of these color choices and I definitely would not have chosen such dark shades of blue and green had I not been able to preview and play with color and value ahead of time in my EQ8 design software.


72 x 96 Geese In Circles, XL Twin Graduation Quilt EQ8 Design
I ended up printing this foundation paper piecing pattern from EQ8 onto two sheets of 8 1/2" x 11" copy paper.  I carefully taped them together, aligning registration points with my light box, and then I had 48 copies printed out onto blueprint paper on the large format printer at Staples.  


Oversize Foundation Paper Patterns Printed on Blueprint Paper
Yes, one of my readers did alert me to the fact that you can buy large enough sheets of newsprint to fit this foundation pattern in one piece (thank you!).  That's why I went to Staples in the first place.  The problem is that I can't fit those huge, odd sized sheets in my printer's paper tray, and the large format printers used by the FedEx Office Store as well as Staples print onto paper that comes on giant rolls.  So even if I bought the oversize newsprint from Staples, they can't print my foundation patterns on that paper!  I chose blueprint paper because it's the lightest weight paper they had for the large format printer and it's the same stuff my pineapple log cabin foundations were printed on, so I knew it would work for what I'm trying to do.

Too bad I didn't think to number the patches on that master pattern before I had the copies made!  Ah, well...


Meet Goldilocks, my Bernina 475QE
I pieced the first arc entirely on my new "Goldilocks" Bernina 475QE travel machine, to put her through the paces, get acclimated with the new machine, and to identify what all I'd need to pack up and take with me in order to sew these blocks on-the-go.  Isn't she a cutie?!

The B 475QE, or any of the new 4 Series Berninas, are fully featured machines that could easily be the one-and-only for many quilting and sewing enthusiasts across a variety of skill levels.  She sews beautifully, purrs like a kitten, and has all of the features I've come to rely on heavily when I sew on Big 'Nina the 750QE.


In My Studio: Goldilocks B 475QE on Left, Big 'Nina B 750QE on Right
I'm including this photo of both machines in my studio to give you an idea of the relative size of these machines.  

As you can see, these large foundation paper piecing patterns can definitely be pieced in the smaller (normal sized) throat space of the 4 Series Berninas:
FPP Oversize Flying Geese Arc on my Goldilocks B 475QE
...They just fit BETTER in the oversize throat space of a 7 Series Bernina:


FPP the Same Oversize Flying Geese Arc on my Big 'Nina 750QE
So, in answer to my husband's silly questions: No, I will not be selling my 7 Series machine now that I bought the cute little Goldilocks!  I love my B 75QE and I'm totally spoiled by having all of that roominess; I just wanted something smaller that would be more portable.  The hope is that, with the big machine available in my studio for sewing in solitude and the smaller machine ready to take to a sit-and-sew or quilting bee for uninterrupted stretches of social sewing, I can be more productive and move these projects along faster.  The more quickly a project progresses, the less I grow bored with it and the sooner it's finished.  The sooner a project is finished, the sooner I can tackle the next idea that's tickling my fancy, and the faster my skills develop.  

After ensuring that Goldilocks can handle my geese arcs just fine, I switched back to my Big 'Nina so that I could make a direct comparison between the two machines.  The vintage Craig's list desk where I've got Goldilocks set up in my studio works fine for my sergers and vintage Singer Featherweight machines, but it's not ideal for a modern Bernina because the kneehole of the desk is too narrow to accommodate the FHS Free Hands System presser foot lifter (a feature I can't live without!) unless I shift the machine to the left significantly and am no longer sitting with my body centered on the machine needle.  Using the B 475QE machine at this particular desk workstation requires uncomfortable ergonomic compromises!    I am also accustomed to always sewing with my machine recessed into a cabinet, which gives me an enormous work surface compared to the slide on accessory tray.  So it felt good to sit down at my plus-size Bernina again!  

I'm going to bring Goldilocks to my bee on Monday afternoon, where I assume I'll be setting up at a kitchen table or something like that instead of at a desk with a kneehole opening.  I don't anticipate any issues using the FHS in that scenario.  However, I am toying with the idea of ordering just ordered one of those SewEzi portable sewing machine tables for my Goldilocks machine.  Even if I can't manage to cram the folded-up table into my little convertible coupe, I will still be able to use it with my Goldilocks machine when I want to do some piecing downstairs in the living room.  I have a fantastic studio, but when my husband is home I like to hang out with him in the evening instead of hiding away upstairs, you know?

Let's see; what else do I have to share with you today?  Between piecing the first and second geese arcs (and shopping for a portable sewing table), I took a few moments to piece some irregularly shaped  fabrics together for that vintage quilt repair:
Vintage Quilt Top Undergoing Surgery.  
In the photo above, this formerly yarn-tied 1970s era quilt has been removed from its original backing and batting and is on my design wall awaiting repair.  See those two large holes near the center of the quilt?  Since the damage spans multiple patches in the original quilt, I'm piecing several fabrics together from which I will cut out patches in hopes that the repairs will be less obvious that way.


Like the Fabric Mix, Not Sure if the Perpendicular Piecing Lines Are Too Straight
I am trying to stick with the original quilter's color palette, spirit and print selections as much as possible, and I think the mix of fabrics that I pieced together in the photo above does a good job of blending into the way the original quilter mixed disparate fabric prints and colors in this quilt.  However, I might have made my piecing lines too straight and perpendicular to blend in with the original quilter's freeform piecing style.  I deliberately cut and pieced random angles for the next patch, and here I could not resist incorporating a couple of fabrics that reflect the current owner of this quilt (who is the quilter's granddaughter).  The music notes are because she's a phenomenal vocalist, and the Tula Pink Disco Kitties fabric (deliberately bleached to blend with the older fabrics) is because she was unjustly deprived of a kitten recently under dubious circumstances.


Tula Pink Disco Kitties Scrap With Musical Notation Fabric
The Kaffe Fassett prints in both photos were also bleached, by the way.  His prints have the right style for this era, but the colors were just way too bright to blend with the faded original fabrics.


New Patches Overlaid on Large Holes on the Design Wall (not sewn)
There are lots of smaller damage spots that will need to be repaired on this quilt as well, and I'm planning to repeat some of these same fabrics for smaller patches in those areas.  The original quilter used several patches of almost every fabric, so mixing my new fabrics across the face of the quilt will help them to blend in.  That strip of solid lilac fabric will blend better once there are a few other patches of lilac fabric in other places!  I had considered fusing some kind of lightweight stabilizer to the entire quilt top, but now I'm leaning towards stabilizing weak areas on an as-needed basis, both to minimize time involved and to preserve the softness of the original quilt.

I'm looking forward to loading this vintage top up on my longarm machine and turning it into a quilt again!  I've decided to do either a freehand meander or a very basic, loopy edge-to-edge pantograph in an off-white thread.  I don't want the quilting itself to be what jumps out at you in the finished quilt; its job is to securely attach the fragile quilt top fabrics to the batting and backing for strength and stability.


My 40 x 40 Modern Baby Clam Shell Quilt is Now Officially a WIP!
One more thing to show you before I go: I've started cutting out clam shells for the Modern Baby Clam Shell quilt that I designed a few months ago!  This baby was born in mid-December, and I'd like to get the quilt to her sometime BEFORE she starts kindergarten...  It's not my top priority with Lars's graduation quilt deadline looming over my head, but it's definitely on my radar, so to speak.


Cutting 9.5 Inch Clam Shells from Layer Cake Precuts
Y'all, tracing around templates and cutting pieces out Old School style with a scissors takes SO LONG!!!!  It took me the entire episode of Bachelor Home Town Visits and I still have several more print clam shells to cut out as well as ALL of the turquoise Grunge textured solid fabric remaining to be cut out.  This would be so much faster if I'd purchased the regular size Accuquilt GO! die cutter that fits their giant clam shell die rather than the GO! Baby cutter...  But I'm not buying a new die cutter just for this baby quilt, so I'll continue with my tracing, scissoring, and grumbling for the time being.


Cutting Progress for my Clam Shell Quilt
Such a happy mix of prints for a baby quilt, don't you think?  Cutting these shapes out of 10" layer cake precuts is yielding a pile of quarter circle scraps that have interesting possibilities as well.  Perhaps a Mill Wheel baby quilt is in my future?

Okay, my "quick catchup" post rambled on forever as usual, and now I need to get ready to take my son for a haircut, drop him off at his evening activities, meet a friend for dinner, and go to choir rehearsal.  

My To-Do list for this week includes:

  • Piecing more flying geese arcs
  • Getting the borders on my pineapple log cabin quilt so I can store it out of my way until I'm ready to quilt it (most likely AFTER my Paducah longarm quilting workshops with Beth Calle and Judi Madsen, and AFTER I finish quilting the vintage quilt repair job, the baby clam shell quilt, and Lars's graduation quilt)

I'll be linking up with:
Colour and Inspiration Tuesday at www.cleverchameleon.com.au
·       To-Do Tuesday at Stitch ALL the Things: http://stitchallthethings.com
·      Midweek Makers at www.quiltfabrication.com/
·      WOW WIP on Wednesday at www.estheraliu.blogspot.com
-->
·      Needle and Thread Thursday at http://www.myquiltinfatuation.blogspot.com/