Showing posts with label hand applique. Show all posts

Thursday, July 2, 2026

Deceptively Simple: Stonefields Blocks 28 + 29 "Paper Flowers"

 Alright, y'all -- I finally finished those two little appliqué blocks for my Stonefields quilt that I was prepping at the end of May, and good riddance to them!  Behold, my design wall displaying meager progress:


29 Blocks Completed for Stonefields Sampler Quilt by Susan Smith


Stitching the stems was fine, but needle turning these flower shapes was a wretched and miserable stitching plan that I regretted almost immediately.  

Saturday, May 30, 2026

Quilt Decor, Stonefields Paper Flowers Appliqué Prep + Hexie Basting Preferences

I have a happy little snippet of renovation progress to share today!  Behold, my in-progress laundry room.  Can you tell a quilter lives here?


Limestone Mosaic Installed Over Laundry Sink


From a distance you might think it's wallpaper, but it's a honed limestone mosaic tile.  It was a splurge but I was helpless to resist (and my husband was foolish enough to send me to the tile showroom unsupervised).  The tile crew installed this on Thursday and it still needs to be grouted.  That brown paper is covering up and protecting my soapstone counter (same color as the dark gray/black squares in the mosaic) and a laundry sink directly beneath the window.  The window trim is only primed right now; it will be painted the same color as the crown molding and the cabinets once the tile installation is complete.  The painters also taped plastic over the window glass.

The tile installers pointed out to me ahead of time that the mosaic pieces are imperfectly cut and the points don't all meet up precisely, but I knew that already from the sample board in the showroom.  Surprisingly, this doesn't bother me -- it's kind of like an old patchwork quilt made out of stone.  I will see this mosaic wall every time I come into my house through the garage and it will make me smile.  💗


Imperfections Up Close, Mosaic Installed But Not Grouted


The installers planned and laid out the whole wall on the floor before they started installing.  

Saturday, May 23, 2026

Stonefields Blocks 26 + 27 "The Semi Circles"

Hello again, my stitchy friends.  I have two more completed appliqué blocks for my Stonefields sampler quilt project to share with you today, Blocks 26 & 27 "The Semi Circles."  I used a prepared edge starch and press method with Karen Kay Buckley's Perfect Circle templates, glue basted the shapes in place with Roxanne's Glue Baste It, and then stitched the appliqué by hand using YLI 100 wt silk thread.  The Stonefields Quilt is a beautiful antique-inspired quilt pattern written for advanced quilters, with very minimal instructions.  It was designed by Susan Smith and you can get a copy of the pattern on Etsy here (this post contains affiliate links).  You know those people who have been sewing clothing forever, who buy a new dress pattern, study the pattern pieces and then just sew up the dress based on their experience and preferences without reading the instructions at all?  If you can do that with appliqué patterns, then you'll be fine with Stonefields.  I was a little intimidated at first by the lack of instructions but now that I'm getting into it, I'm kind of enjoying the extra challenge of puzzling over each block and thinking through the pros and cons of different methods for turning that line drawing into a finished quilt block.


Completed Stonefields Blocks 26 + 27 "The Semi Circles"


My friend Gretchen who is also making this quilt (in a gorgeous blue and white color scheme) didn't care for this particular block design and she came up with a lovely embroidered block alternative that you can see on her blog here.  I thought the Semi Circles blocks were kind of cute and a nice opportunity to showcase some larger prints in my stash, including this pink and green on white floral that I inherited in a small stash of quilting fabric that belonged to my late mother-in-law.  Pink was her favorite color and I think she would be happy to see that her fabric made it into a quilt, especially as this was an intact fat quarter rather than a scrap from a completed project.  Perhaps she thought it was too pretty and couldn't bear to cut into it.  I can relate to that!  


Selecting Fabrics: Overcut Circles on an Overcut Background Square


With The Semi Circles block, there were no instructions given except for the diameters of the circles.  So I put a lot of thought into how I wanted to make mine.  My background squares were all cut oversized before I started my project and normally I would trim the block to size after stitching the appliqué, but I decided to trim the background square down to 6 1/2" first for The Semi Circles since the appliqué goes all the way to the raw edges of the blocks.  I would not want to be cutting through my completed hand stitching when I trimmed the blocks down.

Wednesday, April 22, 2026

Stonefields Blocks 20 and 21-23: "O is for Oscar"

Good Morning, my lovelies!  I have had extra motivation to finish these quilt blocks and share them with you as quickly as possible -- in order to bump the butt photos of my jeans alteration post off the landing page of my blog.  And also, these blocks are cuties!  Quick disclaimer, this post contains affiliate links.  And now, meet "O is for Oscar," blocks 21-23 of the Stonefields Quilt pattern designed by Susan Smith:


Stonefields "O is for Oscar" Blocks 21, 22 and 23

As usual, (for me, anyway) the most time consuming part was selecting fabrics for each block.  However, that's also the most enjoyable part -- picking out one or two new Tilda acquisitions and then digging out treasures from the scrap bin or a fat quarter from my Deep Stash to coordinate, knowing that even though I'm making the same quilt from the same pattern many others are using, mine will be uniquely mine because of the fabric mix.  And it is so satisfying to step back and look at the finished blocks that you imagined in the beginning and then stitched into being.  

I stitched these blocks like an assembly line, since they were three the same.  I cut out all the pieces and organized them on my design wall, then took the pieces down and lined them up next to my sewing machine for chain piecing all of the blocks at once.  Below, the block backgrounds have been sewn together and pressed and the appliqué circles are ready to be positioned on the block.  I used one of Karen Kay Buckley's Perfect Circle templates with the starch and press method to get my circles so round and smooth.  Even if I'm needle turning all of the other raw appliqué edges  in a block as I'm stitching, I'll always use a Perfect Circle template to preturn the edges of circles because they turn out so much better for me that way.  Hats off to the quilters of the 19th century who had no choice but to needle turn their circles because heat resistant plastic templates hadn't yet been invented!


Machine Pieced Blocks, Prepared Circle Appliqués Ready to Go

Susan Smith's (very minimal!) instructions for the Stonefields quilt assume that makers will be hand piecing their blocks and needle turning all of their appliqué.  For this block, there was a note about sewing the circles to each of the square patches before piecing the rest of the block together, which made me scratch my head a bit as I couldn't figure out why that would be advantageous.  I felt it would be easier to keep things straight and square and positioned properly if I pieced the block first and added my circles last, so that's what I did.  

Friday, March 27, 2026

Stonefields Block 19 "The Oscillator," First of Two

Good Morning and Happy Friday, my lovelies!  It's been a busy week, but I managed to finish another appliqué block for my Stonefields quilt (pattern by Susan Smith).  Behold Block #19, "The Oscillator."


Stonefields Block 19 "The Oscillator"


I deliberately did not crop that photo because I wanted to show the difference between my hand stitched appliqué (the green and blue shapes at the bottom of the photo) and my machine stitched appliqué using the stitch I created with the Stitch Designer feature in my Bernina B990 sewing machine.  The size and spacing of the stitches is nearly identical and with Aurifil 100 wt monofilament thread in my needle and Microquilter 100 wt polyester thread in my bobbin, the machine stitches really do look just like my hand stitches in YLI 100 wt silk thread, even under inspection with bright lights and reading glasses.  I'm glad I took the time to customize that stitch on my machine so that I can switch between hand and machine stitching on the same project without any visible difference from one block to the next.

By the way, even using the sewing machine, this is "slow stitching" for sure.  It's like "hand stitching with a machine needle," as Harriet Hargrave said in a workshop I took with her years ago.  Very slow and deliberate stitching under bright lighting, one stitch at a time, constantly pivoting to keep those swing "bite" stitches perpendicular to the edge of the appliqué shape just as if I was hand stitching.  


Size 60 Microtex Needles Leave Visible Holes on Liberty Lawn, But They Will Close Up


The one thing that distracts me on this new block is that the needle holes are more visible on the machine stitched block than on my hand stitched blocks.  I use the smallest size 60 Microtex machine needle for this method, but my size 12 Bohin hand applique needle is skinnier than any needle that could go in a sewing machine.  The other difference is that the hand stitched block below used Tilda quilting cotton fabrics, and I used Liberty of London Tana Lawn prints for my Oscillator block.  The Liberty Lawn is a much lighter weight fabric with a finer, tighter weave and I think the different fabric characteristics are why the needle holes are so apparent right now.  I would expect my machine needle holes to be more pronounced with a batik fabric for the same reasons.  The good news is that needle holes close up when you wet the fabric yarns around them, so I'm not worried about it (I promise!).  It's just an observation.  Every time I step into my studio, my Gemini brain splits into two personalities, The Artist and The Scientist, both asking "What would happen if I tried it THIS way?"

Sunday, March 22, 2026

Conquering Stonefields Block 18, "Star in a Star"

Happy Sunday, everyone!  I have another finished block for my Stonefields sampler quilt (pattern by Susan Smith) to share with you, Block 18 "Star in a Star."  It was a fiddly little bugger for sure, but I'm delighted with how it turned out.  These blocks will finish at 6" after being trimmed down and sewn into the quilt.


Stonefields Block 18, "Star in a Star"


I have heard from a few other quilters who are working on Stonefields or other Susan Smith patterns who are struggling with the lack of instructions, so I'm going to try to share a bit more about how I'm puzzling out the more challenging blocks.  This is not "the right way," "the only way," or even necessarily "the best way" -- only the way that worked for me.

Monday, September 1, 2025

September Goals: Stonefields, FrankenWhiggish, Inherited UFO + BIG News for Rebecca

Happy Labor Day in the United States and Happy September, everyone!  I have a lot going on right now and my Big News (which I shall reveal towards the END of today's post) is going to dictate which projects and tasks take priority this month.

Stonefields Quilt

First, let's talk about my Stonefields quilt, because I am delighted with this project so far.  These blocks have been such a treat to work on!  All 13 of the blocks from Month One are now completed and on the design wall.  All blocks will finish at 6", but the applique backgrounds were cut oversized and will need to be trimmed down.  Because I use starch and glue in my applique preparation methods, I am thinking I might wash my applique blocks before trimming them down to size.  The serged edges will prevent them from fraying whether I hand wash them in a little dish pan or -- gasp! -- put them in a lingerie bag and run them through the washing machine on the Hand Wash Delicates cycle.  Honestly, that is probably exactly what I will do, because I know the washing machine will get all the glue and starch out very efficiently and I am more curious about what will happen in the washing machine than I am worried about what will happen in the washing machine.  


Stonefields Blocks 1-13 Completed, Appliqué Blocks Need Trimming to Size


My Sawtooth Star blocks were foundation paper pieced on the sewing machine, most of my applique blocks were stitched by hand, but the final Posy Pot block is a mixture of some shapes stitched by hand and other shapes stitched with my Bernina B990 sewing machine:


Stonefields Block 13 "Posy Pot"


I am absolutely delighted with my customized invisible machine appliqué stitch and how closely I got it to resemble the look of my own personal hand stitching.  

Sunday, August 24, 2025

Keeping Up With the Gretchens: Hand Stitching vs Bernina B990 Invisible Machine Appliqué Experiment for Stonefields Blocks

Good morning and Happy Sunday, everyone!  After my reckless but ultimately successful experiment on my Deco quilt last week (read about it in this post, which I edited and updated after coming back to the quilt and realizing that all was well after all), I decided to conduct another Mad Scientist Experiment on my Stonefields quilt project.  You may have heard of Keeping Up With the Joneses or Keeping Up With the Kardashians, but I'm all about trying to keep up with my blogging friend Gretchen who is cruising through her Stonefields quilt and leaving me behind in the dust!  Just kidding; I am delighted that Gretchen, Chris, and Hanne were all successfully cajoled into starting or resuming their Stonefields quilts (pattern by Susan Smith available here) as a very informal quilt along with me.  I know it's not a race, but I must be the slowest stitcher ever to have threaded a needle and it can be discouraging to put in so many hours and see so little progress -- especially since there are so many challenging and intense quilts that I want to make (I am thinking of YOU, Star Upon Stars, Down the Rabbit Hole, Simple Folk, and Happy Days!).  Behold my design wall with Blocks 1-12 completed.  Block 13 is another appliqué block that is prepped and ready for hand stitching in the coming days.  (This post contains affiliate links).


Completed Month One Blocks for Stonefields Quilt, One More to Go

Earlier in the week, out of mild curiosity, I timed how long it took me to stitch the 3 1/2" diameter cheddar print circle in one of my Pomegranate blocks.  Wanna take a guess?  


Hand Stitching a Pomegranate Block for Stonefields


It took one hour and seven minutes for me to stitch down that circle.  That was uninterrupted continuous stitching, not including threading the needle, trimming away the backing fabric, and not including stitching the light blue orange peel shape that I've started on in the photo.  No wonder I'm not able to keep up!  I am the snail of stitching!  

Thursday, August 29, 2024

September Stitching Goals: FrankenBerries, Setting Quandaries + Seven Sisters

Stuffed berry production is happening!  Preparing all 96 of the remaining stuffed berries needed for my FrankenWhiggish Rose quilt is my September stitching goal (and if I get any of them stitched onto the blocks as well, that will be "gravy"!).  

Tip: Pencil Eraser Holds Perfect Circle Template for Tracing


I'm using my Karen Kay Buckley Perfect Circles templates to make my berries (this post contains affiliate links) along with leftover Quilters Dream Poly Select quilt batting and Wonder Under fusible web (using up an old package I had on hand).  I discovered that I can prevent the Perfect Circle template from slipping if I hold it in place with a pencil eraser in my left hand while tracing around the template with a mechanical pencil held in my right hand; that photo above is to remind Future Rebecca of these neat trick the next time I am tracing around small template shapes.

I traced all 96 berry circles onto the paper side of my Wonder Under paper backed fusible web, fused the marked Wonder Under to my batting scraps, then rough cut around groups of 12 (12 berries per block) just to help me keep track of how many were needed and how many were finished.  I experimented with three different pairs of scissors before deciding that I like my ApliQuick 4" microserrated scissors best for cutting out these tight circles (that I probably shouldn't have crammed so close together when I was tracing them).

And So It Begins: Cutting Out Fused Batting Circles for Berry Stuffing


Appliqué prep work does seem to go faster for me when I do it assembly line style, so I'm going to cut out all of my berries before I proceed to the next step of fussy-cutting my larger fabric circles.

Meanwhile, I've been walking past these nine blocks on my design wall every day, marveling about how those broderie perse rosebuds didn't take me nearly as long as I thought they would, and realizing that I am going to have all of my blocks completely finished and ready to set if I just keep working on it a little bit every day.  That makes me want to revisit, reevaluate, and overcomplicate my plans for setting the blocks and finishing this quilt!

I could add one inch diamond sashing, a wide neutral border for a quilted formal feather design, and an outer one inch diamond border, as visualized in this EQ8 software rendering below:

66 x 66 FrankenWhiggish Setting with Diamond Sashing


Sunday, August 25, 2024

August Goal Completed, FrankenWhiggish Rosebuds Are Done!

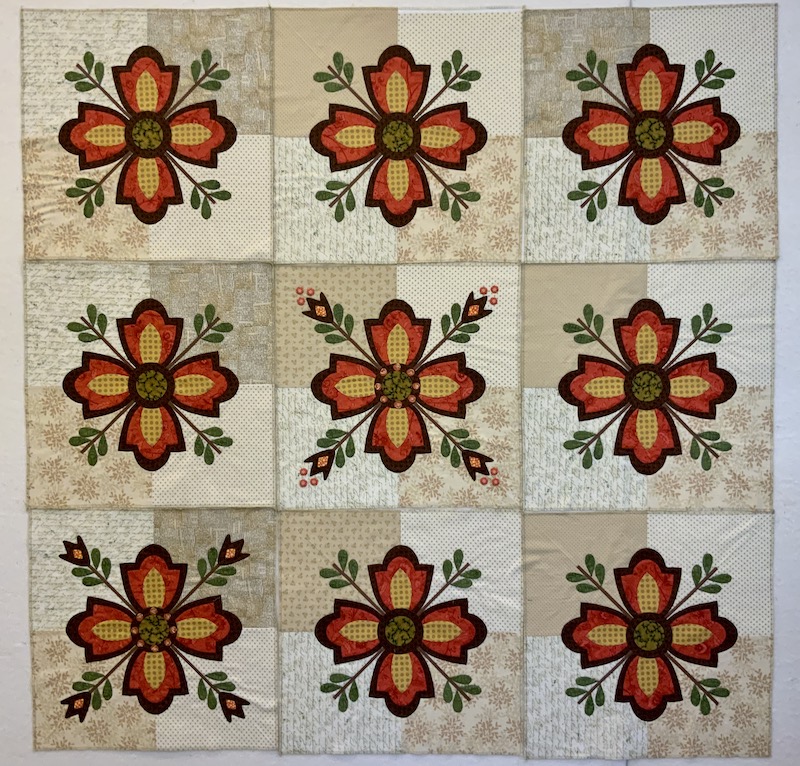
Oh my gosh, y'all -- pigs have sprouted wings and Rebecca has finally accomplished her One Monthly Goal by the end of the month.  I know what you're thinking: flying pigs are much easier to believe.  All nine of my FrankenWhiggish Rose blocks now have their eight tiny broderie perse rosebuds stitched down in their centers:


Rosebuds Completed on All Nine FrankenWhiggish Rose Blocks


The block on the lower left is the only one that is 100% complete with its stuffed berries, so making 96 more of those and stitching them to the other eight blocks is the next task for this project.  Side note: I wish I'd used a greater variety of fabrics for my pieced block backgrounds, because it was annoyingly difficult to come up with a layout for the blocks that didn't put two of the same fabrics next to one another.  And I'm loving how my new-and-improved design wall is working out in the hallway:


FrankenWhiggish Blocks On the Design Wall


By the way, there's an added benefit of the white Bump drapery interlining that I used to recover my design wall, in addition to it complementing my gray walls better than the natural cotton batting.  This is one of those projects where the colors in my photos never look much like the fabrics do in real life, but it was so easy to correct that with a single click using the White Balance tool in photo editing software, just by clicking the white design wall surrounding my blocks.  

Wednesday, August 14, 2024

FrankenWhiggish Rosebuds, Michele's Log Cabin Stars Quilt, Laundry Room Makeover, Swedish Pancakes + A 21st Birthday Celebration

Good Morning, Quilty Peeps!  As you can see by my way-too-long blog post title, I have lots of ground to cover today.  First things first, I am happy to report that I've finished prepping ALL of the remaining broderie perse rosebuds for my FrankenWhiggish Rose blocks, they are all glue-basted in position on the blocks, and the hand stitching to secure them is in progress.  That's right; I have a portable hand stitching project again FINALLY!

All FrankenWhiggish Rosebuds Are Prepped and Ready for Stitching!

In case anyone is interested in what's in my portable hand stitching "toolbox" for this project:

  • YLI 100 wt silk thread in color 256, matched to the rosebud fabric
  • Bohin size 12 Appliqué Needles (these are the only ones I've tried that don't bend or break on me)
  • Colonial Needle Company Leather Thimble Pad stickers (I use one on my right pointer finger to help grab the needle and pull it through the fabric, or to protect my fingertip when I need to exert a little pressure on the back end of the needle to force it through a spot where the glue dried stiff)
  • Thread Heaven (no longer available) or Thread Magic thread conditioner to help prevent snarling and knotting -- I don't need it when I'm using silk thread, but I have it in my hand stitching kit because it's a big help when I'm hand stitching quilt bindings with cotton thread
  • My new 2.75 magnification sewing glasses from Warby Parker, so I can thread the eye of my needle and see how many threads of fabric I'm grabbing with each stitch
  • That nail file in my kit is actually for my fingernails, because often I'll discover some little scratchy spot at the edge of a fingernail while stitching when the thread gets hung up on it
  • Not pictured, I also have a tube of Neutrogena Hand Cream in my hand sewing kit and another one in the drawer next to my sewing machine.  I like this kind because it's not greasy, has no fragrance or dye, and a tiny drop goes a long way to just barely moisten my fingertips so I can get a better grip on what I'm stitching without gooking it up with lotion
  • Either my Apliquick 4" Microserrated Scissors (pictured) or my Gingher Spring Action Thread Nippers (preferred if I'm just clipping thread and not trimming needle turn appliqué shapes while stitching).  If I'm planning to take my hand stitching kit on an airplane, I'll swap out for a cheap thread clipper (in case Airport Security confiscates it and throws it away) with a pack of dental floss that I could use as a backup thread trimmer in a pinch


(Those are affiliate links, by the way).   You probably won't see much of FrankenWhiggish for a couple weeks while I'm stitching the rosebuds to the blocks because, if you've seen one of my blocks get rosebuds, you've seen them all!  My Seven Sisters pattern and templates finally arrived from Australia and I'm planning to start on that project in September.

Instead of sharing FrankenWhiggish, I thought I might share some of the backlog of long arm quilting clients' quilts that I haven't posted about before, like Michele's version of Emily Dennis's Log Cabin Stars quilt.  Here's a teaser to whet your appetite; we'll return to this quilt later in today's blog post:

Michele's Log Cabin Stars Quilt, Pattern Available here


Saturday, August 3, 2024

Actual Rosebud Progress for FrankenWhiggish Rose

Good morning, stitchy friends!  I am delighted to report actual PROGRESS on my FrankenWhiggish Rose appliqué project today!  Finishing the rosebuds is my One Monthly Goal for August.

Me Stitching an Actual Rosebud Onto an Actual Quilt Block


(In case anyone's about to ask, yes, that is a serger 3-thread overlock stitch on the edge of my quilt block in the photo above.  I oversized the block backgrounds (so I can trim them all to exactly the same size once the hand appliqué stitching is completed) and overcast the raw edges of my blocks before beginning, knowing that this project would be a long time in the making and that raw block edges would be prone to fraying as the blocks were scrunched up and manipulated in my hands during my stitching process.  The overlock stitching will be trimmed away prior to joining the blocks into a quilt top).

Four Little Rosebuds Where there Used to Be None

Each block gets eight rosebuds around that center circle but I only glue baste four at a time for stitching, to lessen the chance of my thread getting caught on an adjacent unstitched rosebud and ripping it off the block.

Sunday, November 26, 2023

FrankenWhiggish Setting Options: To Further Complicate, Or To Finish In This Lifetime?

Hello, Quilting Friends, and Happy Thanksgiving weekend to those of you in the United States!  In between the cooking and the baking and the holiday decorating of the past few days, I've been spending an inordinate amount of time in my EQ8 quilting design software, exploring my options for the Frankenwhiggish Rose hand stitched needle turn appliqué blocks that I started in March of 2014 (you'll find that post from nearly a decade ago here).  

At this point, all that stands between me and the end of making the nine identical Whig Rose appliqué blocks is 48 broderie perse rosebuds and 96 fussy-cut stuffed berries.  However, I remain undecided about what I'm going to do with those nine blocks once they are finished.  I have tried out so many options in EQ8, each one more complicated than the last:

70 x 70 On-Point with Mariner's Compass and Pieced Setting Triangles

In the EQ8 rendering above, I've just duplicated a photo of one finished appliqué block and the EQ8 software lets me see how all nine appliqué blocks will look together when they are finished, combined with any combination of thousands of other blocks, borders, sashings, etc.  It's one of my favorite ways to use EQ8 software, and although designing on the computer can suck up a lot of time, every 10 minutes trying something out on the computer saves me weeks/months/years of cutting up fabric, sewing it together, putting it all together on the wall and then hating what it looks like!  So in this version of the quilt, I'd be making four mariner's compass blocks using scraps of my applique block fabrics mixed with other fabric scraps from the same color family and style.  The centers of the mariner's compass blocks could even be the birds from my Vervain Monado-Havana fabric, the luxe drapery fabric I've been chopping up for my broderie perse rosebuds.  Although the mariner's compass blocks look complicated, the EQ8 software lets me print out foundation paper piecing templates in exactly the right size for my quilt, directly onto newsprint paper (I get mine on Amazon here; this post contains affiliate links), which makes it so easy to get sharp, crisp, perfect points.  I'd appliqué the center circle to each compass.  As of right now, I like the way the pieced setting triangles create an illusion of scallop curves to frame the body of the quilt, but they feel a little heavy -- might reduce the scale and use smaller strips and squares for those so as not to overpower the dainty rosebuds and berries.  

But how nice it would be to just be FINISHED with this already once I have the blocks done?  This quilt, like the 8-year skirt project I finished a couple weeks ago, really has no purpose other than educational.  I wanted to try needle turn appliqué, and I know how to do it now, so it's a "win" for me already and I'd like to move on to something else!  So this is the other, simpler option I'm considering:

Keeping It Simple, 66 x 66 Straight Set with Harlequin Border

In this version, I trim my appliqué blocks to finish at 16" square and set them straight with a harlequin border and little X corner blocks to repeat the X shape of the tulip stems in the appliqué blocks.  Then I've slapped on a 6" wide plain outer border, for feather quilting or whatever.

Sunday, October 15, 2023

Halloween Quilts for Paula and Mary + Broderie Perse Rosebud Secrets Rediscovered

Part One: The Halloween Quilts!

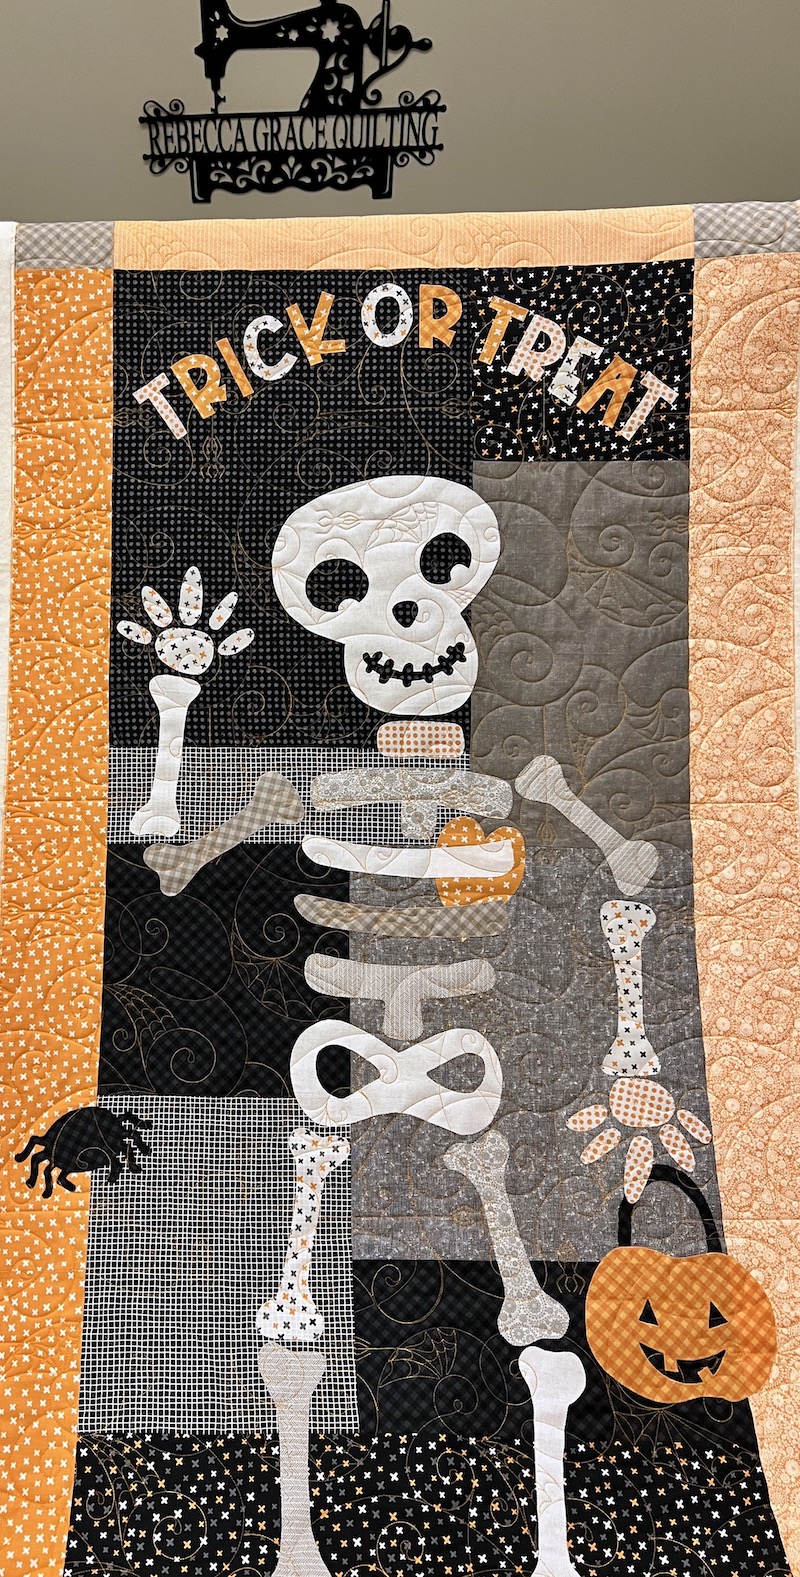
I recently had the pleasure of quilting a couple of really cute Halloween wallhangings for clients that I thought my readers would enjoy.  First up is Mr. Bones, an adorable machine appliqué project made by my client Paula.  This is a pattern from the Quilt Factory that is available on Etsy here (this post contains affiliate links).  

Paula's 32 x 60 Mr. Bones Wallhanging with Spider Spinners B2B

Wouldn't this be perfect to display on your front door on Halloween night, or in your entryway to greet trick-or-treaters?!  This pattern calls for some embellishments that you're not seeing in these photos -- fortunately, Paula knew to wait and add the buttons etc. after having her project long arm quilted.

We chose the Spider Spinners B2B design to play up the whimsy of the appliqué design.  I liked that it had playful spirals and spiders hanging down instead of just cobwebs alone, and I envisioned the whole quilt as an illustration in a children's book as I scaled the digital quilting design, trying to size the spiders and the cobwebs proportionately to the skeleton and Jack-O-Lantern the way they would be if the whole scene had been drawn by a single illustrator.  The perfect thread color turned out not to be gray, silver or white, but a true orange shade of Glide called -- what else? -- Halloween!  

Detail of Spider Spinners B2B Stitched in Glide Thread, Color Halloween

I'm so glad Paula trusted me on the orange thread!  If I'd used gray, silver, or white thread, the cobwebs would have blended in and disappeared against the gray background fabrics and the white and gray skeleton fabrics.  I really wanted those spiders and cobwebs to be "part of the scene" and visible in those areas, and I love how it turned out.  We used Quilters Dream Cotton Deluxe loft batting for that extra oomph to the quilting texture.

Sunday, November 13, 2022

Ten-Year Projects In Progress: Update on Frankenwhiggish Rose, Jingle BOM, + Deco Quilts

So...  I put my Whig Rose blocks back up on my design wall yesterday morning to see how much work remains to be done on them.  I started this needle turn appliqué project in March of 2014 (you can read about it here) and it's been an on-again, off-again kind of thing.  I'm finding it really monotonous to appliqué the same shapes over and over again.  The reason I haven't started any of the Sarah Fielke 2022 Block of the Month projects I signed up for is that I wanted to finish THIS appliqué project before starting on a new one, and this one ain't finished yet!

FrankenWhiggish Blocks on November 12, 2022


Just for kicks, let's compare today's photo to the one from the last time I had these blocks up on my design wall, back in January of this year:

FrankenWhiggish Blocks on January 12, 2022


So it took me TEN MONTHS to complete eighteen of those wretched little tulips!  AAAARGH!!  And I still have ten more to go.  

Sunday, January 30, 2022

Four More Blocks for My Retro '80s Building Blocks Quilt + Layout Options for FrankenWhiggish Rose Blocks

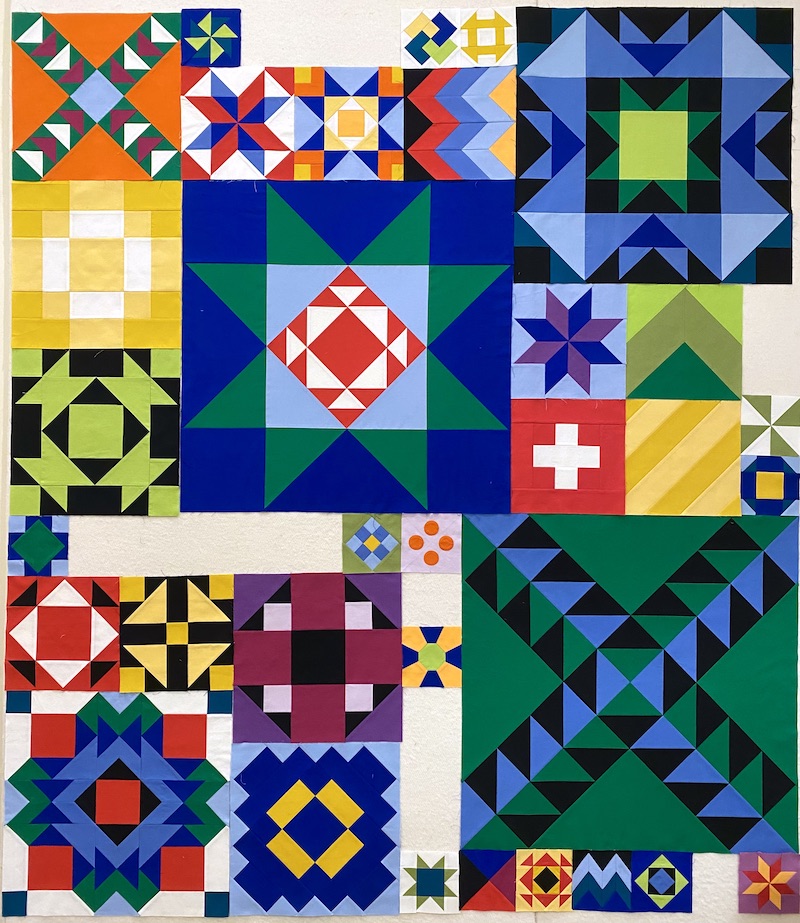
Happy Week End, everyone, and happy Month End as well!  One of the goals I'd set for myself at the start of January was to make some more blocks for my Retro '80s Building Blocks sampler quilt, and I finally did that yesterday.  Four more happy little 5" blocks are completed, only one of which was in the original Moda Modern Building Blocks design.  The other three blocks were among the many that I swapped out when I was redrafting the quilt in EQ8 Quilt Design Software (affiliate link) to suit my purposes.

Four More 5 Inch Blocks for Retro '80s Building Blocks

Gotta admit, I am still not 100% thrilled with the center of the little Lemoyne Star but it took me a LONG time to piece that one with all of its little Y-Seams, and I decided it's Good Enough.  Or at least, it's the best I could do that day.

Here they are, my completed blocks back up on the design wall, with the new ones added into the mix:

Back on the Design Wall: 38 Blocks Finished, 15 Remaining to be Made

For those of you who haven't seen any of my earlier posts about this quilt, here's a quick recap.  I started out with the idea that I wanted to make the Moda Modern Building Blocks quilt that was a popular BOM (Block of the Month) about eight years ago.  But I wanted mine to finish a different size to fit a particular bed, and I did not have the kit or the pattern anyway, so I set about redrafting the quilt in EQ8 from pictures of...  But instead of sizing my blocks as ruler-friendly multiples of 6", my blocks were multiples of 5" in order to get the finished quilt size I wanted with the borders I added.  The whole idea behind the "building blocks" sampler was for it to be a skill builder, so I eliminated all of the unecessary seams that Moda had added to simplify the piecing, adding back Y-seam construction because that's a skill I wanted to focus on.  I also swapped out 40% of the blocks in the original quilt for different ones in order to get that retro 1980s vibe I wanted and/or to include blocks that were more interesting (to me) or more challenging.  And I added rainbow borders that were inspired by the suspenders Robin Williams' character wore on the television show Mork & Mindy.  

Thursday, January 13, 2022

Whig Rose Applique Progress, Christmas Tumbler Top + a Sizzling Star Quilt Finish

Hello, my friends!  How is your January shaking out so far?  Our Christmas decorations are packed away, my sons are out of my house and back at their respective colleges, and I've been sewing up a storm.  I won't get my hands on the first patterns for my Sarah Fielke BOMs until the LAST day of January, so I've been working on the backlog of client quilts in my queue and moving personal projects along so I'll be ready to kick off an Applique-Palooza on January 31st. Today I have two personal projects to share and one client's quilt to showcase.  I'll be linking up with all the usual suspects (favorite linky parties, listed on my blog sidebar).

FrankenWhiggish Rose Applique

Thanks largely to the Medici the Magnificent series on Netflix, I stitched the last of the leaves on my Whig Rose blocks last night.  Woo-hoo!  

FrankenWhiggish Rose Needleturn Applique In Progress

This is the first time I've had all nine blocks in progress on my design wall and I've gotta say, it's looking really encouraging!  The center block is the only one that's 100% finished, but I had forgotten that I had a second block (bottom left) that was nearly finished except for the stuffed berries near the corner tulips.  

Wednesday, November 18, 2020

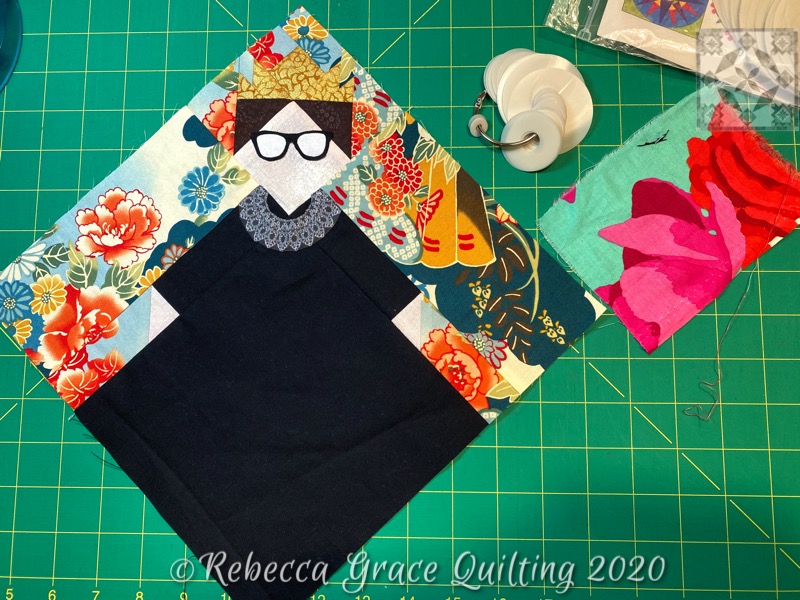
Foundation Paper Piecing + Needle Turn Appliqué: The Notorious R.B.G. is Ready to Join Her International Sisters

Do you remember seeing "a little secret sewing" on my to-do list last week?  I had SEW much fun making this "Notorious R.B.G." block for my quilting friend Preeti, based on her popular International Sisters Block Tutorial (find it on her Sew Preeti Quilts blog here).  

My Notorious Ruth Bader Ginsburg Block, Ready to Join Her Sisters

If you haven't seen Preeti's International Sisters blocks yet, you should pop over to Preeti's tutorial to read how the block came about.  Preeti stumbled upon a quilt block called African Queen a few years ago and drafted her own 10" finished version of the block when she was unable to find a pattern or instructions for making it.  Then she started experimenting with all different skin tones and it became an International Sisters block.  Here are some of Preeti's lovely International Sisters:

Four of Preeti's "Sunshine Sisters" (blocks and photo by Preeti Harris, Sew Preeti Quilts)

One of the great things about Preeti's International Sisters blocks is how fabulously they showcase wildly colorful print fabrics, and I think that is a big part of their appeal.  But of course R.B.G. needed to wear a plain black Supreme Court Justice robe instead, so I used a Japanese print from my stash for her background to set off the black dress and help her to work in a quilt with other sisters blocks, should Preeti choose that.  (She can do whatever she wants with it, or nothing at all.  There are no strings attached).

Justice Ginsburg at the 2015 Elle Women in Washington Power List Dinner

The red and orange Japanese print from my stash reminded me of this gloriously colorful embroidered Chinese silk kimono jacket that Justice Ginsburg rocked at Elle magazine's Women in Washington Power List Dinner in 2015.

My Foundation Paper Piecing Pattern, Created in EQ8 Software

In order for this international sister to be recognizable as The Notorious R.B.G., I needed to swap the head wrap for Ginsburg's trademark swept back hairstyle, topped with a crown.  I recreated Preeti's International Sisters block in EQ8 software, carefully following her tutorial specifications so the block would finish the correct size and with the correct proportions.  Then I just subdivided what would have been the head wrap with some additional seam lines. 

Foundation Paper Piecing Ruth's Crown

Foundation Paper Piecing Completed

Once I'd finished foundation paper piecing the four units that make up the whole block, I starched and pressed them nice and flat before trimming away the excess fabric 1/4" from the seam lines.  Then I removed the paper foundations and joined the units together.

Needle Turn Appliqué for the Broderie Perse Eyeglasses

I needed just a few more customizations for my R.B.G. block, and those were added with needle turn applique.  First, I cut out a pair of appropriately sized eyeglasses for my Supreme Court justice from Geekery "Spectacles" fabric (available from several Etsy sellers here).

Spectacles Fabric from RJR Fabric's Geekery Collection, Available on Etsy here

Back view of Appliqué Stitches

The white seam allowance was pretty skimpy in the deep V of the nose bridge, so there are LOTS of tiny stitches there to ensure it doesn't unravel.  For reference, those machine stitched foundation paper piecing seams have a stitch length of 1.5 and the seams sewing the sections of the block together are stitch length 2.0.

The "dissent collar" was done the same way, cut out of a Spoonflower RBG's Dissent Collar fabric (created by jbtsparkle, available from Spoonflower here) with a fat 1/8" seam allowance and then added to the already-pieced block by needle turn appliqué.

But something was still missing:

Tiniest Perfect Circle Template + Scrap of Kaffe Fassett Fabric = Jade Earrings

Justice Ginsburg Never Went to Work Without Her Earrings!

I used the smallest size of my Karen Kay Buckley Perfect Circles templates and a scrap of backing fabric from a recently completed baby quilt to recreate Justice Ginsburg's iconic jade statement earrings.

Properly Accessorized, Justice Ginsburg is Ready for a Day in Court

This block was a fun little diversion after wrapping up the two baby quilts.  I'm scheduling this post so it won't publish until after Justice Ginsburg has been safely delivered to Preeti.  I hope she likes it!

PSST!!  I'd Love to Quilt for YOU!

By the way, if you or any of your quilty friends has a quilt top or two that needs quilting, I'd be delighted to quilt for you!  My turnaround for edge-to-edge quilting is currently running about 2 weeks, and you can click here to find out how to book your quilt with me.

I'm linking up today's post with the following linky parties:

THURSDAY

Needle and Thread Thursday at My Quilt Infatuation  

FRIDAY

Whoop Whoop Fridays at Confessions of a Fabric Addict

Peacock Party at Wendy’s Quilts and More

Finished Or Not Friday at Alycia Quilts

Off the Wall Friday at Nina Marie Sayre

 TGIFF Thank Goodness It’s Finished Friday, rotates, schedule found here: TGIF Friday

SATURDAY

UFO Busting at Tish in Wonderland

SUNDAY

Frédérique at Quilting Patchwork Appliqué

Oh Scrap! at Quilting Is More Fun Than Housework

Slow Stitching Sunday at Kathy's Quilts


Sunday, May 24, 2020

The Tension Wrecker Apprehended: Pigtail Guide on M-Class Bobbin Case Increases Bobbin Tension!

Good morning, friends, and happy Sunday!  I've just returned from "Drive By Communion" in my church parking lot!  I kid you not -- Crazy times.  We watched the live streamed worship online this morning as usual (or, as has BECOME usual since early March), but this is the first Sunday since early March that they've offered in-person communion in the parking lot, served by masked and gloved pastors.  We are blessed at Christ Lutheran with church leadership that is faithful, creative, and prudent.  We didn't see a lot of cars when we went for Drive-By communion following the Traditional service, but I'll bet there will be more who come at lunch time, after the Contemporary service.  My husband wanted to have his sins forgiven and then "get on with his day," as he put it.  Oh, and do you like the mask he decided to wear for Holy Communion, complete with a little red devil next to his nose?  It's not like that's the only one I made him, either.  Maybe the pastor didn't notice.  More likely, my pastor would not care.  [For more information about how I made my masks, and a link to download the pattern, see this blog post].

Check Out the Mask My Husband Picked Out for Holy Communion (?!)
I did head up to the studio for several hours after yesterday's overload of puppy cuteness.  It took me at least two hours to rip out the really bad tension stitches from my quilt, and it was disheartening work since I was so proud of some of that free motion work when I was looking at it from the top side of the quilt.  

Behold, Love's Labors Lost

Some days are like that, and it's all part of the process.  I only took out the very worst stitching, what I knew would result in thread hanging loose on the back side of the quilt after washing if I'd left it in.  The not-quite-perfect-but-structurally-sound stitches got to stay in.

All This Wretchedness Got Ripped Out
So in the photo above, the outlines of the rectangles had been stitched first, with nicely balanced tension, and then disaster struck a few days later when I decided to come back and fill in every other one with a squiggle.  But I think I figured out what went wrong that day, and as long as I learned something from all of this, it wasn't a waste, after all!  

Note to Self: Threading the Pigtail Guide on the M-Class Bobbin Case INCREASES Bobbin Tension

On the Disastrous Day of Stitching That All Had to be Ripped Out, I believe I unintentionally unbalanced my tension by slipping the thread tail through the pigtail guide, adding a little more tension to the bobbin thread without making any adjustment to the top thread tension.  After running the machine unthreaded for 15 minutes to warm up the motor, I was impatient to start quilting and figured "My tension was excellent yesterday, nothing has changed since then, so no need to do any test stitching today."  

APQS M-Class Bobbin Case, Pigtail Guide Threaded
I vaguely remember that, when I took my bobbin case out to oil the hook at the beginning of that Fateful Day of Frightful Tension, I dropped my bobbin case on the carpeted floor and my bobbin popped out of its case.  When I reinserted the bobbin, I had this split second of doubt about whether I'd been using the little pigtail thread guide of my M-Class bobbin case.  I knew I'd experimented both ways, with and without threading the guide, when I was adjusting the tension, but I hadn't made a note of which way I ended up doing it.  I figured I'd PROBABLY threaded the pigtail, and didn't think it would make a huge difference...  Wrong!

APQS M-Class Bobbin case, Pigtail Guide Unthreaded
APQS recommendations using this guide "for best results with most threads" because it helps to ensure that the bobbin thread is properly positioned to catch the hook with every stitch, but it does put some additional resistance on the bobbin thread.  Which I should have known, since previous Berninas that I've owned in the past had the same little pigtail guide and you were supposed to thread the pigtail for embroidery or satin stitches, where you want the top thread to pull slightly to the back side.  Don't misunderstand me; I'm not saying to never thread the pigtail guide.  I could still get balanced stitches with the pigtail threaded if I increased the upper thread tension accordingly.  And, if I was getting skipped stitches with the pigtail unthreaded, for example, threading the pigtail would be the first thing I'd try for an instant fix.  However, when changing from no pigtail to pigtail threaded midstream, it's important to check and adjust the upper thread tension again to ensure that the stitch is still balanced.  The pigtail is like adding one more person to Team Bobbin in the game of tug-of-war, without adding any more pulling power to Team Needle Thread!


With any thread combination, you can get balanced stitches both with and without threading the bobbin case pigtail.  You can have an evenly matched tug-of-war with three people on each team or with five people on each team, right?  I think I determined in my test stitching that my stitches were more attractive with the particular thread combination I'm using for this quilt (50 weight So Fine in the needle with 60 weight Bottom Line in the bobbin) when tension was balanced but a little looser overall versus balanced but tight overall tension.  Think two duds pulling from each side rather than four dudes pulling from each side. So I had skipped the pigtail and then adjusted my upper thread to balance the looser bobbin tension.  

Well, at least I've learned something, right?  I need to put a sticky note somewhere to remind myself of whether or not I'm using the bobbin pigtail guide on a particular project.  And I should probably get in the habit of ALWAYS doing some test stitching and/or crawling under the frame, run my fingernail along the stitching line on the back of the quilt, or SOMETHING after a few minutes of quilting to check that all is well under there before I put in thousands of stitches that will take forever to rip out.


I am remembering -- and now following! -- advice that quilter Jamie Wallen shared in his long arm tension video tutorial (above) several years ago.  Jamie recommends that you start by adjusting your tension so that the bobbin thread is pulled up to the top of your quilt and then loosening your top tension until you can just see the dots of bobbin thread in the needle holes.  When your quilt comes off the frame and relaxes, those little bobbin thread dots will settle back into the middle of the quilt sandwich, but seeing those dots of bobbin from the right side as you're quilting is your insurance that you are not getting flatlining and eyelashing on the back of your quilt!

One more thought: This is my first time using Quilter's Dream Cotton Select batting on my long arm.  I know I read somewhere -- maybe in my APQS new owner class handouts? -- that a batting with a bit more loft, like an 80/20 blend or wool, is more forgiving for longarm quilting because more batting loft equals more room in the middle of your quilt sandwich for the needle and bobbin thread to lock together without showing through on either side of the quilt.  I am already seeing that the all-cotton batting is not giving me as much dimensional contrast between the unquilted rectangles and the squiggled ones, so I will probably steer clear of 100% cotton batting on the long arm going forward.

Recently Ripped Out and Requilted.  It Was Better the First Time
This section was all ripped out and requilted yesterday.  I thought that maybe I didn't need to use a stencil this time, since the needle holes were still visible from the previous quilting, but I couldn't see them well enough as I was actually stitching out the design.  The result: Notice how these curls are slightly square?  That was the problem I was trying to avoid in the first place, by stenciling guidelines onto the quilt before quilting it.  Well, the next one will be better, right?

I'm looking forward to making some progress quilting NEW areas of the quilt later today!  The other project that I've been working on in weekly dribbles is my FrankenWhiggish Rose needle turned appliqué.  My bee group has been doing virtual Zoom get togethers every Monday throughout the pandemic shutdown, and this is what I work on during that time.  I haven't been sharing it because I'm trying to work efficiently, doing all 16 leaves on all 9 blocks before moving on to the next shape, and it would be really boring if I kept posting photos of the same block over and over again...  It is definitely getting boring to be STITCHING the same exact block over and over again!  That is one of the great benefits of sampler quilts -- variety!

Still Plodding Along with my FrankenWhiggish Rose Needle Turn Applique Project
As a reminder, this is what the first (and only) completed block looks like (below).  All eight of the other blocks are in the process of getting their leaves, like the block shown above.

One Block Completed, Eight Still In Progress at the Leaf Stage
I am definitely looking forward to moving on to the tulips soon.  Hope I still remember how to do the deep inside points and the reverse appliqué  but if I don't remember, I'll just have to relearn it!  I'm linking up today's post with:

SUNDAY

·       Slow Sunday Stitching at Kathy's Quilts  
·       Oh Scrap! at Quilting Is More Fun Than Housework

MONDAY

·       Design Wall Monday at Small Quilts and Doll Quilts  
·       Monday Making at Love Laugh Quilt

·       BOMs Away Katie Mae Quilts