
Happy Weekend, quilters! I have an itty bitty amount of progress on my new Halo quilt to share with you today. For those who missed my earlier post about this NewFO project, Halo is a Jen Kingwell pattern that can be found in her Jenny From One Block pattern booklet, available on Amazon here (this post contains affiliate links).
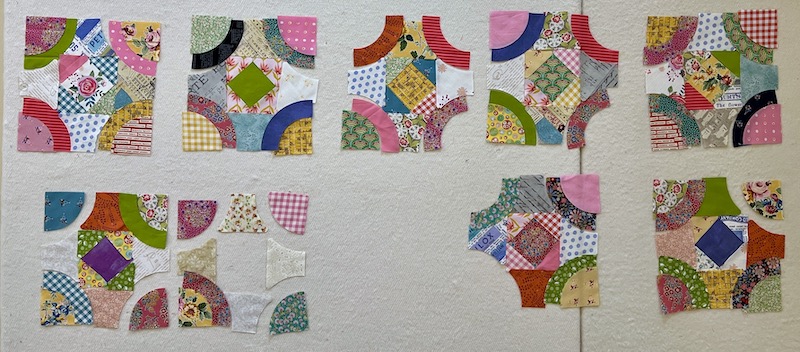 |
| Unsewn Halo Blocks On My Design Wall |
For the last couple of weeks, I've been working on cutting out shapes and rearranging them on my design wall without any sewing. When I searched #haloquilt on Instagram, I found lots of different versions of this quilt, in all kinds of colorways. What struck me immediately was that it's the muddled values in Jen Kingwell's original version that drew me in, the way that her "halo rings" appear to come forward in some places and recede in others, creating an illusion of depth. Other quilters have made some very striking and modern versions of this quilt by increasing the value contrast, limiting the color palette, or restricting themselves to solids, but I was really intrigued by the way Jen broke the conventional "quilt police" rules about value and contrast in her quilt, creating something that feels fresh and modern but also somehow nostalgic and vintage. I want to recreate that in my version of the quilt.
 |
| Jen Kingwell's 66 x 66 Halo Quilt |
I printed a full page, grayscale photo of Jen's quilt and taped it up above my cutting table so I can refer to it as I'm chopping up my fabric pieces:
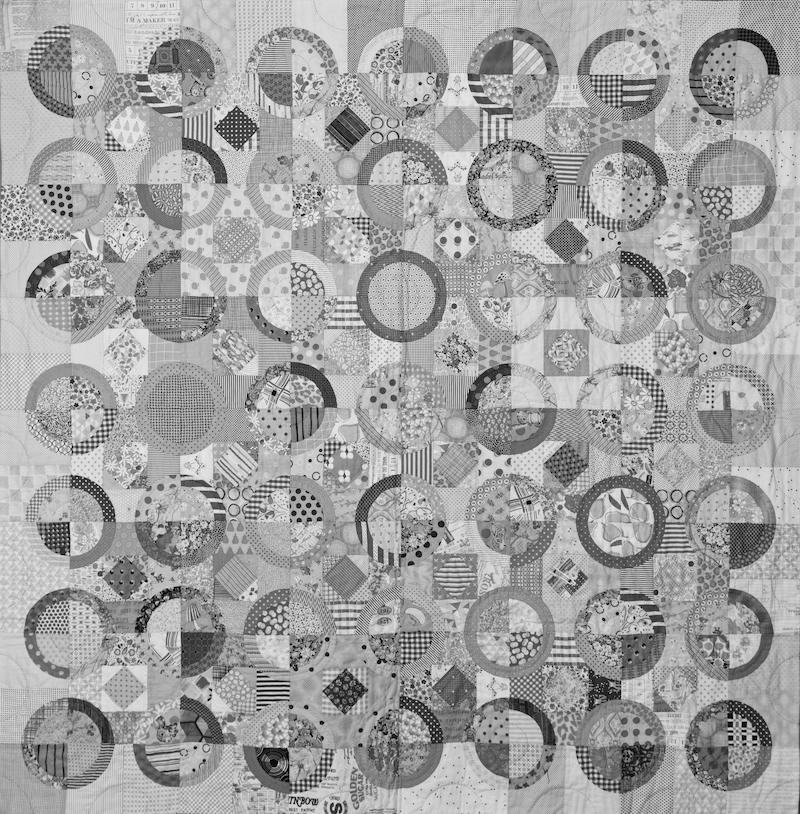 |
| Grayscale Photo of Jen Kingwell's Halo Quilt |
It's so much easier to see what's going on with value when you take color out of the equation!
In the grayscale photo you can really see that there is little to no value contrast from patch to patch in a lot of areas of this quilt, but generally speaking, the darker fabrics are used in "halo" rings and for the on point squares in the center of each block. |
| Grayscale Photo Taped Up for Reference |
A few optional purchases I recommend for anyone wanting to make their own Halo quilt:
- Halo Acrylic Template Set, available here on Amazon. You can use these templates to trace around and then cut your fabric pieces with scissors, or you can use the templates to rotary cut through several layers of fabric at a time. The templates also have little holes to facilitate marking for hand piecing these blocks, if that's your thing
- 28 mm Rotary Cutter with fresh blades. A larger diameter blade can't follow the curves of these templates, but a smaller diameter blade won't work either because the screw holding the blade to the handle doesn't clear the thickness of the acrylic template.
- Odif Grippy Nonslip Coating. This is a new-to-me product that was recommended to me by a friend and I'm loving it so far! You spray it on the underside of your acrylic templates and it creates a tacky surface that resists sliding on your fabric as you're cutting out these curved shapes. It's transparent so it doesn't interfere with fussy cutting, and it's removable if you wanted it off for some reason in the future. I wish I knew about this product when I was cutting out my drunkard's path quilt and my clam shells! I'll be spraying the bottoms of my Star Upon Stars templates with Grippy as well.
- Calibre Art 14" x 14" Rotating Cutting Mat. The photo above was taken before my new rotating cutting mat showed up, when I was alternately attempting to contort my body into weird angles so I could cut all the way around my templates without moving anything, and then trying to turn big pieces of fabric around on my cutting mat so I could cut each side normally, which wasn't working very well either. The rotating cutting mat is the perfect solution; the positioning of the fabric and template isn't disturbed when you are turning the mat. I was concerned that a spinning mat might move when I didn't want it to, in the middle of a cut, but the slight pressure you exert to hold the template in place is enough to lock the position of the mat securely. My new favorite tool!
I used several Fat Eighth bundles of Tilda Pie In the Sky fabric bundles as a jumping off point for my Halo quilt, but I'm pulling lots of other fabrics from my stash and scrap bins for more variety. And I did start a tiny bit of sewing! I sewed the center square-in-a-square unit for two blocks so far:
 |
| The Center is Sewn Together! |
I decided I'd better stop cutting and sew a couple blocks together to make sure I like what I'm doing. All of the cut-but-not-sewn pieces on the design wall were looking like a jumbled mess, but it's a relief to start sewing a block together and realize that it's a little less chaotic (and I like it a lot more!) when the fabric patches are actually sewn together. I sewed the center of two blocks so far.
 |
| This Block's Center is Sewn, Too |
And of course, the whole time I'm working on this project, I have a Beyoncé ear worm that I can't get rid of! 🎶
 |
| 🎶 Beyoncé Can See My Halo, Halo, Halo, She Can See My Halo... 🎶 |
That's all you get from me today. Don't judge me too harshly for my pitifully slow progress; I scheduled a few more quilts this month than I probably should have and that is not leaving much time for personal sewing projects. I should be caught up and "back to normal" by Easter, though. Have a wonderful weekend, everyone, and happy quilting! I'll be linking up today's post with the following linky parties:
Frédérique at Quilting Patchwork Appliqué
Design Wall Monday at Small Quilts and Doll Quilts
Midweek Makers at Quilt Fabrication
Wednesday Wait Loss at The Inquiring Quilter
Needle and Thread Thursday at My Quilt Infatuation
9 comments:
Oh my! I LOVE your "messy start!" I like your approach to incorporating the muted values in your quilt. What I like most of all is your fabric variety!! What a terrific quilt this will be!
What a fun quilt! I'll be watching eagerly as it comes together. As for your new cutting mat, I'm jealous. ;) I bought a rotating mat at the Road to California show, but it's round. That means that the mat, while technically 14" across, can only handle a 9" block without having to re-orient things. BIG mistake.
it would be hard to fit in personal time in between the business quilting
Putting up the grayscale photo of Jen's original quilt is a great idea, Rebecca! Having that to refer back to should make it easier for you to replicate the feel of her quilt. It's SEW lovely and I'm sure your quilt will be, too!
Neat project. You have been such a busy Lady. You deserve a month off to play! I am tempted to order the 14”. I have smaller ones. I admire your ability to work with scraps. Going to be a very happy quilt!
Love love love how this is progressing! I do like the way you are mixing things up. The grey & white pic is a super way to help keep track of the values.
Love how this is coming together. Such gorgeous fabrics! Thanks for sharing on my weekly show and tell, Wednesday Wait Loss.
Wow, this new project is going to be a wonderful quilt! The blocks look tricky, but I love your fabric choices. Well done sofar!
Thank you for sharing your process, and linking up.
I just really really love this!
Post a Comment