Showing posts with label Q-Matic. Show all posts

Sunday, April 20, 2025

Custom Digital Quilting with Q-Matic: The 1984 Sampler Quilt Continues

 Happy Easter and Passover to all those celebrating this weekend!  I quilted this block over a week ago and wanted to jot down what I learned before I completely forget what I did.  Doesn’t the green airplane look great with the swirly computerized quilting design in the background, but not crossing over the airplane itself?


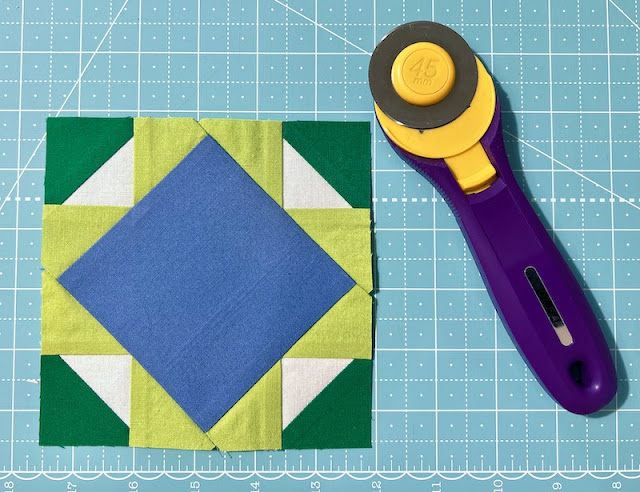
Q-Matic Masking Tool for Airplane Block


Of course there are quilters out there who could freehand quilt those swirls and spirals just as beautifully as the computer, but sadly I am not one of them.  ;-)  Since a computerized long arm machine is like a talented but blind quilting assistant, it’s necessary to precisely program and “mask out” the areas where you do and do not want the design to be stitched by physically moving the machine along the patchwork seams and clicking at the points to map out boundaries that the computer can follow.  This is a slow process, as I learned when I did it on this earlier block in the same quilt:


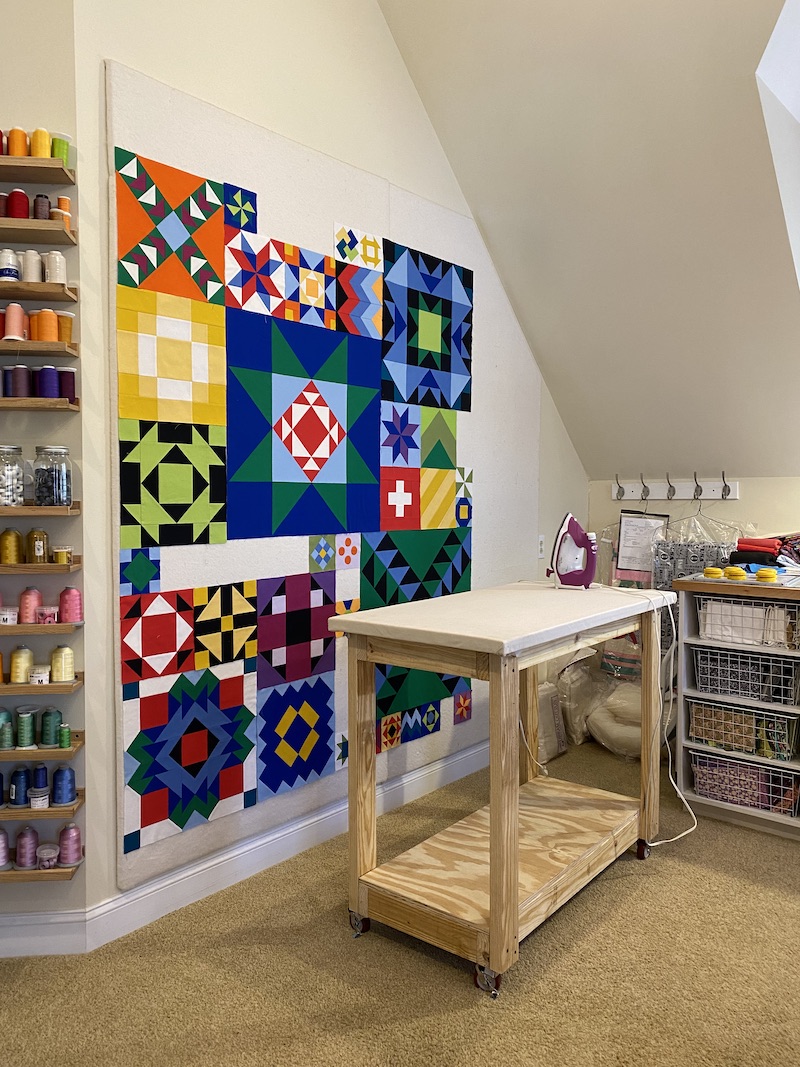
Also Done Using Q-Matic Masking Tool


Looks great, but I learned a lot about what NOT to do with that block!  I set up that circles and spirals as a repeating design right across the block as though it was an edge to edge design going across a whole quilt, mapped out the tumbling blocks appliqué, and told the computer to just stitch it all at once.  Then I watched in horror as the many many stitches went in to create beautifully round circles and spirals balls, but every time the machine encountered a seam line it stitched back and forth multiple times to travel to the next stitching line.  There were jump stitches all over the place that I had to go back and trim and way too many places where the design stitched securing stitches.  Not only is this a less tidy look than I hoped for on the back, but it took me a good hour after I’d finished stitching to clean it all up and trim all those jump stitches from both sides of the quilt.  Very discouraging!

Thursday, March 13, 2025

Deco Blocks Finished, Custom Quilting Progress + Stonefields Pattern Has Arrived!

Drumroll, please...  Only 170 weeks or so behind schedule for the 2021 Deco Quilt Along hosted by pattern designer Lo & Behold Stitchery, I have finally caught up to Week 7 by finishing all of my blocks and moving on to assembling my quilt top!


Finally Finished Making All of My Deco Quilt Blocks!


Once again, if I had any idea how long this project was going to take, I probably would never have started it in the first place.  😬. Ignorance is bliss!  


Rebecca Does Not Follow Directions, As Usual


Including some "action shots" here of quilt top assembly in progress.  My poor B 990 machine must be so bummed; all her fancy high tech features but the only thing she gets to do so far in my studio is Piecing Straight Stitch #1313!  So, if any of you have made this quilt before you might be noticing that I've veered from the pattern instructions in a couple of key ways:

  • I disregarded the instruction to press all of the seams open in this quilt and created my own pressing plan instead.  It is nearly impossible to get crisp and accurate seam intersections if you press all of your seams open -- and conversely, it is practically goof-proof to get perfect seam matches when the seam allowances have been pressed in opposite directions and you can just snug them together for a little seam hug, secure with a couple o pins and then sew
  • The pattern instructs you to create additional full log cabin blocks and then slice them in half from corner to corner to create the side blocks.  I didn't want to do that for two reasons.  First, it would cause weird and unnecessary seams to land right on the outside of my quilt where they would interfere with binding in the last stages of the project.  (Note that, if you're making one of the smaller size versions of Deco rather than the bed size quilt I'm making, you have to slice different blocks in half diagonally, losing your points all along the outside of your quilt!).  Second reason for disobeying instructions was that I wanted to have control over the grain line along the outer edges of the quilt as much as possible, so I cut those blue triangles for my partial side blocks with the grainline on the hypotenuse (long side of the triangle).
  • I used my AccuQuilt GO! Setting Triangles 8" Finished die (this post contains a few affiliate links) to cut my side and corner setting triangles to the exact size for my 8" finished blocks.  AccuQuilt makes their setting triangle dies in various sizes and it's definitely worth getting the coordinating size setting triangle die if you already own one of the AccuQuilt Qube sets and/or you frequently make blocks of a certain size.  Not only does this die "do the math" for you to cut the appropriately sized setting triangles -- with the points pretrimmed for easy alignment before stitching -- but the layout of the triangle shapes on the die itself ensures that all of these setting triangles will have straight, non-stretchy fabric grain on the edges that will form the very outer edges of your quilt top.  So, because I cut these setting triangles with my AccuQuilt die, I did not have to think about making sure I had straight fabric grain on the hypotenuse side of my side setting triangles but straight fabric grain on the short sides (NOT the hypotenuse) for the four smaller corner setting triangles.  The setting triangle die makes it a lot easier for novices to tackle diagonal set quilts successfully.  By the way, if you don't think you'll make enough diagonal set quilts in a particular block size to justify the cost of AccuQuilt or you're not already invested in that cutting system, there are specialty rulers available that will help you cut the correct size setting triangles for any block size.  I have the one Kaye England designed for Good Measure, but I've seen other brand versions in quilt shops and I'm sure they work just as well.  Kaye has a video showing how to use hers here.

Sunday, March 13, 2022

A Sampler Block, a Custom Ironing Table, and a Custom QOV for Harold

Lest you think I've not been making any progress at all on my own projects, I have this block to show for myself:

Another 5 inch Block Completed for my Retro '80s Sampler

I've actually finished several more 5" blocks for my Retro '80s Building Blocks sampler quilt besides this one -- I only have six left, plus borders and corner blocks.  The photo below was taken a few weeks ago and doesn't show any of the new blocks.  What it does show is my new, fancy-schmancy custom ironing table, built by my "Handy Husband":

Rebecca's Fancy-Schmancy Custom Ironing Table

24 x 48 Custom Ironing Table

I have been searching in vain for an ideal quilter's ironing board, and I finally talked my husband into building one to my specifications.  

Sunday, January 23, 2022

Wild Animal Kingdom, Quilters' Edition: A Wolf, a Lion, and a Realignment Tip for Tricky Pantos

Good morning, friends!  I'm so excited that I can finally share this incredible Wolf Abstractions quilt with you, pieced by my client Mary who blogs at Quilting Is In My Blood.  Isn't this amazing?!  Mary made this quilt as a surprise 50th birthday gift for a dear friend.

60 x 65 Wolf Abstractions, pattern by Violet Craft available here on Etsy

Mary used the Wolf Abstractions foundation paper piecing pattern designed by Violet Craft to piece this stunning quilt.  You can find the pattern on Etsy here (affiliate links).  I suggested 40 weight Omni matte polyester thread in Cream so the thread would blend into the fabrics in the wolf's face and contrast softly with the dark gray background fabric.  The batting is Quilters Dream 80/20 and the quilting design is Sound Wave by Jessica Schick.

Tuesday, September 28, 2021

A Tale of Two Baby Quilts

I've been getting the best baby quilts in for quilting lately!  My customers are giving me so many ideas that I'm stowing away for the next time I need a quick baby shower gift.  Check out this first quilt from my client Julie:

36 x 45 Baby Quilt with Rapunzel B2B Quilting Design

Isn't it fabulous?!  The hearts, stem and leaves were fused and machine appliquéd to a single width of background fabric.  It's simple, but so effective, don't you think?  We chose the Rapunzel quilting design to echo the shape of the leaves and carry the movement of the appliqué design across the rest of the quilt.

Quilting Detail.  Glide Thread in Cotton Candy + Quilters Dream Bamboo Batting

I used a pink thread, Glide in Cotton Candy, because I wanted the quilting to blend into the appliqué fabrics and stand out more in the background.  The quilting is fairly dense, but this quilt is still going to be soft and snuggly thanks to the lack of any stiff or bulky seams and the fabulous bamboo/silk/cotton Quilter's Dream Bamboo batting.  I know you guys like to see before and after photos...

Friday, September 3, 2021

Behind the Scenes: Digital Custom Long Arm Quilting With Q-Matic on a Judy Niemeyer Quilt

Good Morning, Happy Friday, Happy Labor Day Weekend, and Happy September!  It was in the fifties this morning in Charlotte, which felt GLORIOUS after the sweltering hot Armpit-of-the-South weather we've had for the past few months.  Fall is my favorite time of year and it can't get here soon enough!

Custom Digital Quilting Fit for a Prismatic Star Queen

Sneak Peek of the Custom Feather Quilting Under My Needle

I've spent more time quilting in the studio than sitting at the computer lately, so I have lots of things I could be sharing with you.  Today, I thought folks might like to see a custom quilting project that I'm working on for a client right now and learn a little bit about what goes on behind the scenes when custom quilting with digital designs.  Spoiler alert: the process is not as automated as you might expect!  Here's my client's quilt top, prior to being loaded onto my frame;

Auditioning Threads for Mildred's 91 x 91 Prismatic Star Queen Quilt Top

My client Mildred pieced this gorgeous Prismatic Star Queen quilt top using one of Judy Niemeyer's Quiltworx foundation paper piecing patterns.  

Thursday, August 5, 2021

Bring On the King-Size Quilts: My Q-Matic is Finally Here!

Today's big news is that my Q-Matics computer robotics that has been backordered since May finally came in and was installed on my machine yesterday!

Q-Matic Computer is Here, Up and Running on My 13' Long Arm

Now I can finally get to the Queen size quilts in my queue whose makers have been waiting so patiently.  I can now quilt anything up to 120" on my 13' Big Girl frame (Bernina calls it the Large frame, but I am calling it my Big Girl Frame after being restricted to the dinky little 8' frame at the Bernina store that couldn't handle anything bigger than a Twin).  Not only can I get caught up with larger customer quilts now, but I'm finally going to quilt my enormous 120" x 120" California King pineapple log cabin quilt -- if I can only make up my mind about how to quilt it!

It took my dealer about 5 hours to install my Q-Matic, and I managed to piece two more blocks for my Retro '80s Building Blocks sampler quilt while he was working in my studio.

Progress on my Sampler Quilt Project

Since my Featherweight was still set up from the LeMoyne star blocks I made last week, I chose two more blocks containing Y-seams (in the original Moda Modern Building Blocks quilt, these were made with flying geese units, but I redrafted them to have fewer seams).

Monday, August 2, 2021

Julie's Positivity Quilt for the Mercyful Quilts QAL

Good Monday morning and Happy August, y'all!  I'll get to my goals for the fresh week and shiny new month later in this post.  First, I want to show you this beautiful Positivity quilt, pieced by Julie Kennedy of Julie's Quilts & Costumes, and quilted by Yours Truly:

60 x 80 Positivity Quilt for Mercyful Quilts QAL

"Positivity" is a FREE pattern from Preeti Harris of Sew Preeti Quilts, available here.  Preeti and Bernie Kringel of Needle & Foot are currently sponsoring a QAL (quilt-along) using this pattern to create donation quilts for Bernie's Mercyful Quilts charity benefitting dying patients and their families at Mercy Hospital in Sacramento, California.  Those participating in the QAL, which runs through September 5th, are encouraged to either ship their completed quilts to Bernie or else donate them to local charity.  Although I didn't have time to piece a top for this effort, I was glad to collaborate with Julie in support of this worthy cause.

Positivity Quilt Pieced by Julie, Quilted by Me


One of the things I love about Preeti's Positivity pattern is that, although there's nothing explicitly religious about the plus sign design to non-Christians, Christian patients and their loved ones will see the plus sign as a cross -- a reminder of the promise of resurrection, which makes this quilt both physically and spiritually comforting.  I love the color palette Julie chose, too.  The blue crosses/plusses against the warm neutral background fabrics is calm, soothing, and organic, like earth and sky and water.  

Wednesday, July 21, 2021

The White On White Bailee Quilt, Final Reveal!

Today's post needs to be a quickie because I have a full day ahead of me, but I just had to share pictures of how that white-on-white "pieced whole cloth quilt" turned out.  My client picked it up yesterday and she'll be surprising her mother with it when she flies out to see her tomorrow.

The "Pieced Whole Cloth" Quilt, Bound and Ready for Gifting

My client is thrilled with how this project turned out and I can't wait to hear about her mom's reaction to the quilt.  This is supposed to be the white on white quilt that she always wanted but couldn't have because of her messy kids and dogs.  I think we nailed it, don't you?

56 x 68 Finished Quilt with Bailee Quilting Design

It's so hard to get pictures that do justice to the quilting when it's white thread on a white background.  

Friday, July 16, 2021

The Pieced Whole Cloth Quilt, Part I: Q-Matic Loves Karlee Porter Designs (and So Do I)!

OH MY GOSH, you guys -- I have died and floated off to quilting heaven!!!  Look what I started quilting yesterday for one of my clients:

Karlee Porter's Bailee E2E Design, Quilted on Bernina Q24 with Q-Matic

This quilt is a gift for my client's 80-something-year-old mother, who says she "always wanted a white-on-white quilt but she could never have one because she had kids and pets."  So my client pieced a very plain quilt top from large squares of assorted white and ivory solids and textures, and told me that "the quilting needs to be the star."  Now, in case you are wondering what is the best way to become my Best Friend Forever, it is DEFINITELY by telling me that my quilting gets to be the star of your quilt!  💕

Setting the Design Up in Q-Matic

When I purchased this particular design for my collection, I didn't think I'd ever actually stitch it out as an edge-to-edge design like this.  I was thinking I'd stitch single repeats of the design motif on plain alternate blocks for custom quilting.  The level of detail in this design is insane and it would be completely lost on a print fabric or busy piecing.  

Thursday, July 8, 2021

TGIFF is At My Studio This Week! Modern Scrap Petal Garden Baby Quilt

 Hello, and happy (almost) Friday! I'm delighted to be hosting this week's TGIFF (Thank Goodness It's Finally Finished) Friday linky party, because I am head over heels in love with this sweet modern baby quilt that I just finished quilting for a client.  

36 x 42 Scrap Petal Garden Baby Quilt with Jessica's Abacus Chevron E2E

The machine appliqué pattern for this quilt is called Scrap Petal Garden, from Cabin in the Woods, and it's available on Etsy here if your local shop doesn't carry it.  I love the fresh, bright flower petals against my client's low-volume background fabrics, don't you?  I know everyone loves the before and after quilting photos, so here's what the top looked like before quilting:

Sunday, July 4, 2021

The High-Tech, Low-Tech, Good News and Bad News Update

Happy Sunday, Happy Independence Day to those of you in the United States, and Happy July, everyone!  Today's post will be a smorgasbord of high-tech and low-tech excitement that has accumulated over the past week.

The Charlotte Modern Quilt Guild hosted a Zoom lecture with Canadian quilter Libs Elliott a few days ago, which was fabulous!  Libs is best known for her use of computer code to generate random geometric designs for modern quilting.  She shared that her parents were antique dealers and that she'd discovered and fallen in love with old quilts at auctions and estate sales.  As she related her journey from trying to replicate traditional patchwork with hardly any instruction through creating ideas of her own on paper and then trying to figure out how to make a quilt that looked like her sketches, I really appreciated her spirit of adventure and the way her style and her process have evolved over time.

Enjoying Libs Elliott's Lecture on Quilt Design with Computer Code

I got some good news last week, and I got some bad news.  Good news first!  I found a buyer for my APQS machine, a quilter from Northern Minnesota who was delightful to talk to on the phone.  She will be driving over 1,300 miles come and pick up the machine this week, and I wish her a safe and smooth journey!

Bad news: I already sold the IntelliQuilter computer robotics that I had on my APQS Millennium, because my Q-Matic computer robotics for the Bernina was supposed to be here at the end of June.  Well, guess what?  The Q-Matic is now pushed back until at least August, due to the global shortage in microchips.  😧 Yikes!  That means I can't stitch any digital edge-to-edge quilts for another month!  My Bernina dealer, Creative Sewing & Vacuum, has graciously offered to let me use their demo Q24 machine at the store for computerized quilts that  I need to get done in the meantime.  The only catch there is that, to conserve floor space in the shop, their demo Q24 is set up on the smallest 8' frame and the widest quilt that will fit that frame is about 71".  Not big enough for the queen quilts in my queue!  I had a customer's baby quilt that needed to get done, though, so I brought it over to quilt it with Q-Matic at the store.  I can't show you this quilt quite yet -- the client is picking it up on Wednesday -- but I'm hosting TGIFF Thank Goodness It's Finished Friday this week and I'll show it to you then, okay?  Pinky promise!  For now you just get this little tantalizing glimpse:

Borrowing My Bernina Dealer's Demo Q24 with Q-Matic

Friday, May 28, 2021

Giverny Kaleidoscope Quilt Finish + Big Birthday Surprises: A Bernina Q24 is Coming Next Week (APQS Millennium + IntelliQuilter For Sale)!

Today's post is a long one; I have three things to share with you.  

1. Graduation Quilt Finished Early!

First things first, my lovelies -- I put the final stitches in the binding of Anders' high school graduation quilt last night.  I finished it EARLY, y'all -- graduation isn't until Tuesday, and Quillow Sunday at church is on June 6th.  Woo hoo!!  This was my One Monthly Goal for May, and it feels good to hit the finish line with several days to spare!

70 x 90 Giverny Teleidoscope Graduation Quilt for Anders

I really love how the ombre backing fabric came out, too:

Giverny Teleidoscope Ombre Backing

I ended up doing a 1/2" finished width binding on this quilt because it seemed more proportional to the oversized kaleidoscope blocks than my usual 1/4" binding.  As for the size, it came out right at 70" x 90" before washing it, and I used 100% cotton batting so I'm bracing myself for some shrinkage to happen in that first wash.  I had intended for the quilt to be a little larger, but it will be fine.