Showing posts with label Samwise. Show all posts

Saturday, August 5, 2023

Lindsay's Ultraviolet Radial, Halo Quilt Top Completed + Deco Quilt Begun!

Good morning and Happy August, y'all!  I have lots to share today: a stunning modern quilt made by one of my quilting clients, the Big Reveal of my finished (!!!) Halo quilt top, and glimpses of the Deco Quilt that I've finally started piecing (nearly two years after buying the pattern and committing to a QAL 😳).  That's a lot of ground to cover and I have limited time available for writing this blog post, so let's get on with it!

Lindsay's Ultraviolet Radial Quilt

Look at this incredible Ultraviolet Radial quilt, pieced by my client Lindsay.  Can you believe Lindsay has only been quilting for two years?!  I can't wait to see what she'll be making ten years from now!  

Lindsay's 60 x 60 Ultraviolet Radial Quilt

Lindsay began this class in a virtual workshop with Ultraviolet Radial pattern designer Audrey Esary of Cotton & Bourbon.  The pattern is available on the designer's web site here.  I love Lindsay's color palette for this quilt and I was impressed by how flat and smoothly pieced these challenging curves were, especially when she told me she was a newer quilter.  Lindsay usually does her own quilting on her domestic machine but she was especially proud of this project and decided to splurge on professional quilting.

Thursday, September 15, 2022

Carrie's Gorgeous Rainbow Quilt + My NEW Favorite Batting

Good morning, my lovelies!  Keeping secrets is so hard...  I have been in agony for weeks, waiting until I could share this spectacular rainbow quilt made by my client Carrie (and quilted by Yours Truly).  

Carrie's 75 x 75 Rainbow Quilt with Raindrops on Water E2e

Carrie, who describes herself as a "relatively new quilter," is a new client who found me on Instagram and took that leap of faith to ship her quilt top off to a stranger in another state.  This is her first time making a quilt with solid color fabrics and her first time hiring a longarm quilter.  She made this quilt as a wedding gift and I hear it was a big hit.  💕

Loving the Dimension and Weight of the Deluxe Loft Cotton Batting!

I am always excited when I see solid and tonal printed fabrics in a client's quilt top because I know that whichever quilting design we choose, it is going to show up dramatically on solid fabrics whereas the quilting often gets "swallowed up" by busy prints.  The quilting design on this one, by the way, is Raindrops on Water.  Because there is some backtracking in this design and because we wanted to see quilting texture more than quilting stitches, I chose 50 wt So Fine in color Blizzard for the thread (this post contains affiliate links).  But what I'm REALLY excited about is the batting we used -- do you see that magnificent, delicious, and decadent dimensional texture?  Are you guessing wool?  Because if you are, you are wrong!  This is Quilter's Dream Cotton batting, DELUXE loft.  

Thursday, November 11, 2021

Two Very Special Clients' Quilts, and a Movie Star Moves Into My Studio

Happy Thursday, Friends!  I just finished writing a different blog post for TGIFF (Thank Goodness It's Finished Friday) that I've scheduled to publish automatically at 6 PM EST this evening, since that's when Friday begins for those linking up from Australia, so be sure to check back for that one and link up your own finishes, even if it's a small finish like a single block completed.  Meanwhile, I have a couple of extra-special client quilts that I've been wanting to share with you.  

Julie's Vintage Equestrian Applique Quilt Repair

This first one belongs to Julie, whose puppy chewed a hole through all layers of the quilt at the top edge.  These dogs sure do keep me busy, don't they?!  I neglected to get a good "before" phot of the entire quilt before I started working on it, but here's what it looked like when it was nearly ready to go home again:

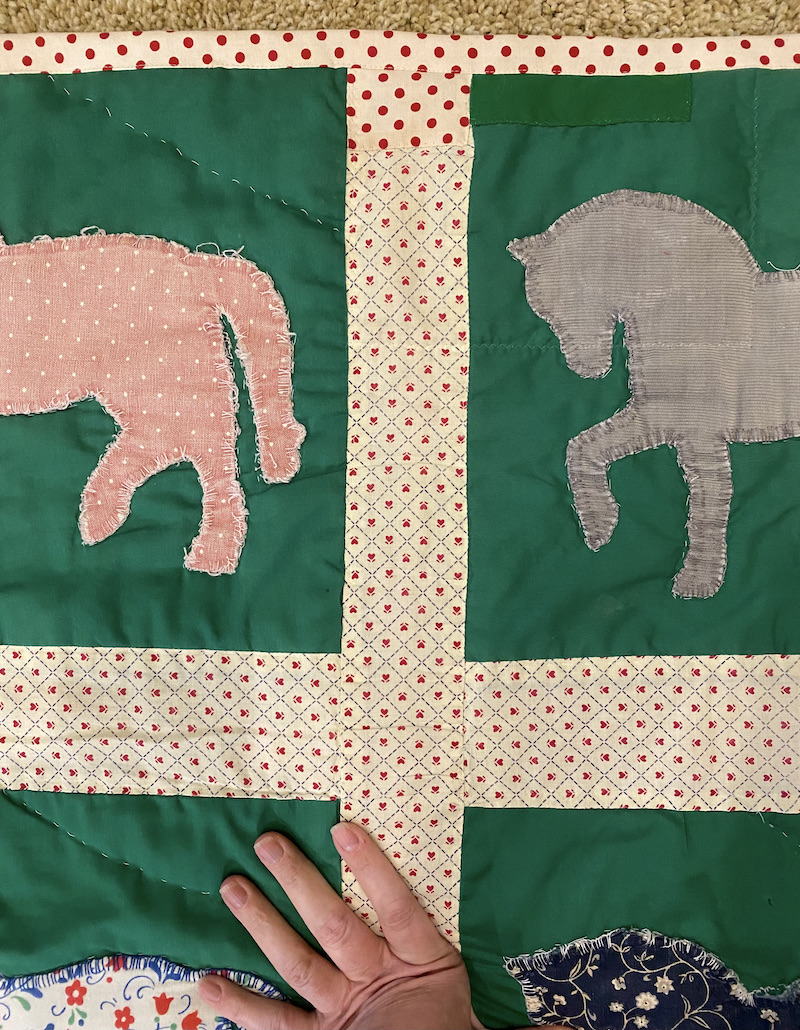
74 x 84 Vintage Equestrian Applique Quilt, After Repair

Julie cherishes this quilt because her husband had it custom made for her as a surprise gift many years ago.  Their family is involved with equestrian sporting and I believe he may have even drawn the horse silhouette for the applique shapes himself.  He found a quilter to make it and was given a shopping list of how much fabric was needed, then went to the fabric store and picked everything out himself -- hence the assortment of calicos, corduroys, and poly blend fabrics in this quilt.

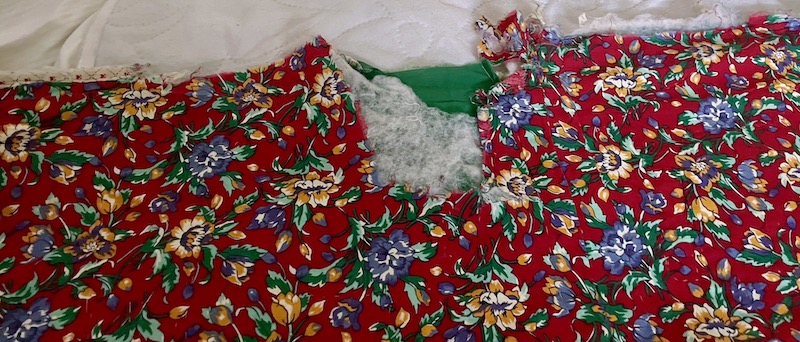
Detail of the Worst Damage Area

This quilt was made with a wide sashing between the blocks and a narrow, 1/2" finished width outer border in the same fabric that simply wrapped to the back of the quilt and was machine stitched in lieu of traditional binding.

Same Spot On the Quilt, Backing Side

Here's what that section of the quilt looked like after I'd repaired it:

Repairs Completed, All Machine Stitched

My client's budget dictated that all of the machine repairs would be machine stitched for this project.  The binding was damaged and falling off on all four sides of the quilt and would need to be replaced, and finding a suitable fabric was the biggest challenge.  I'd initially told Julie that I'd use a solid red for the binding, but I couldn't bring myself to do it.  My goal in restoring a family quilt like this is to have it look as much like it did originally as I possibly can, and although a red binding would look good on the quilt, it would definitely draw your eye and look different to its owners.  I could not find anything like the original ivory/red/blue print calico fabric in any of the local quilt shops I visited, but I did find a red and white polka dot fabric.  I was able to tone down the bright white background of the new fabric to better match the original fabric by coffee staining it before using it to repair the quilt.

Saturday, February 20, 2021

I Have a New Favorite Thread Color! Meet My New BFF, Glide Khaki

I recently had the opportunity to quilt an edge-to-edge design on a client's gloriously scrappy double four patch quilt.  My client's quilting hobby had been "dormant" for the past sixteen years, until her adult son asked her to make this quilt for him.  The most exciting thing about all of this for ME is that her fabrics are ones that I had never seen before, different from what's been available in quilt shops throughout my own quilting journey, but also different from the much older fabrics I encounter when repairing vintage and antique quilts.  However, the wide range of colors and the busy nature of the quilt top necessitated a careful thread selection.  It was Glide thread in Khaki for the win!

Don't You Love That Green/Purple/Turquoise Batik?  And the Orange/Red with Turquoise Spots?!

The thread I chose, Glide in color Khaki, is a warm beige neutral with just the barest hint of green-gold.  Glide has a bit of a sheen to it, so Khaki mimics a metallic thread against the deep navy blues and blacks, but is much less flashy (and less finicky!) than a true metallic thread.

Tuesday, September 8, 2020

LAL#6: The One Where the Dog Ate My Blog Post


No, I haven't quilted anything since last week, but LOOK AT THE PUPPY!  😍


No, Sam didn't REALLY eat my blog post.  I'm just using cute puppy pictures to (hopefully) distract you from what a bad example I'm setting, hosting a linky party that's supposed to be about spending some time each week experimenting, learning, or practicing machine quilting, and here I have nothing to show for myself.  In my defense, I have been throwing that orange ball around the back yard A LOT, and having to fetch it out of the neighbors' yard more often than I would care to admit because I have no aim whatsoever and I keep throwing the ball over the fence...

It's not the puppy's fault at all.  I just spent more of my time piecing and following new design ideas down rabbit holes rather than quilting last week. I've finished all of the curved piecing my Modern Baby Clam Shells quilt top and am currently adding borders and trying to decide what to do about the backing fabric being smaller than I thought it was (I stopped to write this post when I realized tomorrow is Tuesday again) while I wait for the butterfly print fabric to come in the mail.  

I picked my thread color for the outreach veteran's quilt, wound a couple of bobbins, threaded the machine, and swapped out my ruler foot for my new scoop foot.  Then I gave the hook race a nice cleaning and oiling and got the pantograph set up for quilting.  SURELY I'll get it quilted by next Tuesday!

Last week, I especially enjoyed Andree's Pinwheels and Stars free motion quilting progress:


I also admired Chris's curved crosshatching and perfectly round quilted circles on this table topper:


This makes me want to get my rulers out again and do some custom quilting, but I have to work through my backlog first.  Veteran's quilt, clam shell quilt, and baby quilt not yet started, all needing edge to edge pantograph quilting, and THEN I can explore some more custom quilting!

To Do This Week:

  • Quilt pantograph on Veteran's Quilt
  • Finish borders & fix backing shortage for Modern Baby Clam Shells
  • Finalize design for baby brother quilt & purchase fabrics

I'm linking up today's post with To-Do Tuesday at Home Sewn By Us.  What have YOU been quilting this week?  Link up below!


You are invited to the Inlinkz link party!

Click here to enter

Saturday, August 15, 2020

Another MMBB Block Completed + Best Tricks for Binding Breakthroughs

I finished the last sampler block that was in progress on my cutting table, clearing up the space I needed to finally get my Sermon Scribbles (nee Spirit Song) quilt trimmed up and ready for binding!


That makes a total of 12 out of 48 blocks finished for my version of the Moda Modern Quilt Blocks sampler.  


The blocks are laid out on the design wall now according to where they will be positioned in the finished quilt.  I've completed 25% of the blocks, but I predict smooth sailing with the remaining 36 blocks.  Those enormous blocks were a bear to cut and piece with taped-together templates and foundation paper piecing patterns!

With the MMBB blocks done and off the cutting table, I was able to trim my Spirit Song Sermon Scribbles quilt, attach the quilt label, and start on the binding.


With this quilt's fairly flat Quilters Dream Select Cotton Batting, I cut my binding strips 2" wide and sewed them to the front of my quilt with my walking foot and a 1/4" seam allowance.  Found a new use for my favorite Omnigrid Glow Line Tape, by the way.  My Bernina walking foot has quarter inch reference lines etched on the toes, but they are difficult for me to see easily when the bright LED lights are reflecting off the shiny metal surface of the foot.  I slapped a little piece of yellow Glow Line tape on that right toe to help me keep the raw edges of the quilt and binding perfectly aligned for a 1/4" seam around the perimeter of my quilt.

Tuesday, April 21, 2020

Spirit Song Quilting Commences: Monofilament Invisible Stitching in the Ditch

Good morning and happy Tuesday!  My quilting goal for the past week was to complete all of the SID (Stitch in the Ditch) quilting along the seam lines of my Spirit Song quilt.  I'm about halfway there as of when I switched off the machine last night.


Invisible Monofilament SID Halfway Completed
For the SID work, I'm mostly using my 2 1/2" x 6" Quilter's Groove ProMini ruler, with Nexcare clear first aid tape on the backside of the ruler to reduce the slip-and-slide action without sacrificing visibility.  I also have the larger 10" version.


10 inch Pro and 6 inch ProMini Rulers from Quilter's Groove, Lisa Calle's Ruler Line
What I love most about Lisa Calle's Quilter's Groove line of rulers is that they all include helpful reference lines.  As I'm using this ruler for my SID work, I'm using those perpendicular straight lines and 45 degree angle lines on the ruler to line up with my piecing lines, helping me to keep the edge of the ruler nice and straight a quarter of an inch away from the stitching line.  I have a couple of other straight rulers without these reference lines that I bought before I took Lisa's ruler class, but this little ProMini has become my favorite.


How I Use the Ruler's Reference Lines for SID Quilting
You can see in the photo above how my palm, ring finger, and pinky are all resting on the surface of my quilt and acting as a "brake" in case that ruler decides to slide from the pressure of my hopping foot riding along the ruler's edge.  In the closeup below, you can see those etched lines on the ruler that I've aligned with my piecing seams to keep everything nice and straight as I'm stitching.


The Markings Are What Make These Rulers My Favorites!
And of course, when SID is done well and stitched in invisible monofilament thread, it truly disappears into the quilt, providing structure and support kind of like how a good foundation garment can make you look so much better in your dress!


Invisible Stitch In the Ditch: The Wonder Bra of Quilting!
...But from a distance, it looks like I haven't done any quilting yet at all:


Tedious, Invisible, But Crucial
SID takes a LONG TIME, and it doesn't give you that instant gratification of seeing your quilt transform before your eyes with beautiful designs and texture.  Done well, SID should be invisible -- we don't want to see those stitches at all, which is why I'm using Superior's Monopoly invisible monofilament thread in my needle.  By doing all the SID quilting first, I'm doing two things: First, I'm stabilizing my quilt and locking the three layers (quilt top, batting and backing) together with all of these seam lines as straight as possible and the edges of the quilt perfectly square.  That's going to drastically reduce the potential for things shifting and getting stretched out of whack during the fun quilting that comes later.  Also, SID along the seam lines gives more definition to the piecing lines, subtly accentuating those crisp points I worked so hard to create.  If I skipped the SID, the seam lines would actually puff UP after surrounding areas had been quilted down, which would have the opposite effect of obscuring or diminishing the piecing lines.  


Those Needle Holes Will Close Up When the Quilt is Washed
In the above photo, I've stitched on the low side of every one of those seams except the vertical seam between the yellow and hot pink fabrics at top right that extends down to the lower right corner between the mustard color print and the pink daisy print.  SID sinks the seam lines down into the quilt, but the only way to know the stitches are there are the needle holes (those will close up when the quilt gets washed).


Love Seeing the Backing Fabric Starting to Wrap Around the Pickup Roller!


I love seeing the backing fabric start to peek around the pickup roller at the back of my frame as the quilting progresses enough to advance the quilt!

I probably would already be done with the SID if I hadn't had a tension snafu.  Despite having tested and adjusted tension off to the side of my quilt before starting, I noticed with the first advance of the quilt that I had some flatlining (top thread too loose or bobbin thread too tight, causing the bobbin thread to lay flat on the back of the quilt rather than meeting the top thread in the center of the quilt batting to form a balanced stitch) on the back.  


Poor Tension, Bobbin Thread "Flatlining"
In this case, I knew my bobbin case tension was already set very loose (TOWA 150-ish and bypassed the little pigtail guide on my bobbin case) for my Bottom Line bobbin thread, so the upper thread was definitely the culprit.  I'd loosened it so much that it was being pulled all the way through the batting and the backing fabric, creating little loops that suspended a straight line of bobbin thread along the surface of the backing fabric.  I think my monofilament was getting caught on the edge of my thread net at one point, creating resistance, and I loosened my top tension repeatedly to try to "solve" that before I realized that it was a thread path issue.  Whoops!


So anyway, these really lousy tension stitches are very easy to remove from the backing side, just snip at either end of the bad stitching line and pull; the thread comes right out in one piece.  However, after pulling out the bad stitches on backing side, I had a horrible time figuring out which of my invisible seams had been ripped out and needed restitching when I got back to the FRONT of the quilt!  Really all I could see were the needle holes to begin with, and the bad stitching left holes that looked exactly like the good stitching.  I had pulled out the bobbin thread from the bad stitching, but the top thread still needed to be pulled out and clipped away in some cases...  I had to check EVERY STINKING SEAM, and I accidentally requilted a few seam lines by accident because I thought I'd pulled out the stitching there even though it was perfectly fine -- just couldn't SEE it.  Major time suck!  


Testing, Testing, 1, 2, 3...

These string pieced scraps, above, were good for testing stitch tension as well as for a quick refresher on SID, since I haven't done anything with my quilting machine for a few months.  It's also a good way of previewing what my thread is going to look like on a variety of different fabric prints.  I'm using the clear monofilament thread rather than the smoke because most of my fabrics are light colors, but the clear monofilament is slightly visible on the darkest blue fabric strips.


Not Quite 6 Months Old, Already 70 lbs of Sweetness!
This post has been a particularly boring one, even for me, so I'm ending on a high note with a puppy picture of my little Samwise Puppy-Pants.  He'll be 6 months old in 10 days, and this morning he weighed in at a whopping 70 pounds of sweetness!  :-)

So, what are my sewing goals for the coming week?


Tuesday To-Do List:

  • Finish SID quilting on Spirit Song
  • Change needle from 3.5 (for monofilament thread) to either 4.0 (for Bottom Line 60 weight or So Fine 50 weight thread) or 4.5 (for King Tut or YLI 40 weight cotton quilting thread), rethread machine (thread path is different from monofilament), and adjust tension as needed
  • Begin additional straight line ruler work quilting with thread that is meant to be seen!
Stay safe, everyone, and happy stitching!  I'm linking up today's post with:


·       To-Do Tuesday at Home Sewn By Us
·       Let’s Do Some Ruler Work at The Quilt Yarn
·       Midweek Makers at Quilt Fabrication
·       Wednesday Wait Loss at The Inquiring Quilter

·       Tips and Tutorials on the 22nd at Kathleen McMusing

Thursday, April 16, 2020

Spirit Song On the Frame, ALMOST Ready to Quilt... Of Partial Floats, Frame Design and Texas Hold 'Em Brackets

Spirit Song Quilt On the Frame, Top Fully Floated
Good morning, Happy Thursday, Happy Easter, and Happy Passover!  The Spring holidays have been different for sure this year, haven't they?  I got this far with loading my Spirit Song quilt on Easter Sunday before sitting down to dinner with my family, but then I had to switch gears and figure out how to sew a face mask for my son to wear to work at the grocery store for his 6 AM shift on Easter Monday.  I've been working on making more masks for the rest of my family for the last few days, while Spirit Song looked at me mournfully from across the room, whimpering "PLEASE come and quilt me!!!"

59 x 75 Quilt Top Loaded Sideways, Ready to Go

[Holy moly -- I did not realize how badly my DIY PVC light bar was bowing in the center until just now, looking at the photo!  There was a slight bowing from the weight of the light fixtures when my husband Bernie first installed it a couple years ago, but it has gotten significantly worse!  Bernie has promised to replace the PVC pole with steel and possibly upgrade the light fixtures themselves, so stay tuned for a "DIY Light Bar Version 2.0" post one of these days...  It works for now, and changing it is a project for another day when there is no quilt on the frame!]

Loading a Quilt on My APQS Machine, Fully Floated Quilt Top Method with Texas Hold Em Bracket & Quilt Top Roller Removed

Since there are long spans of time between loading quilts on my frame (while I'm busy doing piecing, applique, sewing face masks, learning choir music, puppy training, parenting, or trying in vain to get "caught up" with laundry...), I find myself wanting a quick refresher each time I'm FINALLY ready to get a quilt on the frame again.  It's not a difficult process by any means; I'm just not yet at the point where I can do this with my brain on "autopilot."  Seriously -- it is much faster (and easier on my back, knees, neck, and fingers!) to load a quilt on a longarm frame than it is to crawl around on the floor or bend over a table, basting the quilt layers together with safety pins spaced 4" apart for quilting on a sit-down machine!  My loathing for pin basting was a primary motivator for moving up to the longarm machine.

The video tutorials from APQS and others on YouTube that walk you through loading a quilt are great in the very beginning, but now that I just need a quick review of one or two things the videos seem to take forever to get to the part I want to see again.  So this post is my own personal photo reminder of "how did I do that last time?"  And I'm giving myself this link to the APQS Blog post where they review the basics of loading a fully floated quilt top here.  Wish I'd found that right away on Sunday, before rewatching an hour and a half of videos to get the information that I could have gotten in 2 minutes from rereading the blog post!  As always, I encourage any readers who are more experienced longarm quilters to share their own best practices and suggestions in the comments.  I have learned SO MUCH from all of you.


APQS Texas Hold 'Em Bracket In Place of Quilt Top Bar
As you can see in the photo above, I've completely removed the quilt top roller bar from my frame and replaced it with the APQS Texas Hold 'Em Bracket (that little partial pole that enables my hand brake to function properly without the quilt top roller bar on the frame).  I took the quilt top roller bar off because:

  1. I had not been using it, since I am (so far) getting good results fully floating my quilt tops (rather than pinning the bottom of the quilt top and rolling it up on the quilt top bar).
  2. The position of the quilt top roller bar on the APQS frame gets in my way, especially if I'm quilting with rulers.  Since that bar sits up above the surface of the quilt, it lifts my left wrist at an uncomfortable and ergonomically icky angle when I'm holding rulers in my left hand, whereas WITHOUT that bar I can hold my ruler with my wrist in a straight, neutral position.
See How the Quilt Top Roller Lifts My Elbows and Shoulders?
The photo above is from 2017, right after I got my longarm machine, and I have solid yellow fabric loaded for practice (partial float, so it IS pinned to and rolled up on that quilt top roller).  If I had been using quilting rulers, my right hand would still be on the right handle of the machine, but my left hand would be reaching over the quilt top bar to hold the ruler flat against the surface of the quilt.


Quilt Top Roller On the Frame, Not Doing Anything But Still in My Way
Then, in the photo above of my Tula Pink Disco Kitties quilt, you can see how the design of the APQS frame puts the quilt top roller in your way regardless of whether you're using it or not.  Compare that to the design of the Bernina longarm frame, pictured below.  At the front of the machine, you still have the backing roller bar right at the level of the quilting surface.  But instead of the quilt top roller bar sitting above that, Bernina put the quilt top roller bar BELOW the backing bar -- a much better design for custom quilting from the front of the machine.  Note that, if I was quilting mostly edge-to-edge paper pantographs from the back of the machine, or mostly computerized quilting, the position of the APQS quilt top roller bar would be just fine and possibly easier to reach for a partially floated top, or for smoothing batting each time the quilt is advanced.  I've never actually quilted a whole quilt on any other frame but my APQS Millennium frame, and these are the kinds of preferences that you can't really discover when you're test driving a quilting machine at a dealership or show booth.  
Quilt Top Roller On Bernina's Q24 is Positioned BELOW Backing Roller

So now of course, I'm curious -- are there any disadvantages to this frame style that I'm not aware of?  Bernina Q24 owners, how difficult is it to load a quilt on your frame?  Does that bottom quilt top roller pivot so you can get to the batting between the layers when advancing your quilt?  Any drawbacks?  Those of you who have owned different brands of longarm machines over the years, and those who currently own Bernina, Innova, A-1, HandiQuilter etc., I'd love to hear how those manufacturer's frame designs make certain aspects of the quilting process easier or more challenging for you.  Let me know in the comments!
Meanwhile, back to my Millie.  I bought a set of zippers for my leaders right away when I bought my longarm a couple years ago, but haven't gotten around to installing them yet.  Hence my old school pinning continues -- I've kind of gotten the hang of it and, with my slow-as-molasses creative process, I am not loading quilts so frequently that the zippers would save me that much time right now.  


Lining Up Top Edge of Quilt Top With Stitched Horizontal Reference Line
Again, reminders to self here: The top edge of my batting was ragged and uneven when I laid it out and smoothed it over the loaded backing fabric, ensuring that I had it centered and there was sufficient batting length hanging down at the front of the frame to accommodate my entire quilt.  Then, engaging the horizontal channel lock (a feature I couldn't live without!), I quilted a perfectly straight horizontal line across the top through the batting and backing fabric.  I left the blue variegated King Tut thread I'd been playing with on the machine for that,  because I've made the mistake in the past of stitching this visual reference line with monofilament thread and it is not so easy to line up the top edge of my quilt top to an INVISIBLE reference line!  After stitching that perfectly straight reference line, I carefully trimmed away excess batting approximately 1/2" above the stitched line to eliminate uneven bulk when the quilt rolls up and to reveal where my pins are positioned (I'm slightly less likely to stab myself with pins that I can see).


Quilt Top Not Attached to Any Canvas, Not Rolled Up -- Just Smoothed and Basted to Batting+Backing
I've marked the center of my backing fabric with a dark pencil mark on the selvage (it gets trimmed away anyway) and there's a corresponding white chalk mark (barely visible in the photo but I could see it well enough in real life) indicating the center of my quilt top.  I match those centers and then smooth the quilt top onto the batting, working my way out from the center and keeping the edge of the quilt top aligned with the blue stitched reference line:


Straight Top Edge, Centers Aligned
This batting was a few inches longer than my backing fabric, but I waited until after loading it to trim it on the frame to eliminate the possibility of an "I-cut-it-twice-and-it's-still-too-short" situation.  I've loaded my 59" x 75" quilt top sideways (so I can see and quilt more of it at once and have fewer stops/starts for advancing the quilt), so that excess batting length was excess WIDTH on the frame, extending beyond the edges of my backing fabric.  Once I had the quilt top in place, centered and straight, I carefully trimmed the batting excess on the sides so that it's just inside the backing fabric where my side clamps will attach.  I still have plenty of excess batting and backing at the sides of the quilt where I can throw down a scrap of fabric to do practice stitching and tension tweaking throughout the quilting process.


59 x 75 Spirit Song Quilt Top Fully Floated, Ready to Quilt
At this point, I stopped to change my needle from the 4.5 size that I like for King Tut 40 weight cotton thread to the 3.5 size that I like for ultra-fine Monopoly invisible monofilament thread.  I rethreaded the machine with Monopoly, did some test stitches off to the side in the extra batting/backing area, and adjusted my top tension as well as my bobbin case tension (TOWA gauge reading of about 150 for my Bottom Line bobbin thread is where I finally was happy with my stitches, top and bottom, with monofilament in the needle -- this is a smidge lower than the 170-200 range that Superior recommends for Bottom Line).  


Excess Batting and Backing is Great For Testing Stitch Quality
And then, happy with my stitches, I through a scrap of fabric that was pieced from strips down and did a quick refresher practice of stitching in the ditch.  


When Tension is Just Right, Monofilament Looks Like Perfectly Color-Matched Thread
I love how monofilament hides the boo-boos, when my stitching line accidentally veers across a seam line and it would be oh-so-painfully obvious if I'd used any other thread.  See below -- the camera is zoomed way in on this shot; that's why the quilting cotton fabrics look like burlap:


Monofilament Looks Like Blue Thread on Blue, But the Mistake Disappears Like Pink Thread on Pink
Happy with those stitches on the top, I lay a couple sheets of paper on top of the quilt (to block light shining down through the needle holes) and crawl under the quilt frame with a flashlight to see what the stitches look like on the backing side of the quilt.  


Magnified Backing View Showing Starting Tension (Top Left) and ending tenion (Bottom)
I can feel the REALLY bad tension by running a fingernail along the stitching line to see if my nail catches along little loops or nubs of top thread that is being pulled too far to the backing side, but I want to actually see the stitching on both sides with my eyeballs to fine-tune the tension before I start stitching on my actual quilt.

So today, I'm ready to actually baste down the top and side edges of my quilt and start quilting in the ditch (SID=Stitch In the Ditch).  I'll use my vertical and horizontal channel locks to ensure that the quilt top edges, as well as vertical and horizontal seam lines within the quilt, are perfectly straight (or as straight as possible if they weren't pieced perfectly straight to begin with) before I stitch them down, but (aside from the blue border seams), the only seams I'll be SID are diagonals shown in green below:  

Green Lines Indicate Where I'm Planning to SID

One More Important Note to Self: Even though I've removed the quilt top roller bar from my frame, which makes it look like I have a much bigger working area to quilt in, the machine still can't come any closer to my tummy when the machine throat hits the takeup roller at the back of the frame.  


This Is As Far Forward as Millie Can Go Before Her Throat Hits the Takeup Roller at the Back of the Frame
I remember from my last quilt that, without the quilt top roller on the frame as a visual reference, I repeatedly misjudged how far I could quilt towards myself before the machine throat hit the back roller, resulting in a smooth curved line of stitching that suddenly turned in into a straight line veering off to the right or left.  


There's a Six Inch "Dead Zone" From the Backing Roller to the Furthest Point the Machine Can Stitch
All the way across the frame, there's a 6" "Dead Zone" between the inside edge of the backing roller and the furthest point that my 26" Millennium machine can reach to stitch.  Ergonomically, that means that the area where I CAN move the machine for quilting is 6" farther away from my body than it needs be, due to the design of the APQS frame.  This makes me want to measure the "dead zone" on other model frames, especially the Bernina frame, to see whether my quilting area would be closer to my body with those machines for more comfortable quilting that puts less stress (from reaching) on my shoulders, neck, and upper body.  But I'm not planning on buying a different longarm machine any time soon, especially with the whole world's economy suddenly sucked into the black hole of COVID-19!  

So, for the time being, until I get better at eyeballing how far towards myself I can stitch before I need to stop and advance the quilt, I'm planning to address this challenge in a couple of ways: I can either run a horizontal line of basting stitches right at that "invisible wall," or I'll slide the machine across the quilt without stitching and put little chalk marks, pins, or something else that I can see to remind me of where my machine's needle can and cannot reach. 

Once again, this blog post has dragged on and on -- and I didn't even show you any of my cute little face masks!  I'll save those for another day, because I'm dying to start quilting Spirit Song.  


My one and only To Do for Tuesday goal this week is to complete the monofilament SID quilting on Spirit Song. 

Anything else that happens is pure gravy!

And now, for those of you who have been patient enough to stick with me throughout this long and boring blog post, you get rewarded with PUPPY PICTURES!  Here's a picture of Samwise the Brave at 5 1/2 months, wearing his cute little Julius K-9 Powerharness with custom Velcro patches that say "ASK TO PET ME" on one side and "SAMWISE" on the other:  


Sam in His Julius K-9 Power Harness with Custom Patches
I bought Sam's harness from our wonderful local pet supply store, but you can also get one directly from the manufacturer's U.S. distributor on Amazon here.  You can also order the custom patches from the manufacturer through Amazon here.  It is so hard to get a picture of this squirmy little guy that isn't blurry!  


Samwise the Kissy-Face Rottweiler Puppy
He weighs 67 pounds now and he has an awesome personality -- super friendly, loves animals and people of all sizes, all colors, and all ages, yet when there's a really bad storm like we had on Easter Sunday this courageous little Rottweiler puppy stands his ground and BARKS BACK at sky when the thunder booms -- he's fearless!  It's so funny, and much better than trying to calm a dog who has thunderstorm anxiety (Been there, done that with the golden retriever we had when we were first married).


Side View.  Why Aren't We Going Anywhere, Mommy?  Enough With the Pictures!!
I love this harness for Sam.  It's designed for working dogs (police, search and rescue, service dogs etc.) so it's durable, comfortable, and doesn't restrict his movement.  There's a handle that can be buttoned down if he was running off leash, to prevent the handle from catching on branches in the woods, but otherwise the handle is a much better way to get control of him when he needs to be held back from our 9-year-old dog who isn't always feeling as frisky and playful as Sam is.  And that big ring just below the handle clips onto a seatbelt adapter tether for the car.  Now I can take Sam with me in the back seat of my convertible, knowing that if he sees an interesting family of geese when I'm stopped at an intersection, or if I have to slam on the breaks or, God forbid, get into an accident, my dog will not go flying out of the car or strangled by a tether or leash attached to his collar.

I like this harness so much that I ordered one from Amazon for Great Aunt Lulu as well:


Lulu's Harness, Coming Soon from Amazon for My Favorite Rottie Princess!
How cute is that?  She'll have patches that say her name on one side and "ASK TO PET ME" on the other side, just like Sam's harness.  Lulu is a huge people-lover whose favorite thing on Earth is meeting strangers who want to pet her -- but she's a 98 pound, full-grown Rottweiler, so people can't tell she's friendly just by looking at her.  Bernie mentioned to me that, when he takes the puppy to Lowe's or to the Auto Zone store, everyone comes over to pet him, but when he takes Lulu, people seem to assume that she's not friendly and keep away.  They say that clothes tell a lot about a person, and I think that's true for dogs as well. I'll be interested to see whether Lulu gets more attention from strangers when she's wearing her pink "Flower Child" harness!  


Our 9-Year-Old Rottie, Princess Lulu: "I'm Not Bad; I'm Just Drawn That Way"
I'm linking up today's post with:

·       To-Do Tuesday at Home Sewn By Us
·       Midweek Makers at Quilt Fabrication
·       Wednesday Wait Loss at The Inquiring Quilter

·       Needle and Thread Thursday at My Quilt Infatuation