Showing posts with label So Fine. Show all posts

Thursday, November 30, 2023

Mary's Turquoise Stars Quilt, Preeti's Syzygy Quilt + December Quilting Goals

Good morning, quilting friends!  I have a folder on my computer desktop containing a huge backlog of gorgeous clients' quilts waiting to be shared with you, and every time I open that folder I waste at least 45 minutes trying to decide which quilts deserve to be chosen for their moment in the spotlight.  When I started long arm quilting for clients I was really good about posting each finish right away, but either I quilt too fast (not!) or I write too slow (more likely!) and at this points I have photos of at least 150 quilts in that folder and more photos of more quilts get getting added every week...

The quilts I'm sharing today were both quilted quite awhile ago and I can't believe I never wrote about them because I LOVE them so much.  Without further ado:

Mary's Turquoise Stars

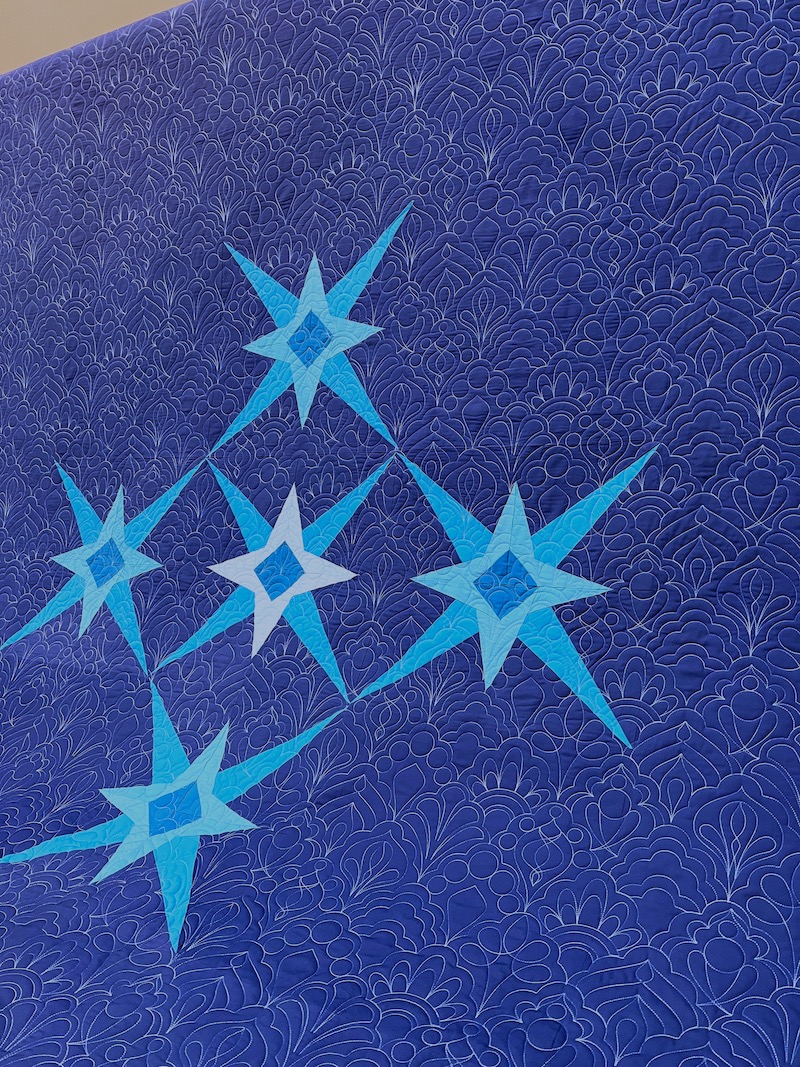
Mary is one of my favorite clients to quilt for -- she ships her quilt tops to me all the way from New Mexico even though there must be a thousand long arm quilters closer to her, she chooses striking, modern patterns and beautiful fabrics, and she often reinterprets the pattern creatively to create something fresh and unique, as she did with her Turquoise Stars quilt, shown below.  Mary used the star block from the Chevron Star Quilt pattern by Lee Heinrich Designs (formerly known as Freshly Pieced, available here on Etsy (this pot contains affiliate links).  

Mary's 67 x 87 Turquoise Stars Quilt with Billowy Combo E2E Quilting

One reason I didn't share this quilt immediately is that I was frustrated with my inability to get accurate color representation in my photos -- I was probably taking these shots late at night and trying to color correct in software, with limited success.  Mary's fabrics for this quilt are Art Gallery PURE Solids, and her background fabric is a deep, muted navy blue with a gray undertone called Night Sea.  The color is a little better in the photo below, but it's still too vivid and royal blue looking: 

Billowy Combo Custom Layout E2E Quilting

More to love about Mary: She lets me do fun things with the quilting!  Instead of just picking one allover E2E ("edge-to-edge") quilting design for Turquoise Stars, I combined nine different design motifs from Karlee Porter's "Billowy" collection, setting them up to alternate in three separate rows.  It took a lot longer to set that up in the computer, but it essentially created a larger scale design repeat, exceeding the depth of the throat of my long arm machine even, that creates more interest in the vast negative space of Mary's quilt than we would have if we'd chosen just one of these motifs to repeat over and over again across the entire surface of the quilt.

Thursday, November 18, 2021

Megan's Vintage Kaffe Fassett Shot Cottons + Curly Weave E2E Equals Magic!

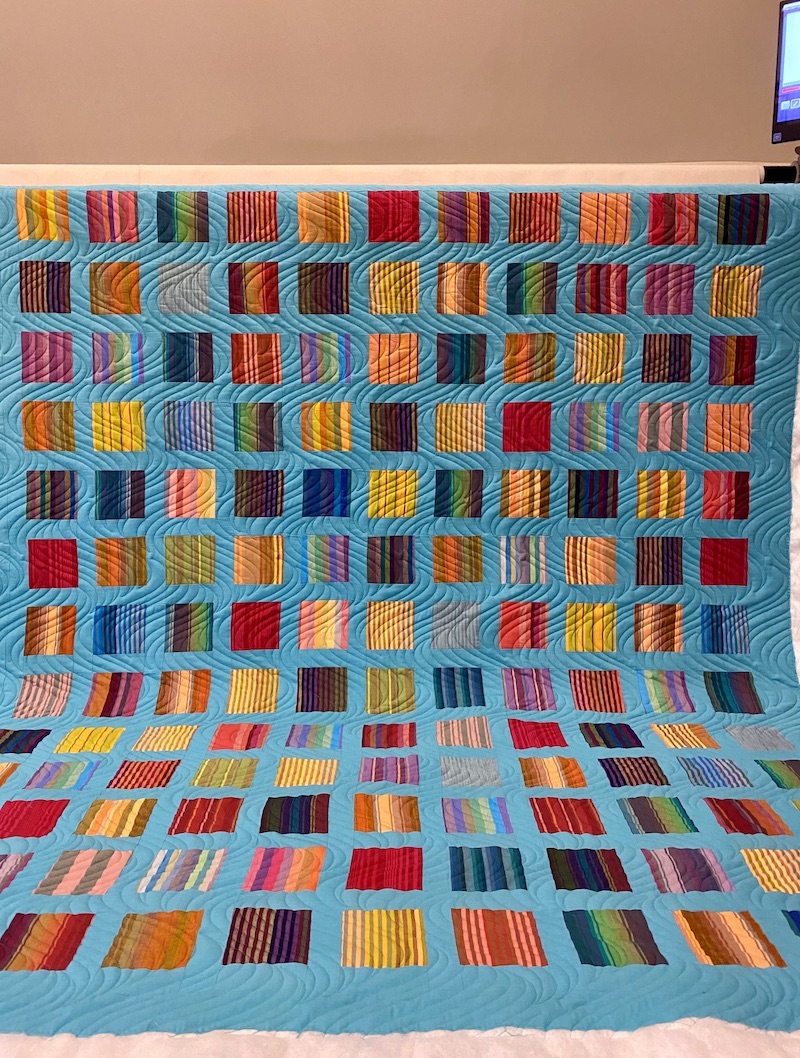
 I don't normally post a client's post before they get it back from me, but my client Megan was so excited by the "teaser photos" I emailed her of her finished quilt that she gave me permission to post them right away.  If she loves this quilt now, I can't wait until she sees it in person because it is just unbelievably soft and cuddly and even more gorgeous in person than it looks in the photos!

Megan pieced this striking quilt using vintage Kaffe Fassett shot cotton stripes (affiliate link -- you can still find these on Etsy!) that she's had in her stash for awhile, and when I saw the pictures of her quilt top I was instantly smitten by the way her unexpected cool turquoise sashing and binding fabric contrasted with the mostly warm, autumnal tones of her striped fabrics. So much energy and life in this pairing, don't you agree?

68 x 78 Shot Cotton Swatches Quilt with Curly Weave E2E Quilting

I was delighted when Megan decided to go bold with her choice of quilting design, playing up the modern vibes instead of going with something "safe."  

Tuesday, November 16, 2021

Sarah's Chevron Memory Quilt, Lazy Day Quilt Progress + Pineapple Nostalgia Quilt Back from the Cleaners

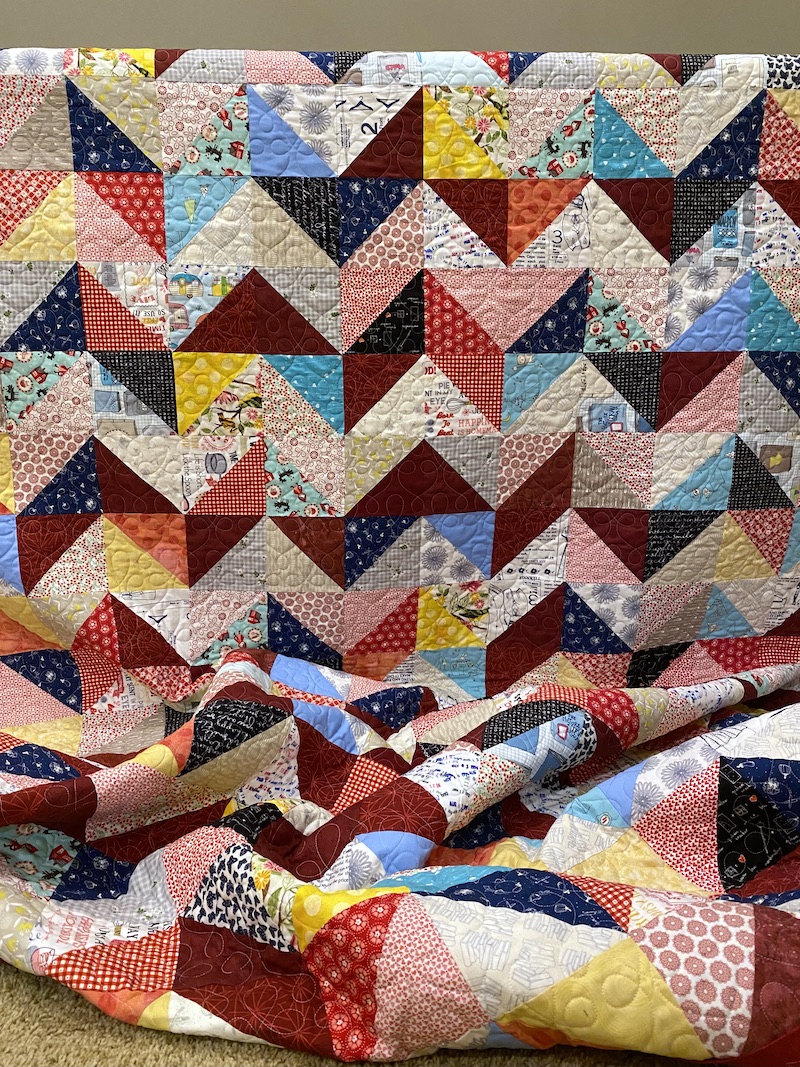
Good morning and happy Tuesday, friends!  I have so much to share with you today, so let's dive into it.  First up is a lovely, snuggly flannel-backed Chevron Memory quilt that my client Sarah made in remembrance of her grandmother.

Sarah's Chevron Memory Quilt

70 x 90 Chevron Memory Quilt with Filigree E2E Quilting

Sarah pieced this quilt while working through the flood of emotions following the sudden passing of her beloved grandmother, incorporating some of her clothing into the quilt top and pieced backing as well as new fabrics with novelty print themes that reminded her of her grandmother.  We chose the Filigree pantograph design because it reminded Sarah of her grandmother's lace tatting and I knew it would give Sarah the loosely quilted, old-fashioned feel she wanted for this project.

Sarah's Pieced Backing, Flannels and Regular Wovens, with Filigree E2E quilting

Okay, so when Sarah first reached out to me about this quilt, she warned me that it was only her second quilt ever when she started it three years ago, that it was "full of flaws" and learning experiences, etc.  I was bracing myself for there to be challenges for me to work around -- and then this beautifully pieced top and pieced backing showed up in the mail.  

Sunday, July 19, 2020

Sunday Spirit Song Quilting

Background quilting is coming along on Spirit Song!  I'm now about 25% of the way finished, and I'm learning a lot along the way.  For instance, I quilted the wrong fill pattern in several patches while I was talking to a friend on the phone, but I'm leaving it because I doubt I could rip out such dense stitches without ripping the quilt fabric, and probably no one but me will notice in the finished quilt.  I am enjoying seeing how the quilting designs transform the flat, smooth surface of the quilt top with an "embossed" texture.  I don't remember whether I shared which thread I ended up choosing for the background quilting -- I went with So Fine #50 in the needle and Bottom Line in the bobbin, the same combination I've been using throughout the rest of the quilt.


Saturday, June 27, 2020

I'm Thinking About Launching a NEW Long Arm Linky Party! Would YOU Participate?

Good morning, my lovelies!  Before I share my custom quilting progress on my Spirit Song project, I'd love it if you'd take a second to give me feedback on an idea I've been kicking around for a new linky party.

When I tried to link up my last quilting post with Karin's Ruler Work linky at The Quilt Yarn, I was disappointed to read that she has decided to discontinue hosting her link-up due to low participation levels.  Like many of you, I already participate in quite a few linky parties (One Monthly Goal, Design Wall Monday, To Do Tuesday, to name a few).  I love that these parties attract a wide variety of participants, from hand quilters to longarm quilters, modern to traditional, appliqué, paper piecing, and everything in between.  I have discovered lots of creative quilt bloggers and inspiration through these link-ups.  

However, right now I'm making a concerted effort to develop my long arm quilting skills, and it would be really helpful to connect with a community of other machine quilters who are working through similar challenges.  I'm always so excited when I stumble across another long arm quilter's blog, whether it's a seasoned professional quilter, a teacher, or a hobby quilter like me.        I want to see and read about the different rulers, notions, and gadgets other quilters are experimenting with and finding useful for machine quilting, which threads and battings they are using and how they like them, and the challenges they are encountering and overcoming as they become more proficient with their machines, where they are finding the best online or in-person classes and workshops, etc.  Also, although I'm quilting with a long arm machine mounted to a frame, I realize that there is a lot of crossover between machine quilting on a frame, sit down long arm machines like the Sweet 16 or the Q20, and quilting with a domestic sewing machine.  This would be an all-inclusive linky party, open to anyone who wants to share their machine quilting, regardless of what kind of machine they're using.


I understand that hosting a linky party is a big ongoing commitment, with even more time required in the beginning to get the word out to other quilters.  I am willing to take this on, as long as there is interest out there from other quilters -- so please answer my poll (above) to let me know how YOU feel about it.  Feel free to share any other suggestions about the linky party in the comments section, like if there's a particular day of the week you prefer, how long you think the link party should be open, etc.  Thank you!

...And Now, Back to the Quilt On My Frame:


Meanwhile, custom quilting on Spirit Song is progressing, slowly but surely.  I've been pretty consistent about getting in an hour or two of quilting time most days.  I finished the first long border a few days ago (my quilt is loaded on my frame sideways, so the "top" is really one of the long sides of the quilt).  


I know it's hard to see my quilting design against the large-scale floral print, so youmight think of all this time I'm spending quilting the borders with rulers as a wasted effort.  But it's really good practice, and it's nice to know that if I DO get a minor bobble or "whoopsie!" here or there, it's not going to jump out at anyone because it's camouflaged by the fabric print.


Chalk Stencil Marking for String of Pearls Border

Since I opted to use blue quilting thread in my wide outer border, I moved right into the skinny blue inner border after that.  And I'm being BRAVE -- I'm trying to quilt a "String of Pearls" in this border -- half inch circles!  In order to bolster my courage, I am marking the circles with a Full Line stencil and Quilt Pounce Stencil Chalk as a guide to help me quilt pearls that are somewhat round, consistent in size, evenly spaced, and to ensure that I end with a full circle when I come to the corner.  Interestingly (and thankfully!), the pounce chalk powder markings are lasting longer with this border design than the exact same chalk powder did for the swirly free motion designs that I was marking in the interior of the quilt.  Several possiblilities for why that might be:

  • I'm using a commercially made Full Line stencil for my String of Pearls border rather than a DIY vellum paper stencil perforated with a sewing machine needle.  This stencil has a very fine mesh with very tiny holes that allow the chalk through the stencil in more controlled amounts.
  • The pieced blocks in the interior of my quilt got a shot of starch after each and every seam was pieced and pressed open, and again as the blocks were joined together into a quilt top, whereas the blue border was only starched once after the border was attached to the quilt.  The interior of the quilt, where the starch was applied in many layers, may have filled in the nooks and crannies of the fabric weave and created a Teflon-like nonstick finish that the chalk can't settle into as well as it does with the only slightly starched border fabric.
  • I am quilting my pearl circles pretty slowly in an attempt to keep them round, and I feel like my quilting machine creates less vibration and bounce to the quilt top at this slower speed, and that may be contributing to the longevity of the chalked markings as well.
For whatever reason, I'm very much relieved that I was able to mark the entire length of this pearl border first and then quilt it in one pass, from corner to corner, and still have clear, distinct circle marks to follow when I reached the end.  

Experimenting With a Smaller Needle

One more thing I changed last night: I put in a new needle -- again! -- and this time, I went with a size 3.5 Groz Beckert industrial needle rather than the 4.0 needle I had been using previously with my So Fine #50 in the needle and Bottom Line #60 in the bobbin combination.  Superior Threads has a handy reference chart on their web site that suggests optimal needle sizes for each of their threads, and size 4.0 is what they recommend for So Fine #50, but size 3.0 is recommended for the 60 weight Bottom Line thread that I'm using in the bottom, so I wanted to see what would happen if I split the difference and went down to a 3.5 needle.  It's a subtle difference, but especially when I'm checking stitch quality on the back of my quilt, the stitches do look better to me when that tiny little Bottom Line bobbin thread isn't swimming in a gigantic hole from a size 4.0 needle.  And I'm not seeing any shredding or thread breaks to my So Fine top thread, so the 3.5 needle eye seems to be plenty big enough for the So Fine thread diameter.


Here's what my inner border of pearls looked like once I'd finished the quilting and wiped away the white chalk markings.  Disappointing, right?!  I was really nervous about trying to quilt half inch circles on a real quilt for the first time, and I thought a blending blue thread color would be my safest option.  But now that I've quilted it and it didn't come out nearly as terrible as I thought it would, I'm bummed that I can't SEE the pearls I quilted!  I wish I'd quilted them in silver metallic instead!  Ah, well -- Live and learn!  Perhaps the quilting texture will be more apparent after I wash the finished quilt.  Next time, I'll make bolder thread choices where I want my quilting to be noticed!

I've also started quilting the two different motifs that I selected for my blue half square triangles throughout the interior of my quilt, since I'm already threaded up with blue.  One of the design is a free motion "lollipop flower" with swirly leaves (at least that's what I'm envisioning as I'm quilting it), and the other one is a simple straight line motif that has me reaching for a ruler once again.


When I tried to quilt this little motif totally freehand, the results were not pretty.  If I was a seasoned pro, any straight line ruler would have worked fine.  I quickly realized that, as a newbie, I needed help gauging where my needle would end up in relation to the angle of my ruler edge, especially since I'm quilting lines that angle away from my seam lines.  My HandiQuilter Versa Tool came to the rescue!  This ruler has little quarter inch extension notches at either end of the straight edge, etched with a faint marking to indicate where the needle will end up if your hopping foot stitches along the straight edge of the ruler.  I've added little pieces of pink OmniGrid Glow Line Tape to the back side of those ruler extensions for even greater visibility.


The long strip of wide, clear tape that you see along the straight edge of my ruler is super cheap, but super effective, NexCare Clear First Aid Tape that reduces unwanted slipping and sliding when I'm quilting with rulers.  You can find that at your local pharmacy, or order it on Amazon here.  

Well, that's all I have for you today.  My To-Do for Tuesday goal is to keep plugging away at the borders and blue HSTs on my Spirit Song quilt, and hopefully progress to the final quilting stage of the off-white background fills.  I'll wrap this up with a photo of a lovely gardenia in my front yard.  I love how, when I take a picture of an all-white blossom and then blow it up BIG on my computer screen, I see so many different colors in the petals, from shades of white, cream, and gray, to ivories and butter yellows.  It reminds me of Georgia O'Keefe's flower paintings!  


Please remember to vote in my linky party poll if you haven't already done so, and share any other thoughts you have about that in the blog comments.  Have a great day, and I hope you get to do some quilting!  I'm linking today's post up with my favorite linky parties:

FRIDAY

·       Whoop Whoop Fridays at Confessions of a Fabric Addict

·       Finished Or Not Friday at Alycia Quilts

·       Off the Wall Friday at Nina Marie Sayre


·       Tips and Tutorials on the 22nd at: Kathleen McMusing

SATURDAY

·       UFO Busting at Tish in Wonderland

SUNDAY

·       Oh Scrap! at Quilting Is More Fun Than Housework

MONDAY

·       Design Wall Monday at Small Quilts and Doll Quilts  

·       Monday Making at Love Laugh Quilt

·       BOMs Away Katie Mae Quilts  

TUESDAY

·       Colour and Inspiration Tuesday at Clever Chameleon

·       To-Do Tuesday at Home Sewn By Us

WEDNESDAY

·       Midweek Makers at Quilt Fabrication

·       Wednesday Wait Loss at The Inquiring Quilter

THURSDAY

·       Needle and Thread Thursday at My Quilt Infatuation  

·       Free Motion Mavericks at Quilting & Learning Combo OR at Lizzie Lenard Vintage Sewing

Thursday, May 21, 2020

Stencils for Long Arm Quilting, Part Three: None of the Magic Tricks Are Working

If you've been following along with me recently, you know that I've been experimenting with the use of homemade stencils and chalk powder to transfer quilting designs onto my Spirit Song quilt.  My DIY stencils are made of 24 pound vellum paper that I've stitched through with an unthreaded domestic sewing machine to perforate the design lines, and since I've already completed all of the SID (stitch in the ditch) quilting on this quilt, it's already loaded onto my long arm frame.  In case you're wondering, there is absolutely no way you could use chalk powder to mark an entire quilt PRIOR to loading it on the frame, because the chalk powder is just resting on the surface of the quilt and if you touch it, move the fabric after marking it, or even breathe on it, it's gone.

Such a Quick Method of Transferring a Design!

Here's what I'm finding: When you see these stencils and powdered marking chalk products demonstrated at quilt shows or in online videos, they are usually demonstrating these products on a single piece of fabric that is laying on a table top.  Transferring a stencil design with chalk powder works much better against a flat surface, and I could not consistently achieve a clean, full design transfer unless I had some kind of flat surface pressing up against the bottom of my quilt.  With smaller stencils, I had good results transferring the stencil design with my machine head positioned so that I could support my quilt with the ruler base while transferring the design, but if I was trying to transfer a large design, like a border pattern, I would need to rig something up beneath my frame in order to get a clean transfer of the entire design.

White Zinc Stearate Magic Chalk on Left (Orange) and Pounce Chalk in Blue on right (Yellow)
However, that may be a moot point.  I have now tried both the original white Pounce Chalk product, the blue Pounce Chalk product, and the zinc stearate Magic Chalk that is supposed to stick to your quilt better than the Pounce Chalk product, removing with steam.  [I didn't have a separate pounce pad for the blue chalk, just a bag of the chalk powder to try, which is why I'm applying that chalk with a foam paint brush in the photo above].  You guys, I saw ZERO difference between these products.  If anything, the chalk powders that were supposed to stick better and were supposed to be MORE difficult to remove actually stuck to my quilt surface not at ALL and disappeared even faster!

80% of Magic Chalk Bounced Off As Soon as I Began Stitching
When you are trying to follow a design line that you've carefully marked on your quilt and it's vanishing before you can stitch it, it's very frustrating!  

The Blue Pounce Chalk That's Supposed to be Harder to Remove
I thought for sure the blue Pounce Chalk would stick to my quilt long enough for me to quilt the design, because a few quilters had warned me that they still had some of that blue pigment remaining in their finished quilts that they couldn't remove once the quilting was finished.  I am absolutely mystified by that.  In the photo above, the periwinkle chalk dust is the blue Pounce Chalk that bounced right off my quilt, completely removing itself as soon as I started stitching, and the couple of places where you see more of a teal line are spots where I filled in the incomplete stenciled design with my blue washaway marker.  All of the chalk disappeared the instant I began stitching, and only the marker lines remained.

This Time, I Wet My Fabric Patch Before Applying the Stencil with Chalk Powder
One tip that I'd read about was to mist the surface of your quilt with water before applying the stencil with chalk powder, to make it "grab" the chalk and hold onto it long enough for you to quilt the design.  Well, I can't spray water all over my quilt because I'm also using the blue water soluble marker to mark my ruler work lines and I don't want those lines disappearing on me.  But I did saturate a scrap of cotton batting with water and pressed that into my fabric patch to wet it prior to applying a chalk stencil.  Did this make any difference, though?  Nope!

Still Pretty Hard to See Once I Start Stitching
Theories as to why these products and tips may be working better for other quilters than they are for me:

1. Is there a difference in the amount of vibration between different quilting machines?  Is my APQS Millennium just "bouncier" than Jamie Wallen's HandiQuilter or someone else's domestic sewing machine that they are quilting with?

2. By the time a quilt top is loaded onto my frame, it has been HEAVILY starched.  I starched every seam of every block throughout construction, because starch helps me achieve a flat, square quilt top with nice, crisp points throughout.  But maybe the quilters who are using stencils with powdered chalk to mark their quilts are not starch fanatics like I am.  If we were to compare a heavily starched piece of cotton fabric to an unstarched piece of cotton fabric under a microscope, I'll bet the unstarched fabric has a rougher surface texture that the chalk powder is able to settle into, especially into those tiny holes in between the warp and weft yarns.  My starch has probably filled in those holes and smoothed any microscopic yarn slubs that the chalk powder could have grabbed onto, giving me a nonstick quilt surface kind of like Teflon in a frying pan.

All Stitched Out
I don't know -- now that I'm looking at these photos of the yellow triangle that I dampened with water before stenciling, maybe the chalk DID stay on better during stitching?  That would actually make sense, because wetting the starched fabric makes the layer of starch a little bit tacky to "grab" the chalk.  Maybe I was just having trouble seeing my little white chalk dots against this particular fabric that has such a profusion of dots and splotches all over the place.  Maybe I'll try wetting the fabric before stenciling again on a couple of different fabric patches with the different chalks before giving up and moving on.

These Look Better Than the Ones I Quilted Two Days Ago
One thing I can tell you is that I'm already seeing improvement from the first couple of times I quilted this motif to the ones I quilted last night.  My curls are more consistent on both sides of each triangle, the curly ends are more rounded, and the echo spacing of the curls is more even.  Also, in the places where the stitching IS a little wonky, my blending Peach Tart So Fine 50 weight thread is camouflaging the oopses nicely.

The First Two Attempts at Quilting This Motif
I don't know how obvious this is to other people comparing these photos, but in the one above there were several places where I lost control for a moment and a line that I intended to be smooth twisted away, or a line that I meant to echo back on a curl was super thick in some places and then super thin in others.  It should be interesting to compare these first attempts to the last ones that I will quilt when I get to the bottom of the quilt.

Still Not Great, But Better Than the First One!
In the photo above, the yellow and pink fabric patch is still wet -- that's why you see the seam allowance shadowing through so badly.  It will look fine when it's completely dry.


Still Wet.  From a Distance, Can't Really See Anything Anyway
You know, these crazy prints and my blending thread do a great job of hiding the skips and bobbles, but they also make it hard to see what I'm quilting WHILE I'm quilting it.  It might be better to plan the next quilt so I'm doing these designs on fabric that will show the quilting more distinctly.

Super Bad Tension MUST Come Out!
I also ripped out and requilted some of the bad eyelash stitching that I showed you last time.  A couple of you advised me to leave those stitches in because "no one will ever know," but I know better from experience!  If your tension is off so badly that you have eyelashes on the back of your quilt as shown in the photo above, it's not just an aesthetic issue.  That bobbin thread is just floating against the backing fabric, barely attached with long loops of top thread that were pulled clear through to the back of the quilt.  When you wash that quilt for the first time and it shrinks -- and yes, it WILL shrink, even if you preshrunk all of your fabrics -- you end up with loose thread all over the back of the quilt that will catch and snag and rip right out of the quilt.  Tension that bad is just not "structurally sound."  What's more, these stitches are faster and easier to remove than nice, balanced stitches that lock together within the batting layer of the quilt.  You just clip the beginning and end of the flat stitching line from the back of the quilt, grab the bobbin thread with your tweezers, and the whole line of stitching slides right out in one piece.  Hideous tension stitches are the only quilting stitches that come out faster than they were sewn.

So, where does that leave us?  I think I have some more lousy tension to rip out and restitch before advancing the quilt.  It's hard to tell for sure until I roll that bit up onto the pickup roller of the frame, because I get vertigo when I keep crawling under the frame and trying to look up to evaluate the stitching.  Now I'm wishing that I'd taken the time to attach the zipper leaders to my canvas leaders (I've had them for three years, still in the package), because it would be so much easier to unzip the top edge of this quilt from the pickup roller, flip the quilt backside up to locate and remove the bad stitches, and then zip that edge right back onto the frame to resume quilting.  Woulda, shoulda, coulda!  I can't attach zipper leaders while I've got a quilt loaded on the frame, though, so I'm just going to have to keep rolling the quilt back and forth to rip and restitch one yucky bit at a time.

Happy Thursday, all of you.  I hope you get some time in your sewing rooms today!