Showing posts with label quilt guild. Show all posts

Monday, October 2, 2023

Margaret Willingham's Reverse Appliqué Workshop, Charlotte Quilters' Guild + My Deco Quilt Progress

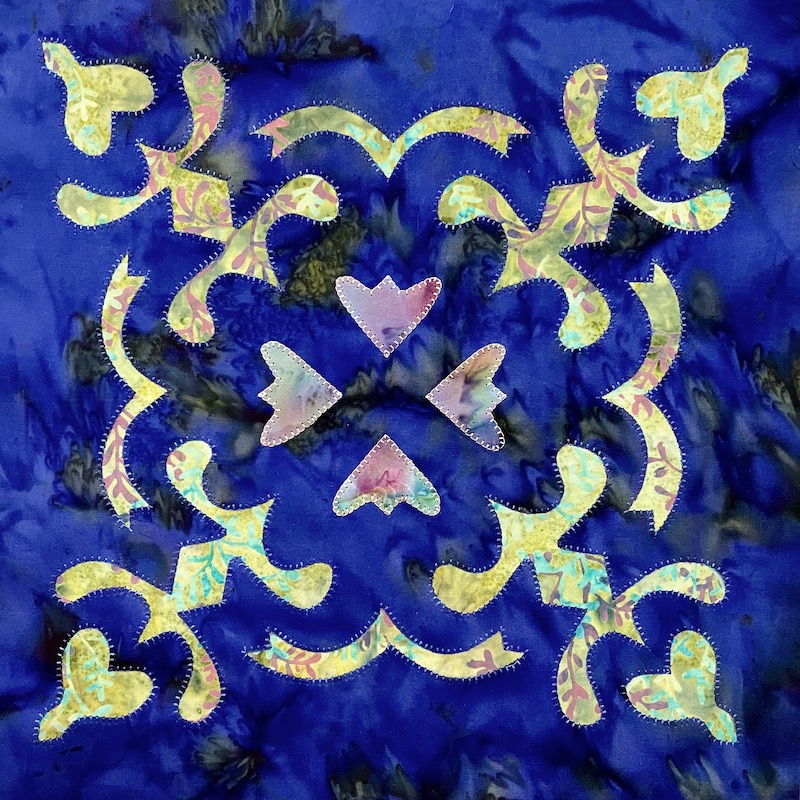
Happy Fall, Quilters!  Guess what -- I took an actual, in-person workshop with the Charlotte Quilters' Guild last month AND I finished my workshop block after I got home!  I'm so proud of myself for 1. Taking a day off, 2. Trying something new, 3. FOLLOWING DIRECTIONS during the workshop 😬, and then 4. Adapting what I learned in class to suit my personal preferences once I got home to my own studio.  

My 12 x 12 Block from Margaret Willingham's Reverse Appliqué Workshop


I'll tell you more about the workshop in a minute.  First, I have other news to share -- I've made some progress and gotten over the Cutting and Kitting Hurdle with my Deco Quilt that has been in-progress/abandoned for the past two years!  Well, better late than never.  I am supremely pleased with my clear plastic tote bag containing all of the pieces for all of the blocks, neatly organized and labeled in little Ziplock bags.  Our guild has lots of social sewing opportunities throughout the month and, as President of the guild, I try to attend as many of them as possible.  Having a project packed up and ready to go (versus strewn around my studio!) is my biggest challenge, but now I'll just be able to grab a Ziplock bag of block pieces and wheel my travel machine out the back door.  I have a feeling this project is about to pick up STEAM!

My Deco Quilt Completely Cut Out and Kitted, Block One Variations In Progress

Now that I've finished ALL of the cutting for my Deco Quilt, I am officially caught up with Week Two of the Deco QAL (Quilt-Along) that I committed to in the Fall of 2021!  😂. Week Two was cutting out all of the fabric pieces for the entire quilt.  I am like that last straggling marathon runner who crosses the place where the finish line used to be, two years after the race has ended...  Not only am I caught up with Week Two, but I'm also about a third of the way through with Week Three of the Deco QAL, which is the week where you piece all of the Block One log cabin variations.  All 16 blue/green log cabin blocks are finished and all 12 of the half blocks in both colorways are finished and I have 32 blue/purple log cabin blocks remaining to be sewn. The cutting for this quilt was monotonous, but the actual sewing is pretty easy.  I think that completely finishing this quilt top was supposed to be my OMG (One Monthly Goal) for November of 2021; maybe I can get it finished by November of 2023 instead!

Thursday, February 16, 2023

Nanette's Brinton Hall Quilt + Charlotte Quilters Guild Happenings

Hello, Happy February, and Happy Belated Valentine's Day!  The quilt I'm sharing today was meticulously pieced by my client Nanette of Do It Right Quilter and you can read about her journey making Brinton Hall on her quilting blog here.  Check out the fabulous English paper pieced central portion of the quilt, featuring larger scale Asian floral print fabrics framed by hand stitched hexagons in glowing batik fabrics:

Detail of Baptist Fan Quilting on Nanette's Brinton Hall Quilt

The Brinton Hall Quilt is a pattern by Leigh Latimore that is based on an historic antique quilt made by Anna Brereton between 1803-1805.  Patterns for making the quilt were published in Quiltmania magazine issues #107 and #108 in 2015, and you can still purchase those back issues (either digital or print versions) from Quiltmania's web site here if you're interested in making your own version of Brinton Hall.  This is one of those quilts that can take on radically different personalities depending on the fabric prints and color palette selections.  Doesn't this look like a FUN project?  This is one of the chief dangers of professional long arm quilting -- I keep getting all of these gorgeous quilts from my clients and I think I wanna make THIS one and THIS one and THIS one..  😍

Nanette's 77 x 77 Brinton Hall Quilt with Baptist Fan Quilting

So, let's talk about the quilting!  

Tuesday, November 6, 2018

Rebecca and the Magical, Magnetical Quilt Guild Name Tag: A Tutorial


Good morning, my lovelies!  I've been away from the blog for a couple of weeks, busy with a trip to Chicago to visit with my sister and nephew, a couple of interior design projects for clients, and keeping up with the reading for a class I'm taking.  But last night I finished my quilt guild name tag, and I can't wait to share it with you.  I even put together a little tutorial in case you'd like to make a magnetic name tag of your own.


Headless Helena Models My New Guild Name Tag
To recap, I finally joined my local quilt guild recently and needed a handmade fabric name tag to wear at meetings and workshops.  Since I have so many projects already in progress (and so little time to work on any of them), I rummaged around in my studio and came up with an orphan sawtooth star block to use rather than starting from scratch.  I machine embroidered my name as legibly as possible -- not sure whether the last name was necessary, but put it on there to be safe so I wouldn't need to make another one -- and did some basic SID and walking foot quilting around the star.  


Pretty Boring Quilting, But It Gets the Job Done
I had originally selected a black and white striped binding fabric, but after sewing it down and mitering all eight corners and then hand stitching it to the back, I was REALLY unhappy with my inability to get the stripes matched up where the binding ends joined.  With the corners of this tiny quilt so close together, I just didn't have enough room to finesse the stripes into a perfect pattern match and I ended up with one heavy black stripe on one side:


First Binding Attempted, Rejected and Removed
Blech!  See what I mean?  My eye just goes right to that awful double black stripe on the right side of the name tag.  The other thing is that, on a regular size quilt, the proportion of binding fabric to main body of the quilt is much smaller.  I felt like, on a small piece like this name tag, the striped binding was distracting and overwhelming, not the subtle pop I was looking for.  I put the project in Time Out for a few days to see if the binding would grow on me and whether I could get over the awkward join, but in the end I had to rip off the binding and do it over.  


The Magnet Magic!
None of this is terribly exciting.  What I AM excited about is that my name tag doesn't hang on strings around my neck or attach with pins that might snag my favorite sweater or blouse -- it's MAGNETIC!  The neodymium magnets are super strong and will even hold the name tag securely through a thick sweater; I tested it to be sure.  Here's how I did this.

First, you need the magnet hardware.  Many businesses use these magnetic name tags now (I first discovered the concept when my teenage son got a job at the grocery store).  I looked locally at Michael's, JoAnn's, and Staples and nobody had them, but Amazon came to my rescue once again:


The magnet bars aren't expensive -- at the time of this post, you can get a 10-pack for $7.99 with Prime shipping.  You can make yourself a different name tag for every season, or make some as gifts for your friends. 

As you see above, the magnetic hardware consists of two pieces.  There's a thin metal rectangle with smooth corners that has 3M adhesive foam on one side, and there's a thin rectangle plastic piece with smooth corners that has the two magnets attached.  They do sell versions with three magnets instead of two, but my experience is that two magnets is plenty strong enough to get the job done.  The metal bar is the part that gets permanently attached to the back side of your name tag, and the plastic bar with magnets attached is the piece that you snap in place on the underside of your clothing.

That 3M adhesive tape on the back of the metal bar is what you would use to adhere the metal bar to the back of a plastic or aluminum name tag, but I sliced it right off with an Exacto knife since I'm going to sew the metal bar into the back of my fabric name tag.  A razor blade would work, too.  You don't have to be fanatical about removing all of the foam, either, as long as you get rid of most of the bulk and all of the sticky glue.

I attached the metal bar to the back of the name tag with a tiny little sleeve, made the way you would make a hanging sleeve for a quilt show.  I cut a rectangle out of my name tag backing fabric, folded it in half WST, and sewed along the two long raw edges.  Then I centered that seam and pressed the little tube flat with my iron.  I didn't measure this piece, just eyeballed it so it would finish close to the width of the metal bar, but with enough loose fabric at the edges for me to hand stitch it to the back of my name tag.

Fabric Tube/Sleeve For Metal Bar
I knew I wanted to position that metal bar about a third of the way down from the top of my name tag -- high enough that it didn't flop down when I was wearing it, but with that metal bar far away from where I would be machine stitching the binding.  But I didn't want the metal bar to slide around inside the fabric casing, so I used my zipper foot to sew a triple straight stitch right up against both short ends of the magnet, trapping it in the center of the tube.

Trapping the Metal Bar In the Center of the Fabric Tube
Next, I positioned this little fabric tube horizontally across the back side of my name tag, trimmed the raw edges of the sleeve even with the edges of the name tag, and secured the short edges with machine stitching about 3/8" in from the raw edges, so the machine stitching would be concealed by my binding.

At this point, you could go ahead and stitch the long edges of the fabric tube down to the backing fabric by hand, but I chose to attach my binding to the front of my name tag first and then secure the long sides of my sleeve when I was hand stitching my binding to the back side of the name tag.  

Long Edges of Sleeve Secured by Hand Stitching
Easy-peasy, but oh-so-snazzy!  Now I have a name tag for the November guild meeting, which is tomorrow evening.  I haven't decided whether I need to jazz my name tag up with any embellishments or if I prefer it plain and simple, the way it is, but at least it's done!

To Bling Or Not To Bling, That Is the Question...
I mean, I could still add some beads, or sequins, or French knots, or additional "big stitch" quilting by hand in a decorative thread...  Heck, I could wire it up with a battery pack and blinking lights if I REALLY wanted to draw attention to myself (not!).

What's next on my sewing agenda?  Well, I still need to load up that outreach cuddle quilt on my longarm machine and get it quilted.  I'm running out the door for an appointment in a few minutes, but hopefully I'll get to that this evening.  Anyway, that's my To-Do for Tuesday weekly goal.

This Outreach Quilt Top is STILL Not Loaded for Quilting!
Happy Tuesday and happy stitching!  Today I'm linking up with: 

  ·       To-Do Tuesday at Stitch ALL the Things: http://stitchallthethings.com


Thursday, September 6, 2018

Because Quilters (Like RAMONA!) Are the Nicest People, I Am FINALLY Joining a Quilt Guild

I'm starting today's post with a shout-out to Ramona, who blogs about her quilting and other needlecrafts over at Doodlebugs and Rosebuds Quilts.  I have never met Ramona in person, but she is one of the many kind and generous quilters I've had the pleasure to connect with on the Internet through the various quilting linky parties in which I participate.  So Ramona read my last blog post  where I mentioned that I'd given up all hope of finding anymore of the leaf fabric I needed to complete my eight remaining FrankenWhiggish Rose needle turned applique blocks.  And then Ramona, out of the sheer goodness of her quilter's heart, took it upon herself to hunt down my discontinued, out-of-stock fabric and FOUND IT for me on eBay!!!


This Project Has Been SAVED By the Kindness Of a Stranger
Can you believe that?!  Of course you can, because if you're reading my blog in the first place, chances are good that YOU'RE a quilter and you have heart of gold, too.  I cannot even begin to express how grateful I am.  Of course I had done every Internet search I could think of when I first discovered the fabric shortage a few months ago, but at that time I came up empty-handed and it didn't occur to me to keep checking since the fabric was so old to begin with.  I started working on this in 2014, so the "Sandy's Garden" fabric was LONG since discontinued.


YES!!!  New Yardage From eBay Is An Exact Match to My Strip From 2014!
Seriously, you guys -- my heart runneth over.  And Ramona, if you ever need a kidney or anything, please give me a call.  I owe you one!

I'll probably give this quilt another name if I ever finish it, but for now I'm calling it the FrankenWhiggish Rose because I cobbled the pattern together from different sources like a Frankenstein monster.  The traditional Whig Rose applique pattern was very popular with 19th century quilters, there are lots of variations, and I love every antique Whig Rose quilt that I've ever seen.  The quilt pictured below is a stunning example of an antique Whig Rose quilt from the collection of the International Quilt Study Center and Museum:
Whig Rose Quilt Attributed to Del Patterson circa 1895-1905, International Quilt Museum Collection
Isn't that gorgeous?  Quilter Kim Diehl reinterpreted the traditional Whig Rose pattern in 2004 in her book Simple Blessings:
Kim Diehl's Country Whig Rose Wallhanging, from her Simple Blessings Book (affiliate link)
I hadn't seen Kim's original quilt when I started mine, though -- I was smitten by another quilter's adaptation of Kim's pattern when I saw it published in the September 2006 issue of Quilter's Newsletter Magazine:


Joyce Stewart's Village Gardens Quilt, Adapted From Kim Diehl's Country Whig Rose Pattern
So I started with Joyce's pattern from the QNM magazine, but I am not a fan of hearts so I swapped those out for reverse appliqued tulip and leaf templates that I got from an antique quilt reproduction pattern in another magazine, and then I added the stuffed berries because stuffed berries are fabulous, and the broderie perse rose buds that I decided to put around the center of my main flower were because I'd never tried needle turned broderie perse and wanted to see if I could do it...  See?  An arm from this pattern, a leg from that one...  If Dr. Frankenstein had been a quilter, I'm sure this is how he would have put his quilts together, too.  

Anyway, that's where my quilt block came from, and then after making one complete block, I imported a photo of my actual quilt block into EQ software, using that photo to color plain blocks in my quilt design (the same way you'd import a photo or scan of a fabric and use that to color patches in your design).  I like to work this way, making a single block out of real fabric and then using the design software to try it out in different settings so I am sure I really love what I'm seeing on my computer screen before I go ahead and make all of the blocks, especially when it's something really time-consuming. 


My EQ8 Design for My FrankenWhiggish Rose Blocks
When I made my first block, I didn't have a whole quilt design in mind and didn't know whether I'd be making one block or several.  Once I finalized my design and knew I'd need eight more blocks just like the first one, I decided to do them assembly-line style for efficiency.  So, by the time I realized I had nowhere near enough green fabric for all of my leaves, I had already spent hours and hours and HOURS appliqueing the stems, the large layered petals, and the stacked centers onto all eight remaining blocks.  When I discovered the fabric shortage and wasn't able to locate anymore of it, I got so discouraged that I shoved the project in a bin and stopped working on it.

Now, do you understand why Ramona's gesture of kindness, taking the time to hunt down discontinued fabric for a fellow quilter she's never even met, means so much to me?  I am so excited to get this project back in my fingers again!

And the kindness of Ramona got me thinking about ALL of you wonderful quilters that I've come to know online.  My Internet quilting buddies are the best -- when I asked for help, you have emailed me lengthy tutorials, mailed me samples of your favorite products, notions, etc.  Someone made me a beautiful embroidered needle book and mailed it to me from New Zealand when I broke my collar bone in a bicycle accident a few years ago, just to cheer me up -- from NEW ZEALAND!  

And so an introverted, secretive closet quilter named Rebecca ventured forth to last night's meeting of the Charlotte Quilters' Guild, thinking that if quilters from all over the country and all over the world who've never even met me can be such wonderful people, then maybe it's worth the risk of walking into a room full of strangers to meet some of the quilters who live in my own town.  I'm going to have to play hooky from choir rehearsal on the first Wednesday of the month so I can give this quilt guild thing a try...  Wish me luck!


Do you belong to your local quilt guild?  Any advice you'd care to share with me in the comments? 

 I'm not even 100% sure that I know what one does as a member of a quilt guild besides paying the dues and showing up at the meetings.  But for now, if you'll excuse me, I have 128 leaves to cut out of my green fabric!


Today I'm linking up with:

Let’s Bee Social at www.sewfreshquilts.blogspot.ca/ 
Midweek Makers at www.quiltfabrication.com/
WOW WIP on Wednesday at www.estheraliu.blogspot.com 
Needle and Thread Thursday at http://www.myquiltinfatuation.blogspot.com/  
• Whoop Whoop Fridays at www.confessionsofafabricaddict.blogspot.com 

• Finished Or Not Friday at http://busyhandsquilts.blogspot.com/ 
Slow Sunday Stitching at http://kathysquilts.blogspot.com/  
Oh Scrap! at Quilting Is More Fun Than Housework at http://quiltingismorefunthanhousework.blogspot.com
Design Wall Monday at Small Quilts and Doll Quilts http://smallquiltsanddollquilts.blogspot.com  
Main Crush Monday at Cooking Up Quilts http://www.cookingupquilts.com/ 
Monday Making at Love Laugh Quilt http://lovelaughquilt.blogspot.com/ 
Moving it Forward at Em’s Scrap Bag: http://emsscrapbag.blogspot.com.au/