Showing posts with label FrankenWhiggish Rose. Show all posts

Monday, September 1, 2025

September Goals: Stonefields, FrankenWhiggish, Inherited UFO + BIG News for Rebecca

Happy Labor Day in the United States and Happy September, everyone!  I have a lot going on right now and my Big News (which I shall reveal towards the END of today's post) is going to dictate which projects and tasks take priority this month.

Stonefields Quilt

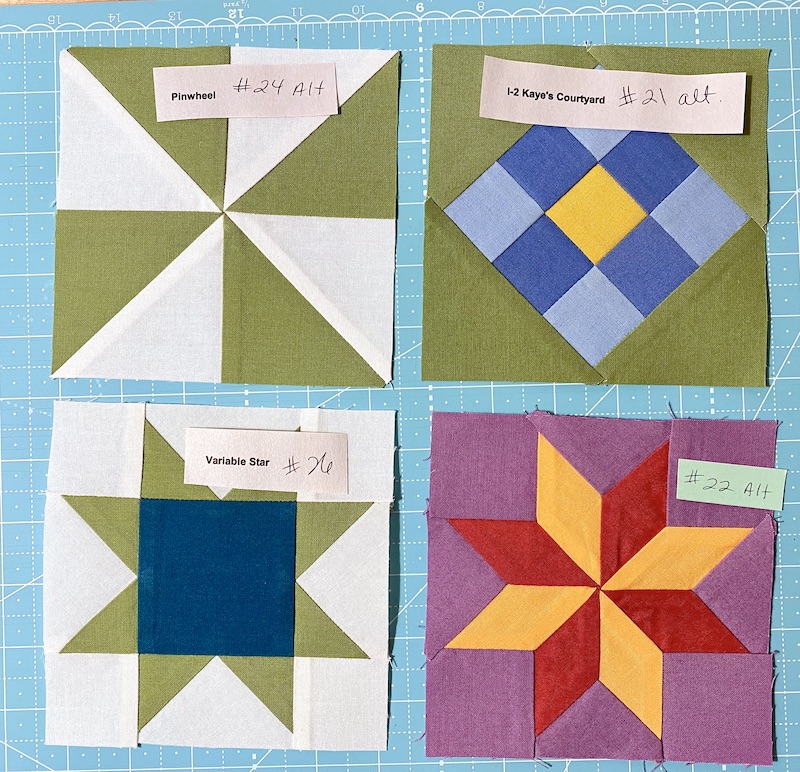
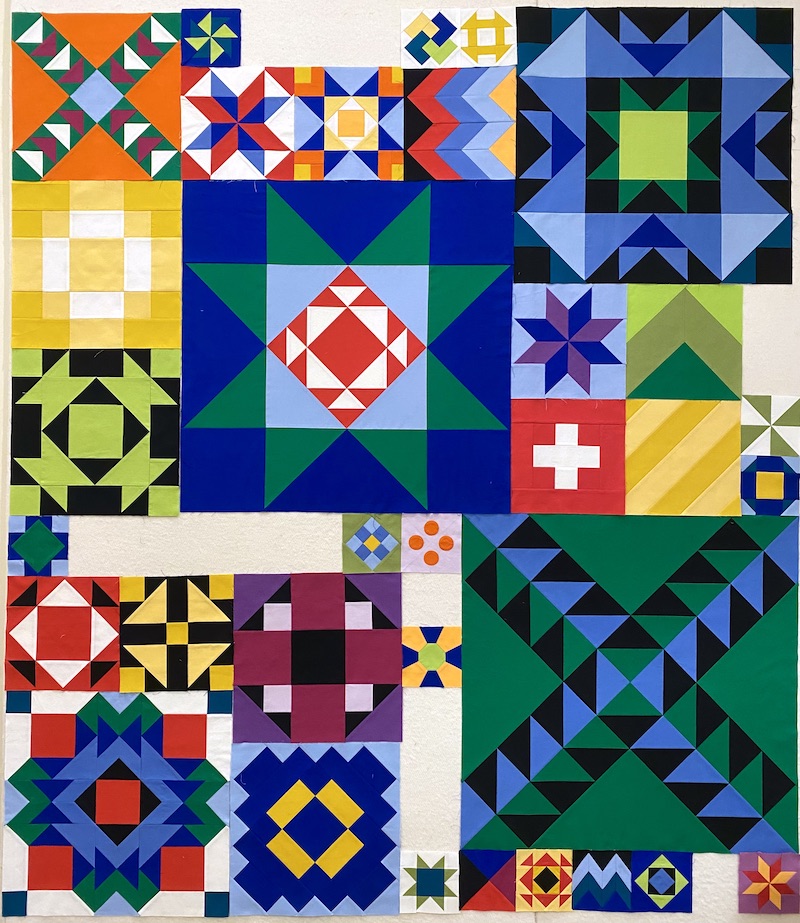
First, let's talk about my Stonefields quilt, because I am delighted with this project so far.  These blocks have been such a treat to work on!  All 13 of the blocks from Month One are now completed and on the design wall.  All blocks will finish at 6", but the applique backgrounds were cut oversized and will need to be trimmed down.  Because I use starch and glue in my applique preparation methods, I am thinking I might wash my applique blocks before trimming them down to size.  The serged edges will prevent them from fraying whether I hand wash them in a little dish pan or -- gasp! -- put them in a lingerie bag and run them through the washing machine on the Hand Wash Delicates cycle.  Honestly, that is probably exactly what I will do, because I know the washing machine will get all the glue and starch out very efficiently and I am more curious about what will happen in the washing machine than I am worried about what will happen in the washing machine.  


Stonefields Blocks 1-13 Completed, Appliqué Blocks Need Trimming to Size


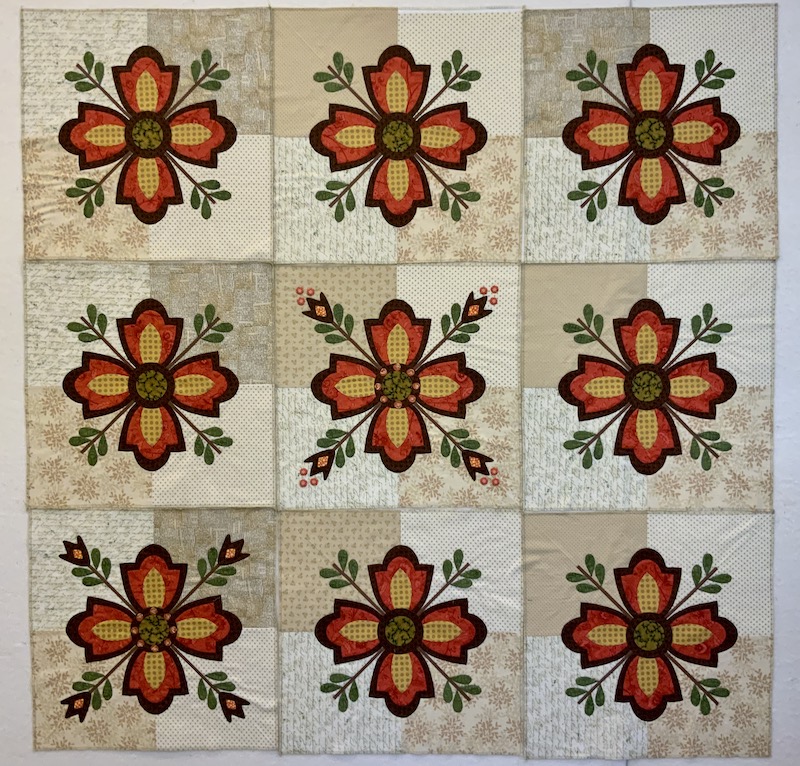
My Sawtooth Star blocks were foundation paper pieced on the sewing machine, most of my applique blocks were stitched by hand, but the final Posy Pot block is a mixture of some shapes stitched by hand and other shapes stitched with my Bernina B990 sewing machine:


Stonefields Block 13 "Posy Pot"


I am absolutely delighted with my customized invisible machine appliqué stitch and how closely I got it to resemble the look of my own personal hand stitching.  

Thursday, August 29, 2024

September Stitching Goals: FrankenBerries, Setting Quandaries + Seven Sisters

Stuffed berry production is happening!  Preparing all 96 of the remaining stuffed berries needed for my FrankenWhiggish Rose quilt is my September stitching goal (and if I get any of them stitched onto the blocks as well, that will be "gravy"!).  

Tip: Pencil Eraser Holds Perfect Circle Template for Tracing


I'm using my Karen Kay Buckley Perfect Circles templates to make my berries (this post contains affiliate links) along with leftover Quilters Dream Poly Select quilt batting and Wonder Under fusible web (using up an old package I had on hand).  I discovered that I can prevent the Perfect Circle template from slipping if I hold it in place with a pencil eraser in my left hand while tracing around the template with a mechanical pencil held in my right hand; that photo above is to remind Future Rebecca of these neat trick the next time I am tracing around small template shapes.

I traced all 96 berry circles onto the paper side of my Wonder Under paper backed fusible web, fused the marked Wonder Under to my batting scraps, then rough cut around groups of 12 (12 berries per block) just to help me keep track of how many were needed and how many were finished.  I experimented with three different pairs of scissors before deciding that I like my ApliQuick 4" microserrated scissors best for cutting out these tight circles (that I probably shouldn't have crammed so close together when I was tracing them).

And So It Begins: Cutting Out Fused Batting Circles for Berry Stuffing


Appliqué prep work does seem to go faster for me when I do it assembly line style, so I'm going to cut out all of my berries before I proceed to the next step of fussy-cutting my larger fabric circles.

Meanwhile, I've been walking past these nine blocks on my design wall every day, marveling about how those broderie perse rosebuds didn't take me nearly as long as I thought they would, and realizing that I am going to have all of my blocks completely finished and ready to set if I just keep working on it a little bit every day.  That makes me want to revisit, reevaluate, and overcomplicate my plans for setting the blocks and finishing this quilt!

I could add one inch diamond sashing, a wide neutral border for a quilted formal feather design, and an outer one inch diamond border, as visualized in this EQ8 software rendering below:

66 x 66 FrankenWhiggish Setting with Diamond Sashing


Sunday, August 25, 2024

August Goal Completed, FrankenWhiggish Rosebuds Are Done!

Oh my gosh, y'all -- pigs have sprouted wings and Rebecca has finally accomplished her One Monthly Goal by the end of the month.  I know what you're thinking: flying pigs are much easier to believe.  All nine of my FrankenWhiggish Rose blocks now have their eight tiny broderie perse rosebuds stitched down in their centers:


Rosebuds Completed on All Nine FrankenWhiggish Rose Blocks


The block on the lower left is the only one that is 100% complete with its stuffed berries, so making 96 more of those and stitching them to the other eight blocks is the next task for this project.  Side note: I wish I'd used a greater variety of fabrics for my pieced block backgrounds, because it was annoyingly difficult to come up with a layout for the blocks that didn't put two of the same fabrics next to one another.  And I'm loving how my new-and-improved design wall is working out in the hallway:


FrankenWhiggish Blocks On the Design Wall


By the way, there's an added benefit of the white Bump drapery interlining that I used to recover my design wall, in addition to it complementing my gray walls better than the natural cotton batting.  This is one of those projects where the colors in my photos never look much like the fabrics do in real life, but it was so easy to correct that with a single click using the White Balance tool in photo editing software, just by clicking the white design wall surrounding my blocks.  

Saturday, August 24, 2024

The New Design Wall, Take 2 + Slogging Along With FrankenWhiggish Rosebuds

Good Morning and Happy Weekend!  We've been bustling and busy since my last post.  Bernie and I drove eleven hours back up to Charlotte, North Carolina to move our youngest son Anders into a new apartment at UNC, spent some time with my mom in South Carolina, and then drove another eleven hours to get back to our new home in Naples, Florida.  We drove him up this time because we needed to get his car up there and we had a lot of stuff we were bringing for the apartment, but we'll be flying him home for breaks.  Meanwhile, the new bump drapery interlining fabric for my design wall was delivered from Amazon (this post contains affiliate links) and Bernie and I are both SO much happier with how it looks now!


96 x 96 Design Wall Wrapped with New Bump Drapery Interlining 


When I posted about the first version of this design wall last week a lot of you thought it was fine as long as it was functional, and if it was in a dedicated studio or craft space in my home where no one had to look at it besides myself, I might have agreed with you.  But I lobbied hard to get my husband on board with putting the design wall in a very prominent, public part of our home where everyone would walk past it and have to look at it all day long, every single day, and I promised that I was going to make it look GOOD there.  

Wednesday, August 14, 2024

FrankenWhiggish Rosebuds, Michele's Log Cabin Stars Quilt, Laundry Room Makeover, Swedish Pancakes + A 21st Birthday Celebration

Good Morning, Quilty Peeps!  As you can see by my way-too-long blog post title, I have lots of ground to cover today.  First things first, I am happy to report that I've finished prepping ALL of the remaining broderie perse rosebuds for my FrankenWhiggish Rose blocks, they are all glue-basted in position on the blocks, and the hand stitching to secure them is in progress.  That's right; I have a portable hand stitching project again FINALLY!

All FrankenWhiggish Rosebuds Are Prepped and Ready for Stitching!

In case anyone is interested in what's in my portable hand stitching "toolbox" for this project:

  • YLI 100 wt silk thread in color 256, matched to the rosebud fabric
  • Bohin size 12 Appliqué Needles (these are the only ones I've tried that don't bend or break on me)
  • Colonial Needle Company Leather Thimble Pad stickers (I use one on my right pointer finger to help grab the needle and pull it through the fabric, or to protect my fingertip when I need to exert a little pressure on the back end of the needle to force it through a spot where the glue dried stiff)
  • Thread Heaven (no longer available) or Thread Magic thread conditioner to help prevent snarling and knotting -- I don't need it when I'm using silk thread, but I have it in my hand stitching kit because it's a big help when I'm hand stitching quilt bindings with cotton thread
  • My new 2.75 magnification sewing glasses from Warby Parker, so I can thread the eye of my needle and see how many threads of fabric I'm grabbing with each stitch
  • That nail file in my kit is actually for my fingernails, because often I'll discover some little scratchy spot at the edge of a fingernail while stitching when the thread gets hung up on it
  • Not pictured, I also have a tube of Neutrogena Hand Cream in my hand sewing kit and another one in the drawer next to my sewing machine.  I like this kind because it's not greasy, has no fragrance or dye, and a tiny drop goes a long way to just barely moisten my fingertips so I can get a better grip on what I'm stitching without gooking it up with lotion
  • Either my Apliquick 4" Microserrated Scissors (pictured) or my Gingher Spring Action Thread Nippers (preferred if I'm just clipping thread and not trimming needle turn appliqué shapes while stitching).  If I'm planning to take my hand stitching kit on an airplane, I'll swap out for a cheap thread clipper (in case Airport Security confiscates it and throws it away) with a pack of dental floss that I could use as a backup thread trimmer in a pinch


(Those are affiliate links, by the way).   You probably won't see much of FrankenWhiggish for a couple weeks while I'm stitching the rosebuds to the blocks because, if you've seen one of my blocks get rosebuds, you've seen them all!  My Seven Sisters pattern and templates finally arrived from Australia and I'm planning to start on that project in September.

Instead of sharing FrankenWhiggish, I thought I might share some of the backlog of long arm quilting clients' quilts that I haven't posted about before, like Michele's version of Emily Dennis's Log Cabin Stars quilt.  Here's a teaser to whet your appetite; we'll return to this quilt later in today's blog post:

Michele's Log Cabin Stars Quilt, Pattern Available here


Tuesday, August 6, 2024

FrankenWhiggish Rosebuds + Random Happenings of Everyday Life

No, my Seven Sisters pattern and templates have not yet arrived from Australia, but I've been making progress on my languishing 10-year-old FrankenWhiggish Rose project while impatiently waiting for that package to arrive.  

Glue-Basting Prepped Rosebuds Prior to Stitching


In looking back through my earlier posts I realized that I never showed the step in between prepping the rosebuds and actually stitching them to the block, hence the photo above.  These rosebuds are too little to be pin-basted to my blocks and the Patchback stabilizer product I'm using makes them a little bit stiff, so I'm glue-basting them in place with tiny drops of Roxanne's Glue Baste-It (this post contains affiliate links).  I've had this particular bottle of glue for a LONG time; it lasts forever because you use so little of it on each appliqué shape.  Not sure whether you can see this clearly in the photo, but I'm putting my tiny drops of glue in the center of my turned seam allowance rather than right on the edge.  The glue spreads when I press the rosebud in place on the block and I don't really want it right on the edge where I have to push my needle through as I'm stitching.  Here's an update on where I am with this project as of today:

11 Rosebuds Glue-Basted to Blocks, Ready for Stitching

24 Rosebuds Need to be Prepped & Glue-Basted to Blocks

97 Stuffed Berries Need to be Made & Glue-Basted to Blocks

Speaking of the stitching part, I got a bit of a rude awakening when I resumed this project after a 6-month hiatus and discovered that my Magical Sewing Glasses (prescription reading glasses that I had my eye doctor order based on the distance I hold my work from my eyes when hand stitching) are no longer capable of banishing the blur!  So apparently my close vision has deteriorated significantly.  AAAARRRGH!  I went to my local Warby Parker store, hoping that I could select and come home with a cute new pair of stronger glasses for hand stitching.  I picked out these frames and ordered them in the 2.75 strength magnification, but instead of taking them home the same day I have to wait for them to be shipped to me in 7-10 days.  Probably should have just gone to the drug store instead.

Warby Parker Brady Frames, Desperately Needed for Blurry Hand Stitching!


I started stitching down my rosebuds with my old glasses even though I can't really see what I'm doing.  Hopefully my muscle memory is picking up the slack from my aging eyeballs!

Saturday, August 3, 2024

Actual Rosebud Progress for FrankenWhiggish Rose

Good morning, stitchy friends!  I am delighted to report actual PROGRESS on my FrankenWhiggish Rose appliqué project today!  Finishing the rosebuds is my One Monthly Goal for August.

Me Stitching an Actual Rosebud Onto an Actual Quilt Block


(In case anyone's about to ask, yes, that is a serger 3-thread overlock stitch on the edge of my quilt block in the photo above.  I oversized the block backgrounds (so I can trim them all to exactly the same size once the hand appliqué stitching is completed) and overcast the raw edges of my blocks before beginning, knowing that this project would be a long time in the making and that raw block edges would be prone to fraying as the blocks were scrunched up and manipulated in my hands during my stitching process.  The overlock stitching will be trimmed away prior to joining the blocks into a quilt top).

Four Little Rosebuds Where there Used to Be None

Each block gets eight rosebuds around that center circle but I only glue baste four at a time for stitching, to lessen the chance of my thread getting caught on an adjacent unstitched rosebud and ripping it off the block.

Sunday, November 26, 2023

FrankenWhiggish Setting Options: To Further Complicate, Or To Finish In This Lifetime?

Hello, Quilting Friends, and Happy Thanksgiving weekend to those of you in the United States!  In between the cooking and the baking and the holiday decorating of the past few days, I've been spending an inordinate amount of time in my EQ8 quilting design software, exploring my options for the Frankenwhiggish Rose hand stitched needle turn appliqué blocks that I started in March of 2014 (you'll find that post from nearly a decade ago here).  

At this point, all that stands between me and the end of making the nine identical Whig Rose appliqué blocks is 48 broderie perse rosebuds and 96 fussy-cut stuffed berries.  However, I remain undecided about what I'm going to do with those nine blocks once they are finished.  I have tried out so many options in EQ8, each one more complicated than the last:

70 x 70 On-Point with Mariner's Compass and Pieced Setting Triangles

In the EQ8 rendering above, I've just duplicated a photo of one finished appliqué block and the EQ8 software lets me see how all nine appliqué blocks will look together when they are finished, combined with any combination of thousands of other blocks, borders, sashings, etc.  It's one of my favorite ways to use EQ8 software, and although designing on the computer can suck up a lot of time, every 10 minutes trying something out on the computer saves me weeks/months/years of cutting up fabric, sewing it together, putting it all together on the wall and then hating what it looks like!  So in this version of the quilt, I'd be making four mariner's compass blocks using scraps of my applique block fabrics mixed with other fabric scraps from the same color family and style.  The centers of the mariner's compass blocks could even be the birds from my Vervain Monado-Havana fabric, the luxe drapery fabric I've been chopping up for my broderie perse rosebuds.  Although the mariner's compass blocks look complicated, the EQ8 software lets me print out foundation paper piecing templates in exactly the right size for my quilt, directly onto newsprint paper (I get mine on Amazon here; this post contains affiliate links), which makes it so easy to get sharp, crisp, perfect points.  I'd appliqué the center circle to each compass.  As of right now, I like the way the pieced setting triangles create an illusion of scallop curves to frame the body of the quilt, but they feel a little heavy -- might reduce the scale and use smaller strips and squares for those so as not to overpower the dainty rosebuds and berries.  

But how nice it would be to just be FINISHED with this already once I have the blocks done?  This quilt, like the 8-year skirt project I finished a couple weeks ago, really has no purpose other than educational.  I wanted to try needle turn appliqué, and I know how to do it now, so it's a "win" for me already and I'd like to move on to something else!  So this is the other, simpler option I'm considering:

Keeping It Simple, 66 x 66 Straight Set with Harlequin Border

In this version, I trim my appliqué blocks to finish at 16" square and set them straight with a harlequin border and little X corner blocks to repeat the X shape of the tulip stems in the appliqué blocks.  Then I've slapped on a 6" wide plain outer border, for feather quilting or whatever.

Sunday, October 15, 2023

Halloween Quilts for Paula and Mary + Broderie Perse Rosebud Secrets Rediscovered

Part One: The Halloween Quilts!

I recently had the pleasure of quilting a couple of really cute Halloween wallhangings for clients that I thought my readers would enjoy.  First up is Mr. Bones, an adorable machine appliqué project made by my client Paula.  This is a pattern from the Quilt Factory that is available on Etsy here (this post contains affiliate links).  

Paula's 32 x 60 Mr. Bones Wallhanging with Spider Spinners B2B

Wouldn't this be perfect to display on your front door on Halloween night, or in your entryway to greet trick-or-treaters?!  This pattern calls for some embellishments that you're not seeing in these photos -- fortunately, Paula knew to wait and add the buttons etc. after having her project long arm quilted.

We chose the Spider Spinners B2B design to play up the whimsy of the appliqué design.  I liked that it had playful spirals and spiders hanging down instead of just cobwebs alone, and I envisioned the whole quilt as an illustration in a children's book as I scaled the digital quilting design, trying to size the spiders and the cobwebs proportionately to the skeleton and Jack-O-Lantern the way they would be if the whole scene had been drawn by a single illustrator.  The perfect thread color turned out not to be gray, silver or white, but a true orange shade of Glide called -- what else? -- Halloween!  

Detail of Spider Spinners B2B Stitched in Glide Thread, Color Halloween

I'm so glad Paula trusted me on the orange thread!  If I'd used gray, silver, or white thread, the cobwebs would have blended in and disappeared against the gray background fabrics and the white and gray skeleton fabrics.  I really wanted those spiders and cobwebs to be "part of the scene" and visible in those areas, and I love how it turned out.  We used Quilters Dream Cotton Deluxe loft batting for that extra oomph to the quilting texture.

Saturday, October 14, 2023

Deco QAL Week 3, Completed Only 101 Weeks Behind Schedule!

You guys, if this was the year 2021 instead of 2023, I would be SO AHEAD OF SCHEDULE for my Deco QAL!!  Here it is, only October 14th, and I have finally finished all of my log cabin blocks for Week 3 (Nov. 1-8, 2021) of Lo & Behold Stitchery's Deco Quilt Along.  

16 Blue-Green Blocks, 32 Blue-Purple Blocks, and 12 Half Blocks

Unfortunately, it is NOT 2021, so instead of being ahead of schedule I'm actually 705 days behind schedule, or 100 weeks plus 5 days behind schedule.  Sadly, I am no longer eligible for winning any of the prizes.  😆. Good thing I still like this quilt!

My 102 x 102 Deco Bed Quilt, pattern available here

In case anyone out there is interested in making a Deco Quilt of their own, the pattern from Lo & Behold Stitchery is available as an instant PDF download on Etsy here (this post contains affiliate links). 

I'm making the largest 102" x 102" bed sized version of Deco, but the pattern also has instructions for making the more manageable baby and throw sized versions and those are striking, too.  I quilted a baby sized Deco for my client Liz back in 2021 and a throw sized Deco more recently for my client Megan.  I've seen this quilt made up in so many different color combinations and I haven't seen any that I didn't like.  I had a great time coming up with my own color palette of Kona Solids and then tweaking it to complement my Anna Maria Horner floral print backing fabric (it's Hindsight "Honorable Mention" in Turquoise from Free Spirit Fabrics, available on Etsy here).

(Note to Self: It would have saved a lot of time to pick the backing print FIRST and then just pull the solid colors from the selvedge instead of coming up with a custom palette first and then trying to find a print that had exactly the same colors in it!)


My Deco Quilt Fabrics with Anna Maria Horner Backing Print

Friday, March 10, 2023

Another Fresh Start On My Horizon: A Halo Quilt for Marlies

 Good morning, quilters!  Despite waking up to a muddy, rainy day here in Charlotte, I am in a sunshine mood today.  I think I may have finally figured out how to get my blog posts to automatically email to all of you wonderful people who have signed up for my email subscription!  Woo hoo!  Any of you who are not signed up for email but would like to be, just scroll to the bottom of my web site to find the signup box.  In case anyone else out there has been having a similar problem, here are the boring technical details: The RSS feed generator I'd been using successfully with that free email subscription service for years (can't even remember the name of it now!) and then with MailChimp created an RSS feed with slightly different tag names than the ones my new SendinBlue service is looking for when it checks my blog for new content.  The tags that were incorrect were "Published" instead of "pubDate" and "Content" instead of "Description," and SendinBlue's tech support identified that problem for me and directed me to a different website that would generate a new RSS feed with the universal RSS tags that their robots look for when they check my site for a new blog post.  The reason those awful blank emails were going out with just a header, a post title, and a footer, with no photos and no text, is that the SendinBlue robots were finding a new blog post title but couldn't "see" any of the text or photos when it wasn't associated with the tag name "Description" that they were looking for.  Clear as mud, right?  Anyway, I've been going back and forth with tech support about this and pulling my hair out over it for three months now, so it will be a huge relief to me if it's finally fixed.  The test email that I sent to myself last night came through correctly, so fingers crossed that THIS blog post shows up in everyone's inbox complete with text and photos, too!

But no one came here to talk about RSS feeds and computer bots, did they?  

Another NewFO for Rebecca: Halo Quilt by Jen Kingwell

I know I just posted last week about starting a new challenge project (the upcoming Star Upon Stars QAL from Laundry Basket Quilts), but the fabric and templates haven't shown up in my mailbox yet and the quilt along doesn't kick off until the middle of next week.  Meanwhile, my restless heart fell under the spell of a more intermediate quilt that will go together faster for me, one that involves curved piecing that I enjoy and find satisfying.  This is all the fault of my client Megan, by the way, because she's going to be starting this quilt in a class at the Quilt Patch shop in Matthews at the end of March and she tempted me with photos of a quilt that is way too adorable to refuse.  I'm also blaming Teresa, the Quilt Temptress who is teaching this class and who has been sharing photos of the gorgeous Halo quilt she made as a sample!  Teresa's class is already full and has a wait list, but I have a feeling she'll be teaching it again in the future.  As for me, I have a constitutional inability to follow directions anyway, so I'll be diving in on this one totally unsupervised.

Halo Pattern, Templates, and Tilda Pie In the Sky Fabric Bundles


If you're local to the Charlotte area and you'd like to make a Halo quilt of your own, Quilt Patch Fabrics in Matthews has both the Jenny From One Block pattern booklet and the optional acrylic template set for sale in their shop.  I purchased my Halo pattern booklet and my Tilda Pie In the Sky fabrics from the fabulous Flash Sew and Quilt shop in Naples, Florida while I was there visiting my in-laws, and I'll be making my Halo quilt as a gift for my mother-in-law Marlies.  

Tuesday, January 24, 2023

Nanette's Globetrotting Quilt + My Newest Favorite Quilting Thread

 Hello, my lovelies!  Have you missed me?  I've been less motivated to write blog posts lately because I switched email subscriptions providers at the end of December (no more flying MailChimp monkeys) and still have not figured out how to get blog posts automatically sent via email with my service provider.  And knowing that the folks who subscribe to get my blog posts sent by email are the ones most interested in what I have to show and tell, and those people will most likely not be seeing the posts I'm writing now is discouraging!  (If a tree falls down on the Internet and no one is watching, does it still make a sound?). I hate wasting perfectly good quilting time on troubleshooting tech problems!!  But the upside to that is that I have been doing a lot of quilting while I've been sulking about my tech woes, so I do have a few things to share today.  

Nanette's Globetrotting Quilt with Aurifil Forty3

First, I have to share the gorgeous quilt I just finished long arm quilting for my client Nanette of Do It Right Quilter.  I used a new thread for the first time (well, new to me -- I think it's been out for about 5 years or so), Aurifil Forty3 long arm quilting cotton, and I am in love with it!

Detail of Feather Garden E2E Stitched in Aurifil Forty3 Light Robin's Egg

I wish I could capture in photos what I'm seeing in person.  First off, the color was an absolute perfect match to the lightest blue fabric in Nanette's quilt.  For this quilt, I wanted a thread that was simultaneously going to blend in like a chameleon to let Nanette's exquisite piecing and beautiful fabrics shine, but also needed that thread to have some presence so that we could actually see the elegant Feather Garden quilting design even though the thread was color-matched to "disappear" on this predominantly blue quilt.  Aurifil Forty3 is beefier than their 40 wt 2-ply thread that comes on green cones; Forty3 is a stronger 40 wt 3-ply thread that comes on big cones and is designed specifically for the demands of high speed long arm quilting machines.  The color saturation, luster of the thread, and its softness remind me of cotton embroidery floss, and I think it's this thread's softness that I like most of all, because of how it bends in and out of the quilt sandwich to form stitches that look more like a dashed line of tiny, perfect hand stitches than like machine quilting.  I mean, this is definitely machine quilting, but I kept doing double-takes and imagining that I was seeing hand quilting stitches coming out of my long arm.  

If you have a long arm and you want to give Aurifil Forty3 a try, you may have difficulty finding it locally but the Fat Quarter Shop stocks it here (this post contains affiliate links).  Just a word of warning: this thread kicked out more lint than any other thread I've quilted with, and I had to stop and clean the hook race and bobbin case out midway through every single bobbin in addition to cleaning thoroughly with every bobbin change.    For me personally, I am willing to deal with lint when the tradeoff is gorgeous stitches that make the quilting sing.

Nanette's Globetrotting Quilt, 62 x 62

But I am getting ahead of myself!  Back to Nanette's quilt!  This 62" x 62" beauty is a BOM (Block of the Month) design by Pat Sloan called Globetrotting, and as of this writing in 2023, the pattern is still available on Pat's website for FREE here.  Nanette started this quilt in March of 2014 and finished her quilt top in September of that year, and you can read about the changes she made to the pattern and how she used EQ7 software to preview her fabric choices on her blog in this post.   Shortly after completing this quilt top, which she'd originally planned to quilt herself, life threw Nanette and her husband some nasty curve balls that sapped a lot of her creative energy for big endeavors and she found more solace in piecing and appliqué than in quilting and finishing for the next few years.  This resulted in the accumulation of a LOT of gorgeous quilt tops needing quilting, more than Nanette felt like she could handle, so she shipped twelve of them to lucky me for long arming. 💕

Sunday, November 13, 2022

Ten-Year Projects In Progress: Update on Frankenwhiggish Rose, Jingle BOM, + Deco Quilts

So...  I put my Whig Rose blocks back up on my design wall yesterday morning to see how much work remains to be done on them.  I started this needle turn appliqué project in March of 2014 (you can read about it here) and it's been an on-again, off-again kind of thing.  I'm finding it really monotonous to appliqué the same shapes over and over again.  The reason I haven't started any of the Sarah Fielke 2022 Block of the Month projects I signed up for is that I wanted to finish THIS appliqué project before starting on a new one, and this one ain't finished yet!

FrankenWhiggish Blocks on November 12, 2022


Just for kicks, let's compare today's photo to the one from the last time I had these blocks up on my design wall, back in January of this year:

FrankenWhiggish Blocks on January 12, 2022


So it took me TEN MONTHS to complete eighteen of those wretched little tulips!  AAAARGH!!  And I still have ten more to go.  

Sunday, January 30, 2022

Four More Blocks for My Retro '80s Building Blocks Quilt + Layout Options for FrankenWhiggish Rose Blocks

Happy Week End, everyone, and happy Month End as well!  One of the goals I'd set for myself at the start of January was to make some more blocks for my Retro '80s Building Blocks sampler quilt, and I finally did that yesterday.  Four more happy little 5" blocks are completed, only one of which was in the original Moda Modern Building Blocks design.  The other three blocks were among the many that I swapped out when I was redrafting the quilt in EQ8 Quilt Design Software (affiliate link) to suit my purposes.

Four More 5 Inch Blocks for Retro '80s Building Blocks

Gotta admit, I am still not 100% thrilled with the center of the little Lemoyne Star but it took me a LONG time to piece that one with all of its little Y-Seams, and I decided it's Good Enough.  Or at least, it's the best I could do that day.

Here they are, my completed blocks back up on the design wall, with the new ones added into the mix:

Back on the Design Wall: 38 Blocks Finished, 15 Remaining to be Made

For those of you who haven't seen any of my earlier posts about this quilt, here's a quick recap.  I started out with the idea that I wanted to make the Moda Modern Building Blocks quilt that was a popular BOM (Block of the Month) about eight years ago.  But I wanted mine to finish a different size to fit a particular bed, and I did not have the kit or the pattern anyway, so I set about redrafting the quilt in EQ8 from pictures of...  But instead of sizing my blocks as ruler-friendly multiples of 6", my blocks were multiples of 5" in order to get the finished quilt size I wanted with the borders I added.  The whole idea behind the "building blocks" sampler was for it to be a skill builder, so I eliminated all of the unecessary seams that Moda had added to simplify the piecing, adding back Y-seam construction because that's a skill I wanted to focus on.  I also swapped out 40% of the blocks in the original quilt for different ones in order to get that retro 1980s vibe I wanted and/or to include blocks that were more interesting (to me) or more challenging.  And I added rainbow borders that were inspired by the suspenders Robin Williams' character wore on the television show Mork & Mindy.  

Thursday, January 13, 2022

Whig Rose Applique Progress, Christmas Tumbler Top + a Sizzling Star Quilt Finish

Hello, my friends!  How is your January shaking out so far?  Our Christmas decorations are packed away, my sons are out of my house and back at their respective colleges, and I've been sewing up a storm.  I won't get my hands on the first patterns for my Sarah Fielke BOMs until the LAST day of January, so I've been working on the backlog of client quilts in my queue and moving personal projects along so I'll be ready to kick off an Applique-Palooza on January 31st. Today I have two personal projects to share and one client's quilt to showcase.  I'll be linking up with all the usual suspects (favorite linky parties, listed on my blog sidebar).

FrankenWhiggish Rose Applique

Thanks largely to the Medici the Magnificent series on Netflix, I stitched the last of the leaves on my Whig Rose blocks last night.  Woo-hoo!  

FrankenWhiggish Rose Needleturn Applique In Progress

This is the first time I've had all nine blocks in progress on my design wall and I've gotta say, it's looking really encouraging!  The center block is the only one that's 100% finished, but I had forgotten that I had a second block (bottom left) that was nearly finished except for the stuffed berries near the corner tulips.  

Sunday, July 5, 2020

Slow Stitching Sunday: Preparing Leaves for Last Two FrankenWhiggish Rose Blocks

Good morning, and happy Sunday!  I haven't mentioned my needle turned applique project in awhile, mostly because it's dragging on FOREVER and, since I'm making 9 identical blocks, it feels like treading water without ever actually making any progress.


For those of you who haven't been around that long, I started this project in March of 2014.  I'd just completed my first appliqué project, my Jingle quilt using Erin Russek's pattern and fabulous tutorials using the starch and press prepared edge method (nope, that one's not finished yet, either, but it's at least a finished top waiting its turn under the long arm needle).  Anyway, I loved the crisp, precise shapes I was able to achieve with the starch and press method, and I loved that I could just focus on my stitches as I sewed the applique shapes to the background, since the raw edges were already tucked neatly underneath.  However, I was hoping to find a method of hand stitched appliqué that was more portable throughout the process and didn't require a hot iron to get a block ready for stitching.


I bought myself a copy of The Best-Ever Appliqué Sampler Book by Becky Goldsmith and Linda Jenkins, and set about teaching myself needle turn appliqué.  It's a great book with clear instructions, but I wasn't feeling inspired by the projects in the book.  The authors had deliberately chosen some straight, skinny stems, circles, inside points and curves, outside points and curves, and reverse appliqué  to build all of those skills that a newbie would need to tackle any appliqué design.  So I set about finding a different pattern that would have all of those different elements but that was more appealing to me creatively at that point in time, and I ended up with this pattern that I found in an issue of the now defunct Quilter's Newsletter Magazine.  The quilter whose work was featured in the magazine had based her design on an older Kim Diehl pattern, and I made further changes to her pattern motivated by my loathing for cutesy folk hearts and my love of antique appliqué quilts.  I replaced the folksy hearts with reverse appliqué tulips from a historical reproduction pattern (sourced from a different issue of QNM -- man, I miss that magazine!).  And I added little broderie perse rose buds around the center of the big rose, fussy cut from leftover drapery fabric.  If you'd like to see and read more about the pattern sources, see this blog post.  


At first I was just planning to make the one 16" block, to teach myself the techniques of needle turn appliqué  but when I'd finished I liked it so much that I decided to keep going and do a whole quilt with it.  So I imported this photo of my one completed block into my EQ quilt design software and played around with how I could use it in a quilt design.  The idea I liked the most was this one, using nine of these big blocks:


And now here we are, six years later...  I am still working on the other eight appliqué blocks!  To be fair, I've only been working on this in fits and snatches.  I've discovered that it's kind of boring to make a bunch of blocks that are all exactly the same.  I've also learned that I probably prefer the starch and press prepared edge method, burned fingertips and all.  Even though I don't need an iron with needle turn, the whole business of perfectly positioning this vinyl overlay so I can get each applique element positioned just right, then fiddling with tiny 1/2" or 3/4" pins to hold them in place, is not really portable anyway -- I mean, I'm not able to do this in my lap while I'm waiting at the doctor's office, if you know what I mean.  And, although the slight variations from one shape to another that you get with needle turning the edges as you go gives a more authentic, organic look for an historical reproduction quilt (none of those antique quilts were as "perfect" as what we quilters aim for today!), my personality is probably better suited to a method where I have more precise control over the outcome.

Looking at that design I came up with in EQ today, I'm not quite as in love with it anymore -- but it's hard to know whether that's because I've got a combination of photo blocks with so-so-lighting and virtual fabric swatches from the software program.  If I do make that design, I would be using the same fabrics for the pieced blocks, sashing and skinny border that I used in the appliqué blocks.  Right now I'm still plodding along with the appliqué.  After finishing the first block in its entirety, I've been doing the remaining 8 blocks like an assembly line, so all eight of them have their layered petals, center circles, and stems stitched down.  I'm currently pinning leaves on the second-to-last block, which is nice because I am SO SICK AND TIRED OF SEWING LITTLE GREEN LEAVES OVER AND OVER AGAIN!!!  After the leaves, I'll move on to the reverse appliqué tulips for all 8 blocks, and then finish with the stuffed fussy cut berries and the broderie perse rosebuds that go around the center circles.  

I feel like we should place bets as to how many years it will take me to finish this quilt, like guessing how many jelly beans are in the jar and whoever comes closest wins a prize!

I'm linking up today's post with the following linky parties:

SUNDAY

·       Slow Sunday Stitching at Kathy's Quilts  

·       Oh Scrap! at Quilting Is More Fun Than Housework

MONDAY

·       Design Wall Monday at Small Quilts and Doll Quilts  

·       Monday Making at Love Laugh Quilt

·       BOMs Away Katie Mae Quilts  

Sunday, May 24, 2020

The Tension Wrecker Apprehended: Pigtail Guide on M-Class Bobbin Case Increases Bobbin Tension!

Good morning, friends, and happy Sunday!  I've just returned from "Drive By Communion" in my church parking lot!  I kid you not -- Crazy times.  We watched the live streamed worship online this morning as usual (or, as has BECOME usual since early March), but this is the first Sunday since early March that they've offered in-person communion in the parking lot, served by masked and gloved pastors.  We are blessed at Christ Lutheran with church leadership that is faithful, creative, and prudent.  We didn't see a lot of cars when we went for Drive-By communion following the Traditional service, but I'll bet there will be more who come at lunch time, after the Contemporary service.  My husband wanted to have his sins forgiven and then "get on with his day," as he put it.  Oh, and do you like the mask he decided to wear for Holy Communion, complete with a little red devil next to his nose?  It's not like that's the only one I made him, either.  Maybe the pastor didn't notice.  More likely, my pastor would not care.  [For more information about how I made my masks, and a link to download the pattern, see this blog post].

Check Out the Mask My Husband Picked Out for Holy Communion (?!)
I did head up to the studio for several hours after yesterday's overload of puppy cuteness.  It took me at least two hours to rip out the really bad tension stitches from my quilt, and it was disheartening work since I was so proud of some of that free motion work when I was looking at it from the top side of the quilt.  

Behold, Love's Labors Lost

Some days are like that, and it's all part of the process.  I only took out the very worst stitching, what I knew would result in thread hanging loose on the back side of the quilt after washing if I'd left it in.  The not-quite-perfect-but-structurally-sound stitches got to stay in.

All This Wretchedness Got Ripped Out
So in the photo above, the outlines of the rectangles had been stitched first, with nicely balanced tension, and then disaster struck a few days later when I decided to come back and fill in every other one with a squiggle.  But I think I figured out what went wrong that day, and as long as I learned something from all of this, it wasn't a waste, after all!  

Note to Self: Threading the Pigtail Guide on the M-Class Bobbin Case INCREASES Bobbin Tension

On the Disastrous Day of Stitching That All Had to be Ripped Out, I believe I unintentionally unbalanced my tension by slipping the thread tail through the pigtail guide, adding a little more tension to the bobbin thread without making any adjustment to the top thread tension.  After running the machine unthreaded for 15 minutes to warm up the motor, I was impatient to start quilting and figured "My tension was excellent yesterday, nothing has changed since then, so no need to do any test stitching today."  

APQS M-Class Bobbin Case, Pigtail Guide Threaded
I vaguely remember that, when I took my bobbin case out to oil the hook at the beginning of that Fateful Day of Frightful Tension, I dropped my bobbin case on the carpeted floor and my bobbin popped out of its case.  When I reinserted the bobbin, I had this split second of doubt about whether I'd been using the little pigtail thread guide of my M-Class bobbin case.  I knew I'd experimented both ways, with and without threading the guide, when I was adjusting the tension, but I hadn't made a note of which way I ended up doing it.  I figured I'd PROBABLY threaded the pigtail, and didn't think it would make a huge difference...  Wrong!

APQS M-Class Bobbin case, Pigtail Guide Unthreaded
APQS recommendations using this guide "for best results with most threads" because it helps to ensure that the bobbin thread is properly positioned to catch the hook with every stitch, but it does put some additional resistance on the bobbin thread.  Which I should have known, since previous Berninas that I've owned in the past had the same little pigtail guide and you were supposed to thread the pigtail for embroidery or satin stitches, where you want the top thread to pull slightly to the back side.  Don't misunderstand me; I'm not saying to never thread the pigtail guide.  I could still get balanced stitches with the pigtail threaded if I increased the upper thread tension accordingly.  And, if I was getting skipped stitches with the pigtail unthreaded, for example, threading the pigtail would be the first thing I'd try for an instant fix.  However, when changing from no pigtail to pigtail threaded midstream, it's important to check and adjust the upper thread tension again to ensure that the stitch is still balanced.  The pigtail is like adding one more person to Team Bobbin in the game of tug-of-war, without adding any more pulling power to Team Needle Thread!


With any thread combination, you can get balanced stitches both with and without threading the bobbin case pigtail.  You can have an evenly matched tug-of-war with three people on each team or with five people on each team, right?  I think I determined in my test stitching that my stitches were more attractive with the particular thread combination I'm using for this quilt (50 weight So Fine in the needle with 60 weight Bottom Line in the bobbin) when tension was balanced but a little looser overall versus balanced but tight overall tension.  Think two duds pulling from each side rather than four dudes pulling from each side. So I had skipped the pigtail and then adjusted my upper thread to balance the looser bobbin tension.  

Well, at least I've learned something, right?  I need to put a sticky note somewhere to remind myself of whether or not I'm using the bobbin pigtail guide on a particular project.  And I should probably get in the habit of ALWAYS doing some test stitching and/or crawling under the frame, run my fingernail along the stitching line on the back of the quilt, or SOMETHING after a few minutes of quilting to check that all is well under there before I put in thousands of stitches that will take forever to rip out.


I am remembering -- and now following! -- advice that quilter Jamie Wallen shared in his long arm tension video tutorial (above) several years ago.  Jamie recommends that you start by adjusting your tension so that the bobbin thread is pulled up to the top of your quilt and then loosening your top tension until you can just see the dots of bobbin thread in the needle holes.  When your quilt comes off the frame and relaxes, those little bobbin thread dots will settle back into the middle of the quilt sandwich, but seeing those dots of bobbin from the right side as you're quilting is your insurance that you are not getting flatlining and eyelashing on the back of your quilt!

One more thought: This is my first time using Quilter's Dream Cotton Select batting on my long arm.  I know I read somewhere -- maybe in my APQS new owner class handouts? -- that a batting with a bit more loft, like an 80/20 blend or wool, is more forgiving for longarm quilting because more batting loft equals more room in the middle of your quilt sandwich for the needle and bobbin thread to lock together without showing through on either side of the quilt.  I am already seeing that the all-cotton batting is not giving me as much dimensional contrast between the unquilted rectangles and the squiggled ones, so I will probably steer clear of 100% cotton batting on the long arm going forward.

Recently Ripped Out and Requilted.  It Was Better the First Time
This section was all ripped out and requilted yesterday.  I thought that maybe I didn't need to use a stencil this time, since the needle holes were still visible from the previous quilting, but I couldn't see them well enough as I was actually stitching out the design.  The result: Notice how these curls are slightly square?  That was the problem I was trying to avoid in the first place, by stenciling guidelines onto the quilt before quilting it.  Well, the next one will be better, right?

I'm looking forward to making some progress quilting NEW areas of the quilt later today!  The other project that I've been working on in weekly dribbles is my FrankenWhiggish Rose needle turned appliqué.  My bee group has been doing virtual Zoom get togethers every Monday throughout the pandemic shutdown, and this is what I work on during that time.  I haven't been sharing it because I'm trying to work efficiently, doing all 16 leaves on all 9 blocks before moving on to the next shape, and it would be really boring if I kept posting photos of the same block over and over again...  It is definitely getting boring to be STITCHING the same exact block over and over again!  That is one of the great benefits of sampler quilts -- variety!

Still Plodding Along with my FrankenWhiggish Rose Needle Turn Applique Project
As a reminder, this is what the first (and only) completed block looks like (below).  All eight of the other blocks are in the process of getting their leaves, like the block shown above.

One Block Completed, Eight Still In Progress at the Leaf Stage
I am definitely looking forward to moving on to the tulips soon.  Hope I still remember how to do the deep inside points and the reverse appliqué  but if I don't remember, I'll just have to relearn it!  I'm linking up today's post with:

SUNDAY

·       Slow Sunday Stitching at Kathy's Quilts  
·       Oh Scrap! at Quilting Is More Fun Than Housework

MONDAY

·       Design Wall Monday at Small Quilts and Doll Quilts  
·       Monday Making at Love Laugh Quilt

·       BOMs Away Katie Mae Quilts