First off, I need to thank Matt at Electric Quilt Tech Support for figuring out how to create a layout for this quilt in EQ8. I am not taking credit for his solution, just writing it down before I forget how I did it and sharing it with other EQ users who want to play with similar quilt designs on their own.
 |
| EQ8 Quilt Design Using Hexagons and Equilateral Triangles |
When you go into EQ8 to start a new project, you see a bunch of different layout options -- horizontal square blocks, on-point square blocks, variable on-point diamond shaped blocks, baby blocks, variable blocks, horizontal or vertical strips, one patch, photo patchwork, custom set... But none of those is an obvious choice when you want to make a TWO patch quilt, using hexagons and triangles. The fastest and easiest way to get this layout in EQ so you can audition fabrics is to choose Variable Point layout style and then create a diamond shaped block that encompasses one hexagon with one triangle at the top and one triangle at the bottom.
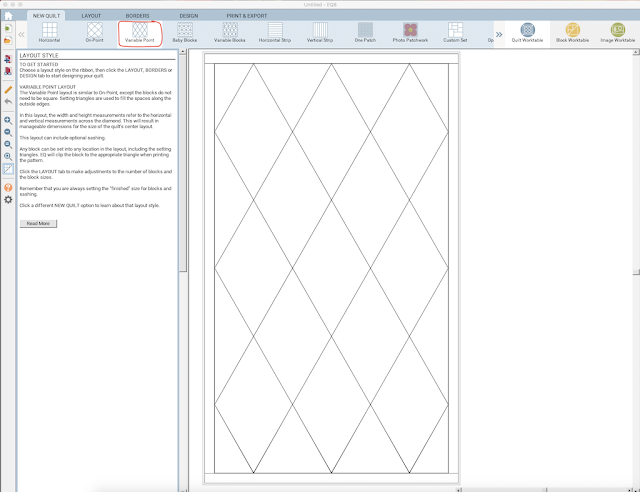 |
| Choose Variable Point Layout Style |
Next, click on the Layout tab to tweak the dimensions of the diamonds to match your desired hexagon size.
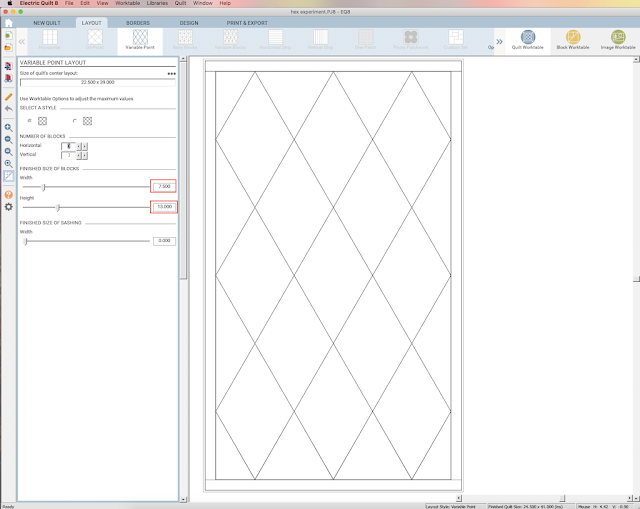 |
| Set the Width and Height to Match Your Templates |
I had acrylic cutting templates that I wanted to use to actually cut my fabrics for this project, so I used the measurements of my actual templates to ensure that fabric prints would be represented to scale on my computer screen. In the Width field, you want to enter the point-to point measurement across your hexagon from seamline to seamline. But, for the Height field, you want the height of one hexagon with triangles attached at the top and bottom, not the height of the hexagon alone. For those of us who haven't seen the inside of a geometry classroom in a few decades (ahem!), there are nifty online calculators that will automatically give you the measurements for hexagons here and for equilateral triangles here. In order for your triangles and hexagons to fit together in a quilt, the sides of the hexagons need to be the same length as the size of the equilateral triangles. If you already have a set of acrylic templates that you'll be using like I did, it's easiest to just measure your actual template (making sure to exclude the seam allowances). Using my hexagon and equilateral triangle templates, those measurements are 7.5" Width and 13" Height.
Now we need to create that block by opening up the Block Worktable.
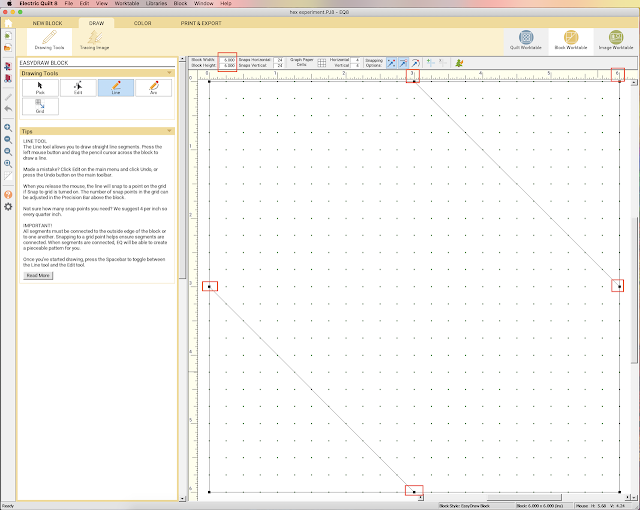 |
| This Block Magically Transforms Into a Hexagon When It's Stretched Into Our Diamond Layout |
And this is the ridiculously easy block that will magically turn into a hexagon with a pair of equilateral triangles once we plop it onto our diamond quilt layout and the EQ software stretches it to fit the diamond. I drew this as a 6" x 6" block, with diagonal lines going from the 3" center points. It doesn't matter what size the block is on the block worktable because EQ is going to resize it to fit the block size stipulated in the quilt layout. What matters is that the diagonal lines go from the exact center of one side to the exact center of the adjacent side of that block.
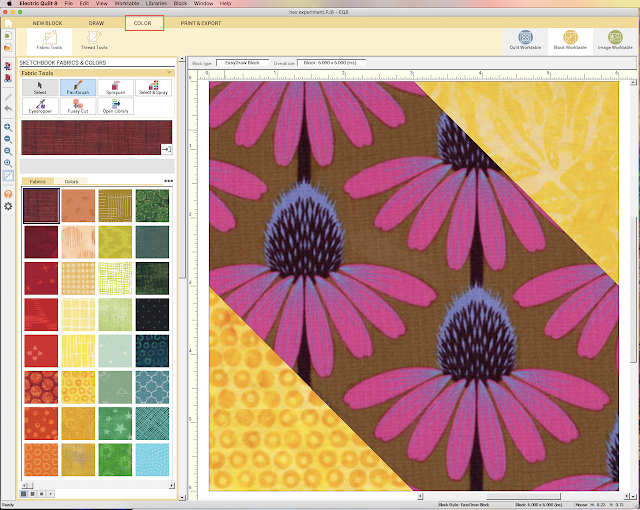 |
| Same Block, Colored With Fabric |
Next, I clicked on the color tab and put a lovely Anna Maria Horner fabric in the center for my hexagon, with two different gold print fabrics for my triangle star points. Then I added the block to my project Sketchbook and switched back to the Quilt Worktable.
 |
| Setting My New Block In My Variable Point Quilt Layout |
In the screenshot above, I've set just one of these new blocks into the quilt layout that we set up in the first step. See how my center floral fabric has stretched to fit the dimensions of my diamond block, creating a perfect hexagon? Now look what happens when I fill all of the other diamonds with the same block:
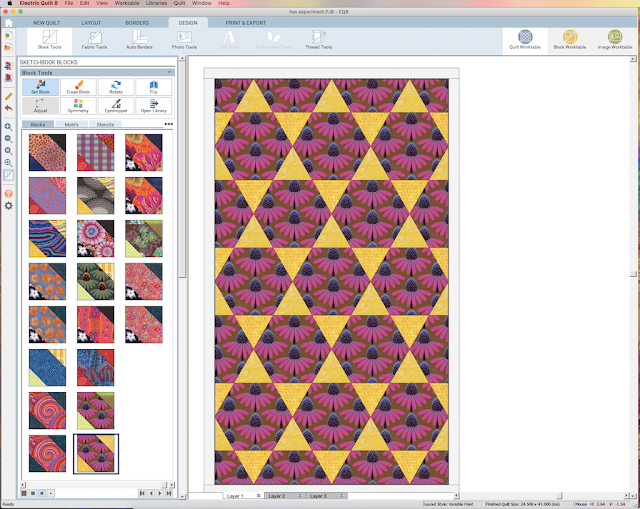 |
| Ta-Da! Hexagon Stars! |
How cool -- yet simple -- is that?! That's how I created the different fabric combinations for my Kaffe Fassett Mediterranean Hexagons workshop in last week's post.
I'm linking up today's post with:


6 comments:
That is one beautiful piece of art.
so neat that you have the ability to scan your fabric or pull them in from a program I'm sure that helps with design work. It is so nice being back home and being able to read all the blogs again. I miss good wifi when traveling
Good solution! Thanks for sharing..I’m working on one with jelly roll strips and the hex n more rulers - this may come in handy!
Thanks for showing us how to do this. I created a new EQ project and tried it, also put a link in the notecard for your instructions so I can find this again!
That's great, Connie! Glad to have helped, and putting a link in the notecard was a great idea!
Thanks so much!! I am fond of the 60 degree shapes and have struggled with placing them into the custom layout. This is fantastic. I hope EQ will add a layout for hexies next upgrade.
Nancy
Post a Comment