Showing posts with label Marjorie Lee Bevis. Show all posts

Tuesday, November 23, 2021

Rebecca's Ultimate Etsy Gift Guide for Quilters and Crafters

 Hello, friends, and happy Nearly Thanksgiving to those of you in the United States!  Today's post is something I've never done before -- a shopping guide chock full of gift-worthy goodies that I personally would love to find under my tree on Christmas morning.  If you have quilters, sewists, or embroiderers on your shopping list this year, I have some suggestions that are sure to be received with delight.  (If YOU are the quilter/sewist/embroiderer reading this post, you may find a few items for your OWN wish list).  What's more, every item on my list is in stock and coming from a small craft business owner via Etsy -- and none of them contains those pesky microchips that are delaying just about everything else you might want to buy for the holidays this year.

A Few of My Favorite Tools

Each of the items on this list is something I personally own and love, or something I currently have on my own wish list.  Feel free to share this post with others, post on social media or wherever.  Disclaimer: this post does contain affiliate links, which means I may receive a small commission (at no additional cost to you) if you make a purchase after clicking my link.  I do appreciate your support of my wicked thread addiction!  ðŸ˜‰

 Beautiful Tools: Where Form Meets Function

The items in this section are a pleasure to own and use because they combine the finest craftsmanship with beautiful design.  Bonus: They make great Instagram props to "style" your work-in-progress photos.

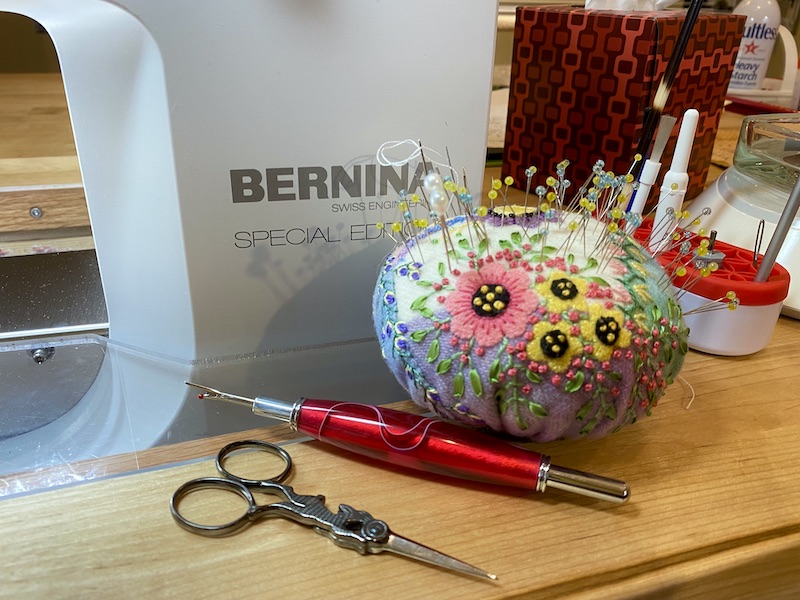
1. Hand Embroidered Felted Wool Pin Cushion from Etsy maker Martha of Quilt Shenanigans.  Who is this good for?  Anyone who does any kind of sewing at all can use a pin cushion, and these must take Martha hours to individually hand stitch and embellish with tiny beads.  Her hand stitching is exquisite, the felted wool is soft and luxurious to the touch, and the pin cushion is well-packed to hold its shape and is stable on a flat surface.  Even the slenderest pins slide in and out with ease, and she has lots of beautiful designs in stock to choose from.   

My New Favorite Pin Cushion, made by Martha of Quilt Shenanigans on Etsy 

2. Handmade, Hand Paired Embroidery Scissors from Maison Sajou.  These are manufactured by a 200-year old company in France, but available in several Etsy shops.  I got mine from Penelope Textiles' Etsy shop.  A few things to know: There are lots and lots of cheap imitations out there for a fraction of the price, but while the mass-produced knockoffs might look just as cute as photo props, there is no comparison to the way they actually cut.  It's like the difference between a Wustof steak knife versus the plastic knife that comes with your takeout order.  The lesser version SORT of cuts, but not cleanly or easily and it's not a joy to use!  Authentic Maison Sajou scissors are individually handmade by French craftsmen, with hand paired blades that are kept together throughout the entire production process to ensure that they match up perfectly. They are sharp, accurate, and cut smoothly and cleanly all the way to the tip (which is absolutely crucial for snipping the inside corner seam allowances in needle turned applique).  Who is this good for?  Anyone who enjoys any kind of hand stitching like cross stitch, embroidery, needle turned applique, or hand quilting would love to receive a pair of Sajou scissors!  In addition to the Hare design that I own, there is also a cute Eiffel tower version, gorgeous Art Nouveau Peacock scissors, and other historic reissue designs to choose from.  Of course, if you just want a cute pair of scissors for a photo prop, those cheaper knockoffs will suit you just fine!

Hand Paired Hare Embroidery Scissors from Maison Sajou, via Penelope Textiles on Etsy

Saturday, March 13, 2021

The Supreme Yumminess of the Hand Marbled Fabrics and the Graffiti Quilting

Earlier this week, since I was all caught up with customer quilts and right on-track with the kaleidoscope blocks I'm making for Anders' high school graduation quilt, I finally -- FINALLY -- got my UFO Bear Paw quilt out of the Purgatory closet and loaded it on my frame for quilting.  I am so excited to finally be finishing this quilt for myself!  I stewed over how to quilt this one for three years, but when I discovered this digital edge-to-edge quilting design, Graffiti E2E #7, by Karlee Porter,  I knew it would be perfect for this top.  

I'm Loving Graffiti E2E #7 on my Bear Paw Quilt!

I started making my 10 1/2" bear paw blocks in May of 2014 as an experiment, chopping up Anna Maria Horner's large scale LouLou Thi print and enjoying the "blobs of paint" effect that created in my blocks, with sections of butterflies or flowers recognizable in the larger patches but not in the small triangles.  Soon afterwards, I got my hands on my first hand marbled fabric assortment from Marjorie Lee Bevis (I think she was selling them through Luana Rubin's equilter.com online shop at that time, but today she sells her fabric directly through her Etsy shop here) and started making 4" sawtooth stars out of them.  

Sunday, February 21, 2021

Kick-Starting the Kaleidoscope Quilt

Son-the-Younger's high school graduation quilt has begun!  And it's SOOO exciting!


In the photo above, the isosceles triangles have not yet been sewn together into an octagon, but I just loved the way the strippy pieced triangles came out and had to snap a picture.  This idea was born of necessity, because I didn't pay attention to the size of the hand dyed fabric pieces in the assortments I ordered from Marjorie Lee Bevis on Etsy and I do not have enough of any one of them to cut four identical 5" x 6" triangles out of any one fabric.  Bummer -- but also opportunity for inventive solutions!  I cut two different marbled fabric pieces into four strips each, then pieced them with strings of Kaffe Fassett, a green batik, and a strip of Tula Pink spots that was trimmed away from leftover quilt backing, all from my overflowing scrap bins, and then I layered for of these me-made string fabrics over my AccuQuilt 5" x 6" Isosceles triangle die to get two different sets of pieced triangles for my kaleidoscope blocks.


My GO! cutter did not appreciate me cramming four layers of pieced fabric with stacked seam allowances through at once, and it was really hard to turn the crank handle -- but it cut them cleanly and without breaking anything...  So I'll be doing that again!

Saturday, January 2, 2021

First New-FO of 2021: Kaleidoscope Grad Quilt for Anders

Alright you guys, I know you've heard me sing this song before, but THIS time I mean it.  THIS is the quilt I'm making for Son-the-Younger's upcoming high school graduation:

77 x 99 Kaleidoscope Quilt in Blues, Greens, and Purple

Some of you are raising your eyebrows at this, recalling my previous announcement about a year ago that I would be making Anders a version of Karen Kay Stone's spectacular Cinco de Mayo quilt for his graduation, but that idea has been abandoned for the following reasons:

  1. Graduation is only 5 months away, and I have customer quilt commitments that will demand my attention in addition to my own ongoing projects.
  2. While I still love the elaborately foundation paper pieced New York Beauty blocks in Karen's design, I know that all of those seams add up to a stiffness that is fine for a wall display quilt, but not so soft and snuggly to sleep under.
  3. It bothered me that the New York Beauty blocks were too similar to the curved flying geese arcs in my older son Lars's high school graduation quilt, and I wanted Anders' quilt to be completely different.
  4. Most importantly, I think, is that I just don't want to devote such a significant block of time to recreating a version of someone else's design right now.
So I may (or may not) end up making a quilt like Cinco de Mayo someday, but it's not going to be Anders' graduation quilt.

Wednesday, February 15, 2017

Baby Steps On the Baby Quilt

I've been very busy this past week, working on clients' design projects, learning my music for the upcoming VOX St. John's Passion rehearsals, and even had some minor outpatient surgery last Thursday, so I haven't exactly made great strides with my baby bear paw quilt.  However, I got about 15 minutes in the studio last night for fabric therapy and another 30 minutes this afternoon, and SOME progress is better than NO progress.

On the Wall, Now with Sashing Rectangles

So.  I printed out ten foundation paper patterns from EQ7 for my 4" finished sawtooth stars.  Then I cut out my white rectangles, 4 1/2" x 11", for my sashing.  And I started precutting my patches for the FPP star blocks.

Precutting Patches with Specialty Rulers

I rough cut my shapes using a generous 3/8" seam allowance rather than a standard 1/4" for paper piecing.  This enables me to control the grain line, minimizes fabric waste, and streamlines the process once I start sewing.  Since my block is based on a 1" grid and I'm paper piecing, I'm cutting 1 3/4" strips from which I subcut squares, quarter square triangles and half square triangles using my Nifty Notions Cut for the Cure specialty rulers.  That's the cool thing about those specialty rulers -- I only have to cut one strip size, and from that I can directly cut the correct size half square or quarter square triangles, without having to do any additional math, and without having to first cut squares and then subcut them diagonally as you do in traditional rotary cutting.  Those rulers were one of the best quilting notions purchases I ever made. 

Marble Hand Dyed Fabrics for Sawtooth Stars

I'm using prewashed(!!!) marble hand dyed fabrics from Marjorie Lee Bevis for my sawtooth stars, which are like delicious little textile treasures. I need 10 more stars, and although I have Bible study and choir rehearsal tonight, tomorrow is pretty open except for one ten o'clock meeting.  Hopefully I'll be able to sew up some stars after that.

I'm linking up with Needle & Thread Thursday at My Quilt Infatuation.  Also linking up with:

·       Finish It Up Friday at www.crazymomquilts.blogspot.com

·       Whoop Whoop Fridays at www.confessionsofafabricaddict.blogspot.com

·       Off the Wall Friday at Creations: http://ninamariesayre.blogspot.com/

·       Finished Or Not Friday at http://busyhandsquilts.blogspot.com/

Have a wonderful night!

Saturday, August 23, 2014

Spinning My Wheels, and Dreaming of Grandeur

UGH.  I feel like Ugh.  Does that happen to you?  I had this great idea about how I was going to start working on multiple quilts simultaneously, switching back and forth between projects according to my mood, whether I felt like doing hand applique, paper piecing, traditional piecing or whatever, and this was going to be a great thing for productivity and for creativity, blah blah blah.  And so, for the first time ever for me, I set aside a quilt that I had not finished and started working on another one... and another one... and another one. 

Guess what?  It's not working out for me!  I feel lost when I walk into the sewing room, and each time I switch projects I lose my groove and have to relearn whichever technique I haven't done in awhile.  
There was the Jingle BOM, with blocks designed by Erin Russek of One Piece at a Time:

Completed Center Medallion for my Jingle BOM UFO
I set that aside when I realized that I wanted to set my center medallion straight rather than on-point as per Erin's original design, and I was unsure how to calculate the additional pieced borders I envisioned going between the center medallion and the on-point border blocks.  I can't believe I haven't touched this since APRIL!  :-(

My Jingle Border Blocks, Languishing Untouched
Then I decided that I should learn needleturn applique, since I had so much fun with starch and press prepared applique for my Jingle blocks, so and I started working on a Frankensteined Whig Rose applique block consisting of several magazine patterns that I cobbled together.  That one stalled out when I realized that I do not yet know a good method for appliqueing the tiny circles that I imagined going around the center of my flower:

Whig Rose Thingy, Stumped by Rosebuds in Center
Here's the issue with that one: I liked the idea of appliqueing the fussy-cut rosebuds from my Vervain drapery fabric around the center of my flower, but the rosebuds are an odd shape, not really round.  So I can't use the Perfect Circles templates to make these.  I don't think I can needle turn them and get the edges of these tiny shapes perfectly smooth -- and what's more, I'm concerned about making sure that no ivory background shows at the edges of the rosebuds against the brown background.  I got this block to this point by mid May or early June, and then set it aside so I could mull over the rosebud dilemma for awhile:
Stalled Franken-Whig Rose Applique Block
"Let's do something EASY next, to rebuild that confidence," thought Moi.  So I made 9 Bear Paw blocks at the end of May and then decided they needed little 4" sawtooth star blocks as sashing posts. 


My Bear Paws
First, I paper pieced a 3" star that was a pain in the tushy and too small anyway.  Then I tried to make some 4" sawtooth stars at the beach and realized I can't sew anything at the beach because I can't SEE at the beach.  Then I sewed two lovely red sawtooth stars once I got back home...  only to have the red hand marbled fabric bleed all over the white background fabric when I tried to steam and press the finished block.  Bummer!
Bloody Sawtooth Star
One would THINK I might have learned my lesson when one of my red batik fabrics bled in my Jingle blocks.  One would THINK I would have tested this fabric for colorfastness before sewing it to white fabric.  Whatever.  The photo above shows what the block looks like now, after I soaked it in warm water with a couple drops of Dawn dishwashing liquid.  I was able to get a lot of the excess dye out, but dye is still bleeding from the seam allowances where the fabric is stacked up and I am not sure how to get all of that out without fraying or distorting the edges of my blocks.  I made two little star blocks out of this fabric and I used up all of the fabric, otherwise I would make new blocks after rinsing all the loose dye out of the uncut yardage.  And of course I chose to make stars out of this fabric first because it was my favorite...  

Meanwhile, in another fit of inspiration, I started making paper pieced pineapple blocks for a King sized quilt.  Two of those are finished.  I will need to make 34 more of these blocks to get the California King size I want for my bedroom:

EQ7 Mock Up of Pineapple Quilt from Scanned Finished Block
So I've been working on all these quilts for months now, and I have nothing finished to show for myself except for the school fundraiser quilt and the kids' projects.

And yet I find myself longing to start on two more quilts, both of them totally unrealistic choices for me given my current skill set, my family responsibilities, and the amount of time I actually am able to spend sewing.  I have officially lost my mind and have set my heart on making not one but TWO unbelievably challenging historical reproduction quilts:

"Love Entwined," updated color palette, by Esther Aliu
The first one is called Love Entwined, and it's Esther Aliu's free BOM based on a 1790 British quilt.  Esther fell in love with this quilt after seeing a black and white photo of it in an old book called Patchwork.  The current owners of the quilt refuse to allow anyone to see it or photograph it, so Esther has devised her patterns from enlargements of the black and white photo in her book.  We don't know for sure what colors were used in the original, but Esther's mockup of bright fabrics against a dark background is captivating and reminds me of Scandinavian rosemaling.  Look at this gorgeous Love Entwined quilt currently in progress, made by a Dutch quilter:

Dutch Quilter's "Love Entwined" in progress, from Juud's blog
Isn't that insane?  I have been downloading and printing off the patterns as each month's installment is released, and they are all neatly stored in a binder.  Me attempting this quilt today would be like a failing Algebra I student deciding to take Advanced Honors Trigonometry.  However, it gives me something to work towards, and although the project is overwhelming when you look at the whole thing, how bad can it be if you just take it one piece at a time?

The other historical reproduction quilt that I am recently obsessed with is the Civil War era quilt with 4 1/2" miniature blocks and a striking, unusual pieced triangle border made by Vermont quilter Jane A. Stickle in 1863.  This is the "Dear Jane" quilt:

Original Sampler Quilt by Jane A. Stickle, 1863, Photo by Ken Burris
This quilt was popularized and made accessible by Brenda Manges Papadakis' 1993 Dear Jane book, including all 256 block patterns that she painstakingly redrafted.  In the years since Papadakis' book came out, thousands of quilters have created faithful reproductions or modern reinterpretations of this quilt, and EQ sells a standalone Dear Jane software program that allows you to print out the block patterns in any size for rotary cutting, hand piecing, foundation piecing, or applique.  I really love the border on this quilt, and how fresh and modern it looks when it's made up in bright contemporary fabrics:

"Dear Jane Revisited" made by Gwen, Quilted by Judi Madsen of Green Fairy Quilting
I think Gwen used all Kaffe Fassett prints for her version of Dear Jane.  She did a phenomenal job, and of course Judi Madsen's long arm quilting is magnificent as usual:
Detail of Madsen's Quilting on Gwen's "Jane Revisited"
Madsen's Quilting Completed, Ready for Gwen to Finish and Bind

Madsen spent 70 hours quilting this masterpiece.  Doesn't this just take your breath away?  Please check out Judi's Green Fairy blog here to read more about this beautiful quilt. 

Ah, but what business do I have contemplating Love Entwined and Dear Jane when I have so many more attainable projects underway, and can't seem to make progress on any of them?!

And so, UGH!  :-)

Have a great weekend, everyone!

Monday, August 18, 2014

Sawtooth Stars, Take 3: a Book Review of Quiltmaking Essentials 1 by Donna Lynn Thomas

Design Wall With Bloody Sawtooth Star
So, good Monday evening, everyone!  I have not made great strides with anything since finishing up my sewing machine cover last week, but the boys start school again ONE WEEK FROM TODAY so hopefully that will mean more sewing time for this mama soon enough.

In case you missed my earlier posts, I wanted to make sawtooth star sashing posts at the intersections of my 10 1/2" (finished size) bear paw blocks.  At first I thought I wanted 3" sawtooth stars, but I felt the scale was wrong after paper piecing the first one (the one on the right in the photo above).  So then I had grand, ludicrous aspirations of piecing a whole slew of 4" sawtooth stars while I was at the beach a few weeks ago, but that didn't work out very well.  I packed up one of my vintage Singer Featherweight sewing machines, rotary cutting tools, and my travel iron, along with precut strips of Kona solid in Snow and a bundle of hand marbled fabrics from Marjorie Lee Bevis.  Unfortunately, I just didn't have good enough lighting in our rental digs to see what I was doing in the evening.  My cutting was off, my fabric edges weren't perfectly aligned, and things weren't working out generally, so I packed everything up and picked the seams out once I got home.

Available here on Amazon (affiliate link)
For the third try at my sawtooth stars, I decided to incorporate Donna Lynn Thomas's methods from her new book, Quiltmaking Essentials 1: Cutting and Piecing Skills.  I was given a copy of this book to review nearly a month ago, and although I read and enjoyed it immediately, I wanted to wait until I had a chance to actually try out the ideas I'd read about before writing my review.  My sawtooth star blocks gave me the perfect opportunity to "test drive" Donna's best practices for piecing.

This book, the first volume of a planned series of two, is a thorough overview of everything a beginning quilter needs to know to piece just about any quilt block.  Although there are lots of beautiful quilt photos sprinkled throughout the book for eye candy, there isn't a single project in this book.  I LOVE THAT!  Here's why.

Quilting magazines can be a great "point of entry" into quilting, especially for those who don't know any other quilters.  Barnes and Noble, Michael's craft store, and even many grocery stores sell a variety of quilting magazines these days, just waiting to catch a would-be-quilter's eye with tantalizing cover quilts running the gamut from traditional to modern, in trendy of-the-moment color schemes and seasonal themes.  However, due to space limitations, the instructions in magazine projects tend to assume that readers have a basic understanding of the quiltmaking process.  This can be confusing and frustrating to someone who might never have touched a sewing machine and has no idea what terms like QST, SOG or 9-Patch means.  A beginning quilter's odds of successfully completing a magazine quilt project without any outside help or additional instructions is usually pretty slim -- and once that beginning quilter has wasted money on fabric and hours of his or her time just to end up with a frustrating mess, that first quilt is liable to be their last.

That's where Quiltmaking Essentials 1 comes in.  This book explains everything you need to know to get started with any quilt pattern, whether it's a standalone pattern, a magazine pattern, a project from another quilt book, or an idea you came up with on your own.  It's a book that will help establish good habits and techniques from the very beginning, that you'll dog-ear and highlight and refer to again and again. 

There are a lot of how-to quilting books on the market, and I've read most of them.  So, what makes this one a must-have?

  • So many books geared towards beginners downplay the need for accuracy in cutting and piecing.  How many times have you heard quilters comforting one another by saying, "there are no quilt police" or "as long as I can't see the mistakes when I'm galloping by on horseback it's fine"?  Yet, as Thomas points out, tiny inaccuracies in cutting and piecing have a way of compounding into a great deal of frustration and disappointment, and quilters who never learn to cut accurately and piece with a precise seam allowance are doomed to remain beginners forever.  Quilting Essentials 1 will help beginner quilters establish good skills and habits with their very first quilt, and will help many veteran quilters to correct bad habits that have may have been holding them back.
4" Sawtooth Star, Right on the Money with Nice, Sharp Points
As you can see, the sawtooth star block that I cut, pieced, and pressed using the methods in Quilting Essentials 1 came out pretty close to perfection.  (Except that I neglected to check that hand marbled red fabric for color fastness, and the dye ran when I attempted to steam and starch the finished block -- shame on me!)

Seams Pressed As Per Quilting Essentials 1
  • The section of this book on pressing is worth its weight in gold.  Those who were born in the 1970s or later grew up with permanent press fabrics and missed out on the home economics classes of earlier generations, and we don't know how to use an iron.  I have read so many quilting books that warn me to "press, not iron" and that I should "be careful not to distort the bias," but I had no idea what that actually meant.  I thought "press" and "iron" were synonyms, and naturally I'm not going to distort the bias on purpose!  Thomas explains how to press seams open properly with handy little diagrams showing which way the iron should be pointing in relation to your half-square triangle seam, and it was NOT the way I had been doing it.  When I pointed my iron like the iron in the book illustration, lo and behold -- my half square triangle unit looked much more like a square after I pressed it open.  This book is also very thorough in explaining the hows and whys of creating a pressing plan for your block up front.  That's another issue I've struggled with in the past as I followed another book's admonition to "always press to the Dark Side" and ended up with lumps and distortions in my blocks where several seams come together.  Seriously, this chapter alone could have saved me so much frustration and tears if I'd read it 10 years ago.  As it is, I'm planning to go back to my bear paw blocks and press some of the seam allowances in the opposite direction to eliminate the bumps and bulges I created with my "press to the Dark Side" mentality.  I don't think I've ever seen another beginning quilting book that teaches you the logic behind how to create a pressing plan for your quilt.
Bear Paw Bulges, All Seams Pressed to the Dark Side


  • Directions on how to wash your quilts with quilt soap so the dyes don't fade prematurely -- IN A FRONT-LOAD, HIGH EFFICIENCY washing machine.  THANK YOU!! 
So, thank you again, Donna, for giving me this opportunity to improve my own piecing and pressing skills and to review your book  -- it's definitely a keeper, and one I'll be reaching for again and again.  If you're ever teaching a class near Charlotte, North Carolina, please let me know!

Now, since I originally meant for this to be my Design Wall Monday post, I just have to show you this monstrosity that was on my design wall briefly yesterday, and is now going to be bundled out of the house as quickly as possible:
Anders' 60" x 80" Finished Quilt Top for Lutheran World Relief

I got this brilliant idea over the summer that my 10-year-old son Anders and I should go and help a group of quilters that meet at our church on Wednesday mornings, making mission quilts for Lutheran World Relief.  I thought it would be a great opportunity for him to strengthen his budding quilting skills while we worked together for a good cause.  Skeptically, he asked me, "What age group is this quilting group for?"  and I cheerfully told him "Quilting is for ALL ages!" 

Well, true as that may be, Anders and I were the only quilters under age 70 who showed up that morning, and he was the only male in the room.  We were told to pick fabric from a tub of precut 11" squares and to sew them together with 1/2" seam allowances in a 6 x 8 grid to create a 60" x 80" finished quilt.  The fabrics were slim pickings, not very exciting choices for a little boy's preferences, and he was disappointed that there weren't enough squares of the same fabrics for him to create any cool patterns.  The ladies explained that they used fabric from donated draperies, bed sheets or whatever they could get their hands on, so it was all different weights and fiber contents rather than the 100% cotton quilting fabric we are used to.  The 11" so-called "squares" were very roughly cut (with garden shears, perhaps?), varied up to a quarter inch or more in size, and Anders whispered to me, "Aren't squares supposed to have right angles at the corners, Mom?"  I felt like it would be rude to criticize someone else's cutting skills or attempt to recut the fabrics in front of them, so what could I do?  I just pinned the blocks together for Anders the best I could and my little trooper worked diligently at sewing those blocks together into rows with his trusty Featherweight machine for two and a half hours.  Bless his heart! 

When the meeting wrapped up, I know Anders hoped he'd never have to look at these blocks again, because his little face clouded over when he was told that he could "finish it up at home."  The project sat at the back of my cutting table for a month, until finally I told Anders that we needed to finish it because we made a commitment and we have to follow through.  My son was unenthusiastic, and he was pretty certain that Mom was the one who roped us into this commitment, not him!  I revived his interest by allowing him to swap out some of the fabric we got from the church bin with a frog print fabric from my stash, and that gave him the motivation to get back to work. 

Anders arranged the layout for this quilt by himself, and he sewed all of the blocks together into rows.  But at that point, Mom had to take over because -- as Donna Lynn Thomas pointed out in her book, accuracy is not about pleasing the Quilt Police; it's about reducing the frustration and disappointment you get when you spend hours working on a project only to a get to a point where the errors have compounded and multiplied to the point where nothing fits together and you want to throw the sewing machine out the window and take up macramé!  I have never had to do so much pinning, easing, steaming, begging, pleading, and swearing to get quilt seams to match up in ANY project before.  If these blocks had actually been 11" squares to begin with, this would have been an ideal project for Anders to do all by himself, but due to careless cutting, it was a nightmare to assemble this quilt top. 

Granted, the person who cut these squares had no way of knowing a child would be trying to work with them.  Experienced seamstresses who have been sewing all their lives probably don't need a high degree of accuracy in order to put together a quilt top like this, and the faster they can get them together, the more quilts they can donate to help people in need all over the world.  I have the utmost respect for these ladies.  However, in retrospect, I should have done more research and attended one of the meetings without Anders ahead of time to ensure that he would have a positive experience.  In hindsight, I should have let him pick out his own fabrics and cut them precisely for him at home.  The next time Anders and I make a charity quilt, we are going to make a Project Linus quilt instead, and Anders gets to pick out all the fabrics.  The Charlotte Chapter Coordinator for Project Linus tells me that they always have a shortage of boy quilts, especially quilts for older boys in middle school and high school.  Now, who better to fill this need than a young man who is always begging me to buy more Star Wars and pirate fabric at the quilt shop?

I've been very long-winded today, even for me, so I doubt anyone is still reading this.  But, just in case you're still here, I'll tell you that I'm linking up with Design Wall Monday over at Patchwork Times.  And now, I'm off to check out what everyone else has been working on.  Happy stitching, everyone!

Saturday, June 28, 2014

In Pursuit of Paper Pieced Pineapple Perfection

Pineapple Block In Progress: 33 Pieces Sewn, 64 Pieces (and 35 more blocks) to go!

I forced myself to finish those wretched throw pillows last week.  I'll show them to you in a few days, but right now I don't feel like looking at them! 

I rewarded myself for all of that grunt sewing with some pineapple play time.  In case you missed my earlier post about this project, I'm making the 17 3/4" paper pieced pineapple blocks using a free pattern that I downloaded here from Fons & Porter.  Now that I've worked out a few kinks, the first pineapple block is coming together very smoothly.  Fons & Porter labeled this a "challenging" project, but I think it's ideal for a beginner paper piecer like me -- the only "challenging" part was figuring out how to work the large format printer at the FedEx print shop... but I'm getting ahead of myself.

FedEx To the Rescue!
Since most of our printers can only handle 8 1/2" x 11" sheets of paper, the Fons & Porter pattern prints out in six sections and the instructions tell you to "join them together."  But they don't tell you HOW to join them together!  At first, I printed out the foundation pattern sections on special paper piecing foundation paper and carefully taped them together with Scotch Magic Tape, aligning the registration marks as accurately as possible.  This was a pain in the butt.  Then, when I started paper piecing my pineapple block, I only managed to get five fabric pieces sewn down before I realized that the Scotch Magic Tape was shrinking from the heat of my iron, distorting my foundation patter so that it was wavy instead of flat.  I didn't want to reduce the temperature setting of my iron because I needed every seam allowance to lie flat like a pancake and I know I'm not supposed to use steam or starch with foundation paper patterns.  So I printed off another block in sections, carefully taped them all together, and headed out to my local FedEx print shop.

Default Printer Settings that Don't Work
The large format printer at the FedEx shop prints onto rolls of paper that are trimmed internally to fit the size of whatever you're printing.  The girl at the FedEx shop was helpful and friendly, but she only knew the basics of how to work the large format printer and it took me about an hour of trial and error before I figured out that, in order to get copies of the entire foundation pattern with nothing cut off and a little extra white space around the outside line, I needed to feed my original into the machine perfectly centered and I needed to change the Width setting on the printer from "Auto" to "24.0" Bond.  Even after a 10% off coupon it cost about $80 to print 38 of these giant foundation patterns (36 for my California King sized quilt, plus two extras in case of oopses), and the printer paper is a little heavier than the specialty foundation piecing papers sold in quilt shops, but I think the tradeoff will be more than worth it.  No more fussing with tape and hoping my alignment is identical from block to block, and I have all of my pineapple foundations printed and neatly trimmed, ready to go. 
Making a Start: Size 90/14 Needle, Open Toe Presser Foot, and 50/3 Cotton Thread


Back in my studio, I set up my Bernina 750 QE for paper piecing.  I'm using my 20D presser foot with Dual Feed engaged, my straight stitch plate, centered needle position, and piecing straight stitch #1326.  I'm using regular weight 50/3 Mettler cotton thread instead of Aurifil to make my seams a little stronger, since I'll be stressing them by ripping all of the paper away eventually.  I started off using the 90/14 Jeans needle (pictured above) that was in my machine from my last project, but when that got dull I switched to a 90/14 Schmetz Quilting needle and saw improvement in my stitch quality right away, so that's what I'd recommend.  Other than shortening the stitch length to 1.5 and reducing the top tension to 3.25, those were the only adjustments I had to make -- and I was pleased to see that, when I saved the altered stitch in my machine's Personal Program menu, the tension adjustments were saved as well as the altered stitch length.  Since the pineapple block is sewn outward from the center, I'm bringing my bobbin thread up at the beginning of each seam just like I would if I was quilting, and then I use my machine's automatic thread trimmer (the scissors button on the front of the machine) to automatically trim my threads at the end of each seam. 

I have very little paper piecing experience, and if I can do this, anyone can.  I made one paper pieced star block from Carol Doake's book, and that's the full extent of my paper piecing experience.  So, if making a paper pieced pineapple block was truly too challenging for a beginner, I would be having a terrible time right now.  In fact, the pineapple block is really easy to paper piece because it's all done with strips that are all cut to the same width.  There are no fussy little triangles that you might accidentally sew down with their points going in the wrong direction, and you don't have to stop and think about how much to overcut each piece and how to position it before you can sew it in place.  The only reason this is slow going for me in the beginning is because I want a very scrappy look for this quilt and I have got LOTS of fabric strewn all over my studio -- I spend at least 15 minutes deciding which fabric I want to use next, and then I have to press the fabric and cut off a 1 1/2" strip. 

Check Fabric Alignment Just Prior to Stitching
The sewing itself is so easy that it's mindless.  I don't even have to pin anything, I just sit down at the machine, place the strip where it needs to go, flip the foundation pattern carefully and slide it under the needle, peek underneath to make sure my raw fabric edges are still more or less aligned (see photo at left), and then sew down the dotted line.  With paper piecing, there is no measuring after every seam or worrying about whether your seam allowance is accurate.  As long as you sew right on the lines, every little point comes out perfectly every single time. 

So if any of you have ever wanted to make a pineapple quilt of your own, I encourage you to give it a try.  There are a lot of smaller paper pieced pineapple block patterns available if you don't want to deal with printing blocks as big as mine.  Alex Anderson has one in her book, Paper Piecing with Alex Anderson, that can be printed on regular sized paper. 

I love how my pineapple block looks so far.  As I mentioned earlier, this quilt is destined for my master bedroom and it's going to need 36 of these 17 1/2" pineapple blocks in order to comfortably fit a California King bed, factoring in the inevitable shrinkage that happens during quilting and the initial laundering.  That's why it's nice to have several projects -- UnFinished Objects (UFOs) or Works In Progress (WIPs) to rotate between, so I can switch to a different project when I get tired of paper piecing strips.

Speaking of WIPs, remember the Bear Paw blocks I was working on?  I may have changed my mind about setting my 10 1/2" bear paw blocks on point with plain white alternate blocks as I had originally intended.  I did this mockup in EQ7 quilt design software (birthday gift from my sons!) and it looks kind of boring:

Option 1

Of course, I'm still learning how to use the design software and I have not yet figured out how to adjust the scale of an imported fabric image -- that's why my LouLou Thi Clippings fabric looks like an old-fashioned granny floral (no offense to you hip and stylish grannies out there).  My bear paw blocks look much better in real life:


I bought some hand dyed marbled fabrics from Marjorie Lee Bevis that I really love with the LouLou Thi print.  They remind me of an artist's palette, with all the oil paints swirled and blended to paint the focal print.  I know I'm going to make some 3" sawtooth star blocks out of the marbled fabrics for this quilt, and initially I was thinking of using the stars for a border.  But then I played some more in EQ and came up with this:

Option 2

Again, I'm still learning EQ and haven't yet figured out how to get my sawtooth border sized the way I want it, or how to get rid of the gap at the corners of my ribbon border.  But I kind of like the look of straight set bear paw blocks with 3" sashing and 3" sawtooth star sashing posts.  So I'm going to make up sixteen sawtooth stars so I can play with them on my design wall and figure out which version I like best. 

This post has ended up MUCH longer than what I had planned to write, so I'm going to sign off now and step away from the computer.  Have a wonderful weekend, everyone!