Showing posts with label Piecing. Show all posts

Saturday, October 14, 2023

Deco QAL Week 3, Completed Only 101 Weeks Behind Schedule!

You guys, if this was the year 2021 instead of 2023, I would be SO AHEAD OF SCHEDULE for my Deco QAL!!  Here it is, only October 14th, and I have finally finished all of my log cabin blocks for Week 3 (Nov. 1-8, 2021) of Lo & Behold Stitchery's Deco Quilt Along.  

16 Blue-Green Blocks, 32 Blue-Purple Blocks, and 12 Half Blocks

Unfortunately, it is NOT 2021, so instead of being ahead of schedule I'm actually 705 days behind schedule, or 100 weeks plus 5 days behind schedule.  Sadly, I am no longer eligible for winning any of the prizes.  ðŸ˜†. Good thing I still like this quilt!

My 102 x 102 Deco Bed Quilt, pattern available here

In case anyone out there is interested in making a Deco Quilt of their own, the pattern from Lo & Behold Stitchery is available as an instant PDF download on Etsy here (this post contains affiliate links). 

I'm making the largest 102" x 102" bed sized version of Deco, but the pattern also has instructions for making the more manageable baby and throw sized versions and those are striking, too.  I quilted a baby sized Deco for my client Liz back in 2021 and a throw sized Deco more recently for my client Megan.  I've seen this quilt made up in so many different color combinations and I haven't seen any that I didn't like.  I had a great time coming up with my own color palette of Kona Solids and then tweaking it to complement my Anna Maria Horner floral print backing fabric (it's Hindsight "Honorable Mention" in Turquoise from Free Spirit Fabrics, available on Etsy here).

(Note to Self: It would have saved a lot of time to pick the backing print FIRST and then just pull the solid colors from the selvedge instead of coming up with a custom palette first and then trying to find a print that had exactly the same colors in it!)


My Deco Quilt Fabrics with Anna Maria Horner Backing Print

Sunday, September 19, 2021

A Couple More Blocks for My Retro 'Eighties Building Blocks Sampler

Good morning, my lovelies!  I have been "SEW" busy lately that I'm starting to accumulate a backlog of things I wanted to share here on my blog.  Today I'll show you the last two 10" blocks I made for my Retro 'Eighties Building Blocks sampler (adapted from the 2014 Moda Modern Building Blocks QAL).  Here's what the design wall is looking like these days:

All of the 10 inch Blocks Are Completed!

This project would be a finished quilt top by now if I was able to work on it consistently, but I've been more focused on customers' quilts lately.  I've also been responsible for more church music over the past few weeks, now that Church Council has decided we have to wear masks while we're singing and a lot of our singers are staying away because of health concerns etc.  So, those are my excuses for only having TWO new blocks to share since the last time I posted about this project!

Block 18

Both of these blocks finish at 10" and use Kona Solids in Lipstick, Snow and Black.

Wednesday, April 21, 2021

Giverny Teleidoscope Quilt Progress + Custom Sewing Cabinet Modifications

I'm still chugging along with my son's high school graduation quilt, in fits and snatches!  The real challenge is coming up with new pictures for each post about it, because it looks pretty much the same up on the design wall regardless of whether seams have been sewn together yet!  

Giverny Teleidoscope In Progress

You can't see the whole thing in the photo above, but the top six rows have corners attached and blocks sewn together into rows.  I have three more rows to go with attaching corners and joining blocks into rows.  There are no borders planned for this quilt, so once the top has been sewn together, it will be ready for quilting.

Tuesday, March 9, 2021

Weekly Progress: Kaleidoscope On Track With More Fabric en Route

Anders' graduation quilt is starting to take shape on my design wall!  My goal for the past week was to get 23 of the necessary 63 block centers cut and pieced, and I pushed myself to get 8 block centers finished yesterday to stay on track with that goal.

11 inch Kaleidoscope Block Centers on my Design Wall

It's exciting to see the illusion of curved lines begin to emerge now that I have more blocks on the design wall.  However, it was SAD to take down my sampler blocks (again!) and put that project in Time Out.

One Last Look at the Retro Building Blocks Sampler Before Exile

I'm really hoping to come back to the Retro 'Eighties Building Blocks sampler as soon as the kaleidoscope project is finished.  I decided to store the blocks laid flat on my older son's bed, since he's away at college.  Two reasons: First, storing the blocks flat on Lars's bed means no creases from folding the larger blocks to fit in a storage bin or drawer.  Second, this will force me to return my attention to the sampler blocks immediately after finishing the kaleidoscope quilt top, since Lars will be coming home from school by then to SLEEP in this bed.  Buh-bye, sampler blocks!

Tuesday, January 12, 2021

Four More Blocks This Week for my Retro '80s Building Blocks Quilt

 Progress, y'all!!!  I've made four more blocks for my Retro Building Blocks sampler quilt this week.  New blocks are circled and numbered below.

16 Blocks Finished, 32 Yet To Be Made

I'm almost out of my Kona Ocean fabric until my order from Missouri Star shows up, so the most recent 5" blocks were selected because they could make use of the itty-bitty scraps I have on hand.  I'm at least partially using foundation paper piecing techniques for most of these blocks, but a few of the blocks I chose to mix require good old fashioned template cutting and fussy-fiddly piecing.  The orange and blue one numbered 4 in the photo above was one such block.

Tuesday, October 20, 2020

Yes, I'm Still Here, Working On Baby Quilts...

 Hello, my lovelies!  It felt good to step away from the blog for a few days.  

We brought our 19-year-old son home from college for the weekend so he could cast his very first vote in a Presidential election during Early Voting rather than having to change his voter registration to his college address.  My 17-year-old son has strong opinions about the election that he believes we're all entitled to hearing, and he is not pleased to be the only nonvoting member of the family.  ;-). Hah!

I made more progress on my baby quilt version of the AQS "Letter Home" September QAL:

Monogram Baby Quilt In Progress

Those are 8" finished blocks, center monogram block that I added is English Paper Pieced, and the finished size of this quilt with narrow borders will be 42" x 42".  None of the blocks are sewn together yet, but I'm nearly finished piecing all of the blocks now.


I did get my Modern Baby Clam Shell quilt finished -- COMPLETELY FINISHED!! -- a couple days ago, but haven't taken the final photos of it yet.  Still debating whether or not to wash it first.  And, since my October goal is to completely finish BOTH of these sibling quilts and get them mailed off by the end of the month, I figured I might as well wait and photograph both of them together.

Final Stretch of Binding on Modern Baby Clam Shells

As usual, I'd be farther along with the baby quilts if I hadn't been busy working on other things.  I spoke with a potential new client about a vintage quilt made by his grandmother that he's looking to have restored.  I've been researching and crowd sourcing about quilt battings in order to finalize which ones I want to stock for clients.  I also worked on a Double-Top-Secret Surprise design for a friend in EQ8 and sourced special fabrics to bring that idea to life.  The fabrics I needed showed up in yesterday's mail and they are AWESOME -- it is going to be SO HARD not to show you this one until after I surprise my friend with it!  

I have also been working my way through all of the IntelliQuilter training videos provided by my dealer, all SIX hours' worth, covering both computerized edge-to-edge as well as computerized custom quilting.  I am SO excited by the possibilities!  The system that I ordered in late August is finally ready to ship and install on my APQS Millennium, and I finished the last of the training videos last night so I'm raring to go.  I absolutely cannot wait to start putting everything I've learned into practice on my quilts!  My IntelliQuilter should be up and running by Halloween.

Speaking of Halloween, my furry little beefcake puppy Samwise will turn one year old on Halloween!

Samwise Turns One Year Old on Halloween!

That's all you get for today, folks!  I'm linking up with the following linky parties:

WEDNESDAY

·       Midweek Makers at Quilt Fabrication

·       Wednesday Wait Loss at The Inquiring Quilter

THURSDAY

·       Needle and Thread Thursday at My Quilt Infatuation  

·       Put Your Foot Down at For the Love of Geese

Saturday, August 29, 2020

Machine Piecing the Modern Baby Clam Shells Quilt, with Help from QNM

Hello, my lovelies!  My one and only weekly goal last week was to START -- just to start, not to finish, mind you! -- piecing my Modern Baby Clam Shells quilt.  I created the design in my EQ8 software in December of 2018, with a specific baby in mind whose due date was several weeks away...  Then it took me awhile to find the 9.5" acrylic clam shell templates I wanted to use (from an Australian Etsy seller who has since closed her shop).  Then I hemmed and hawed about the best way to cut out completely accurate 9.5" diameter circles (10" actually, since I needed a seam allowance).  After cutting out all the clam shells, circles, and partial clam shells, I then realized I didn't know how to sew them together!  I had my heart set on old school curved piecing, which I'd done for Lars's Drunkard's Path quilt eight years ago, but I wasn't sure how to go about piecing a clam shell quilt.  Do you start at the bottom and work your way up, or start at the top and work your way down?  Searching online, I either found instructions that confused me and explained only the part I already understood (how to sew a curved seam) and left out the part I didn't know (where to start and how to progress through the piecing of the quilt).  I also found patterns that subdivided the clam shells to simplify the piecing, or for using a prepared edge appliqué technique to avoid piecing altogether, neither of which interested me.  Ugh!  Annoying!  Set aside and ignored for a year and a half, until I made it my goal for THIS week:


So, as you can see, I've met that goal already because I did start the piecing!  Yay, me! 😉.  I'm using my Golidilocks machine for this -- my 5.5 mm Bernina 475QE, which is why I have my portable SewEzi table set up in my studio next to the big machine's cabinet.


So that's my quilt design rendering, created in EQ8 software.  It should finish at 40" x 40" unless I decide to enlarge it somehow.  There may or may not be embroidered butterflies before the top gets layered for piecing.


As you can see, I'm using a bazillion pins, because I want the smoothest, most accurate curve possible and I don't want to clip the seam allowances.  I prefer piecing with Patchwork Foot #37 on my little machine, and I bought a Bernina seam guide that I can snug right up against the side of my foot just like the seam guide that came with the #97D foot for my big 750QE machine.  Having that fence-like guide out in FRONT of the presser foot makes it so easy to to feed the curve smoothly with a deadly accurate 1/4" seam.  I'm also using my Patchwork Straight Stitch defaults (lower tension for my Aurifil 50/2 cotton thread and a shorter stitch length of 2.0).  On my 475QE it's stitch #1303, but the same exact stitch on my other Bernina is #1326 -- go figure!


Yay!  The first seam!!  As you can see, I started in the middle of my quilt.  Where should I add the next patch?  Let's put another clam shell onto the blue half circle!


Yay again!  Smooth round curves are making me happy!  This is awesome; why was I so afraid?!  Let's add a circle next!


But then I started second guessing how I was going about all of this and wondering if I was going to piece myself into some kind of a corner.  And I remembered an article I'd saved when I was going through a haul of ancient Quilters' Newsletter Magazines that a former member of the Charlotte Quilter's Guild gave me about a year ago.  (She wanted to donate them to a current member of the guild and I was the only person who raised my hand).  So I stopped piecing and (miraculously!) located the article, filed away in one of my ubiquitous 3-ring binders.


THIS!!  THIS is the information I'd been looking for, and I had to go all the way back to a March 1997 magazine to find it.  The instructions are for hand piecing, but all I really needed was that piecing diagram explaining that you start at the top, alternating between rows one and two, and then work your way down adding row by row beneath the first two.  That, the pressing direction for seam allowances, and the Fig. 6 photo showing that the seam allowances need to be kept open where two pointy clam shell sides meet up.  


Maybe I would have been fine if I'd kept working my way out from the middle of the quilt, but maybe there's a good reason for working top-down that would have caused frustration and swearing and, God forbid, seam ripping.  I'd rather not have to reinvent any wheels on this quilt that is already so far behind schedule, so I left off working on the middle rows and started working on the top and bottom rows instead, per the magazine instructions.


By the way, in the QNM illustrations they have cut out their clam shell using tag board templates to mark the seam lines and then adding 1/4" seam allowances beyond the drawn line.  That makes it easier for hand piecing, since you can check periodically as you're stitching to make sure your stitches are landing right on the seam line on the back of your work as well as on the front.  My acrylic clam shell template has small holes along the edges that I'm using with a Frixxion heat erase pen to mark alignment dots on my clam shells.  I know some people have had horrendous issues when they've used Frixxion pens to mark quilting designs on the front of quilts, with "ghost marks" left behind or the ink reappearing in certain situations, but I am just twirling the tip of the pen inside the hole to make tiny black dots on the WRONG side of my fabric.  They disappear pretty well when I iron them, and if they are not completely gone, well, they are on the wrong side of the fabric where no one can see them anyway!


So here you can see the completed bottom row of my quilt, all pieced and pressed!  I now know that a normal quilter would have used whole clam shells along the outside edge and trimmed after piecing, but it seems to be working just fine.  I think I planned for a 2" wide border in that same blue so the clam shells would float away from the binding. My top row is completely pieced now, too, in addition to that bit in the center that I'd already started before locating my instructions.  My plan now is to continue piecing down from the top and up from the bottom per the QNM instructions, joining the sections together at the center circles.

SO, having met my goal of STARTING the piecing this week, what are my quilting goals for the week to come?

This Week's Quilting Goals

  • FINISH piecing Modern Baby Clam Shell Quilt!  
  • Load next charity top on the long arm and decide how to quilt it
  • Write next post for my Long Arm Linky party and schedule publication for Tuesday morning!

I'm linking up today's post with the following linky parties:

SATURDAY

·       UFO Busting at Tish in Wonderland

SUNDAY

·       Frédérique at Quilting Patchwork Appliqué

·       Oh Scrap! at Quilting Is More Fun Than Housework

·       Slow Stitching Sunday at Kathy's Quilts

MONDAY

·       Design Wall Monday at Small Quilts and Doll Quilts  

·       Monday Making at Love Laugh Quilt

TUESDAY

·       To-Do Tuesday at Home Sewn By Us

Saturday, August 1, 2020

One Monthly Goal for August, 2020: K.I.S.S.!


Good morning, and happy AUGUST!  Y'all, I'm still riding high on the euphoria from actually FINISHING my July OMG goals by the end of last month, the first time that has ever happened in however many months of linking up.  I even finished with a couple days to spare, giving me time to write and link up at the end of the month.  Is THIS what life feels like to people who don't bite off more than they can chew and then waste their time procrastinating?!!  Despite how eager I am to move Spirit Song from a work in progress to a completely finished quilt, I need to clear off my cutting table first before I can trim the excess batting and backing from Spirit Song and move on to cut my binding fabric.  

Friday, March 20, 2020

Y-Seam Reality Check and a Refresher Tutorial


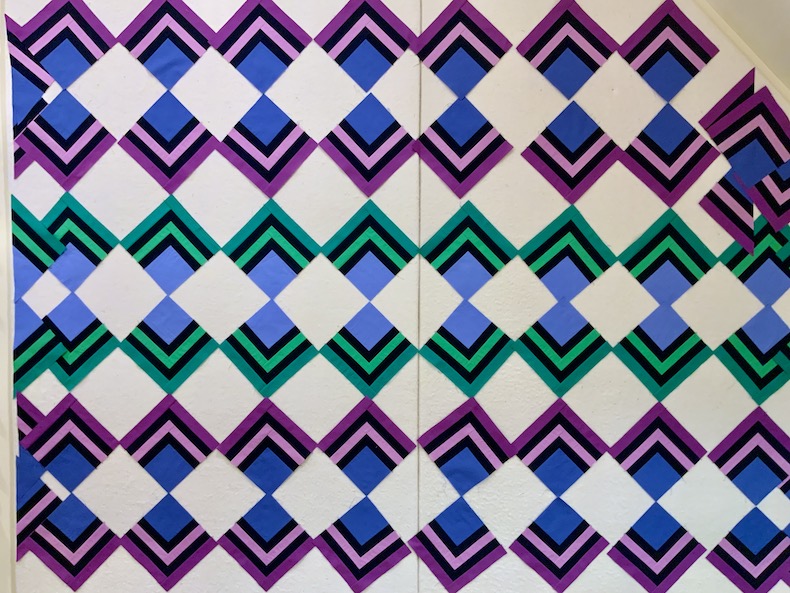
You guys, how did I look at this block yesterday and think there were only 8 Y-seams?  


My 20" Block
There are SIXTEEN Y-seams in this block!  See below.  Ugh.  I liked the Y-seams better when I thought there were only going to be eight of them.


The Wicked Block Diagram
So this block is kind of like the news lately -- it's twice as bad today as it was last night, and the only way to get through it is to just focus on ONE seam at a time instead of worrying about the whole block at once.  

I'm Piecing These Corner Squares First

This shot is for my own future benefit, because I never remember how I decided to press the seam allowances:

How Did I Press Those Seams?
You know, as I'm looking at this, I'm thinking that those Y-seam points would be crisper and flatter if I pressed these two seams towards the outside of the block instead of pressing them towards the red center square.  I was thinking "Press to the Dark Side" but now I'm second guessing myself...

Okay.  Two Y-seams waiting to be sewn:

Ready for Y-Seams
As you see in the photo above, I did NOT sew all the way to the raw edge of the fabric when I attached the green triangles to the white pieces.  I stopped 1/4" in, right where those seams are all going to meet up.  I also removed the stitches from that last 1/4" in the seam where the dark blue and red fabrics are joined in the foundation pieced unit.

The Piece In My Hand Gets Sewn On First
Just one seam at a time...  Pinning the first bit up to the Y-junction, with my final pin exactly where the seams are all meeting up and the green triangle folded neatly out of the way so it can't get caught in my stitching:

Here's How I've Pinned It
These are extremely fine pins (Clover Extra Fine Patchwork Pins) that I'm using, by the way, so I have no qualms sewing over them, especially as slowly as I'm running the machine for this precision work.  It's kind of like hand piecing with a machine needle.  If my sewing machine needle does strike one of these hair-thin pins, it shifts out of the way or maybe bends; nothing breaks and definitely no timing disasters!  

You Can See the Stitching Better Here
In the photo above, you can see how that previous line of stitching ends precisely where the next stitching will meet up with it.  After stitching along the pinned white side, I take out the pins, flip the seam allowance the other way, and tuck the white fabric out of the way so it doesn't get caught in the next line of stitching.  Pins are repositioned along the green triangle edge like so:

Ready to Stitch the Next Bit
Stitching down the next side, I backstitch right up to the previous seamline without crossing it, adjusting where that final stitch lands with the hand wheel if necessary.  This is why I'm using my Featherweight for the Y-seams instead of a modern computerized machine -- the manual Featherweight never takes an extra stitch when I'm reversing directions.

This is SLOW Stitching, Not Full Speed Ahead!
By the way, I've got a vintage Singer "cloth guide" screwed into the bed of the machine exactly 1/4" from the needle so I can use the original Singer multipurpose foot that came with the machine for piecing instead of a generic foot.  I have almost identical Patchwork Seam Guides for my modern Berninas that I also position exactly 1/4" from the needle on those machines, enabling me to switch back and forth between any of my sewing machines on the same project, knowing that my seam allowance and finished block sizes will be identical regardless of which machine was used.

After Stitching
The backstitching is necessary because we can't cross the seams to secure stitching lines with a Y-seam.  Since we're sewing right up to the seam intersection but not a single stitch beyond, the backstitching ensures that those stitches don't come loose.

One Down, One To Go (For This Corner Section, Anyway!)
Then the other side goes on the same way.  One of the reasons I pressed that red/white seam allowance toward the red square was so these two seam allowances (Red/white and white/teal) would nest together nicely, but I could have reversed the seam allowance on the white/teal...)

Same Process As Before
Sewing the first leg, you can see how I connect my new line of stitching to exactly where the previous stitching line left off.  From there I took 2-3 back stitches before pulling the work out of the machine, clipping the threads, and repositioning for the second leg of the seam:

Sewing Right Up To Connect to the Previous Stitching Line, then Backstitch to Secure
Pinning the Second Leg
...And then the threads are clipped, the work comes out of the machine, and the seam allowance is flipped out of the way so you can sew the second side.  I start a few stitches beyond that seam junction, backstitch right up to the point where all three seams converge, and then continue sewing forwards the rest of the seam.  At the Y-seam intersection, all three seam allowances are completely free from the seams.

Ready to Sew
Again, I've very carefully folded and positioned the white fabric out of the way so none of it gets inadvertently caught in the next leg of the seam.

Stitching Lines Meeting Up Nicely!
In the photo above, I've just stitched the left side of that green triangle.  Next I pull out those two pins from the green fabric, pull the green fabric out of the way to the left, and flip that seam allowance to the left so I can sew the next leg of the seam in the white fabric.  

Ready For the Last Side
See how that seam allowance on the left is still loose?  That's the whole Secret Magic of the Y-Seam.  You sew right up to the seam allowance but never INTO the seam allowance, and then you get a nice, smooth, pucker free finish on the right side of your block.

Two Y-Seams Later, This Is What I've Got
There are a couple of inexpensive gadgets that I use to make Y-seams easier.  First, in addition to printing foundation paper piecing patterns on newsprint from my EQ8 software, I also printed traditional piecing templates (with 1/4" seam allowances) for these chisel and quarter square triangle shapes onto heavy card stock.  Then I used a 1/16" hole punch to cut tiny holes in my templates at the corner points of the seamlines, just big enough to fit the point of my Sewline mechanical pencil.

Sewline Pencil and Mini Hole Punch for Marking Start/Stop Points
My yellow Sewline ceramic pencil shows up nicely on the dark fabrics.  For my light colored fabrics, I mark that start/stop point where the seams match up with a single dot from a Frixxion heat erasable pen.  (The dot is on the wrong side of the fabric right where the seams all meet up, and it disappears as soon as I iron the finished block unit.). You could also use a dot of regular graphite mechanical pencil instead.

Black Dot On Pale Blue Fabric is Frixxion Heat Erasable Ink Pen
What you want is a very tiny, very distinct dot that will not smudge with handling, indicating EXACTLY where that first/last stitch needs to land.  The black Frixxion dot above is very easy to see on light fabrics, and the same is true for the yellow Sewline dot on the darker fabrics, as seen below.  My final stitch will sink directly into the center of that dot, then I'll sew in reverse for 2-3 stitches to secure the seam.

Yellow Dot on Green Fabric is Sewline Ceramic Fabric Pencil
So anyway, I finished all four of these corner sections today.  I'm not sue which seams should be sewn next, and that's okay.  One day -- and one seam -- at a time, remember?  I will figure out which seam to sew tomorrow!

Stay safe everyone, and happy stitching!  I'm linking today's post with: ·       UFO Busting at Tish in Wonderland