
I don't normally post a client's post before they get it back from me, but my client Megan was so excited by the "teaser photos" I emailed her of her finished quilt that she gave me permission to post them right away. If she loves this quilt now, I can't wait until she sees it in person because it is just unbelievably soft and cuddly and even more gorgeous in person than it looks in the photos!
Megan pieced this striking quilt using vintage Kaffe Fassett shot cotton stripes (affiliate link -- you can still find these on Etsy!) that she's had in her stash for awhile, and when I saw the pictures of her quilt top I was instantly smitten by the way her unexpected cool turquoise sashing and binding fabric contrasted with the mostly warm, autumnal tones of her striped fabrics. So much energy and life in this pairing, don't you agree?
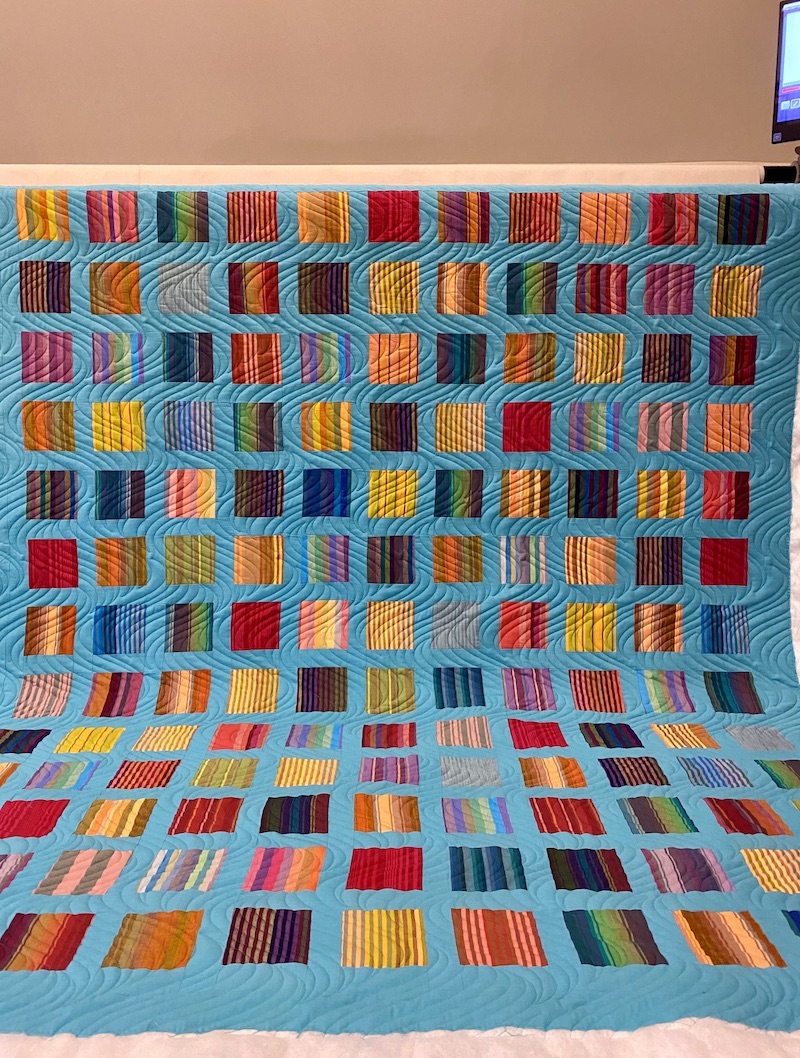 |
| 68 x 78 Shot Cotton Swatches Quilt with Curly Weave E2E Quilting |
I was delighted when Megan decided to go bold with her choice of quilting design, playing up the modern vibes instead of going with something "safe." Megan and I chose Curly Weave E2E, designed by Karen Thompson, with So Fine 50 wt thread in color Geyser, nearly identical to her background fabric color.
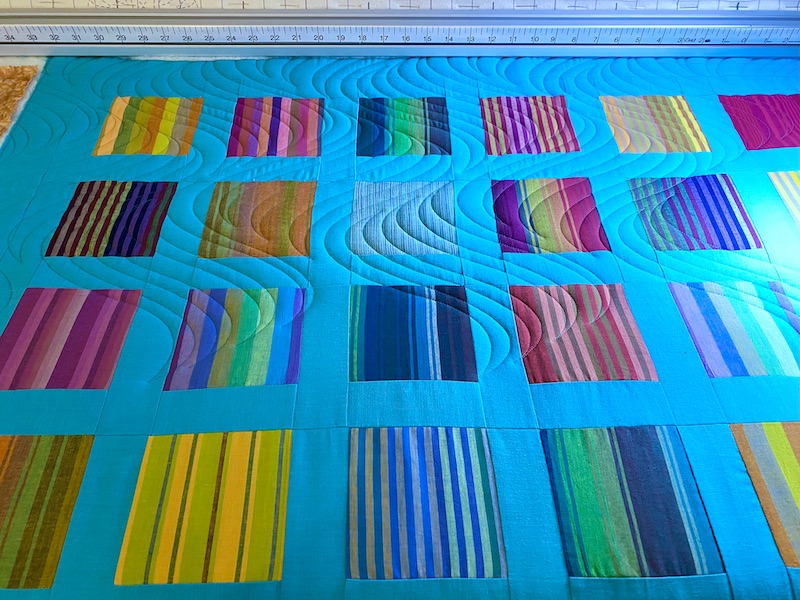 |
| Starting the First Row is So Exciting... |
The Curly Weave design I quilted on Megan's quilt is very similar to the Modern Eccentric design by Anita Shackelford that I stitched on Ann's Magic Carpet Ride quilt a few weeks ago. The difference is that this design is a little less dense than Modern Eccentric and the way the rows nest together is just a little bit more forgiving than Modern Eccentric. Megan wants this quilt to be for couch snuggling, so I didn't want to go too dense with the quilting design, and precision alignment of pantographs when you advance the quilt can be more challenging when stitching dense designs on a lofty batting like the scrumptious Quilter's Dream Wool (affiliate link) we used here. That's why I am continually adding to my library of quilting designs -- sometimes even if two designs appear very similar at first glance, they are both worth owning because each will perform better on different kinds of quilts.
My Loading Process
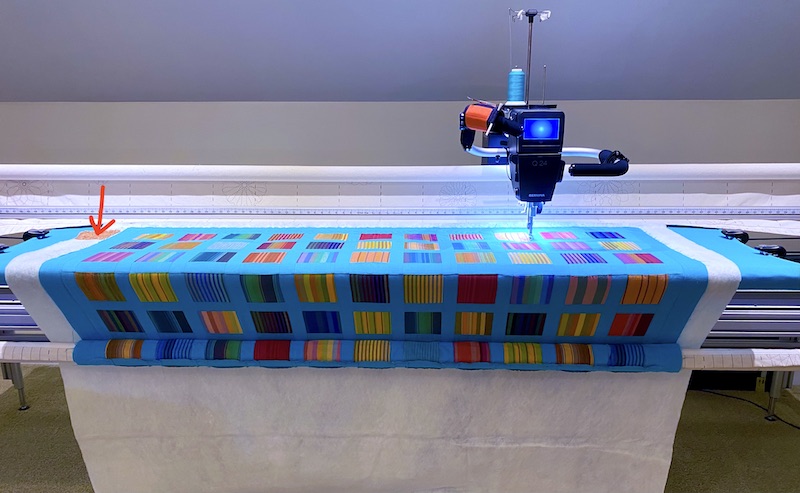
In case anyone is curious, the photo below shows what it looks like when I have a quilt loaded on my frame and I'm ready to start quilting. The very top edge of the backing is pinned to the canvas leader at the back of my frame, and since stitching on top of the leaders or pins would be VERY bad, the batting and quilting start a few inches down from the pins at the top of the backing fabric.
 |
| Why Do Long Arm Quilters Need Extra Backing and Batting? |
I load the backing fabric first, after checking to ensure that it is as straight and as square as humanly possible. If the client has given me enough excess backing fabric and her ends aren't quite straight and square, I will correct that at no extra charge before loading because a square backing is essential for preventing any ugly pleats or tucks from happening on the back side of a quilt. I also pin every quilt top to the quilt top roller that you see at the front of my frame, just below the quilting work surface. Lots of quilters skip this step and "float" quilt tops instead of pinning them to the leaders, but I've tried it both ways and I have much, MUCH better control over keeping a quilt straight and square throughout quilting when I take the extra time to pin the quilt top. That gives me even tension on the quilt in all directions, and it makes it easier for me to isolate and address any areas of fullness due to "piecing personality" that a quilt might have, whereas when I have floated quilts in the past I've occasionally had those fullness areas shift down throughout the quilt without me realizing it until I got to the bottom of the quilt and it was curved like a smile instead of straight. Yikes! There were no such personality problems in Megan's quilt, but I give every quilt the same TLC in the loading process because sometimes those fullness areas aren't obvious when you first inspect the quilt top. The other reason I went back to pinning is that some of the dense, most difficult to align modern pantos require that even tension throughout quilting that I can only get when I pin the bottom edge of the quilt top to the leader and roll it up. It can take me 2-3 hours to prep and load a large quilt top and set up the design in my computer, before I even start quilting, but I feel like 90% of what makes or breaks the quilting is determined by what happens in the prep and loading stage.
One more thing -- see that red arrow in the previous photo, pointing to a scrap of orange fabric that I've slapped down on the excess batting at the side of Megan's quilt? This is why I need the backing to be so much wider than your quilt top. There are clamps attached to the very edges of the backing fabric that I don't want to hit with my machine carriage, but then the space between the clamps and the quilt top is crucial for checking my stitch length, tension, and overall stitch quality BEFORE I start quilting on the actual quilt. Backing fabric and batting can have a huge impact on tension, which is why I test stitches every time, with every quilt, even when I'm using the same threads with the same needles. I also slap a scrap of fabric at the side to do a stitch test at the start of a new day, or if I've stopped the machine because I don't like the way the stitches look, etc. This is even more important with custom quilts that may have multiple thread types in different weights throughout the quilt -- any excess fabric gets returned to you with your quilt, nothing is "wasted" unless you choose to toss the leftover fabric strips. But I would much, MUCH rather do those test stitches and tension tweaks off in the margins than have so little excess around the edges that I have to make adjustments on the fly in the middle of your quilt!
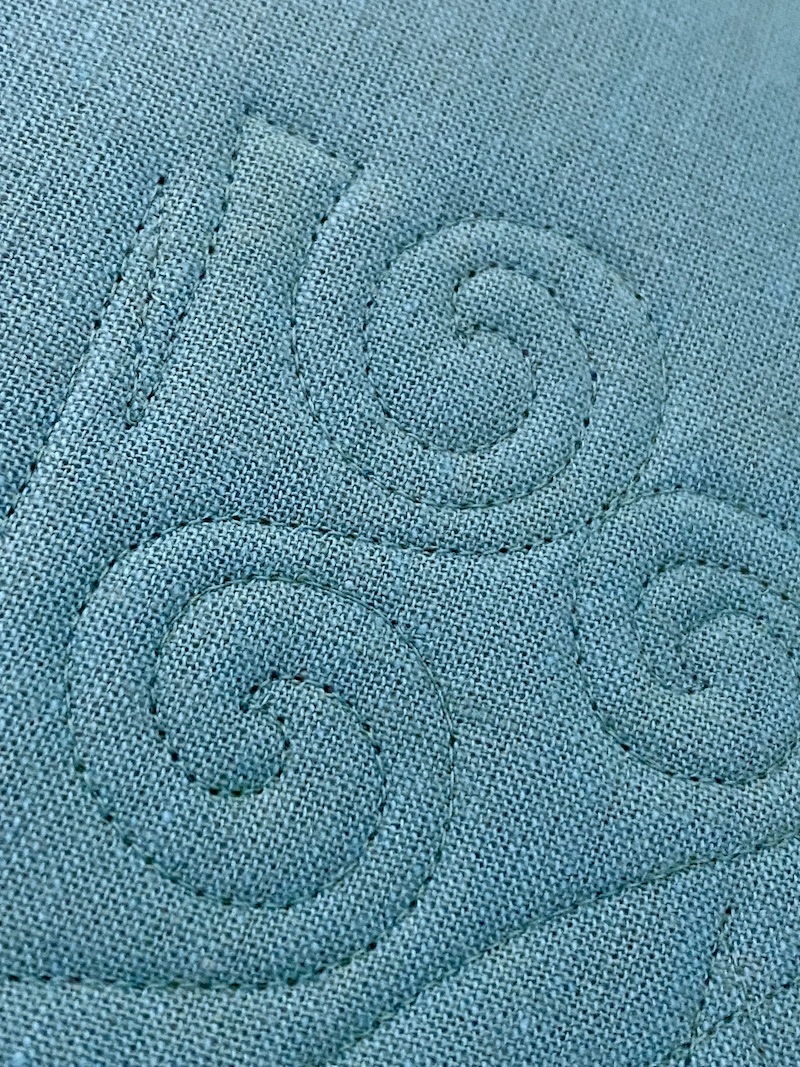 |
| Tension Test Scribbles from the Backing Side, Magnified 2x |
When I'm testing tension and stitch length, I scribble a couple of designs in the directions that a long arm machine is LEAST happy moving -- meaning that I start at the bottom RIGHT corner of the fabric scrap and scribble quilt some loops, spirals and diagonal lines moving away from me and towards the upper LEFT corner. If I run my fingernail along the stitching lines on the backing side, I can feel little "clicks" from the upper thread if my tension is WAY off, but even if I don't feel anything drastic like that, I'm still not satisfied until I crawl under the quilting frame and snap some photos of the back of the quilt with 2x magnification on my phone. In those photos, I can see much more easily if I have slight flatlining of the bobbin thread when stitching in certain directions, as happened in the photo above. Increasing my upper thread tension by just .25 is the difference between "good enough" tension and "good enough for Rebecca" tension.
I was especially grateful that Megan was generous with the size of her backing fabric because, like the shot cotton squares, the turquoise backing fabric was a looser, more open weave than most quilting cottons. If I'd had to do my stitch tests on any other fabric besides her actual backing fabric, I might have gotten beautiful stitches on my test swatch and NOT so beautiful stitches on her actual quilt!
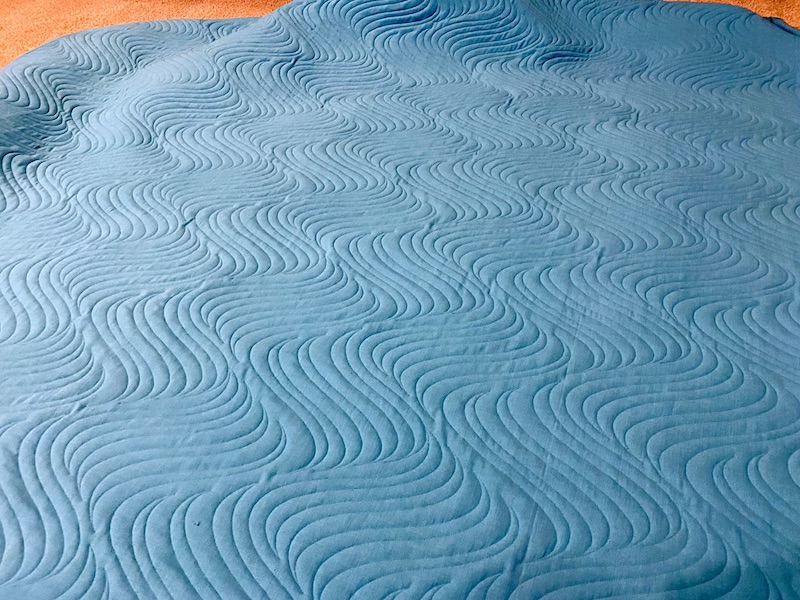 |
| Fabulous Texture on the Back of Megan's Quilt |
By the way, I used the exact same 50 weight So Fine thread in my bobbin as I ran in the needle for this quilt, even though I often pair So Fine with a 60 weight bobbin thread like Bottom Line or MagnaGlide Classic 60 weight. Two reasons -- first, I didn't happen to have a matching 60 weight turquoise bobbin thread to pair with Geyser So Fine. But honestly, I would have special ordered a cone if I thought it was the best choice for the quilt. Those Kaffe Fassett shot cottons have such a muted aesthetic that I didn't want to upstage them with a shiny quilting thread, and both of those 60 weight options have a slight sheen to them. I mean, SUPER slight sheen, barely noticeable... But So Fine works great as a bobbin thread, tension is actually easier to set with the same thread in both needle and bobbin, and the So Fine Geyser thread was such a perfect match to the backing fabric that you can't tell the quilting thread apart from the yarns in the fabric weave! This is why I keep so many threads on hand:
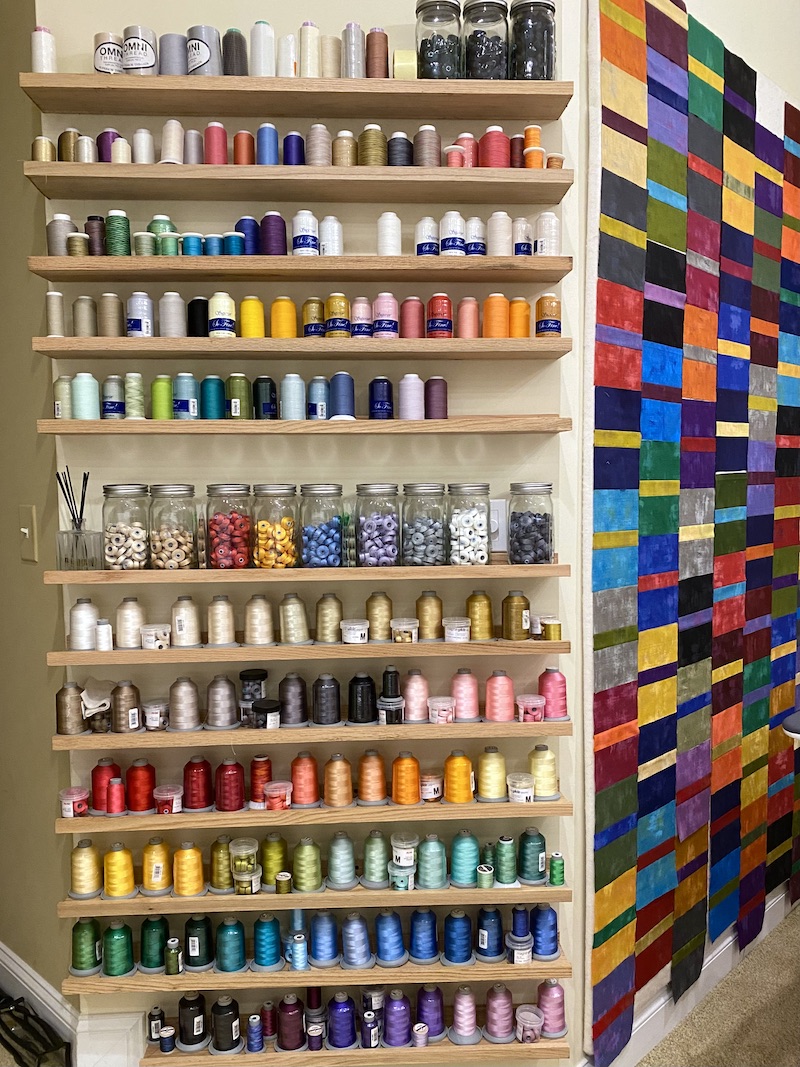 |
| This Is What Not Enough Thread for Rebecca Looks Like |
Those are just my long arm quilting threads, by the way. All of my piecing, appliquéing, general sewing, hand stitching, and embroidery threads are squirreled away in other locations. Hello, my name is Rebecca, and it's been exactly FOUR hours since I placed my last thread order... 😂😂😂
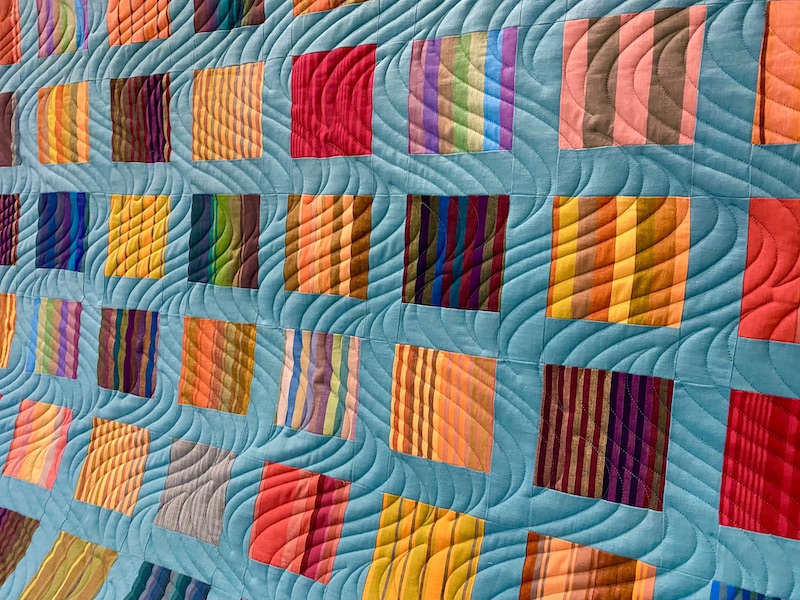 |
| I Love How Megan's Quilt Turned Out! |
You know, with a simple pieced top like this one, just squares with sashing and a border, there are literally thousands of different quilting designs that would have worked. Hundreds of designs that would have looked great, and which one is the best option has as much to do with the owner/intended recipient of the finished quilt and its intended use as it has to do with the piecing design or the fabrics in the quilt top. When you find the right design to address all of those different considerations, the result is pure magic.
Ooh, I almost forgot to show you the Before Quilting photo! I know everyone loves to see the Befores and Afters.
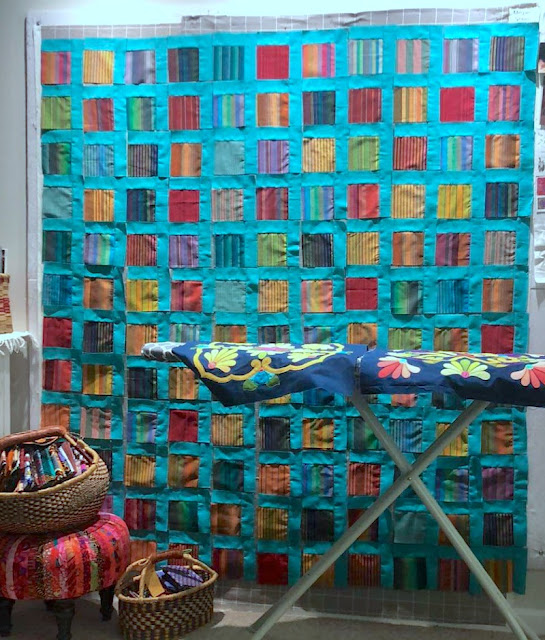 |
| Before Quilting (Before Piecing, Actually!) |
I actually don't have a photo of the finished quilt top before I finished it -- that's a photo of the blocks and sashing strips laid out on Megan's design wall before she sewed it all together. (And do you see that tantalizing applique project on the ironing board? I cannot wait to see that one when it's finished).
Megan, thank you so much for bringing me this quilt! 😍. I know I say this all the time, but I seriously have the BEST. JOB. EVER!
PSST!! I'd Love to Quilt for YOU!
By the way, if you or any of your quilty friends has a quilt top or two that needs quilting, I'd be delighted to quilt for you! I am currently accepting quilts for January & February of 2022. Click here to learn how easy it is to book a quilt with me!
Apparently it's Thanksgiving already in the United States next week -- yikes! Where did the time go?! I am hosting a very small feast this year, just me, my husband, my two sons, and my mom. I've taken the easy way out by ordering everything catered from Whole Foods this year except for my molasses pumpkin pies that I cannot live without. Although I've enjoyed preparing and eating elaborate multi-course Thanksgiving menus in the past, I felt the urge to simplify and streamline this year. Especially now that both of my boys are away at college, I don't want to be slaving away in the kitchen for most of their Thanksgiving break. The time is just slipping by faster and faster every year, and I don't know how many years I have left before the boys will have their own families and need to split holiday time with in-laws and all of that.
15 comments:
That wave design on that quilt is AWESOME! WOW!!!!!!! Kudos to you for streamlining Thanksgiving preparations so you can spend more time with your sons!
This is gorgeous! Your client is lucky. OMG, the combination of quilting choice and color is divine
Wow! The quilting design really enhances that pieced quilt -- gorgeous!
What a gorgeous quilt!!! So striking. We are having a small Thanksgiving here since youngest daughter is due any day. She won't be able to travel the 3 hours back to our hometown so we decided to just spend Thanksgiving here with our girls. We will either have a baby joining us or not, but she won't eat much. LOL! And we are going very untraditional with steaks and twice baked potatoes! But still having my Pumpkin pies!
beautiful quilt and thanks for the explanation on how you do your quilts and why I found that very interesting
for a big change I am not cooking Thanksgiving dinner at my house but we are going to our younger daughter who has a big new house that she wants to show off. Mike and I will be joining them for a 2 day stay and sharing the day with our son-in-law's family also so instead of a tiny day like we usually have there will be about 20 of us. I will make the pies up there the day before.
I think we all love the before and after shots because it is such a major transformation!
Another beautiful quilt, and I love, love, love that quilting design! Nice work!
The swirly pattern is so perfect for the modern structured quilt. The swirls add so much life and zest to the lovely shot cotton squares. A question....on the before photo, on the ironing board, is a lovely applique reminiscent of tentmakers of Cairo work. Is that your work or a clients? Tell us more.
Oh my, I love the movement in the quilting. This quilt is gorgeous!
I love this quilt! Both the choice of fabrics, and your excellent Quilting design. I saw it on Instagram and thought, wow, that’s bold with the blue background. But the Quilting just finishes it off perfectly. Well done.
Another fantastic finish! I love your explanations of your method of loading and testing for longarm tension. I have spent years! yes years! trying to get the tension right. I recently replaced my bobbin case and that has made a world of difference. Apparently the original one was bent or warped or something. Who knew???
Anyway...I really wanted to say we should organize a thread hoarders anonymous group...LOL! I thought I was the only one who has dozens and dozens of spools of thread. All for different purposes of course.
That is stunning. The quilting makes such a statement.
Fabulous, as always, Rebecca! I enjoyed reading this quilt story!!!
I certainly enjoyed reading about your process with this quilt. Especially the part about how much time it takes to prep the quilt before the actual quilting begins - many people don't realize that's a timely process. Sounds like we should have "I'll Show You My Threads If You Show Me Yours" post, lol. When I first started quilting, I had a monthly delivery of various colors. I now have some that I figure I will Never use - doh! But they're very pretty to look at.
Happy Thanksgiving to you and yours. We are downsizing the menu this year ourselves. Yours pumpkin pie sounds delicious though!
That is a beautiful quilt!!! The contrast in colors is amazing and the wavy quilting is awesome on it!! Enjoy your feast - I agree - its more fun to hang out with the people!!
Post a Comment