
Good Monday morning, everyone! I am delighted to share that, FIVE and a half years after starting my version of the 2014 Moda Modern Building Blocks sampler quilt, I have finally finished making all 48 blocks!
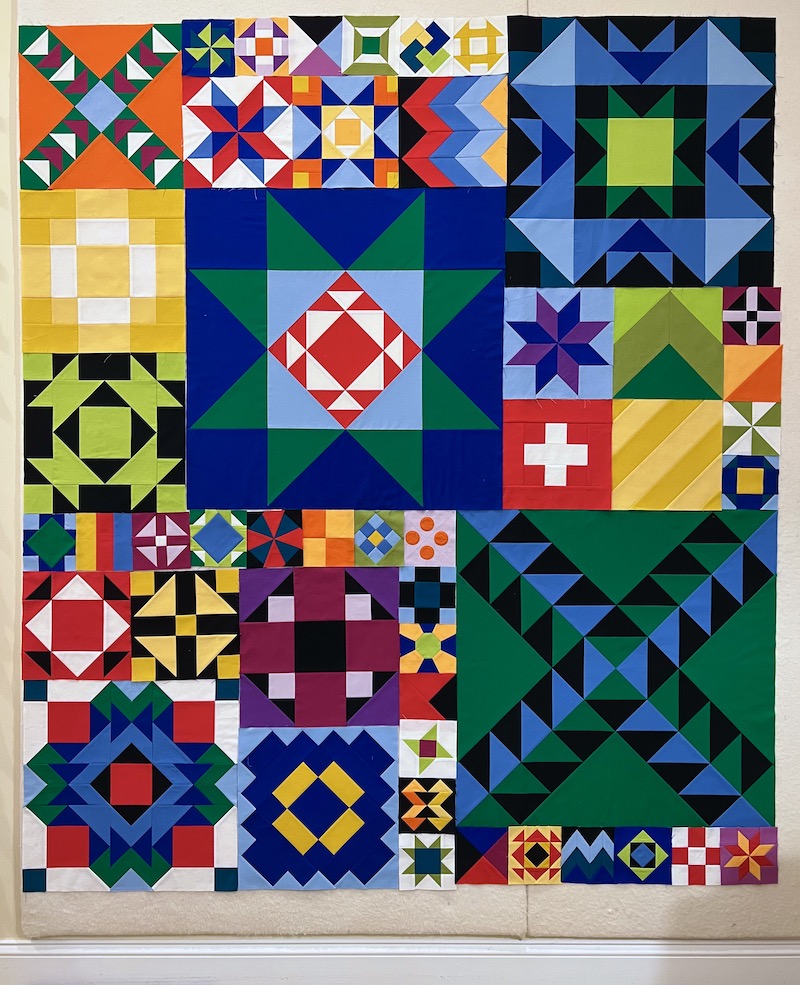 |
| Woo Hoo! All 48 Sampler Blocks Are Finished (Finally)! |
No, the blocks aren't sewn together yet. Expect that to take me some time, because after all of the time I've invested into making these blocks there is no way I'm willing to sacrifice any pointy points along the seam lines where the blocks join together. This quilt top will be assembled slowly, with lots and lots of pins and probably also with lots of help from my BFF, the seam ripper. Which is fine, because I can use that time to think about how the heck I'm going to quilt this when the top is finally done.
 |
| 5 Inch Finished Block, Not In Original Moda Pattern |
The black, orange and yellow block shown above was not in the original Moda pattern. It's a traditional block design that I swapped in from my EQ8 quilt design software (Disclaimer: this post contains affiliate links), either from the main EQ8 block library or from the BlockBase Plus add-on containing all of the blocks from Barbara Brackman's Encyclopedia of Pieced Quilt Patterns. I don't remember the name of this block, but it supports the early 1980s graphic design vibe I am aiming for with this quilt, especially with the opportunity to use two shades of orange and yellow for a three dimensional effect. There are two Y-seams in that block, on either side of center where the black QST (quarter square triangles) on the outside edges of the block are sewn to pairs of 45 degree diamonds. The Kona Solid colors used in the block above are Tangerine, Goldfish, Grellow, Sunflower, and Black (links take you to where those Kona colors can be found from Etsy sellers).
This next block below was easier. I foundation paper pieced it (due to the Unfriendly-to-Rotary-Cutting measurements you get when you resize a 6" block down to 5") in three sections and then just joined the three sections with straight seams after removing the foundation paper.
 |
| Another 5 Inch Block, in Cerise, Orchid, and Black Kona Solids |
The block below is another traditional quilt block that I substituted (not in the original Moda pattern). Again, due to my weird 5" block size I couldn't rotary cut the patches, so I cut the center square out with a template, foundation paper pieced the trapezoid side pieces, and then assembled the block with four Y-seams after removing the foundation papers.
 |
| 5 Inch Finished Block in Clover, Peridot and Snow |
Sometimes when I print foundation paper piecing patterns in EQ8, the software will give me suggested order of construction numbering on the foundation papers. Often with more complex blocks that are not usually made with FPP the software has no suggestions and I have to figure it out myself, or if the software does give numbering I might change it to get my seams to nest when I sew the FPP units together, as with this block. It's a lot easier to get seam intersections spot-on when two opposing seam allowances lock together where they meet up, and it makes for a nice, flat block when I'm finished. Not having access to the original Moda Modern Building Blocks pattern, I have no idea whether their instructions were to press all of the seams open as so many "modern" quilt patterns do. In my version, all seams are pressed to one side because that's my preference. I feel like the seams will be more secure over time as this quilt is used and laundered, and seams pressed to one side also gives me the option to SID (stitch in the ditch) if I decide to custom quilt this one. More on that later...
 |
| The Back is Almost As Cute As the Front |
This last one is a traditional quilt block called Friendship Star that was part of the original Moda Modern Quilt Blocks pattern, but the Moda version of the block has unnecessary "simplification" seams dividing the chisel patches into squares and HST (half square triangle) patches so there are no Y-seams.
 |
| Moda's Friendship Star Block with Extra Seams |
I'm not sure whether the oldest versions of this block in antique quilts include those seams or not, but my personal preference is to eliminate any seams that aren't absolutely necessary in a quilt block, even if that makes construction of the block more difficult. I find a seam between two patches of the same fabric distracting, I don't want the additional bulk of seams that don't need to be there, and let's be honest -- I like the challenge!
In the block drawing below, I've circled the four Y-seams/partial seams in my Friendship Star. (Note that I forgot to mirror-image my block when I printed my foundation paper piecing patterns in EQ8 and that's why the asymmetrical blocks are backwards compared to the block drawings. FPP blocks are sewn upside-down!)
 |
| Friendship Star In Progress, After FPP but Before Y-Seams |
When I FPP'd the rectangular Kona Snow and Chartreuse units, I deliberately did NOT sew through the seam allowances where I needed "hinges" to do the Y-seams. Don't know if you can see it in the picture, but I have tiny chalk dots placed 1/4" in from the corners of that Cerise center square to mark the exact point of the seam intersections.
 |
| Finished Y-Seam |
Y-seams really aren't difficult, but they do require slowing down and concentrating. I use my favorite Clover Extra Fine Patchwork Pins to keep those seam intersection dots aligned during stitching without distortion. The key is to stop and backstitch exactly from that marked seam intersection point, without sewing through into the seam allowance or catching an adjacent patch of fabric in the stitch. I always sew the last couple of stitches by manually turning the flywheel on my Featherweight machine, one stitch at a time, so it's kind of like "hand stitching by machine."
 |
| 5 Inch Friendship Star: Look Ma! No Extra Seams! |
Even though all the blocks for the main body of the quilt are completed, I still have a bit more work to do on this quilt top. My version of this quilt is going to have rainbow borders inspired by Robin Williams' suspenders on the television show Mork & Mindy, and I'll be foundation paper piecing those border corner blocks.
 |
| Rendering of 94 x 104 Quilt With Borders |
This quilt will finish at 94" x 104" for a Queen bed in my son Anders' bedroom. Which brings me to the Quilting Quandary... I am torn between edge-to-edge versus custom quilting on this one! My son has already expressed reluctance about having a "masterpiece" on his bed that he has to worry about "ruining." He is 18 and away at college at the moment, but when he comes home he will likely resume his habits of eating fast food and crackers in bed, wearing shoes on the bed, inviting the dog up on the bed etc. Investing less time in the quilting with an E2E design would get the quilt finished and on the bed sooner (since Anders' bed has been without a homemade quilt ever since we traded his Twin for a Queen several years ago) and would give less of a "don't-you-dare-mess-up-Mom's-quilt" vibe. Because that's exactly what my husband is going to say to my son -- "What are you doing eating a pizza in your bed?! You're going to mess up Mom's quilt!!!"
Another advantage of an E2E design would be to keep the quilting density even across the entire quilt, maintaining the batting loft for a quilt that is comfortable to sleep under. I have seen custom quilted versions of the Moda Modern Building Blocks quilt that are fabulous, but that fall into the "quilted-to-death" category that looks great in a quilt show at the expense of being less snuggly and soft.
And yet... You guys, I have put a lot of time into this one and I'm very pleased with the patchwork. So what I'm leaning towards right at this moment is light density custom quilting with all of my seams stitched in the ditch to show off my pretty little points. I may or may not do any additional quilting in the smallest 5" blocks, but some of the patches in the larger blocks would need additional quilting lines in order to secure the batting adequately. If I go this route, I want those quilting lines to be as unobtrusive as humanly possible so I'll probably use 50 weight Aurifil threads color matched to all of my fabrics. In case anyone is wondering, this will NOT get the quilt finished and on the bed quickly...
Well, that's all you get from me today! Just a heads up; I'll be taking a few weeks off in April (Time Off for Good Behavior, as my Dad used to say) so I might not be responding to comments as promptly as usual. If you are interested in getting on my quilting schedule, please email me a photo of your quilt top along with its dimensions to Rebecca@RebeccaGraceQuilting.com and I'll be following up with those emails in the order received when I return to work on April 25th. Just so you don't forget about me, I'll be writing and scheduling a few blog posts showcasing some recent clients' quilts that will publish automatically while I'm gone. Enjoy this lovely Spring weather and happy quilting, everyone! I'm linking up today's post with my favorite linky parties, listed on the left sidebar of my blog.
9 comments:
you sure will have to look closely at how to piece those blocks together being different sizes - glad to hear you have them all done now though even if it takes awhile to the finish line - it is progress!
Wahoo. . celebration time! Congratulations on piecing all of the blocks. While you do have a quilting dilemma, I imagine you will have it worked out by the time you piece the top together. I too like seams pressed to one side for stability. Seams pressed in this manner are much easier to stitch in the ditch!
I’ve been swapping out blocks in quilt alongs, changing block sizes, and drafting my own blocks a lot lately. I’ve also found that using the paper piecing option in EQ to be fabulous for this purpose! It means that I don’t have to fuss with strange sizes to rotary cut them, and I still get the exact outcome that I originally pictured in my head. So great! Your quilt looks amazing, and I can’t wait to see it as you keep making progress with it. The border makes me smile, just thinking of those suspenders :)
Yup -- I'm not at all surprised that you've finished your blocks! And, wow, do they look great! :) Despite all the time you've put into piecing this quilt, I'd be tempted to do an all-over quilting design (assuming I had a longarm like you ), simply because of its home on a young man's bed. Whatever you finally decide, I know it will be wonderful :)
Beautiful job, Rebecca! There are so many cool E2Es now that I'd vote for that in a heartbeat. Sounds like your heart is beating a different rhythm. I'll be watching for the final decision. Enjoy your time off!!!
The blocks and top look fabulous. Mille kudos! Now, please help me understand about those Y-seams in the Friendship Stars. Based on that post-FPP/pre-Y-seam photo I would sew one partial and three full length seams to assemble the block. What is the advantage of your method? What am I missing?
I can understand why you're torn on the quilting approach although it seems to me that you've already made the decision. You made the to-date choices, i.e. design, fabrics, piecing methods, etc. While it may go out the door with him when he gets his own place, you designed it for your house and have approached it as a skill builder. Now is not the time to take the safe route.
Looks great! I will be anxiously awaiting seeing the final top with borders. Enjoy your time off.
Really gorgeous colors and crispness to the arrangement. I'm with you, I like to eliminate unnecessary seams too. It does sometimes make the final assembly of a block more fiddly, but erases the division of the solid. Thanks for explaining your methods.
It's a beautiful quilt! Love your plans for the borders, that rainbow is really fun.
Post a Comment