Showing posts with label Sampler Blocks. Show all posts

Friday, October 7, 2022

The One Where the Longarm Quilter Finishes Her OWN QUILT: Nanu Nanu! Retro '80s Building Blocks is Ta-DONE

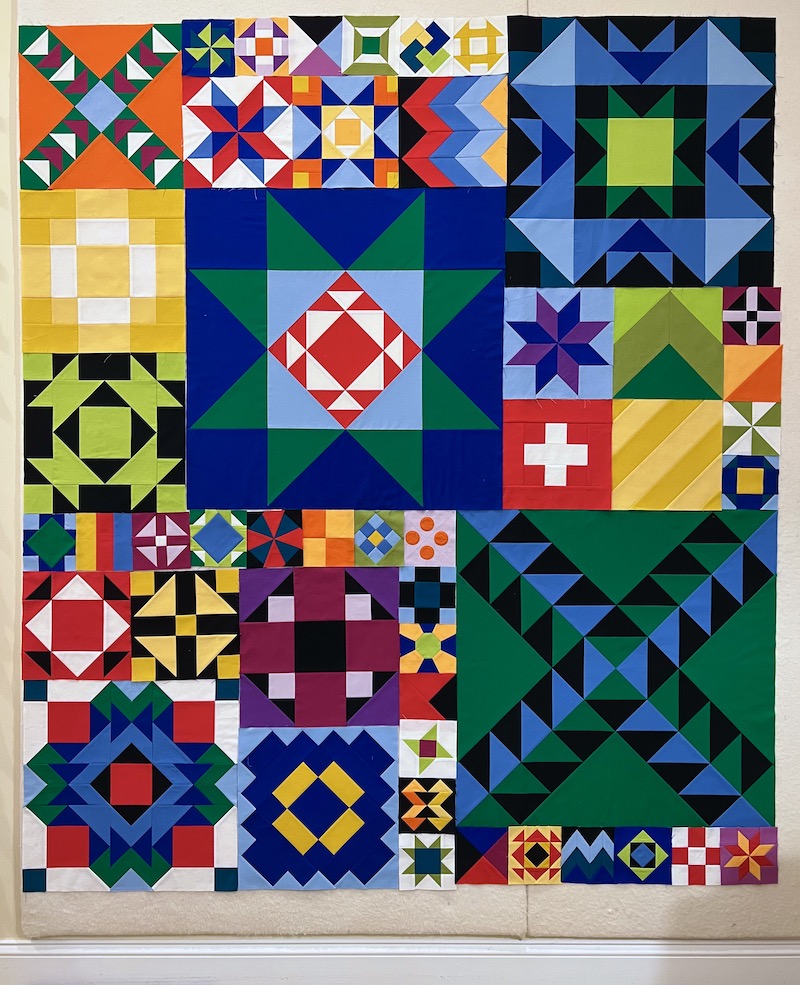
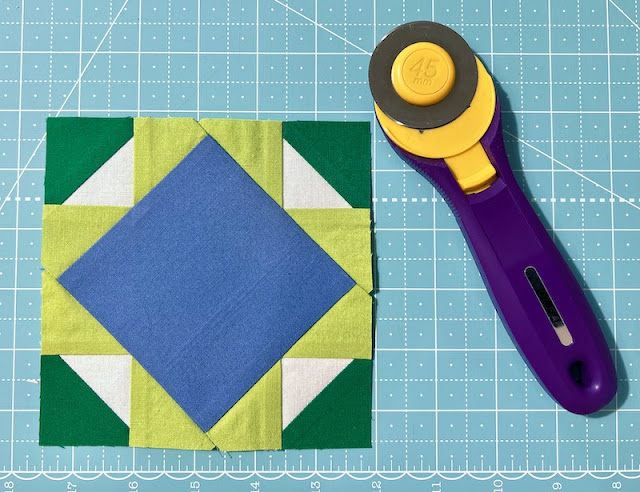
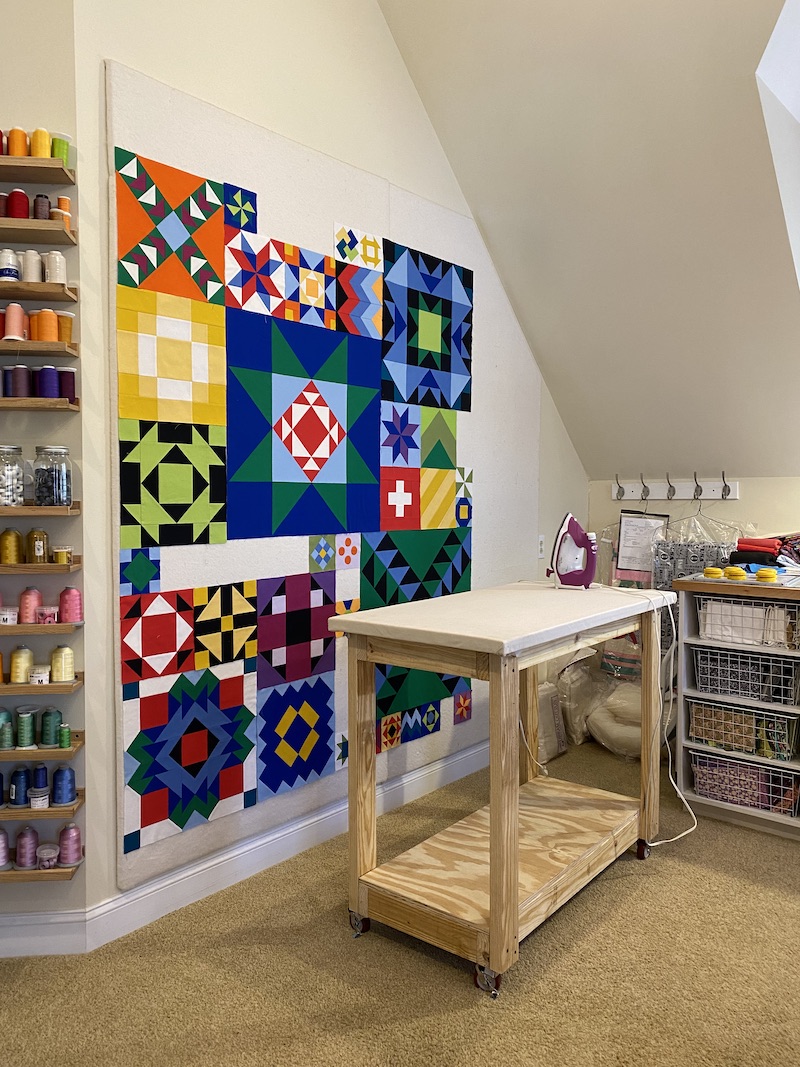
Y'all are not going to believe how I decided to quilt my Retro '80s Building Blocks sampler that I've been working on in fits and snatches since 2016.  When I started this project, I was drawn to it partly because it would be so much fun to custom quilt each block individually...  But by the time the quilt top was finished SIX years later (who's counting?), I just wanted the quilt to be done.

85 x 93 Nanu Nanu! Retro '80s Building Blocks is FINISHED!

I know some of you are in shock, wondering why I would take a challenging quilt pattern, make lots of changes to make it even more difficult to put together, and then just quilt over six years of blood, sweat and tears with an allover meandering edge-to-edge design.  Well, I will explain.  

Reason #1: This is a Bed Quilt, Not a Show Quilt

This Time, It Fits the Bed Perfectly

Don't you love how the rainbow borders tie in with the Pink Floyd poster above the bed?  And it's no coincidence that I have the exact same shades of blue, yellow, green, white and red in my quilt to match the wallpaper in the adjoining bathroom, either.  I matched my Kona Cotton Solids Color Card fabric swatches to my handprinted Italian wallpaper in the early planning stages of this quilt!  Once an interior designer, always an interior designer...

From his second birthday until he was 12 years old, my younger son Anders slept underneath his Mommy-made "Froggy Quilt of Many Colors."  I finally took it off the bed because it was beginning to show some serious wear and because I thought the novelty frog print fabrics were too babyish for a middle schooler, and I promised him that I would make him a new quilt.  Because I overcomplicated the plan for the new quilt and got sidetracked with lots of other projects along the way, Anders has been sleeping under a plain old comforter from Bed Bath & Beyond for the past 6 or 7 years, a comforter that was supposed to just be "temporary" until Mom finished the new quilt.  Oh, the SHAME!  I can't tell you how good it makes me feel when I walk past his room and see a handmade quilt on his bed again!  

Saturday, June 11, 2022

Nanu Nanu! Borders Are In Progress for My Retro '80s Building Blocks Sampler

Y'all, PROGRESS IS HAPPENING on my Retro '80s Building Blocks quilt!  I foundation paper pieced my 6" border corner blocks yesterday:

6 inch Border Corner Blocks Completed

The fabrics in my corner blocks are Kona Cotton 1019 BLACK Kona Cotton 146 GLACIERKona Cotton 25 OCEANKona Cotton 317 PERIDOTKona Cotton 476 GRELLOW, and Kona Cotton 1370 TANGERINE (By the way, this post contains affiliate links.  If you scroll all the way to the bottom, I've got links to where you can find every single fabric that I used in this quilt).  

Meanwhile, I've finally sewn the interior blocks of this quilt together.  (At which point a little devil on my shoulder whispers "You could be done with this now, if you skipped the borders..."). Begone, Devil!  Without the borders, the quilt would be too small to fit the bed!  ðŸ˜¤

Here it is, draped (sideways) over my longarm frame for measuring:

Quilt Top Sewn Together, Sans Borders

I always take border measurements through the vertical and horizontal centers of the quilt top rather than at the edges, and that bar on my 13' long arm frame comes in handy for measuring.  It's a lot longer than my cutting table.

Tuesday, May 10, 2022

Progress On the Retro '80s Building Blocks Quilt is Happening! Nanu Nanu!

Hello and Happy Tuesday!  It's been awhile since I've set any goals for my personal sewing projects, but I'm right on schedule with quilting commitments for clients and I'm SO close with my Retro '80s Building Blocks sampler...  See, I managed to assemble the "A" section of the quilt top last week, the part that I've outlined with a red rectangle: 

First Section Assembled, No Casualties Suffered By My Points

Woo hoo!  And then I assembled section "B" this morning.  This one was a lot faster since it was only three big blocks and no fiddling around with the little ones, but still very satisfying to have another chunk of the quilt top put together:

Second Section Assembled, Still No Catastrophes

This is slow going because I'm working out which way to press the seam allowances between the blocks as I go along and, total honesty -- I was procrastinating putting the blocks together once I'd finished them in case there was going to be a lot of seam ripping and swearing involved like there was when I was joining all the blocks together for my Sermon Scribbles quilt awhile ago.  I am a Side Presser and not an Open Seam presser.  When my seams are pressed in opposite directions and they nest and lock together at the seam intersections, that's when it's the easiest to get those seams to line up perfectly.  But without sashing between blocks and with so many different block styles in the quilt -- and without any pattern instructions telling me which way to press the seams to match up like that -- sometimes it works out and it's easy, and other times I have to match two seams that are pressed in the same direction and use that little hump-jumping tool to keep my presser foot level as it passes over the giant mountain of seam allowances!

Saturday, May 7, 2022

And Now, Back to Our Regularly Scheduled Programming: Linda's Exquisite Traditional Quilts

HAPPY MOTHER'S DAY to all of the mothers, grandmothers, sons of mothers, and daughters of mothers out there!  The last few quilts I've shared on the blog have been modern or contemporary in their fabrics and patchwork design, and I love those styles.  But I also adore really precise, well-executed traditional patchwork in timeless reproduction fabrics.  Fellow Charlotte Quilters' Guild member Linda Dassenko excels at traditional patchwork and I was delighted when she brought me two of her masterpieces for quilting.

Linda's Everyday Patchwork Sampler

Linda's 52 x 60 Everyday Patchwork Sampler

After seeing the Baptist Fan design I quilted on Cathy's quilt last year, Linda thought it might look good on her Everyday Patchwork Sampler and I wholeheartedly agreed.  While we often think of edge-to-edge quilting designs as only suitable for modern quilts, the Baptist Fan edge-to-edge design has been a staple of hand quilters for hundreds of years.  Originally, quilters would mark the Baptist Fan design on a quilt as they went along, using a string knotted at regular intervals and a pencil or piece of chalk, like a swing arm compass.  Each knot on the string corresponded with one fan arc.  This resulted in an allover quilting design that was fancier than just quilting along the patchwork seam lines, but still quick and easy enough to execute for utilitarian quilts.  Since the Baptist Fan design has been so popular throughout so much of the United States for hundreds of years, it's an excellent option for machine quilting traditional and reproduction quilt projects.

Ready For Her Close-Up: Look at Linda's Perfect Little Flying Geese Points!

Of course, I did not use knotted string or pencils to quilt the Baptist Fan design on Linda's sampler -- I resized the digital design to complement the scale of Linda's piecing and stitched it out with my computerized Bernina longarm machine.  I used So Fine 50 weight matte thread in color Mushroom (this post contains affiliate links) for the sampler quilt to minimize overstitched areas in the design and to ensure that the texture of the quilting design is what you notice, not the machine stitching.  The batting for this one is Quilters Dream 80/20 Cotton/Poly blend.

Monday, March 28, 2022

Y-Seams Make Me Feel Like a Boss: My Retro '80s Sampler Blocks Are Finished!

Good Monday morning, everyone!  I am delighted to share that, FIVE and a half years after starting my version of the 2014 Moda Modern Building Blocks sampler quilt, I have finally finished making all 48 blocks!  

Woo Hoo!  All 48 Sampler Blocks Are Finished (Finally)!

No, the blocks aren't sewn together yet.  Expect that to take me some time, because after all of the time I've invested into making these blocks there is no way I'm willing to sacrifice any pointy points along the seam lines where the blocks join together.  This quilt top will be assembled slowly, with lots and lots of pins and probably also with lots of help from my BFF, the seam ripper.  Which is fine, because I can use that time to think about how the heck I'm going to quilt this when the top is finally done.

5 Inch Finished Block, Not In Original Moda Pattern

The black, orange and yellow block shown above was not in the original Moda pattern.  It's a traditional block design that I swapped in from my EQ8 quilt design software (Disclaimer: this post contains affiliate links), either from the main EQ8 block library or from the BlockBase Plus add-on containing all of the blocks from Barbara Brackman's Encyclopedia of Pieced Quilt Patterns.  I don't remember the name of this block, but it supports the early 1980s graphic design vibe I am aiming for with this quilt, especially with the opportunity to use two shades of orange and yellow for a three dimensional effect.  There are two Y-seams in that block, on either side of center where the black QST (quarter square triangles) on the outside edges of the block are sewn to pairs of 45 degree diamonds.  The Kona Solid colors used in the block above are Tangerine, Goldfish, Grellow, Sunflower, and Black (links take you to where those Kona colors can be found from Etsy sellers).

Wednesday, March 23, 2022

Holly's (Not So) Little Ruby Layer Cake Quilt + Retro 80s Sampler Progress

Good morning and happy Tuesday, my lovelies! It's a rainy spring day here in Charlotte, North Carolina, and the grass looks so vividly green against the overcast skies.  My favorite kind of weather -- cool but not cold, new life springing up all around me, yet it's not such a beautiful day that you have to feel guilty for squirreling away in the studio instead of being outdoors.  It's drizzling out there, but it's dry in the sewing room where all the good fabric is waiting for me!

Holly's (Not So) Little Ruby Layer Cake Quilt

Speaking of all the good fabric...  Today I'm sharing my client Holly's enormous 100" x 100" quilt made from layer cakes (packages of precut 10" squares of coordinating print fabrics) of the Little Ruby fabric collection by Bonnie and Camille for Moda Fabrics.  Doesn't this fabric collection channel the spirit of Spring?  I did find several Etsy sellers who have Little Ruby precuts available here (affiliate link) in case you can't find them at your local quilt shop.  

Little Ruby Layer Cakes + Winter Flower E2E Quilting Design

I don't know the name of the pattern Holly used to make her quilt, but every time I see a quilt like this I think "Why don't I ever make quilts like this?!"  When you have great fabric prints, a simple patchwork pattern shows them off so beautifully.  I love how the large print squares are separated by frames of white.  My cerebral wheels are spinning, y'all -- I have a couple of fabulous large scale print fabrics stashed away, waiting for me to figure out how to show them off in a quilt.

This King quilt is for Holly's guest bedroom.  Won't this be a wonderful treat for her overnight visitors?  We used Hobbs Tuscany 80/20 Cotton/Wool batting for this quilt (affiliate link), a batting that I've only recently started stocking.  I like it -- it's an 80/20 blend so it's similar to the Hobbs and Quilters Dream 80/20 Cotton/Poly battings I carry, but the wool seems to give it just a bit more loft resilience than the cotton/poly blend.  Like the other wool battings I carry, the Hobbs cotton/wool blend batting is resin bonded to prevent the wool fibers from bearding through the finished quilt the way that cheaper wool battings do.  The cotton/wool blend has a lower loft -- and a lower price point -- than 100% wool batting, so it's not going to replace 100% wool in my inventory, but it's not going to replace my go-to 80/20 cotton poly batting, either.  Some people have wool allergies, and wool battings are less forgiving than cotton or polyester if someone throws a quilt in a hot dryer after laundering.  But I love having so many different choices so we can get exactly the look, feel, and laundering options we want for every quilt!

100 x 100 Little Ruby Layer Cake Quilt with Winter Flower E2E Quilting Design

Sunday, March 13, 2022

A Sampler Block, a Custom Ironing Table, and a Custom QOV for Harold

Lest you think I've not been making any progress at all on my own projects, I have this block to show for myself:

Another 5 inch Block Completed for my Retro '80s Sampler

I've actually finished several more 5" blocks for my Retro '80s Building Blocks sampler quilt besides this one -- I only have six left, plus borders and corner blocks.  The photo below was taken a few weeks ago and doesn't show any of the new blocks.  What it does show is my new, fancy-schmancy custom ironing table, built by my "Handy Husband":

Rebecca's Fancy-Schmancy Custom Ironing Table

24 x 48 Custom Ironing Table

I have been searching in vain for an ideal quilter's ironing board, and I finally talked my husband into building one to my specifications.  

Sunday, September 19, 2021

A Couple More Blocks for My Retro 'Eighties Building Blocks Sampler

Good morning, my lovelies!  I have been "SEW" busy lately that I'm starting to accumulate a backlog of things I wanted to share here on my blog.  Today I'll show you the last two 10" blocks I made for my Retro 'Eighties Building Blocks sampler (adapted from the 2014 Moda Modern Building Blocks QAL).  Here's what the design wall is looking like these days:

All of the 10 inch Blocks Are Completed!

This project would be a finished quilt top by now if I was able to work on it consistently, but I've been more focused on customers' quilts lately.  I've also been responsible for more church music over the past few weeks, now that Church Council has decided we have to wear masks while we're singing and a lot of our singers are staying away because of health concerns etc.  So, those are my excuses for only having TWO new blocks to share since the last time I posted about this project!

Block 18

Both of these blocks finish at 10" and use Kona Solids in Lipstick, Snow and Black.

Friday, August 13, 2021

Olga Quilt Finish for a Brand-New Quilter + More Y-Seams for My Retro '80s Building Blocks Sampler

Part One: Yolanda's Very First Quilt!

Good morning and thank goodness it's Friday, everyone!  I haven't been blogging as frequently as usual because I've been busy, busy, busy.  My oldest son Lars just got home from working all summer as a camp counselor and he leaves to head back to college this Saturday.  My younger son Anders' 18th birthday is TODAY and he heads off to begin his adventures as a college freshman next Thursday.  I've been doing lots of laundry, birthday planning and college shopping for the boys to ensure they have everything they need for school.  

Of course, quilting has been happening, too -- I'm behind on a few quilts that I wanted to share with you, and today I want to show you this Olga quilt (a beginner quilting pattern from Tuesday Bassen, inspired by vintage Scandinavian textiles and available for purchase here) that I quilted for my client Yolanda.  The most amazing thing about this quilt is that it was made by a TOTAL beginner -- not only is this the first quilt that Yolanda has ever attempted, it's her very first project on her very first sewing machine.  She did an amazing job -- I would never in a million years have known that she was brand-new to sewing if she hadn't told me that when she dropped off her quilt top!

60 x 60 Olga Quilt with A Bit of Fun E2E

Yolanda requested a "simple meandering quilt design" for this throw quilt destined for sofa snuggling, and I suggested A Bit of Fun E2E, which combines a basic meander with loops for a playful counterpoint to the rigid geometry of the piecing lines.  

Wednesday, July 28, 2021

Happiness is an Eight-Pointed Star, and Y-Seams Are My Super Powers

If Prince Charming was a LeMoyne Star quilt block, then Wendy Welsh of Wendy's Quilts and More would be my Patchwork Fairy Godmother.  I am just ridiculously happy about how perfect this 10" eight-pointed star block turned out on my very first try, nice and flat and zero puckers in those Y-seams, and all this was accomplished without any seam ripping or swearing, thanks to Wendy's fabulous Hand Piecing 103 - 8 Pointed Stars video.

10 inch LeMoyne Star, Block 15 for my Retro '80s Sampler Quilt

In the original Moda Modern Building Blocks quilt, this Eight Pointed Star block (also known as LeMoyne Star, Lemon Star, and Puritan Star) was simplified to be more beginner-friendly by bisecting the 45 degree diamonds into half square triangles, eliminating the set-in seams as shown below:  

I prefer the cleaner look of the traditional block with the Y-seams for my own quilts, and I relish a good piecing challenge.  This is supposed to be a skill building project, after all!

I finished the partially-pieced block I shared in my last post (also with unnecessary simplification seams removed in favor of Y-seams) and that one came out pretty good, but I'm regretting using white thread because I can see little white thread dots at the center of the block.  I might redo that center bit with red or blue thread.

Block 12 Completed, 10 inches

Block 12 from the Moda Modern Quilt Blocks Sampler was first published as Mosaic #13 in the Ladies' Art Catalog #341, according to Barbara Brackman's Encyclopedia of Pieced Quilt Patterns, 3rd Ed.

Thursday, February 4, 2021

The Fabulousness That Is February: One (or More) Monthly Goals

Hello, my lovelies!  Happy Thursday, and happy FEBRUARY!  Now that I have replenished my supply of Kona Solid in Ocean, I came close to finishing two more sampler blocks for my Retro '80s Building Blocks quilt last night.  The 10" block below wasn't quite done yet when I took this photo:

Progress on Another 10 Inch Sampler Block

All of my block sections had been foundation paper pieced and trimmed, but they still needed to be pieced together and, in order to nest the seams the way I wanted them for crisp, perfectly matched seam intersections, I designed my foundation paper piecing pattern so that the sections go together with partial seam construction.  I weighted the finished sections down with my acrylic square ruler just to keep it crisp and flat overnight.

Here it is, finished:

10 Inch Block Finished

As my dad used to say, "I think that's close enough for government work!"  (I have no idea WHY he used to say that, but he did).

Friday, January 29, 2021

January OMG, Smashed to Smithereens

Well, folks, my January OMG (One Monthly Goal) was to make four more sampler blocks for my Retro Building Blocks quilt.  I made six!


Four Retro Building Blocks Added to the Design Wall...


Plus This One...


...And Also This One

I know that making six blocks in a whole month might seem like a pretty weak goal, but I also completed a vintage quilt repair for a client, quilted several charity tops for our guild's outreach to local pediatric hospitals, and I just finished quilting a huge, gorgeous Rainbow Scrap Challenge quilt for a client that I am DYING TO SHOW YOU -- but I can't because she reads my blog and she deserves to see her finished quilt in person before I show it to everyone on the Internet...  (You know who you are!  ðŸ˜‰)

I also ordered and received all of the Kona Solids yardage that I was short on for the Retro Building Blocks sampler, and I've prewashed all of it so that it's ready to go.  Now that I'm caught up with customer commitments, my next order of business will be to cut and piece the Rainbow Mork Suspenders borders and set them aside.  I just want to make 100% certain that I get those long, skinny strips I need out of the yardage before I start cutting into what's left for my remaining blocks.

I'm linking up with the One Monthly Goal finish party at Elm Street Quilts!


Tuesday, January 19, 2021

Two More Retro Sampler Blocks Completed, and Fabric Crises Averted

 Hello and happy Tuesday!  This post needs to be a "quickie" because I have a dentist appointment to get ready for.  I like making these Tuesday To-Do lists, even if I don't always cross everything off before the next Tuesday rolls around.

Last week, I managed to eke out two more 5" sampler blocks for my '80s Retro Building Blocks sampler quilt:

5 Inch Puss In the Corner Block


Neither of these blocks is in the original Moda Modern Building Blocks quilt, by the way.  I always try to mention that in case anyone out there is working on that quilt, so as not to confuse anyone. Like most of the blocks in my quilt, these were both foundation paper pieced due to the non-ruler-friendly patch sizes that happen when you take a 6" block and force it down to 5".

5 Inch Card Trick Block


Meanwhile, my order of Kona Solids from Missouri Star Quilt Company DID arrive this past week, including the Ocean blue that I was needing so desperately, and I washed, dried and folded all of it.  I HATE prewashing fabric, but the only thing I hate more than prewashing fabric yardage is frantically trying to remove dye bleed from a finished quilt.  

Sunday, January 3, 2021

Just ONE Monthly Goal for January: Complete Four More Blocks for My Retro Building Blocks Sampler Quilt


 Y'all, I am hangin my head in shame over this one.  Here I am, gleefully ordering fabric for my son Anders' high school graduation quilt, when all the while the quilt that I started for him back when he was in MIDDLE SCHOOL is still languishing on my design wall.  Where did the last 5 years go?!

13 Blocks Completed, but 35 Remain

I told you about my plan for his high school graduation quilt in yesterday's post, and yes, that will need to be a priority in 2021.  Hopefully, Anders will get to participate in the quilt blessing ceremony that our church usually does for the graduating high school seniors in June (if this pandemic abates, anyway), so that gives me a hard deadline to work towards.  But I can't start on that one until the fabric gets here, and I don't know how long that will take due to how backed up and messed up package delivery has been lately.  So until then, my version of the Moda Modern Quilt Blocks sampler will be my top priority.  Anders deserves TWO finished quilts in 2021.

Wednesday, July 10, 2019

Farmer's Wife 1930s Block 7, Augusta: The Diaper Block

I finished another 6" sampler block yesterday!  Behold Block 7 "Augusta" from The Farmer's Wife 1930s Quilt Sampler:

Farmer's Wife 1930s Block 7, Augusta
This block went together more smoothly than the last one I did.  This time, before joining sections together that needed seams matched, I stuck a pin straight through at the intersection with the papers still attached on both sides, then slid the two units apart along the pin, put a glue stick gob between the two seam allowances, and then slid them back together so they were right up against the pin head.  Then I removed the foundation papers and pinned the units on either side of the seam intersection, with that "stab pin" still holding the matched intersection in place while the glue dried, and put pins on either side of the matched intersection LAST -- right before I put the whole thing under the presser foot to stitch the units together.  It's more accurate than the other things I tried on the last block, and there was zero seam ripping -- much more fun!

When I chose the fabrics for this block I wasn't sure about how they would play together in the block.  Now that it's finished, I do like it -- the only thing I might change is that there is a LOT of that busy blob print.  It would look better if the four triangles surrounding the center square were in a solid color like orange, pale green, etc.  However, that fabric came from an oddly shape scrap that was left over from my son's diaper covers circa 2003-2004 -- my son who is nearly 16 now and towering over me.  I used to pair that diaper cover with different solid colored Hanna Andersson T-shirts (no boring navy/brown/gray wardrobe for my baby boy), so when I look at this block I see a pudgy blond toddler with big, blue eyes...

Back in the Diaper Days: Anders at 11 mos.  Soon to be a Licensed NC Driver!
Can you believe this kid is eligible to get a driver's license next month?!  Yikes!

Me, Lars (18), Bernie, and Anders (15)
My husband is going to take issue with my posting a picture of his hair doing that weird rhinoceros horn thing, but it was windy the day of Lars's high school graduation, we were in a rush (what else is new?), and this was the best family picture we got.  Anyway, with 15 years of gentle care and feeding, 10,000 bed time stories and plenty of love, a pudgy blue-eyed baby in a ladybug bib and psychedelic diaper covers grows into a 5'10" young man.  In the blink of an eye.

Alright, you guys -- the day is wasting away in a puddle of nostalgia.  I've got to get ready for a dentist appointment this afternoon, then select my fabric and supplies for the Karen Kay Buckley workshops I'm taking tomorrow and Friday and pack all of that up, and we have our guild meeting (followed by Karen's lecture) this evening.  

I threw my newly completed FW1930s Block 7 up on the design wall with my other Motley Fools (6" blocks from various sources plus a 12" applique workshop orphan block) and rearranged a bit.  When I first started making the Farmer's Wife blocks I was going for a more muted and traditional color palette, but then I decided to just pull out whatever I felt like playing with for each block and see what happens.  When I decided to mix in the 12' applique workshop block I knew I'd need some darker 6" blocks to tie it in, hence the darker colors in the two blocks I've just finished.  I'm not sure what size blocks we'll be making in Karen's workshops this week, but I'm thinking of adding them to the other Motley Fools.  

Motley Fools On My Design Wall
It's also totally possible that these blocks won't all end up in the same quilt together.  I might separate out the calmer pastels for one quilt and put the Bold, Bright and Bodacious blocks together for something different.  

I'm linking up with:

WEDNESDAY

·      Midweek Makers at www.quiltfabrication.com/
·      WOW WIP on Wednesday at www.estheraliu.blogspot.com

THURSDAY

·      Needle and Thread Thursday at http://www.myquiltinfatuation.blogspot.com/  

FRIDAY

·      Whoop Whoop Fridays at www.confessionsofafabricaddict.blogspot.com
·      Finished Or Not Friday at http://busyhandsquilts.blogspot.com/
·      TGIFF Thank Goodness It’s Finished Friday: http://tgiffriday.blogspot.ca/p/hosting-tgiff.html  

Tuesday, July 2, 2019

Rosemary's Baby: Farmer's Wife 1930s, Block No. 88

FW 1930s Block No. 88, "Rosemary's Baby"
I spent a whole hour in my studio a few days ago, just cleaning up the mess from Mission Impossible and last-minute travel wardrobe mending.  I was surprised by how far out of control my workspace had gotten in such a short time from being "too busy and too rushed" to clean up after myself as I went along, but it had gotten to the point where I couldn't even work in there anymore.  All better now -- and so, as a reward to myself, I pulled out the project box with my 6" sampler blocks and decided to make a couple more random, self-indulgent blocks before getting into one of those important quilts that I keep telling everyone I'm prioritizing...  Yes, I know this is why I rarely COMPLETE anything.


The Evil That Is Rosemary's Baby, Back View
Also, can someone please remind me next time that a 6" block containing 53 patches is probably NOT going to be a quick and easy diversion?!  There were some hairy moments, some seam ripping, and a little bit of swearing involved -- and although my block miraculously finished at a pretty precise and square 6 1/2", I am displeased by a couple of seams that did not line up precisely when I sewed the final seams.  This is why MY block is named "Rosemary's Baby," after the 1968 horror movie.  


Prep Work for FW 1930s Block 88 "Rosemary," Foundation Paper Piecing
So this was my beginning prep work for Block #88 "Rosemary" from the book The Farmer's Wife 1930s Sampler Quilt by Laurie Aaron Hird.   


The author pieced her Rosemary block using 4 different fabrics, so step one was to rummage through my stash and select 4 fabrics that played nicely together.  I went with a smallish scale focus print, coordinating olive green and navy blue in dark values, and a light value chartreuse green for the accent fabric.    Next, I colored in the block diagram and scribbled the colors onto my foundation paper piecing templates as well, because when there are this many pieces in a block it is all too easy to get confused about which fabric goes where at the sewing machine.

Then I precut all of my fabric patches, with the correct shape (square, rectangle or HST or QST) as well as the correct grain line (unless I'm fussy cutting, in which case I'm just positioning the print the way I want it to go).

The paper piecing went fine and, thanks to coloring the foundation papers ahead of time, there was no seam ripping due to sewing the wrong fabric in the wrong spot.  The difficulties reared their ugly heads and showed their claws once I got to the part where the various foundation pieced sections needed to be sewn together with traditional piecing.


One of the Tricky Seams
Yes, I was pinning, but still struggled with this one stupid place where I needed a perpendicular seam to align with a seam at a 45 degree angle.  I finally left it be, against the violent objections of every fiber of my being, because there are only so many times you can rip a block apart and sew it back together before it's irreparably frayed and stretched out of shape.  Also, with my particular fabrics, I don't think that the extra time and effort that it would take to get it REALLY perfect would really give me a huge payoff -- your eye just doesn't go there when you look at the block, in my opinion.

The Disappointing Mismatched Seams
Sometimes I get comments from readers who think I'm being hard on myself when I write about these kinds of issues, but it's not about being a hard judge on myself as much as taking a scientific approach -- I want to figure out WHY if something didn't turn out like I expected it to.  That's part of the fun for me, in the strange way that the New York Times crossword puzzles are fun for other people!  In this case, I think I was overly worried because the pieces seemed so small as I was working on the block, and I was afraid that surely I was shrinking them with steam or from bulk building up in all of those seam allowances.  I suspect that I stretched those larger print rectangles (on the diagonal) when I was pressing and starching them.  That would explain why the two seams shifted away from one another.  And I do have a smidge of excess fabric on the yellowish corner squares to trim away, which also supports my stretched rectangle theory.  

So, what's m takeaway?  It would have been handy to have an actual size block diagram to use as a reference while piecing a block this complex, so that as I finished and pressed each subunit I could compare it to the diagram and ensure that each unit was finishing the correct size and shape before joining it to the next piece.  If I remember, I'll try that next time I tackle one of these little monsters.  But I won't be attempting to fix or redo this particular block -- I don't love it that much, and I don't think anyone looking at the finished block would realize that those two seams were necessarily intended to match -- not without my handy little close-up picture with the arrows showing you where the oopses are, anyway!  

The blocks in this Farmer's Wife book get more complex the farther you go through the book.  I'm starting to think that some of the ones like this one that have a ton of pieces are not really worth what a pain in the keyster they are -- I'm not really feeling the payoff, you know what I mean?  Maybe I could have done better with the fabric mix or something.  Perhaps, if I decide to do any of these other really elaborate blocks from her book, I'll resize those blocks to 9" or 12" to make them easier to work with, open up my options with larger scale prints and fussy cutting, and get that mix of block sizes that will let me use the 12" applique block...


In This Case, Done IS Better Than Perfect!
And so, moving on...  Who knows if this motley assortment of blocks will ever amount to anything, anyway!  Except that I just now came up with a good name for these blocks, if they ever do become a quilt.  Behold, my Motley Fools Sampler!


My Motley Fools Sampler Blocks

Although today's Rosemary block and several of the others came from the Farmer's Wife 1930s book, I'm not necessarily committed to making ALL of the blocks in that book.  I've just been making random 6" blocks off and on from fabrics that appeal to me and I'll figure out what to do with them later. I've made some of the blocks from The Farmer's Wife 1930s Sampler Quilt book, some of the blocks from the original Farmer's Wife Sampler Quilt book, a couple random 6" blocks from the EQ8 Block Library, and some interesting/challenging vintage blocks that I resized to 6" so I could mix them in with the others.  Then I made that 12" appliqué block in a workshop back in January and decided I might want to mix in some larger blocks with the small ones...  I like the idea of mixing up different block sizes, I enjoyed doing that zany colored appliqué block and I would like to mix in some more like that.    Maybe some sashing and maybe some borders; I'll figure that out later.  For now, I'm just having fun treating each 6" block like its own special creation and then tossing it up on the wall to see what it looks like with the others once it's finished!  

I have another sampler block picked out from the Farmer's Wife 1930s book on my agenda but it has far fewer pieces and should go together in a snap for me tomorrow.  

SO...  My To-Do for Tuesday is to finish that other 6" sampler block, pack this project away again, and then get busy with at least ONE of the following WIPs:

  • The obscenely overdue Modern Baby Clam Shell quilt, which needs all of the turquoise patches out and then to be pieced
  • Spend some time with the longarm machine, trouble-shooting and finishing up some of the class samples from the Paducah workshops I took back in April
  • Prep some more applique for hand stitching at my bee meeting next Monday


Meanwhile, I'm linking up with:


·      Colour and Inspiration Tuesday at http://www.cleverchameleon.com.au
·       To-Do Tuesday at Stitch ALL the Things: http://stitchallthethings.com
·      Midweek Makers at www.quiltfabrication.com/
·      WOW WIP on Wednesday at www.estheraliu.blogspot.com
·      Needle and Thread Thursday at http://www.myquiltinfatuation.blogspot.com/  
·      Whoop Whoop Fridays at www.confessionsofafabricaddict.blogspot.com
·      Finished Or Not Friday at http://busyhandsquilts.blogspot.com/
-->

To all of my American readers, enjoy a happy and safe Independence Day holiday!