Showing posts with label Jeanne Sullivan. Show all posts

Sunday, October 15, 2023

Halloween Quilts for Paula and Mary + Broderie Perse Rosebud Secrets Rediscovered

Part One: The Halloween Quilts!

I recently had the pleasure of quilting a couple of really cute Halloween wallhangings for clients that I thought my readers would enjoy.  First up is Mr. Bones, an adorable machine appliqué project made by my client Paula.  This is a pattern from the Quilt Factory that is available on Etsy here (this post contains affiliate links).  

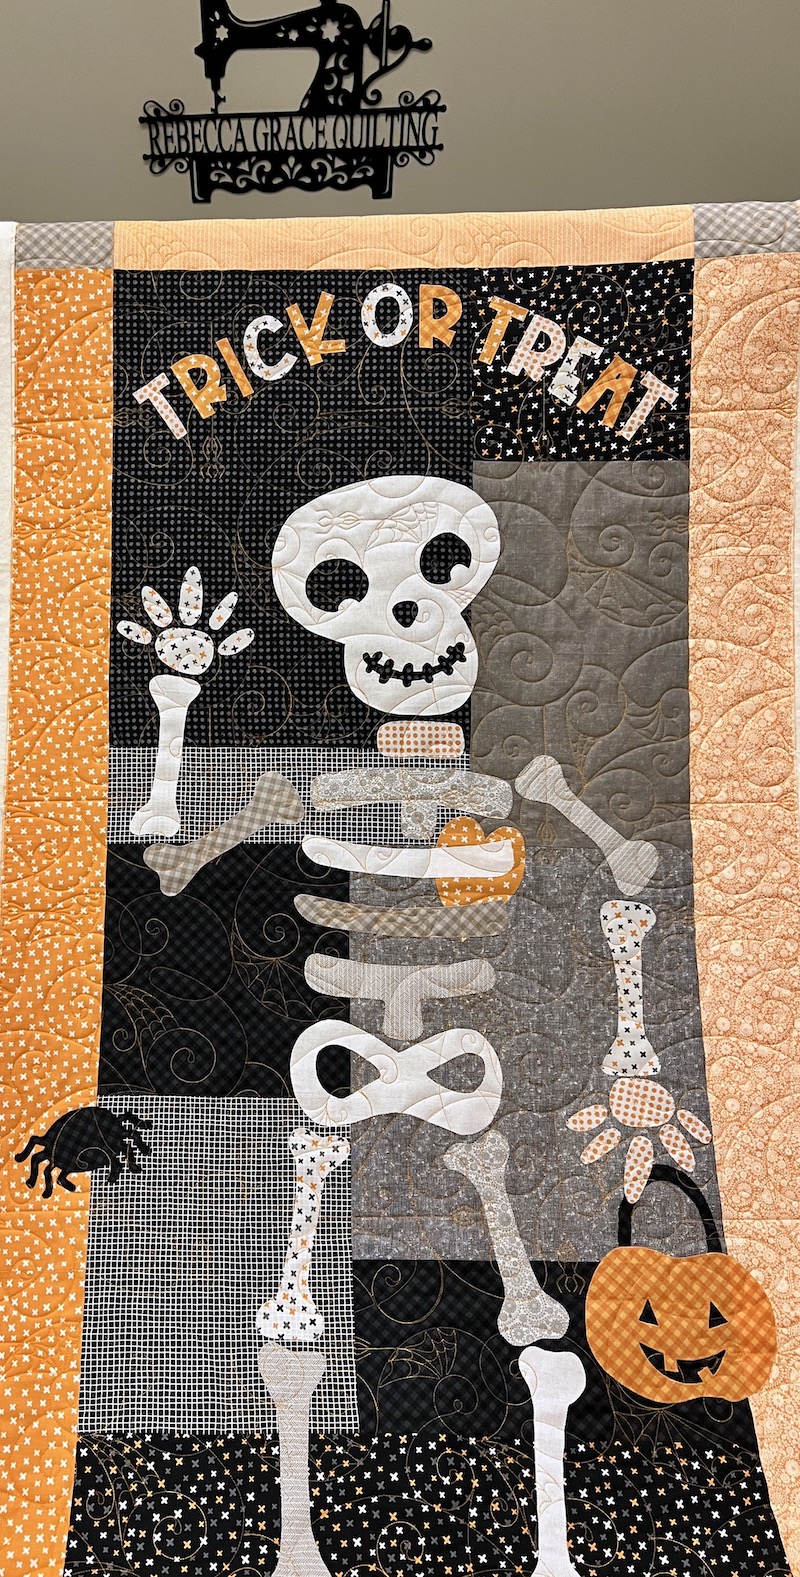
Paula's 32 x 60 Mr. Bones Wallhanging with Spider Spinners B2B

Wouldn't this be perfect to display on your front door on Halloween night, or in your entryway to greet trick-or-treaters?!  This pattern calls for some embellishments that you're not seeing in these photos -- fortunately, Paula knew to wait and add the buttons etc. after having her project long arm quilted.

We chose the Spider Spinners B2B design to play up the whimsy of the appliqué design.  I liked that it had playful spirals and spiders hanging down instead of just cobwebs alone, and I envisioned the whole quilt as an illustration in a children's book as I scaled the digital quilting design, trying to size the spiders and the cobwebs proportionately to the skeleton and Jack-O-Lantern the way they would be if the whole scene had been drawn by a single illustrator.  The perfect thread color turned out not to be gray, silver or white, but a true orange shade of Glide called -- what else? -- Halloween!  

Detail of Spider Spinners B2B Stitched in Glide Thread, Color Halloween

I'm so glad Paula trusted me on the orange thread!  If I'd used gray, silver, or white thread, the cobwebs would have blended in and disappeared against the gray background fabrics and the white and gray skeleton fabrics.  I really wanted those spiders and cobwebs to be "part of the scene" and visible in those areas, and I love how it turned out.  We used Quilters Dream Cotton Deluxe loft batting for that extra oomph to the quilting texture.

Saturday, October 14, 2023

Deco QAL Week 3, Completed Only 101 Weeks Behind Schedule!

You guys, if this was the year 2021 instead of 2023, I would be SO AHEAD OF SCHEDULE for my Deco QAL!!  Here it is, only October 14th, and I have finally finished all of my log cabin blocks for Week 3 (Nov. 1-8, 2021) of Lo & Behold Stitchery's Deco Quilt Along.  

16 Blue-Green Blocks, 32 Blue-Purple Blocks, and 12 Half Blocks

Unfortunately, it is NOT 2021, so instead of being ahead of schedule I'm actually 705 days behind schedule, or 100 weeks plus 5 days behind schedule.  Sadly, I am no longer eligible for winning any of the prizes.  😆. Good thing I still like this quilt!

My 102 x 102 Deco Bed Quilt, pattern available here

In case anyone out there is interested in making a Deco Quilt of their own, the pattern from Lo & Behold Stitchery is available as an instant PDF download on Etsy here (this post contains affiliate links). 

I'm making the largest 102" x 102" bed sized version of Deco, but the pattern also has instructions for making the more manageable baby and throw sized versions and those are striking, too.  I quilted a baby sized Deco for my client Liz back in 2021 and a throw sized Deco more recently for my client Megan.  I've seen this quilt made up in so many different color combinations and I haven't seen any that I didn't like.  I had a great time coming up with my own color palette of Kona Solids and then tweaking it to complement my Anna Maria Horner floral print backing fabric (it's Hindsight "Honorable Mention" in Turquoise from Free Spirit Fabrics, available on Etsy here).

(Note to Self: It would have saved a lot of time to pick the backing print FIRST and then just pull the solid colors from the selvedge instead of coming up with a custom palette first and then trying to find a print that had exactly the same colors in it!)


My Deco Quilt Fabrics with Anna Maria Horner Backing Print

Sunday, October 12, 2014

Of Rose Buds and Rotary Phones


Broderie Perse Rosebuds Appliqued
After all that worrying, I finally appliqued my broderie perse rose buds to the center of my Whig Rose block this week, and they weren't as bad as I thought they would be.  Broderie Perse means that I cut the rose buds out of a scrap of my Vervain Monado print drapery fabric (it's 100% cotton, very lightweight, and I did prewash it). 
Monado print from Vervain, Havana colorway
 
I used Jeanne Sullivan's Patch Back product to give the rose buds a little dimension and preturned the fabric edges with glue stick, then used Roxanne's Glue Baste It to secure them in place for stitching. 

As you can see, the rose buds that initially appeared to be identical in the drapery fabric are more obviously NOT identical now that I've stitched them onto the dark brown fabric.  I think that's okay.  What may or may not be okay is that now the center of my Whig Rose block bears an uncanny resemblance to a rotary telephone dial: 

Would it help if I tried to squish additional rose buds between each of these to reduce the rotary dial effect, or should I leave it alone?  It would be a pretty tight fit if I tried to add more rose buds.  Alternatively, I could do some kind of embroidered embellishment between the rose buds.  Who knows -- maybe the rotary phone dial look will grow on me.
Tulip Thingys Up Next

Next up for this block will be the tulip thingys, or whatever they are supposed to be.  Today I think they look like Daffy Duck footprints.  I've already reverse appliqued the centers, and now the challenge will be in needle turning the tight outer curves smoothly as I stitch these onto the block.  Wish me luck!  I'll try to take the sharp curves slowly, just turning enough for one stitch at a time, and hope for the best.

Tulip, or Daffy Duck Foot Print?
Before I get back to more hand stitching, though, I have to dust off Sergei the Serger and thread him up for a cover stitch.  This will require a consult with his instruction manual, since I haven't done it in awhile.  The BBC Shop only sells Dr. Who tee shirts in adult sizes, and I bought Anders an adult size small that needs to be shortened for him lest anyone mistakes it for a nightgown!

I'm linking up with Slow Sunday Stitching at Kathy's Quilts today and Anything Goes Monday at Stitch By Stitch.  Enjoy the rest of your weekend!

Monday, September 8, 2014

Design Wall Monday: Back to the Whig Rose Applique

Needle Turn Applique In Progress
I finally got back to my needle turn applique practice block over the weekend.  After several unsatisfactory attempts to needle turn the stacked flower center circles and stitch them off the block, I finally adjusted the circle diameters slightly so that I could use my Perfect Circle templates: I ran a gathering stitch around the outer edge of the circles and then used the starch and press method to preturn the edges. 

Smooth Circles, but Uneven Petal Gaps
Once I had lovely preturned circles ready to go, I used Roxanne's Glue Baste It to position the circles on my block for hand stitching. 

Now, I'm pleased with how nice and smooth the circles are, but it is obvious that something went awry when I stitched the stacked petals to my quilt block earlier.  See how there is more of a gap between petal and stem in some places than in others?  I couldn't tell that happened until I had the center circles in place, and by then it was too late to move the petals.  Either I turned under a little too much of the dark brown print on some of those petals, or I didn't get them positioned accurately enough.  This could be an issue with the chalk pencil I'm using to mark the turning line on my applique shapes, because the chalk does seem to smudge as I'm handling the applique for hand stitching and it is sometimes unclear just where edge of the line is.  Or the inaccuracy could be happening when I'm positioning the applique shapes and pinning them to the background fabric.  I must say, I'm not enjoying fiddling with the giant vinyl overlay and it seems to me that each time I lay that placement overlay back on the block, it's harder and harder to get the block to match up with the lines on the overlay.  With my earlier applique project, I preturned the edges of all of my shapes and then glue basted them in place with a light box instead of reaching under a sheet of vinyl, and I think that method might be more accurate for me.  Should I have lightly traced some of the major placement lines on my block background with a pencil? 

But this is a learning project, so on we go!  I will probably add something to the design to hide those oopses later.

Last night I finger pressed a few leaves and pinned them in place for stitching.  This block is my first attempt at needle turn applique and I knew that the tight outer curve on the small leaves would be more challenging than the softer curved edges on the large flower petals.  My first leaf came out kind of lumpy, as you can see in the photo:
Lumpy First Leaf
I suppose it isn't terrible for a first attempt.  My applique stitches are really tiny and close together, so it's not easy to take of an applique shape without risking a hole in the background fabric.  I can probably live with this leaf as long as the others come out better.  I think I had an issue with the chalk line smudging as I was working, and I also probably need to go slower around the curve and only turn enough of the fabric edge for one stitch at a time.  I'm going to try a few more leaves this way, but if they all come out looking like rocks I might have to preturn the edges of the rest of these leaves with templates.

Which wouldn't really be the end of the world.  One of the primary reasons I wanted to learn to turn the fabric edges under at the point of stitching the applique is that I thought it would make my projects more portable -- no more hours spent at the ironing board, fiddling with starch or sizing and pressing the raw fabric edges around my templates.  However, as you can see, I'm not exactly making speedy progress with this method, either.  With preturned shapes I was able to glue baste more shapes onto my block at a time and it was easier to make sure I always had something ready to hand stitch when I headed out the door.  With the method I'm using for this block, I can only really position one or two pieces at a time, and then I have to fiddle around with the vinyl overlay and the pins at home every time I need a new piece to stitch. 

Once I've figured out my leaves, I'll go back to the rosebuds that go in the center of the flower.  I do want them to have a little bit of dimension, so I'm going to try Jeanne Sullivan's Patch Back product using the instructions in her book Simply Successful Applique


Design Wall Today
Meanwhile, I think I'd like to start another pineapple log cabin block today, if I can manage to accomplish laundry and grocery shopping before the kids get home from school!  I'm linking up with Judy's blog for Design Wall Monday at Patchwork Times, WIP Wednesday at Freshly Pieced, and WIPs On Wednesday at Esther's blog.