
Showing posts with label Quilter's Newsletter Magazine. Show all posts

Saturday, August 29, 2020

Machine Piecing the Modern Baby Clam Shells Quilt, with Help from QNM

Hello, my lovelies!  My one and only weekly goal last week was to START -- just to start, not to finish, mind you! -- piecing my Modern Baby Clam Shells quilt.  I created the design in my EQ8 software in December of 2018, with a specific baby in mind whose due date was several weeks away...  Then it took me awhile to find the 9.5" acrylic clam shell templates I wanted to use (from an Australian Etsy seller who has since closed her shop).  Then I hemmed and hawed about the best way to cut out completely accurate 9.5" diameter circles (10" actually, since I needed a seam allowance).  After cutting out all the clam shells, circles, and partial clam shells, I then realized I didn't know how to sew them together!  I had my heart set on old school curved piecing, which I'd done for Lars's Drunkard's Path quilt eight years ago, but I wasn't sure how to go about piecing a clam shell quilt.  Do you start at the bottom and work your way up, or start at the top and work your way down?  Searching online, I either found instructions that confused me and explained only the part I already understood (how to sew a curved seam) and left out the part I didn't know (where to start and how to progress through the piecing of the quilt).  I also found patterns that subdivided the clam shells to simplify the piecing, or for using a prepared edge appliqué technique to avoid piecing altogether, neither of which interested me.  Ugh!  Annoying!  Set aside and ignored for a year and a half, until I made it my goal for THIS week:


So, as you can see, I've met that goal already because I did start the piecing!  Yay, me! 😉.  I'm using my Golidilocks machine for this -- my 5.5 mm Bernina 475QE, which is why I have my portable SewEzi table set up in my studio next to the big machine's cabinet.


So that's my quilt design rendering, created in EQ8 software.  It should finish at 40" x 40" unless I decide to enlarge it somehow.  There may or may not be embroidered butterflies before the top gets layered for piecing.


As you can see, I'm using a bazillion pins, because I want the smoothest, most accurate curve possible and I don't want to clip the seam allowances.  I prefer piecing with Patchwork Foot #37 on my little machine, and I bought a Bernina seam guide that I can snug right up against the side of my foot just like the seam guide that came with the #97D foot for my big 750QE machine.  Having that fence-like guide out in FRONT of the presser foot makes it so easy to to feed the curve smoothly with a deadly accurate 1/4" seam.  I'm also using my Patchwork Straight Stitch defaults (lower tension for my Aurifil 50/2 cotton thread and a shorter stitch length of 2.0).  On my 475QE it's stitch #1303, but the same exact stitch on my other Bernina is #1326 -- go figure!


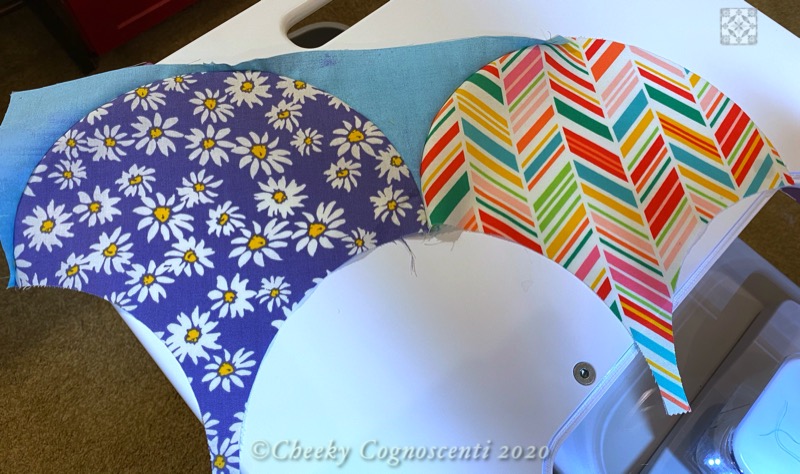
Yay!  The first seam!!  As you can see, I started in the middle of my quilt.  Where should I add the next patch?  Let's put another clam shell onto the blue half circle!


Yay again!  Smooth round curves are making me happy!  This is awesome; why was I so afraid?!  Let's add a circle next!


But then I started second guessing how I was going about all of this and wondering if I was going to piece myself into some kind of a corner.  And I remembered an article I'd saved when I was going through a haul of ancient Quilters' Newsletter Magazines that a former member of the Charlotte Quilter's Guild gave me about a year ago.  (She wanted to donate them to a current member of the guild and I was the only person who raised my hand).  So I stopped piecing and (miraculously!) located the article, filed away in one of my ubiquitous 3-ring binders.


THIS!!  THIS is the information I'd been looking for, and I had to go all the way back to a March 1997 magazine to find it.  The instructions are for hand piecing, but all I really needed was that piecing diagram explaining that you start at the top, alternating between rows one and two, and then work your way down adding row by row beneath the first two.  That, the pressing direction for seam allowances, and the Fig. 6 photo showing that the seam allowances need to be kept open where two pointy clam shell sides meet up.  


Maybe I would have been fine if I'd kept working my way out from the middle of the quilt, but maybe there's a good reason for working top-down that would have caused frustration and swearing and, God forbid, seam ripping.  I'd rather not have to reinvent any wheels on this quilt that is already so far behind schedule, so I left off working on the middle rows and started working on the top and bottom rows instead, per the magazine instructions.


By the way, in the QNM illustrations they have cut out their clam shell using tag board templates to mark the seam lines and then adding 1/4" seam allowances beyond the drawn line.  That makes it easier for hand piecing, since you can check periodically as you're stitching to make sure your stitches are landing right on the seam line on the back of your work as well as on the front.  My acrylic clam shell template has small holes along the edges that I'm using with a Frixxion heat erase pen to mark alignment dots on my clam shells.  I know some people have had horrendous issues when they've used Frixxion pens to mark quilting designs on the front of quilts, with "ghost marks" left behind or the ink reappearing in certain situations, but I am just twirling the tip of the pen inside the hole to make tiny black dots on the WRONG side of my fabric.  They disappear pretty well when I iron them, and if they are not completely gone, well, they are on the wrong side of the fabric where no one can see them anyway!


So here you can see the completed bottom row of my quilt, all pieced and pressed!  I now know that a normal quilter would have used whole clam shells along the outside edge and trimmed after piecing, but it seems to be working just fine.  I think I planned for a 2" wide border in that same blue so the clam shells would float away from the binding. My top row is completely pieced now, too, in addition to that bit in the center that I'd already started before locating my instructions.  My plan now is to continue piecing down from the top and up from the bottom per the QNM instructions, joining the sections together at the center circles.

SO, having met my goal of STARTING the piecing this week, what are my quilting goals for the week to come?

This Week's Quilting Goals

  • FINISH piecing Modern Baby Clam Shell Quilt!  
  • Load next charity top on the long arm and decide how to quilt it
  • Write next post for my Long Arm Linky party and schedule publication for Tuesday morning!

I'm linking up today's post with the following linky parties:

SATURDAY

·       UFO Busting at Tish in Wonderland

SUNDAY

·       Frédérique at Quilting Patchwork Appliqué

·       Oh Scrap! at Quilting Is More Fun Than Housework

·       Slow Stitching Sunday at Kathy's Quilts

MONDAY

·       Design Wall Monday at Small Quilts and Doll Quilts  

·       Monday Making at Love Laugh Quilt

TUESDAY

·       To-Do Tuesday at Home Sewn By Us

Sunday, July 5, 2020

Slow Stitching Sunday: Preparing Leaves for Last Two FrankenWhiggish Rose Blocks

Good morning, and happy Sunday!  I haven't mentioned my needle turned applique project in awhile, mostly because it's dragging on FOREVER and, since I'm making 9 identical blocks, it feels like treading water without ever actually making any progress.


For those of you who haven't been around that long, I started this project in March of 2014.  I'd just completed my first appliqué project, my Jingle quilt using Erin Russek's pattern and fabulous tutorials using the starch and press prepared edge method (nope, that one's not finished yet, either, but it's at least a finished top waiting its turn under the long arm needle).  Anyway, I loved the crisp, precise shapes I was able to achieve with the starch and press method, and I loved that I could just focus on my stitches as I sewed the applique shapes to the background, since the raw edges were already tucked neatly underneath.  However, I was hoping to find a method of hand stitched appliqué that was more portable throughout the process and didn't require a hot iron to get a block ready for stitching.


I bought myself a copy of The Best-Ever Appliqué Sampler Book by Becky Goldsmith and Linda Jenkins, and set about teaching myself needle turn appliqué.  It's a great book with clear instructions, but I wasn't feeling inspired by the projects in the book.  The authors had deliberately chosen some straight, skinny stems, circles, inside points and curves, outside points and curves, and reverse appliqué  to build all of those skills that a newbie would need to tackle any appliqué design.  So I set about finding a different pattern that would have all of those different elements but that was more appealing to me creatively at that point in time, and I ended up with this pattern that I found in an issue of the now defunct Quilter's Newsletter Magazine.  The quilter whose work was featured in the magazine had based her design on an older Kim Diehl pattern, and I made further changes to her pattern motivated by my loathing for cutesy folk hearts and my love of antique appliqué quilts.  I replaced the folksy hearts with reverse appliqué tulips from a historical reproduction pattern (sourced from a different issue of QNM -- man, I miss that magazine!).  And I added little broderie perse rose buds around the center of the big rose, fussy cut from leftover drapery fabric.  If you'd like to see and read more about the pattern sources, see this blog post.  


At first I was just planning to make the one 16" block, to teach myself the techniques of needle turn appliqué  but when I'd finished I liked it so much that I decided to keep going and do a whole quilt with it.  So I imported this photo of my one completed block into my EQ quilt design software and played around with how I could use it in a quilt design.  The idea I liked the most was this one, using nine of these big blocks:


And now here we are, six years later...  I am still working on the other eight appliqué blocks!  To be fair, I've only been working on this in fits and snatches.  I've discovered that it's kind of boring to make a bunch of blocks that are all exactly the same.  I've also learned that I probably prefer the starch and press prepared edge method, burned fingertips and all.  Even though I don't need an iron with needle turn, the whole business of perfectly positioning this vinyl overlay so I can get each applique element positioned just right, then fiddling with tiny 1/2" or 3/4" pins to hold them in place, is not really portable anyway -- I mean, I'm not able to do this in my lap while I'm waiting at the doctor's office, if you know what I mean.  And, although the slight variations from one shape to another that you get with needle turning the edges as you go gives a more authentic, organic look for an historical reproduction quilt (none of those antique quilts were as "perfect" as what we quilters aim for today!), my personality is probably better suited to a method where I have more precise control over the outcome.

Looking at that design I came up with in EQ today, I'm not quite as in love with it anymore -- but it's hard to know whether that's because I've got a combination of photo blocks with so-so-lighting and virtual fabric swatches from the software program.  If I do make that design, I would be using the same fabrics for the pieced blocks, sashing and skinny border that I used in the appliqué blocks.  Right now I'm still plodding along with the appliqué.  After finishing the first block in its entirety, I've been doing the remaining 8 blocks like an assembly line, so all eight of them have their layered petals, center circles, and stems stitched down.  I'm currently pinning leaves on the second-to-last block, which is nice because I am SO SICK AND TIRED OF SEWING LITTLE GREEN LEAVES OVER AND OVER AGAIN!!!  After the leaves, I'll move on to the reverse appliqué tulips for all 8 blocks, and then finish with the stuffed fussy cut berries and the broderie perse rosebuds that go around the center circles.  

I feel like we should place bets as to how many years it will take me to finish this quilt, like guessing how many jelly beans are in the jar and whoever comes closest wins a prize!

I'm linking up today's post with the following linky parties:

SUNDAY

·       Slow Sunday Stitching at Kathy's Quilts  

·       Oh Scrap! at Quilting Is More Fun Than Housework

MONDAY

·       Design Wall Monday at Small Quilts and Doll Quilts  

·       Monday Making at Love Laugh Quilt

·       BOMs Away Katie Mae Quilts  

Thursday, August 15, 2019

Throwback Thursday: Quilter's Newsletter Magazine, Nov/Dec 1986

A former member of our Charlotte Quilter's Guild who is no longer quilting was cleaning out her home recently and graciously decided to gift her entire stash of Quilter's Newsletter Magazines to a current guild member.  Her issues go from 1986 through the late 'nineties, long before I began quilting, so I snapped at the chance to do a little "time traveling" through these back issues.  Quilter's Newsletter Magazine has been my all-time favorite over the years, and I was a subscriber from the early 2000s until the magazine folded at the end of 2016.  


QNM Issues from the 2000s, When I Began Subscribing
I'm interested in the patterns that were published in earlier issues of the magazine, but I'm also interested in reading the articles and studying the advertisements to learn how the art, craft and industry around quilt making has evolved over the past 33 years.  


And so, for today's Throwback Thursday, we are traveling back to November/December of 1986!

QNM Issue 187, Nov/Dec 1986
When this magazine was published, I was a thirteen-year-old eighth grader whose primary goal in life was trying to get my spiral-permed hair to stick straight up in the air with hairspray.  Although my junior high mandated one semester each of co-ed shop class and co-ed home economics, all I got out of that was a little wooden stand that I built for VHS tapes -- and I learned how to cook scrambled eggs while dodging the airborn eggs that the boys were throwing at one another across the classroom.  

In the wake of Second Wave feminism, the traditional home economics curriculum had all but disappeared from the schools, and even though my mom did a lot of garment sewing when I was growing up, she worked full-time outside the home and, for one reason or another, didn't pass that skill set along to me or to my sisters.  I think the prevailing idea in the '80s was that it was backwards or anti-feminist to teach young girls to sew, since our generation was expected to go out and crush it in the business world instead of staying at home.  (Consider this article from the Dec. 30, 1986 New York Times, in which researchers studying data from the 1980 Census concluded that women's roles and social norms had not been in agreement since the 1950s).

That seems to be a key generational difference between those who began quilting in the '70s and '80s versus those who have taken up quilting more recently.  The earlier generation of quilters already possessed basic sewing skills and equipment that they could transfer to their new quilting hobby, whereas a typical beginning quilter today might not own a sewing machine or has never even threaded a needle when she or he first develops the itch to make a quilt.


Baby Boom (1987) and Mr. Mom (1986), available on Amazon here
Two films that were in theaters around the time this issue of QNM was on the newsstand were Baby Boom (1987) and Mr. Mom (1986), conveniently packaged as a Double Feature available for streaming on Amazon here.  I vividly remember watching both of these movies that idealized the new phenomenon of the "working mom."  I had no idea at the time that this seismic cultural shift in American family life was concurrent with a renewed interest in the traditional women's craft of quilting.  Despite the quilting Renaissance that was kicked off in the United States by the Bicentennial celebrations of 1976, I don't remember seeing any representations back then of quilters in popular culture.  This intrigues me, and I wonder who those women were who were resurrecting the art of hand quilting while Diane Keaton was building a baby food conglomerate and home economics classes were disappearing from the schools.  Did the new quilters of the '80s and '90s identify as feminists, or were they actively rejecting feminism by embracing and romanticizing the traditional needlework that women had engaged in during "simpler times," or do you feel that the renewed appeal of quilting as a creative outlet had no relation at all to the changes in American family life that were happening at the same time? 

If you were making quilts back in 1986 while I was still in the bathroom playing with hairspray, I'd love to hear from you in the comments.  


What brought you to quilting?  Were you a homemaker or working outside the home at that time?  Did you feel liberated by the new possibilities available to women outside the home, or did you feel that your traditional identity, values, and skills were being devalued?  Did you then, or do you now in retrospect, see any connection between the changing opportunities and expectations for women that were happening culturally and the pleasure that you and other women found in quilt making during the '80s and '90s?


These are the things that stood out to me from the Nov/Dec 1986 issue of Quilter's Newsletter:

  • The ads are all for polyester batting
  • No mention of rotary cutting anywhere -- all of the patterns have templates instead.  That surprised me, because I know that Olfa introduced the first rotary cutters for garment sewing in 1979.  Seven years later, quilters were still tracing templates onto cereal boxes and cutting out every patch with a scissor?!  I'll be interested to discover when the first ad or article for rotary cutting finally shows up in QNM as I read through the decades of back issues!
  • None of the ads have websites listed, and many of them instruct readers to mail in $5.50 or however much with a SASE (Self-Addressed, Stamped Envelope).  I had forgotten all about SASEs!
  • There was an interesting article about the difficulty that quilters in 1986 were having locating the fabric colors they wanted.  That seems bizarre to me, spoiled by local quilt shops that carry full ranges of solid colors and everything from the traditional Civil War reproduction prints to Aunt Grace to Kaffe Fassett and beyond -- and if I can't find what I'm looking for at my LQS, there's always the Internet to find that elusive out-of-print fabric that I need to finish my project!
  • All of the quilts in this issue appear to be hand quilted.   I saw no mention of machine quilting at all, many ads for different styles of hand quilting frames, hoops, and thimbles, and several photos of women quilting by hand in articles as well as in advertisements.  There was one small 1/6 page black and white ad for a "Nustyle Table Frame for Professional Quilting" that depicted a domestic Juki sewing machine mounted onto a small frame to do narrow width pantograph quilting, instructing readers to "Call or send 22 cent stamp for literature and prices."  Remember when a postage stamp only cost 22 cents?!
  • Another thing that stood out to me is that the quilters who are pictured in this 1986 issue all look so YOUNG -- three appeared to be in their late twenties or thirties, two who may have been in their forties or fifties, and one woman who might have been early sixties.  And they really WERE young, because 1986 predates the ubiquity of Botox...  Just sayin'.
  • The articles and patterns in this issue of QNM are still depicting very traditional quilts in terms of their design and color.  However, several of the quilts in the QNM Readers' Quilt Show section are starting to look more experimental and contemporary:

Readers' Quilt Show: More Experimental Quilts Made by QNM Readers
Traditional Quilt Patterns Written by QNM Staff
That was an interesting discovery -- I would have thought that readers' quilts would have been more traditional and the editorial content would have been introducing new aesthetics, new techniques, and innovation.  Instead, at least from this issue, it seems that the magazine was still pretty traditional in 1986 even as its readers were starting to explore new possibilities in quilt making.

Okay, so no actual quilting got done today, and I got off on quite the tangent with this one back issue of QNM.  Uff da!  Tomorrow is a whole new day -- hopefully one that involves loading an outreach top on the longarm and quilting it!

Wednesday, October 12, 2016

Happy Fall, Y'All: Bernie's Sugar Shack Leaves Quilt circa 2004-2006

I know you're all tired of my snail's pace updates on my current projects, and Val's Archives Linky for this week is Fall Themed Projects, so I thought I'd share the Vermont-inspired Sugar Shack Leaves quilt that I made for my husband Bernie back in 2004-2006.  That was before I even knew what a blog was, so I haven't written about this one here before.

"Sugar Shack Leaves," 51" x 51", completed in 2006
The pattern for the leaf blocks came from Quilter's Newsletter Magazine Issue 357, "Shelly's Swirling Leaves, but I changed the borders.  I wanted to evoke the feeling of laying on our backs on that Vermont mountainside outside the sugar shack, surrounded by the forest at peak foliage season, with those brightly colored leaves floating down from a clear blue sky.  My version of the quilt was published in the Quilting Bee section of QN Issue 397, November 2007.

This was my third completed quilt, my first attempt at hand stitched applique (for the leaf stems), and my first and only hand quilted quilt.  It's only a throw sized quilt, but my boys were little at that time and I was only able to work on it in small snatches of time here and there so it took me about two years from start to finish.  Here you can see a much younger, exhausted version of myself working on the hand quilting back in 2005:

Hand Quilting In Progress, back in December 2005
How time flies!  That photo was taken in my in-laws' motor coach after we had spent the entire day in Disney World with toddlers.  Hence the dark circles under my eyes, general exhaustion, and "Really?  You need to take my picture NOW?!" look on my face.  But it's kind of neat now to have an "in progress" shot to share.  I'm using my square Grace lap hoop and my Roxanne thimble.

Hand Quilting Detail
This quilt wasn't really the best choice for showing off hand quilting.  You can't even see it unless you look up close, and my little random leaves quilted in the background look pretty lame to me now.  But it was relaxing hand work and I did enjoy it.  Maybe if I ever get around to setting my Jingle applique blocks, that one might be a good candidate for some hand quilting.

One more shot to share -- the machine embroidered quilt label:


That's it for today.  I'm linking up with Val's Tuesday Archives linky.  Have a great day!

Tuesday, May 20, 2014

Butterflies and Bear Paws: Another New Project for Rebecca!

New Project!  Butterflies and Bear Paws
Greetings, Neglected Blog Readers!  Never mind that I have not yet finished the Jingle BOM project I started over a year ago, nor have I finished even the first block of the new hand applique project that I started a couple of months ago (and don't even ask me about that paper pieced Advent table runner project).  I recklessly launched myself into yet another new quilting project this week.  Now that I have multiple UFOs (Unfinished Objects) and WIPs (Works In Progress), I feel more like a REAL quilter!

Bear Paw Inspirations: Quilts! Quilts! Quilts! and QNM Back Issue, LouLouThi Clippings Fabric in Passion
I have wanted to make a Bear Paw quilt ever since I saw a vintage navy and white Bear Paw quilt in the 2nd Edition (the Bear Paw quilt is NOT in the newest 3rd Ed.) of Quilts! Quilts! Quilts! by Diana McClun and Laura Nownes.  That was back when I was planning my very first quilt in 2002.  I dog-eared the page and chose a simple Roman Square for that first project instead.  But in organizing back issues from Quilter's Newsletter Magazine recently I came across another bear paw quilt project, and somehow it popped into my head that the Anna Maria Horner LouLouThi Clippings fabric in Passion that I've been hoarding in my stash might make a fresh and interesting bear paw quilt, especially if I cut up the large scale print completely randomly.  Normally I use MANY different fabrics in a single quilt, primarily to amuse myself throughout the construction process, but this time I'm using just the LouLouThi print, Kona Solid in Snow for the background, and a complementary batik scrap for the center squares. 

Should Have Used WHITE Thread!
This is actually the first time I've used white fabric in a pieced quilt, believe it or not, and I discovered that although beige and gray threads work well for piecing multicolor quilts, I really need to use WHITE thread when one of my fabrics is a solid white.  See those visible dots of gray thread at the seam lines once I've pressed the seam open?  Yuck!  I switched thread colors as soon as I noticed that.  It's not noticeable for me to rip out all the stitches and start over, but I'll try to make a mental note to match my piecing thread to the lighter fabric from now on.

I really love how my first bear paw block came out.  I did NOT follow the patterns in the book or magazine projects, though.  The book project had instructions for 12" blocks (despite the fact that the vintage quilt in the photo could not possibly have had blocks that large) and the magazine article was for 8 3/4" blocks.  I knew I wanted to make a square quilt with 9 blocks set diagonally, and I could see that the bear paw has a 7x7 underlying grid structure.  I bored my children to tears by demonstrating how I can use the Pythagorean theorem to calculate the dimensions of a quilt with a diagonal setting (gotta LOVE math-in-the-real-world quilting lessons!) and decided that a 10 1/2" finished block size will give me a finished quilt in the size I want, with 9 diagonal bear paw blocks and four plain alternate blocks. 

So, going back to my 7 x 7 grid, I just need to make each unit finish at 1 1/2" to create a 10 1/2" finished block.  If I wanted a 7" block, I'd make each unit finish at 1", or for a 14" block, each unit would finish at 2", etc.  This is where those specialty rulers come in handy, too -- I was able to cut my small squares and HSTs (half square triangles) all from 2" strips of fabric instead of having to add weird fractional amounts to squares and then slice the squares apart on the diagonal as traditional rotary cutting instructions tell you to do. 

Anyway, I've been sitting here typing for longer than I had intended, and I still have lots to get done before it's time to pick up the kids so I'll just leave you with this:

I'm In Print!  June/July 2014 Issue of QNM
My "300 Words" essay about "My Dream Quilting Space" was published in the June/July issue of Quilter's Newsletter Magazine, which just showed up in my mailbox the other day.  My smiling face and opinions await you at your local news stand.  :-)

I'm linking up with Judy's Design Wall Monday at Patchwork Times, Esther's WOW: WIPs on Wednesday as well as with WIP Wednesday over at Freshly Pieced.  If you have a moment, stop by to see what everyone else is up to today.

WIP Wednesday at Freshly Pieced
Have a wonderful day!

Monday, March 10, 2014

No Hearts for Rebecca: A New Applique Project!

Frankensteined Applique Pattern from Back Issues of QNM
Good Monday Morning!  I've been suffering from HSWS lately (Hand Stitching Withdrawal Syndrome) ever since I finished the applique blocks for my Jingle BOM project.  I learned a lot with that first applique project (no, it's not finished yet -- still needs some pieced borders, top assembled, and quilted) and by the end, I felt pretty comfortable with the starch and press prepared applique method.  However, it took eons to prepare all those little applique shapes that way, and several times I had to go out in the world with no applique project to work on because I didn't have the next pieces prepared and ready to stitch down. 

I've been reading several books on different hand applique methods (reviews to come later, possibly, if I get around to it).  My hope was that I could learn to do "old school" applique like they did in the 19th century, no irons or prep work required, just trace around the templates onto fabric and turn the raw fabric edges under with your needle as you go.  The best books I found on this needle turn applique method were the Piece O'Cake Designs sampler books by Becky Goldsmith and Linda Jenkins.  Their instructions are very clear and straightforward, and they even have some great video tutorials on their web site here.  The only problem is that the cutesy off-kilter style of the projects in the book don't resonate with me.  I don't hate them, I just don't love them enough to want to make them, you know what I mean?

So I turned to my Giant Binder of Magazine Clippings, compiled over the last decade or so, looking for a pattern with similar shapes but more formal symmetry.  I found this Village Gardens quilt, made by Joyce Stewart, that I had torn out of the September 2006 issue of Quilter's Newsletter magazine.  These are large, 16" blocks, with larger applique pieces than the ones in my Jingle project, so I think they should work for a beginner's foray into needle turn applique, don't you? 

The only problem was the cutesy little hearts.  I HATE cutesy little hearts.  So I went back to my binder full of clippings and found a pointy flower element in a different pattern for an historic reproduction quilt, very similar size and scale to the heart motif that I can't live with, and I swapped it out, creating my own little Frankensteined applique block pattern:
Swapping the Heart on the Right for the Flower on the Left
Remember that children's book, No Roses for Harry?  Well, No Hearts for Rebecca! 
 
So far, all I have done is create this full-size master pattern from my photocopied magazine pages, marked the vertical, horizontal, and diagonal centering lines, and pieced one block background together:
Pieced Applique Background, Ready to Go
I am proceeding with no plan except that I am going to make one block using the Piece O'Cake needle turn instructions and see if I can achieve the smooth curves and accuracy that I want that way.  Of course I bought WAY more fabric than I could ever use in just one block...
New Fabric Goodies, Prewashed and Ready to Play
I was experimenting with a new method when I shopped for this project.  I brought a scrap of my kitchen drapery fabric with me, which I really love, and then selected fabrics in shades pulled directly from the drapery fabric as well as brighter and muddier shades of those colors.  I ended up with a VERY different assortment than the bright, in-your-face fabrics that normally insist on coming home with me. 
 
Inspiration Print Fabric with Coordinates: Monado in Havana, Vervain

(And no, the fabrics are not made in the U.S.A.  I didn't notice that the ruler was in the picture until I posted it just now, and I'm too lazy to go back and crop it out).

So if this trial block goes well, and I make more of them, then whatever those blocks turn into should look great in my kitchen or in my adjoining keeping/family room, which has the same drapery fabric.  And if the block comes out terrible and I wad it up into a ball or torture it as a free-motion quilting sample, then I'll just have to use all that fabric for something else!


Hope Chest Prints, Laundry Basket Quilts Layer Cake for Moda
By the way, I bought one of those precut "layer cake" fabric packs (precut 10" x 10" squares all from the same fabric collection) for this project because there were a couple of prints in the layer cake pack that I really liked and my quilt shop didn't have yardage in stock from this collection yet.  I've never bought precut fabric before, and I prewashed the squares with my yardage and then ironed and attempted to straighten them.  How annoying to discover that several of the fabrics were cut severely off grain!  It's not a big deal for my purposes, since I'm planning to cut the squares up into Swiss cheese for applique shapes, but the whole point of precuts is supposed to be that you can sew them together right out of the package or cross-cut them into triangles, etc. without fabric waste.  But I found that when I prewashed my layer cake squares, even though they were all Moda fabrics from the same Hope Chest Prints collection, they shrank at different rates and shrank more in one direction than the other.  If I was using these fabrics for piecing, I'd lose even more fabric from the original 10" square because I would have to straighten the grain and true up the sides.  So I won't rule out layer cakes as a way to buy fabric for applique, but I won't be purchasing fabric this way for a pieced quilt project.

I showed you what I'm designing on my work table today instead of on my design wall, but I'm still going to link up with Design Wall Monday at Judy's blog.  I always love to see what all those other creative quilters are up to!