
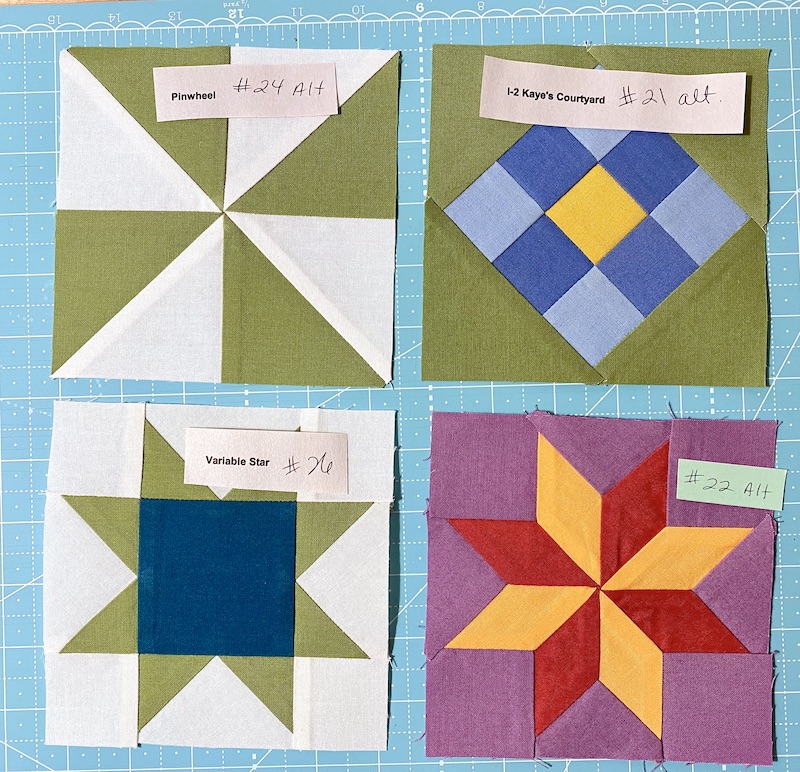
Happy Week End, everyone, and happy Month End as well! One of the goals I'd set for myself at the start of January was to make some more blocks for my Retro '80s Building Blocks sampler quilt, and I finally did that yesterday. Four more happy little 5" blocks are completed, only one of which was in the original Moda Modern Building Blocks design. The other three blocks were among the many that I swapped out when I was redrafting the quilt in EQ8 Quilt Design Software (affiliate link) to suit my purposes.
 |
| Four More 5 Inch Blocks for Retro '80s Building Blocks |
Gotta admit, I am still not 100% thrilled with the center of the little Lemoyne Star but it took me a LONG time to piece that one with all of its little Y-Seams, and I decided it's Good Enough. Or at least, it's the best I could do that day.
Here they are, my completed blocks back up on the design wall, with the new ones added into the mix:
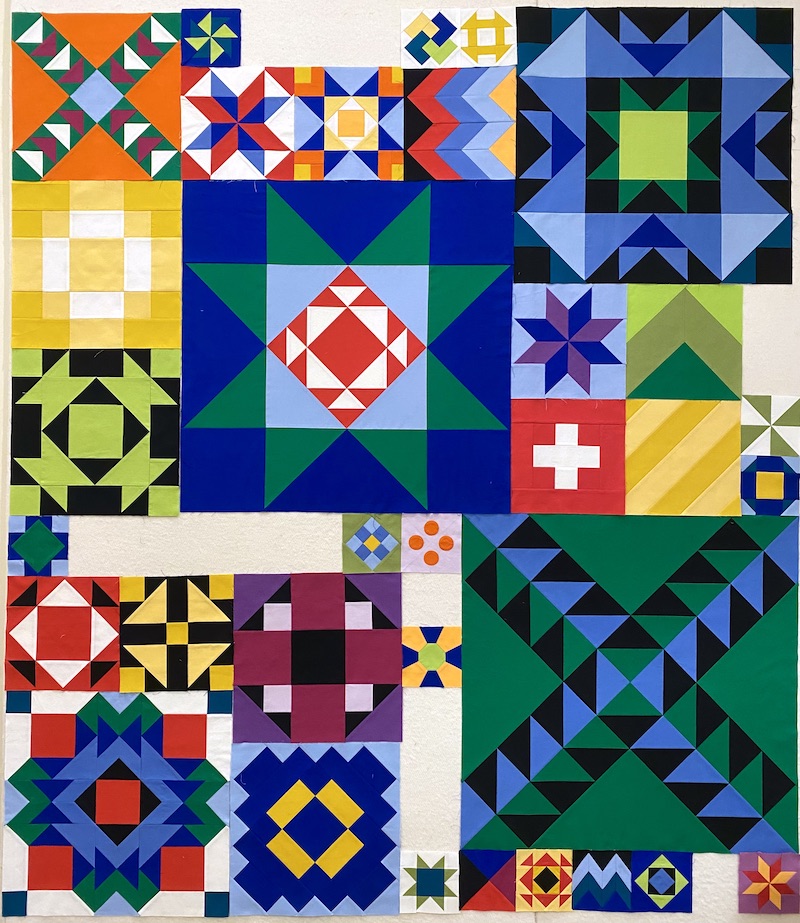 |
| Back on the Design Wall: 38 Blocks Finished, 15 Remaining to be Made |
For those of you who haven't seen any of my earlier posts about this quilt, here's a quick recap. I started out with the idea that I wanted to make the Moda Modern Building Blocks quilt that was a popular BOM (Block of the Month) about eight years ago. But I wanted mine to finish a different size to fit a particular bed, and I did not have the kit or the pattern anyway, so I set about redrafting the quilt in EQ8 from pictures of... But instead of sizing my blocks as ruler-friendly multiples of 6", my blocks were multiples of 5" in order to get the finished quilt size I wanted with the borders I added. The whole idea behind the "building blocks" sampler was for it to be a skill builder, so I eliminated all of the unecessary seams that Moda had added to simplify the piecing, adding back Y-seam construction because that's a skill I wanted to focus on. I also swapped out 40% of the blocks in the original quilt for different ones in order to get that retro 1980s vibe I wanted and/or to include blocks that were more interesting (to me) or more challenging. And I added rainbow borders that were inspired by the suspenders Robin Williams' character wore on the television show Mork & Mindy.
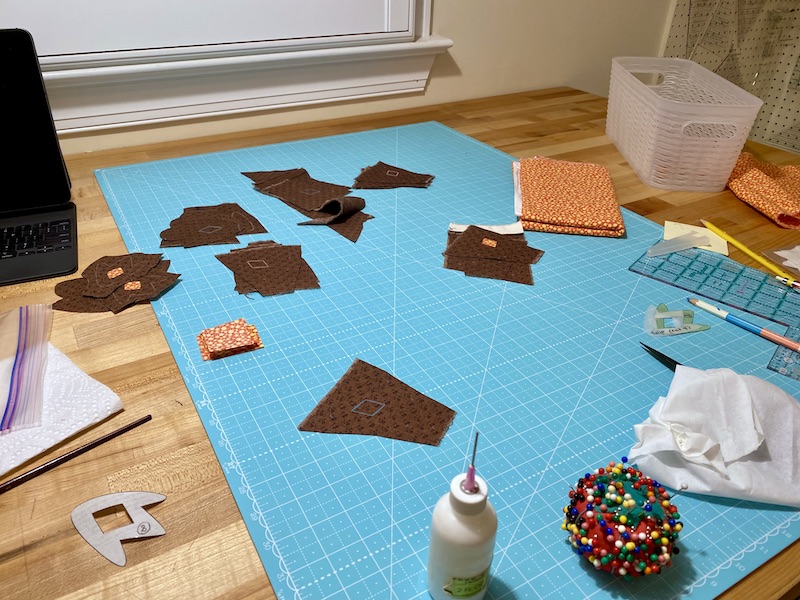
Changing my block sizes from multiples of 6" to multiples of 5" gave me unworkable measurements for rotary cutting, so nearly all of the blocks in this quilt have had to be either foundation paper pieced (FPP)or else cut out the old fashioned way, using card stock templates that I printed out from EQ8. That adds a lot of prep work to each block, since I have to print out foundation paper piecing templates on newsprint, traditional templates on cardstock (my cardstock is green), and then I also print rotary cutting charts with oversized seam allowances for precutting my FPP patches. I took some time a few days ago to print out everything I needed for ALL of the remaining blocks in this quilt the other day, so from here on out I can just grab the printed papers for the next block and start cutting and sewing.
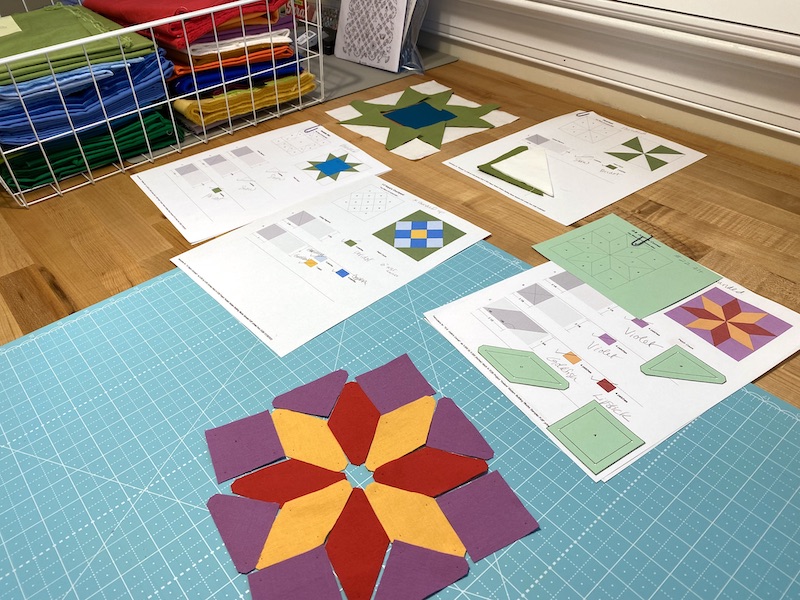 |
| Four Blocks Prepped and Ready to Sew, FPP Patterns, Cutting Charts and Templates |
Notice the Kona Solids stacked and labeled with their color names in the wire bin at the back of my worktable? All of the fabrics for this quilt are in that bin, separated from the rest of my fabric stash so I don't accidentally grab one for another project and then come up short on my sampler quilt!
Three of yesterday's four blocks were able to be mostly foundation paper pieced, and then after trimming the FPP units and removing the papers, I just piece the units together like I would any other quilt block with a 1/4" seam allowance and pinning at the seam intersections. Even when I'm paper piecing a block, I try to plan for seam allowances that will nest together when the units are sewn together to complete the block.
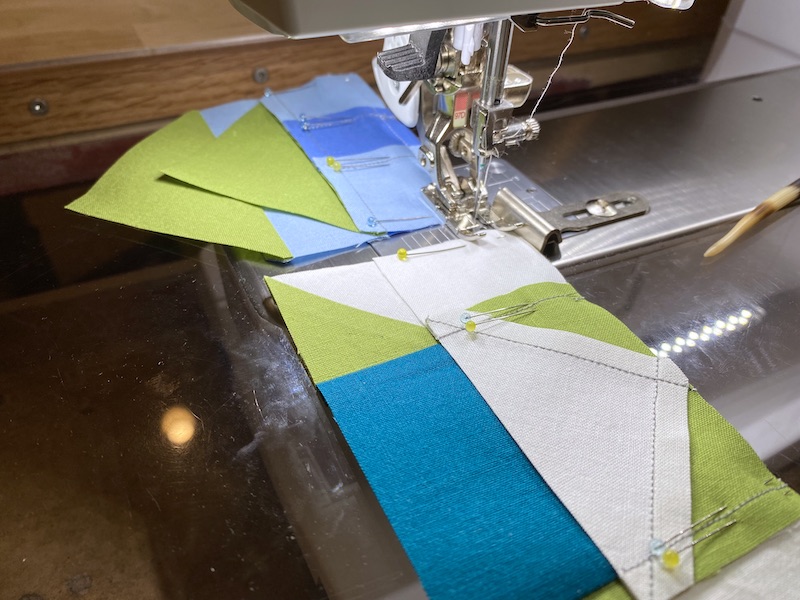 |
| Traditional Machine Piecing FPP Units |
The block below was not in the original Moda Modern Building Blocks quilt. It's one of the blocks from the antique Civil War quilt made by Jane Stickle of Vermont (the one modern quilters call "the Dear Jane Quilt"). I sourced a few other blocks from the Stickle quilt in my sampler. All of the blocks I swapped out in my quilt are historic quilt block designs, either from the EQ8 Block Library, the Dear Jane quilt, or Barbara Brackman's Encyclopedia of Quilt Blocks.
 |
| 5 Inch Block #21, Swapped from Jane Stickle's 1863 Quilt |
So when I say that the block pictured above is Block #21 Swapped, I mean that this block was not in the original Modern Building Blocks quilt and I'm using it in place of Moda's Block #21 that I eliminated. All of the fabrics in my quilt are Kona Solids, and the block above features the colors Peridot, Blueberry, Copen and Grellow.
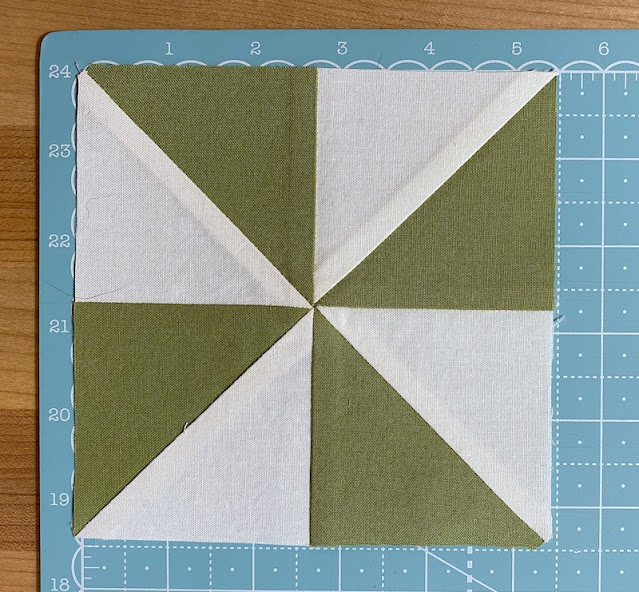 |
| 5 Inch Block #24, Also Swapped |
This pinwheel block is in Kona Snow and Peridot. Gotta say, EQ8 was one of the best investments I ever made. I love being liberated from "Ruler Friendly Measurements!" However, I'll definitely think twice before I do a whole Queen size bed quilt this way again.
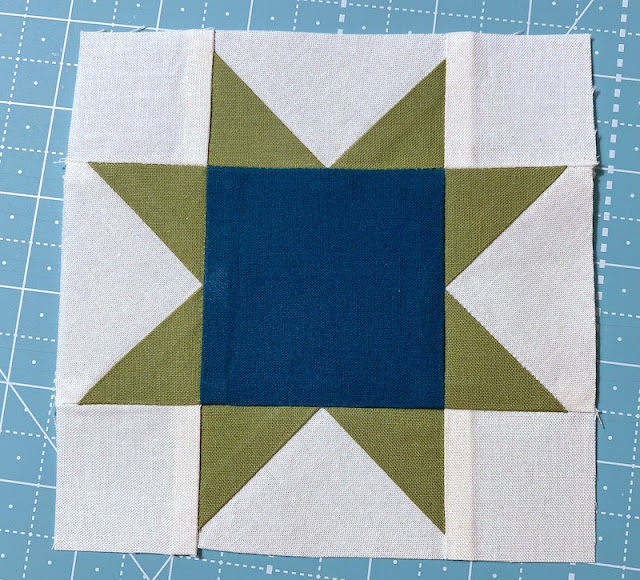 |
| 5 Inch Block #26 |
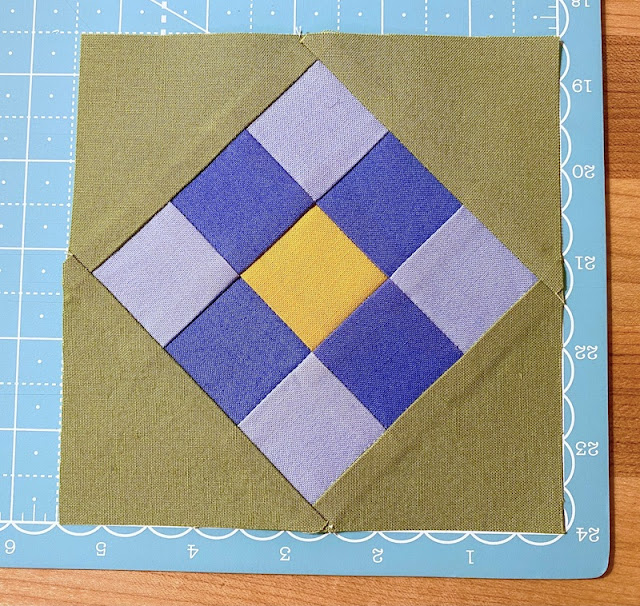
The star block above is Kona Glacier, Peridot, and Snow. The Lemoyne Star block below is Kona Goldfish, Lipstick and Violet.
 |
| 5 Inch Lemoyne Star Patches, Template Cut and Marked With Pencil |
This is the block I cut out with the old school card stock templates. I punched tiny holes at the seam intersections and marked them on the wrong side of each fabric patch with a mechanical pencil. I got out my 1935 Singer Featherweight to piece this block, because the much narrower presser foot on the vintage machine makes it easier to machine stitch up to the bulk in the center of the star. I also like that the old mechanical machine changes stitch direction immediately when I flip that lever, never taking an additional stitch in the wrong direction as modern computerized machines often do.
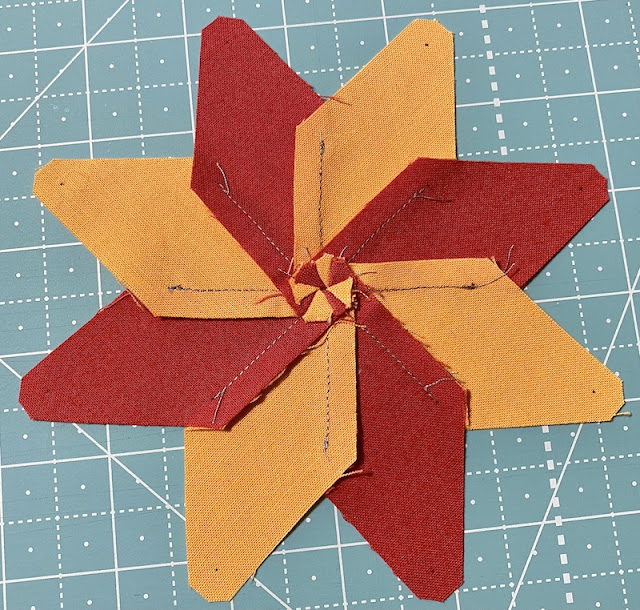 |
| Star In Progress, Rear View |
You know, I think I just realized what's going wrong with my points in the middle of Lemoyne stars. In the photo above, after pressing the seam allowances in a spiral around the star, I poked my finger into the center to open the unstitched seam allowances and then I did a twist/spiral movement with my finger to open and flatten the seam allowances before pressing them down with my iron. Then when I look on the front of the block, the points that matched so perfectly a few minutes ago have spiraled and twisted out of alignment! Note to self: Next time I make one of these blocks, try to just open the seam allowances WITHOUT twisting and see if that comes out better on the right side! I know it's minor and it looks fine when you step back from the whole quilt, but this IS a skill builder after all. Improving my piecing and pressing skills is literally the whole point.
 |
| The End is In Sight! |
So now I have only 15 more 5" blocks to go to complete the center of the quilt, plus the Mork's Suspender borders and border corner blocks. When it's finished, the quilt will look something like this:
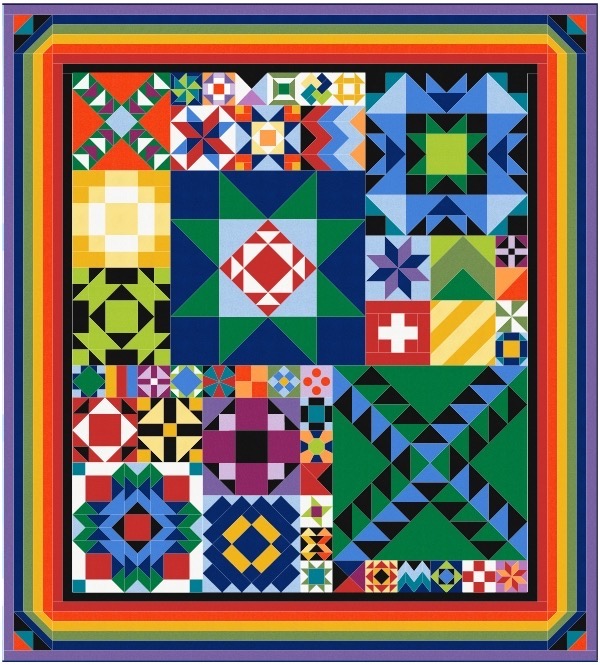 |
| 94 x 104 Retro '80s Building Blocks Design |
Of the remaining blocks, some of them are SUPER easy like the two-tone orange 4-patch block and half square triangle blocks. Only two more involve Y-seams -- the Friendship Star block and the one below it that looks like yellow and orange ribbons on a black background.
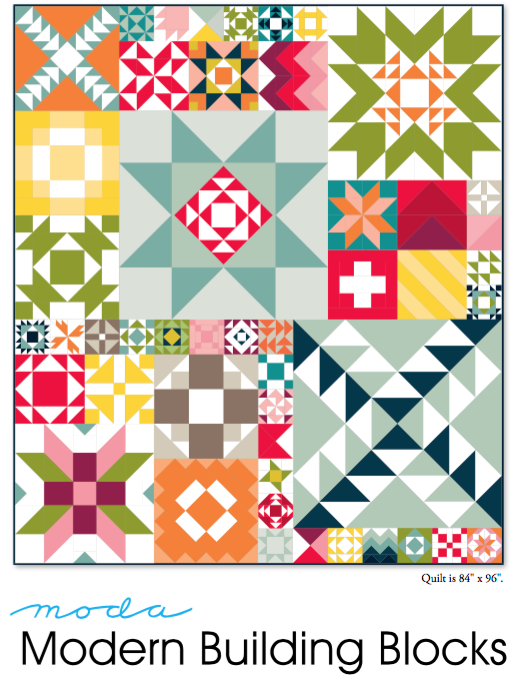
For those who don't remember what the original Moda Modern Building Blocks quilt looked like, here it is:
Hey, if any of you have made the Moda Modern Building Blocks quilt and happen to have the patterns or kit packaging anywhere, could you please look and see if the quilt pattern designer was credited anywhere? For everything that I changed in my version of the quilt, it's definitely a derivation and not my original design. It bothers me that I am not able to credit the pattern designer when I write about this quilt, and if I decide to custom quilt this one and enter it in a show, I'd definitely want to credit the designer!
Meanwhile, Back at the Ranch...
The other WIP (Work In Progress) that I've been slogging away with this month has been my FrankenWhiggish Rose appliqué. I've got my dark brown tulips appliquéd to three of the nine blocks and I've been working on the remaining 24 tulips for the other six blocks assembly line style. I'm working on reverse appliquéing the diamond centers first "off block."
 |
| Applique Assembly Line for FrankenWhiggish Tulips |
I am getting so bored with this project -- I think it might have to go back to Time Out soon, even though it's SO CLOSE... The monotony of making the same little shapes out of the same exact fabrics over and over and over again is getting to me!
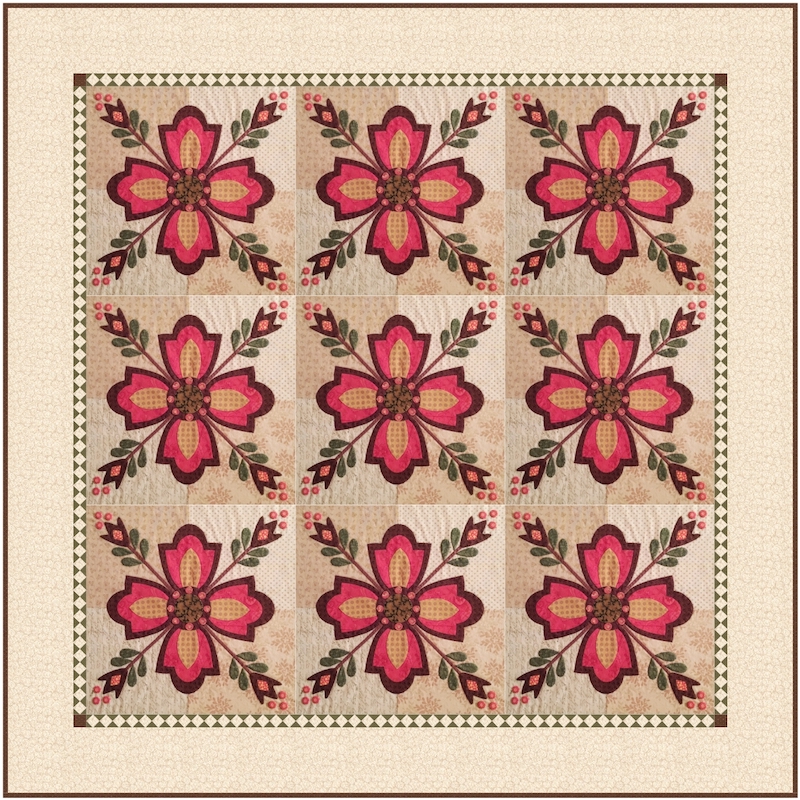 |
| Possible 60 x 60 Layout for FrankenWhiggish Rose Blocks |
It's simple in that, once the appliqué blocks are finished, I just trim them down and sew them together to make the body of the quilt top. The 60" x 60" finished size would work well for hanging this quilt on a wall in my family room, where it works with the color scheme (nevermind that I'm already sick of these colors and itching to redecorate). The only remaining annoyance will be the 1" FW inner diamond border. I love how it LOOKS, but I'm not sure I'll be up to the bother of piecing it. A sawtooth, checkerboard squares or solid inner border would be so much faster and easier, so it depends on my mood and level of impatience once I get the blocks together.
17 comments:
I have better luck with the Lemoyne Star pattern I have that has no Y seams and I press all of the seams that meet in the middle open - just my opinion but I think it goes together easier that way. Nice to see so much progress on that quilt though.
I love LeMoyne Stars, Rebecca. I have the best luck with just opening that center "blog" and smooshing down -- forget the twisting. Your quilt is gorgeous! I envy you being able to work on so many different projects at the same time; I just can't do that!
What great progress you are making on those two projects! You are getting so close to a finish on both! That has to feel really, really great! I hope that your TV segment goes well and does air. I wish I lived within the broadcasting range so I could listen in!
Great job on making progress on your Moda quilt. I LOVE the proposed setting you showed for the appliqué blocks.
Wow, you are brave to redraft your Building Blocks pattern at 5". It's looking good!
Have you thought about Seminole Piecing for the inner border of your Frankenwhiggish Rose? Tip: make the outer white pieces longer than you think you need so you have plenty to trim down later. Good luck!
It's fun seeing your progress on the Moda Modern quilt. I finally bought EQ8 a few weeks ago and need to sit down and play with it.
Beautiful. I'm jealous of your precision piecing skills. You do an awesome job. I need to slow down. I think I picked up too many bad habits when I first began to quilt, decades ago. But periodically I do try to go thru precision piecing exercises and slow down. Still, those bad habits bubble up.
Wow! You've come a long way on this project! :) I have to keep my temperature quilt fabrics totally separated, too, or they'd get accidentally used with other projects. I ***love*** your Frankenwiggish Rose project - that 1" diamond border is so amazing on it. . .but I'm not the sewist for it, so that's easy for me to say. . . :D
Your blocks on the Design Wall look sensational, the colors just glow! Love the way you're using the inspiration of Mork's suspenders. Gosh those FrankenWhiggish Rose Blocks are going to be gorgeous, but I sure hear you on being bored with the same shapes and fabrics over and over. Reading about your process is so fun!
Thank you for linking with To Do Tuesday!
You've spent a lot of time on the Building Blocks sampler and it's going to be stunning when you finish all the blocks! I'm looking forward to seeing your Sarah Fielke BOM starts - hers are always such amazing designs.
Rebecca, I just watched the news videos and you all did a good job. And the shop looks like a great one, so, lucky you.
Whoa! I am in awe of your determination and persistence with both the projects you've shared. I've been whizzing through a quilt project, choosing to live with imprecision for this one, but determined to re-visit my techniques in order to build precision into my piecing. I guess the first piece of advice to take on board is 'slow down'!
Partial seams, pointy points and swirled centers!!! You go girl!!! Rock on!
These blocks look amazing! It's going to be a gorgeous quilt.
Love the plan for the FrankenWhiggish blocks but I'd be hesitant about that border too. Love your modern blocks! Fingers crossed you get more made soon. Thanks for sharing on Wednesday Wait Loss.
FrankenWhiggish Rose is going to be spectacular. While it might take a little longer to assemble that border I say go for it - it will look absolutely fantastic. Just enjoy every step in the process.
Hi Rebecca,
I have the Moda Modern Building Blocks pattern - the sort of flash card deck - and it doesn't credit any designer at all. Just copyright 2014 Moda Fabrics. (And the stock # is PS9900.) I must get around to making it! But I think I'll stick to the 6" multiples for the blocks. ;-)
Post a Comment