Showing posts with label Bernie. Show all posts

Monday, March 24, 2025

Deco Quilt Top FINISHED!

Well, THAT took a bit longer than I thought it would.  😐.   Behold the idiocy of my own words, mocking me from my November 1, 2021 blog post when I started this quilt

"...So, yes -- my Weekly Goal is to cut and sew 54 Block One log cabin blocks for my Deco Bed Quilt, and my OMG (One Monthly Goal) for this quilt is to complete the entire quilt top!"

HAHAHAAHAHAHA!  Spoiler alert, to those just joining me -- it took me a lot longer than a week to cut and piece 54 log cabin blocks.  If my life depended on accurately predicting how long it would take me to make a quilt, I'd just be dead already with no quilts to show for myself at all.


102 x 102 Deco Quilt Top is Finished


Finishing this quilt top (FINALLY!) nearly three and a half years after starting it was my OMG (One Monthly Goal) Part I for March, as in THIS March, 2025, so I'm glad it's together and off my design wall.  I finished it late last night after Bernie had already gone to bed and I couldn't get it back up on my design wall without his help, so I just spread it out on this bed in a guest room instead.  Photos taken with morning light.  This is probably the room where this quilt will "live" once it's quilted and bound.


Deco Quilt Top Awaiting Quilting


I did the perimeter stay stitching 1/8" from the edge on all four sides of the quilt top, so it is ready for quilting.  I have backing fabric already; I bought it and prewashed it three years ago when I finalized the color palette for the quilt top.  

Friday, March 10, 2023

Another Fresh Start On My Horizon: A Halo Quilt for Marlies

 Good morning, quilters!  Despite waking up to a muddy, rainy day here in Charlotte, I am in a sunshine mood today.  I think I may have finally figured out how to get my blog posts to automatically email to all of you wonderful people who have signed up for my email subscription!  Woo hoo!  Any of you who are not signed up for email but would like to be, just scroll to the bottom of my web site to find the signup box.  In case anyone else out there has been having a similar problem, here are the boring technical details: The RSS feed generator I'd been using successfully with that free email subscription service for years (can't even remember the name of it now!) and then with MailChimp created an RSS feed with slightly different tag names than the ones my new SendinBlue service is looking for when it checks my blog for new content.  The tags that were incorrect were "Published" instead of "pubDate" and "Content" instead of "Description," and SendinBlue's tech support identified that problem for me and directed me to a different website that would generate a new RSS feed with the universal RSS tags that their robots look for when they check my site for a new blog post.  The reason those awful blank emails were going out with just a header, a post title, and a footer, with no photos and no text, is that the SendinBlue robots were finding a new blog post title but couldn't "see" any of the text or photos when it wasn't associated with the tag name "Description" that they were looking for.  Clear as mud, right?  Anyway, I've been going back and forth with tech support about this and pulling my hair out over it for three months now, so it will be a huge relief to me if it's finally fixed.  The test email that I sent to myself last night came through correctly, so fingers crossed that THIS blog post shows up in everyone's inbox complete with text and photos, too!

But no one came here to talk about RSS feeds and computer bots, did they?  

Another NewFO for Rebecca: Halo Quilt by Jen Kingwell

I know I just posted last week about starting a new challenge project (the upcoming Star Upon Stars QAL from Laundry Basket Quilts), but the fabric and templates haven't shown up in my mailbox yet and the quilt along doesn't kick off until the middle of next week.  Meanwhile, my restless heart fell under the spell of a more intermediate quilt that will go together faster for me, one that involves curved piecing that I enjoy and find satisfying.  This is all the fault of my client Megan, by the way, because she's going to be starting this quilt in a class at the Quilt Patch shop in Matthews at the end of March and she tempted me with photos of a quilt that is way too adorable to refuse.  I'm also blaming Teresa, the Quilt Temptress who is teaching this class and who has been sharing photos of the gorgeous Halo quilt she made as a sample!  Teresa's class is already full and has a wait list, but I have a feeling she'll be teaching it again in the future.  As for me, I have a constitutional inability to follow directions anyway, so I'll be diving in on this one totally unsupervised.

Halo Pattern, Templates, and Tilda Pie In the Sky Fabric Bundles


If you're local to the Charlotte area and you'd like to make a Halo quilt of your own, Quilt Patch Fabrics in Matthews has both the Jenny From One Block pattern booklet and the optional acrylic template set for sale in their shop.  I purchased my Halo pattern booklet and my Tilda Pie In the Sky fabrics from the fabulous Flash Sew and Quilt shop in Naples, Florida while I was there visiting my in-laws, and I'll be making my Halo quilt as a gift for my mother-in-law Marlies.  

Saturday, October 31, 2020

Goodbye, October 2020! Baby Quilt Update (and Happy Halloween)

 Well, October is officially a wrap.  The trick-or-treaters have gone home and my husband, younger son, and I have set ourselves to the task of finishing off the leftover candy.  I've powered off my long arm machine for the night, even though I'm only 2/5 of the way through quilting the baby quilt that was supposed to be Part Two of my One Monthly Goal for October.  Here's what Charlie's quilt looks like so far:

My Letter Home Monogram Baby Quilt is 2/5 Quilted

I loaded this quilt on my frame upside-down, so I'm actually quilting it from the bottom up.  There are five rows of 8" blocks in this quilt and the first row took me awhile because I only had a fuzzy idea about how I was going to quilt this one.  I wanted to keep the quilting fairly light and open, similar to the density of the pantograph design I quilted on my October OMG Part One quilt (below), but this baby brother quilt is getting SID, light ruler work, and a little bit of free motion rather than E2E pantograph quilting.  

Big Sister's Quilt, Aiming for Similar Quilting Density in Baby Brother's Quilt

I don't normally quilt such a large scale meander freehand, though, so keeping the size of that pattern big and somewhat uniform is challenging, and I'm also reminding myself that LARGE quilt blocks with LONG ruler lines to quilt are a lot harder than quilting the exact same designs on smaller blocks.  So my "quick and easy" quilting plan has evolved to require a bit of marking, which is helping to keep lines straighter and more evenly spaced.

Doubting Design Choices After the First Row

One thing that slowed me down was that, since we took the machine head off the frame to install the interchangeable hopping foot upgrade, my horizontal channel lock hadn't been holding as securely as it had previously.  I use my horizontal and vertical channel locks to keep my seams straight and square as I'm quilting, and this was bugging me, so there was an interruption of troubleshooting that yesterday with Bernie and the folks at APQS Tech Support (One little washer was all it took to snug that wheel back up to the carriage and correct the problem).  But, while I had Bernie and Anders available, I had them lower my frame about 3 1/2" so I could quilt from the front of the machine more comfortably.  I'd been wearing high heel platform sandals the day before, since we'd raised my frame a few inches for quilting pantographs from the back side of the machine.  We also moved my laser light from the back of the machine to the front, where it will be more useful to me once my IntelliQuilter gets installed.  But I digress.  Back to the quilt at hand:

40 wt Fantastico in #5007 Wales (Lime, Bright Green, Turquoise, Green Variegated)

I selected a cone of Superior Thread's Fantastico variegated 40 weight trilobal polyester thread in shades of Lime, Bright Green, Turquoise and Green, which I auditioned against the Kona Bone background as well as on the Indigo and the green fabrics.  I wanted to use one thread color throughout to "keep it simple," but knew that a white or off-white background thread might look really harsh against the dark blue.  I was excited about the variegated thread until I started quilting with it, and then I second-guessed myself midway through the first row.  

Superior's Fantastico Thread in #5007 Wales

I was tempted to start ripping out all the quilting I'd done so far, because I felt like the quilting was just screaming at me instead of playing a supportive role to the piecing design...  But the next day, when I came back to it, I reminded myself of my self-imposed deadline and how I wanted most of all to have this finished, so I soldiered on.  And, you know what?  I'm glad I kept going rather than reaching for my seam ripper, because the more I got quilted, the more the thread began to grow on me.

By the End of the Second Row, My Thread Felt Like the Right Choice

This is a good reminder to TAKE A STEP BACK before making rash decisions involving seam rippers!  With my face 8" away from the quilt surface, the green pastel threads seemed like they were too loud and fighting with the quilt, but from a distance it's much more subtle.  If I'd ripped out all the variegated thread and switched to yellow, green, navy and white, not only would I have slowed myself down considerably, but the quilting designs would have disappeared into the fabrics more -- and I might have been disappointed that I couldn't see my quilting designs well enough!  Knowing how the quilt will soften and smoosh and crinkle once it's finished and washed for the first time, I think this thread will be just fine.

So now my only question is whether those giant green 8" HSTs have enough quilting in them.  I mean, I know they have enough quilting to meet the requirements of the batting.  I kind of like the way they look right now, but maybe I'll come back and add something when everything else is finished.

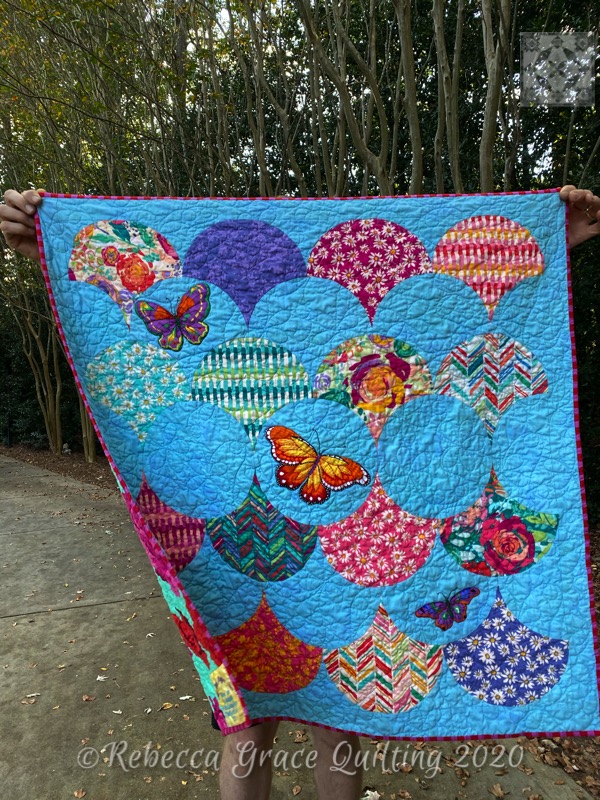
Speaking of finished, I did finish the big sister's quilt, which you can read about here.  Here's a glimpse of how that one turned out, freshly washed and ready for gifting:

October OMG Part One Was Finished On Time!

That's it for me for tonight.  I'm going to eat too many Twix bars with my husband and son while we watch Saturday Night Live.  I just realized that this is probably the last Halloween that I'll have a kid at home with us, since Anders is a high school senior this year.  They don't come home from college for Halloween, so this will be an Empty Nester Holiday for us from now on.  So strange to think about that!  Okay, I lied.  I'm leaving you with one more picture, from my favorite Halloween in 2006 when the boys were 3 and 5 years old:

Halloween 2006: Anders is Batman, Bernie is Aquaman, and Lars is Spiderman


Anders is in the Batman costume on the left, Lars is Spiderman on the right, and my wonderful, amazing husband is wearing what is supposed to be an Aquaman costume.  I did not have an Aquaman pattern, so I made this costume from a Jalie men's figure skating costume pattern, out of green stretch velvet for the figure skating pants (more revealing in real life than they appear on TV during the Olympics) and an orange sequined lycra figure skating top, because the sequins were the closest thing I could come up with at JoAnn fabrics that looked like scales.  Bless his heart; he got more than a few catcalls from the neighbor ladies as he was out trick-or-treating with the kids, but my sons were SO HAPPY to be their own little Justice League with Daddy!

Happy Halloween, everyone!  I'm linking today's post with:

SATURDAY

·       UFO Busting at Tish in Wonderland

One Monthly Goal at  Elm Street Quilts

SUNDAY

·       Frédérique at Quilting Patchwork Appliqué

·       Oh Scrap! at Quilting Is More Fun Than Housework

·       Slow Stitching Sunday at Kathy's Quilts

MONDAY

·       Design Wall Monday at Small Quilts and Doll Quilts  

·       Monday Making at Love Laugh Quilt


Thursday, March 12, 2020

Order In the Studio: DIY Wall Mounted Racks for Longarm Quilting Rulers

Good morning, and happy Thursday, everyone!  Thanks to my blog-reader-friend Diane in Texas, SAMWISE LEARNED HOW TO GO DOWN THE STAIRS YESTERDAY!!!  After reading my post about how I was carrying my 50-pound Rottweiler puppy down a flight of stairs every morning, Diane emailed me with step-by-step training instructions to get Samwise over his fear of the stairs, and they worked like a charm.  It took me all of 5 minutes, y'all, and this morning he came down the stairs all on his own.  I am eternally grateful, Diane, and so is my back!!


On to the Quilty Goodness...  I have been wanting to show you guys the wall-mounted ruler racks that my husband made me for Christmas, and since I haven't got any sewing progress to share with you, today is the day for the DIY Ruler Rack post!

Inspiration: Lisa Calle's Ruler Racks, shown on her blog here
I first saw racks like these on Lisa Calle's blog, Living On a Thread, in her post about setting up her quilting studio in her new home.  If Lisa had these for sale in her online shop, I would have just ordered them from her -- but when I asked her about them, she said that a friend made them for her and it's not an item she sells.  I searched Amazon, did some google searches, and still could not find anyone selling racks like these, so I begged and pleaded with my husband to make them for me.  Anyone who develops a ruler addiction will understand that it's not just owning the right ruler for the quilting task at hand that matters -- it's REMEMBERING which rulers you own, and being able to survey your options and quickly put your hand on the right ruler right when you need it!

Here's what you -- or a handy woodworker who loves you -- will need to make racks like these for your studio:

DIY Ruler Racks for Longarm Quilting Rulers

Gather Your Supplies:


  • 4' long 2x4 of wood, one per rack


Rebecca's Ruler Racks

Making the Ruler Racks:


  1. Mark evenly spaced lines on your boards, approximately 1 3/4" to 2" apart
  2. With a table saw (or a sliding miter saw, if you don't have a table saw), cut grooves into the board at each line that you marked.  My grooves are cut at a 31.6 degree angle and go approximately 1" deep into the boards.  Make sure the groove is slightly wider than the 1/4" thickness of your rulers, so they don't get scuffed up when you take them in and out of the board.
  3. Sand the board smooth with the sandpaper
  4. Rub all sides of the boards with mineral oil to make them look pretty and to protect the wood from drying out
  5. Drill through your board about 8-10" in from each end
  6. Mount to your wall near your longarm machine with toggle bolts through the pre-drilled holes (the toggle bolts will safely hold the weight of the racks on drywall even if you don't have a stud in the exact location where you want your racks)


Lisa's racks look beautiful in the dark stain finish, but I preferred the mineral oil finish for my studio.  The light, natural finish of my racks looks better with my maple butcher block cutting table, plus the mineral oil doesn't need time to cure like a varnish or stain.  I wanted my racks to be installed and filled with rulers ASAP, without having to worry about not-quite-dried stain making my rulers stick in the grooves.

Bernie actually made four of these racks for me, but I only have enough rulers for three of them (so far...)!

Although I've been doing more piecing than quilting lately, I did buy some more nifty longarm rulers, and I'm looking forward to trying them out on a real quilt soon!  When I first purchased my longarm machine, I ordered some rulers from The Gadget Girls that I thought would be useful.  These are the yellow ones you see on my ruler racks.  First attempts to use them were comical, though -- this was before I'd taken any classes on quilting with rulers and I didn't know anything about where to position my hands for the best control of the ruler or using anything on the back of the rulers to keep them from sliding around while I was stitching!  Also, the rulers I ordered initially weren't as versatile as I thought they would be -- the clam shell ruler only makes clam shells in one size, for instance, whereas clam shell quilting can easily be accomplished with circle templates that are easier to control and can be used for so many other things.  

So, after taking hands-on ruler work classes with both Lisa Calle and Judi Madsen at the Paducah AQS show last Spring, I had a few rulers that were included with my kit fee for the classes.  It was great to be able to test those rulers in class, learn how to use them successfully, and know for sure that they would work for me before committing to purchasing an entire range of sizes.  These rulers/templates are just 1/4" thick etched acrylic, but they are pricier than you'd think -- probably because they are made in relatively small quantities for small businesses serving a niche market.  Some of those yellow Gadget Girls specialty rulers I played with probably work well for what they're designed to do, but I need to find a good tutorial for using them!  I really liked Lisa Calle's Quilter's Groove circle and arc rulers after using them in class, so I purchased them in every size she offers.  That way I'll always have the exact size I need, no matter what I'm working on.  

Quilter's Groove Pro Circle Templates, available here
I'm thinking of using those circles to quilt a Baptist Fan design in the center of my Pineapple Log Cabin quilt.  Not sure what to do with the borders, though.  I can also use them for clam shell quilting, wreaths, etc.  I really like the horizontal, vertical, and diagonal reference lines on the Quilter's Groove Pro Circles.

The Pro Echo arcs, also from Quilter's Groove, can be used for everything from curved crosshatching to border designs.  Lisa's YouTube channel has lots of great videos for how to use her rulers, and she also has an online ruler work class on the iQuilt platform.

Quilter's Groove Pro Echo Rulers, available here.
My most recent ruler purchase was Bethanne Nemesh's Garden Lines collection of rulers: two different French curve rulers, a nifty little applique ruler, a long point-to-point or stitch-in-the-ditch ruler, and a pair of small multipurpose rulers for stitch-in-the-ditch and continuous curve quilting within pieced blocks.

Bethanne Nemesh's Garden Lines Ruler Collection, available here

I also purchased the two larger French curve rulers that Bethanne released more recently, the Lily 3 and Long Lines rulers:

Bethanne Nemesh's Lily 3 and Long Lines set, available here

Not only can I use the French curve rulers for creating identical, symmetrical feather spines, but there are so many other cool ideas for using them in Bethanne's video tutorials.  Seriously; those video tutorials are a huge selling point for me, because any ruler is more useful when you understand how to use it, what it was designed to do, and how the various markings are intended to be used.  After successfully quilting Lars's Mission Impossible graduation quilt with a DIY custom curve ruler and two basic straight edge rulers, I feel MUCH more confident now about what I can do with my longarm machine when I can guide my hopping foot along the edge of a 1/4" thick acrylic template to ensure a smooth line of stitching.  So much easier than free motion or even following a pantograph, in my own limited experience, and that's what encouraged me to splurge on a complete arsenal of the basics.  

These rulers are going to be so much fun to play with on my quilts!  I'm linking this post with:

·       Whoop Whoop Fridays at Confessions of a Fabric Addict
·       Beauty Pageant at From Bolt to Beauty
·       Finished Or Not Friday at Busy Hands Quilts

Tuesday, February 18, 2020

Spirit Song Quilt: Are We Done Yet? (NO). But Blocks On the Move is Ready to Debut at Quilt Show!

My progress on the Spirit Song Dress Code quilt has slowed way down because I'm at a tedious point in the construction.  After spending so much time planning my mix of colors and prints in my design software, I barged ahead with my piecing without bothering to create  a pressing plan...  So now as I'm joining the 4" inch Birds in the Air blocks together to form the large 16" composite blocks, none of my seam allowances "nest" where the blue triangle points touch one another.  As you can see in the completed block below, that happens EIGHT times in every single block.  Therefore, every time I'm joining two units together with blue triangles that need to touch, I've got six layers of fabric stacked up on one side of those triangle points and only two layers of fabric on the other side, and the nasty little triangles want to slide apart as they pass under the presser foot, and even pinning them is a vicious business involving savage stick pin wounds and a fair amount of swearing.  UGH. Therefore it's taking me a lot longer than expected to join 16 four inch units into one 16" block -- about 2 hours or more per block, including pinning, stabbing myself with the pins, seam ripping, fudging, swearing, pressing...


Block 6 of 12.  This is Getting Tedius.
I left this project in Time Out for a week while focusing on the needs of our new puppy, but I started piecing again a few days ago and I'm feeling better about it now that I'm past the halfway point!  

Yesterday I decided that, for the remaining blocks, I should just bite the bullet and stitch every one of the blue points together by hand first before machine stitching the rest of the seams.  I think it's the only way to get them to line up precisely without shifting when that mountain of bulk passes under my presser foot, and that hand tacking up front will save me a lot of time in the long run, ripping and restitching over and over again!  


NOTE TO SELF: ALWAYS MAKE A PRESSING PLAN FOR THE WHOLE QUILT BEFORE I START PIECING IT!

The best explanation of how and why to create a pressing plan is in Donna Lynn Thomas's book Quiltmaking Essentials 1: Cutting and Piecing Skills.  When I'm looking at a quilt block, or an entire quilt that I've designed on the computer, trying to decide the best way to press seams in order to get crisp points, matched seam intersections and a flat quilt top free of speed bumps, I always consult this book for a refresher.  Highly recommended!


I should be back to smooth sailing with nesting seams at every intersection once I'm assembling those big blocks into rows, if I can only get the rest of these stinking blocks pieced together...


Eight 16 inch Blocks Completed, Four Left to Piece
The Spirit Song quilt was meant to be a "quick detour" project, just to try out the Accuquilt GO! half square triangle dies, before loading and quilting my Jingle appliqué quilt.  And here we are, several months later, with nothing finished and one more work-in-progress!

Meanwhile, Thoroughly Modern Millie (my APQS Millennium longarm machine) is going to be awakened from her deep slumber within the next day or two, because I need to quilt and finish a couple of 16" mini quilt tops that other guild members made to contribute to the Blocks On the Move program I'm launching as Community Education chair of the Charlotte Quilters' Guild.  (I got this idea from Donna Shervington's blog where she mentioned making a 16" block for the Modesto California Country Crossroads Quilters' Guild Blocks on the Move program).


One of Two Blocks On the Move Displays Built by Bernie
Loisann and husband Sig, the geniuses behind the Country Crossroads Quilters' Guild in Modesto, have been so unbelievably kind and generous, providing detailed plans and photographs of exactly how their display units were built so that my handy husband Bernie could recreate them for our Charlotte Quilters' Guild in North Carolina.  Pictured above is one of our two display units, designed to hold mini quilts of 16 to 16 1/2" square.  Because these displays will be set up and left unattended in public spaces, the quilts are mounted with sleeves on dowels that screw into the sides of the display unit and you can't get them out without a screwdriver -- that will significantly reduce the chance of mischief/theft of the beautiful donated mini quilts.  Isn't that COOL?!  We're going to "debut" our Blocks On the Move display at our upcoming Carolina Lilies Annual Quilt Show on March 6-7.  


My Husband Bernie, Fixer of Longarm Machines and Builder of Quilt Displays
The idea behind Blocks On the Move is to move this display throughout the city, setting it up for a month at a time at venues such as assisted living facilities, libraries, hospitals, museums, etc.  I think this will be a great way to raise awareness about who we are and what we do in the community.  Readers who are members of quilt guilds, I'd love to hear what YOUR guild does for community education -- please share those great ideas in the comments!


To-Do List for Tuesday:

This week I'm hoping to accomplish the following:

  • Finish piecing all of my Spirit Song blocks
  • Quilt the two 16" Blocks On the Move flimsies that were pieced by another guild member
  • Go through all of the tax receipts (blech!) and fill out my accountant's tax prep packet
  • Work on an assignment that's due March 1st for a seminary class I'm taking

Well, that puppy isn't going to nap all morning -- if I want a shower today, I'd better get off the computer and do that right now!  Have a wonderful week.
I'm linking today's post with:

MONDAY

·       Design Wall Monday at Small Quilts and Doll Quilts  
·       Monday Making at Love Laugh Quilt
         BOMs Away Katie Mae Quilts  

TUESDAY

·       Colour and Inspiration Tuesday at Clever Chameleon
·       To-Do Tuesday at Home Sewn By Us

WEDNESDAY

·       Midweek Makers at Quilt Fabrication
·       “WOW” WIPs on Wednesday at Esther's Blog

THURSDAY

Needle and Thread Thursday at My Quilt Infatuation

Thursday, January 2, 2020

One Less Bell to Answer, One Less Egg to Fry, One Less Dog to Pick Up After... Saying Goodbye to Otto

I've been putting this post off for awhile now, but I might as well get it over with.  This post has nothing to do with sewing or quilting and everything to do with why I haven't been sewing or quilting lately.  

The canine love of our lives was a joyful, ball-chasing, howling-and-singing companion full of energy.  He followed along behind Bernie every time he mowed the lawn, as if the two of them were patrolling the yard together.  He slept at the foot of my bed, and I swear his gentle snore was the best sleep machine noise ever.  Whenever I started singing anything, especially anything in a minor key or anything with "Alleluia" in it, he'd sit up, wag his tail, and howl along with me like a canine Andrea Bocelli belting out his favorite aria.   


Our Sweet Otto, Jan. 5 2011 - Dec. 20 2019
At nearly 9 years old, Otto was the absolute picture of health at the beginning of December, except for a troubling limp that was getting worse instead of getting better, despite restricting his activity and giving him anti-inflammatory meds.  We took him to the vet on the Tuesday before Christmas for X-rays and were totally blindsided by a diagnosis of advanced osteosarcoma, an aggressive and very painful bone cancer with close to 100% mortality because it tends to metastasize before it's even diagnosed.  Our choices were to either amputate his affected leg and put him through chemotherapy, which would eliminate the tumor pain but only give him another 4-5 months, or manage his pain with medication for as long as possible, likely 1-3 months.  


Otto and Lulu Snuggling With My Son, Lars (Otto in Foreground)
Even with that awful news, we expected to have a few months to pamper and love on him.  I was researching his bone cancer online, ordering him special orthopedic beds from Orvis so he'd be more comfortable and getting recommendations for veterinary oncologists.  But I didn't even get a chance to take him to a specialist -- his initial diagnosis was on Tuesday, and by Thursday afternoon he was absolutely leveled with pain that was beyond control, with vomiting and bloody diarrhea and so extremely ill that there was nothing we could do for him but let him go on Friday.  My sweet, loving dog who wanted nothing more than to be glued to our sides, constantly supervising us and snuggling with us, was at the point that he was hiding beneath the deck steps at 3 AM in 20 degree weather, unable to pick up his head.  He wouldn't come in the house, he wouldn't/couldn't come when called.  And when we brought him back to the vet on Friday he was so severely dehydrated, low blood pressure, rapid heart rate, gums were pale and did not pink up when pressed, still having bright red bloody diarrhea, suffering so badly...  All of this happened only three days after receiving the bone cancer diagnosis, with a dog who had been full of playful puppy energy and joy up until that point.


Happy Boy Just a Few Months Ago, Visiting Lars at College

To say that it has been a sad couple of weeks for our family is such an understatement.  Even Otto's sister Lulu, our other Rottie, is grieving.  At first she seemed agitated after we took Otto away and didn't bring him home, and she would run to the door whenever someone came home like she was hoping they'd brought Otto with them.  Now she seems more depressed and anxious, even though we've been trying to give her lots of positive attention and distractions.  She won't play, she doesn't want to go outside except to go potty, and she's been licking at her forelegs a lot.  I got her some tasty chew bones for redirection and that's helping, but she's definitely affected as much as we are -- she and Otto were together since birth, she's never been an only dog before, and her personality is totally different now.

Lulu Snuggling with Lars's Feet on Christmas Morning
I just wanted to share some of my favorite Otto pictures and memories as a final goodbye to the best little choir dog and quilting supervisor ever:

My Sweet Baboo, Otto, Supervising Pineapple Log Cabin Quilt Construction
I loved it when Otto would hang out in my sewing room with me.  Such a cutie pie.

More Hanging Out With Mommy in the Studio
In the Studio With Me For the Last Time, The Day Before We Lost Him
Otto had three favorite humans on this planet: Me, my husband Bernie, and our oldest son Lars.  My younger son Anders and my mother were also in his "inner circle" of humans from whom love and kisses were tolerated.

Another Puppy Pic, Back When Bernie Could Still Scoop Him Up in His Arms

Snuggling With My Husband Bernie, In My Office.  Lulu on Left, Otto on Right
As ferociously as he could bark at would-be intruders and door-to-door salesmen, Otto was incredibly gentle and loving with family members.  He was such a snuggler!

Lars and Otto Had Such a Special Bond.
More Snuggling With Lars
On his last morning, once Bernie got Otto out from under the deck steps, he was able to get him into the garage where it was a little bit warmer, but he wouldn't come in the house and he was unwilling or unable to pick up his head, even when I started the car right next to him.    


When Otto Wouldn't Come In the House, Lars Came Out to the Garage
It's so strange not having Otto in my house anymore.  No howling when I sing.  No snoring in my bedroom.  No supervision in the quilting studio.  No furry friend appears in my kitchen, looking up at me with hopeful longing the instant I take out butter, chicken, or peanuts.  No one scratches the side of my desk chair impatiently to tell me "Enough computer -- time to throw my tennis ball!"  The worst is when I glance down at his favorite places where he used to lay and no one is there.


I Smell Butter.  Or Chicken.  Or Peanut Butter.
Raising this dog has been a wonderful experience that I would do again in a heartbeat, despite all of the challenges and inconveniences that come with owning a strong, powerful dog who is distrustful of strangers.  I wrote about my dogs the day we brought them home as 9-week-old puppies, I have shared their antics and adventures here over the years, and it seemed only fitting to give Otto a eulogy here on my blog.  

Selfie With Puppies On the Car Ride Home From the Breeder.  Otto on Left, Lulu on Right
Nine years was not nearly enough.  

No More Puppy Kisses For Me
Goodbye, my sweet Baboo!  We will never forget you.