Showing posts with label Monofilament. Show all posts

Thursday, November 11, 2021

Two Very Special Clients' Quilts, and a Movie Star Moves Into My Studio

Happy Thursday, Friends!  I just finished writing a different blog post for TGIFF (Thank Goodness It's Finished Friday) that I've scheduled to publish automatically at 6 PM EST this evening, since that's when Friday begins for those linking up from Australia, so be sure to check back for that one and link up your own finishes, even if it's a small finish like a single block completed.  Meanwhile, I have a couple of extra-special client quilts that I've been wanting to share with you.  

Julie's Vintage Equestrian Applique Quilt Repair

This first one belongs to Julie, whose puppy chewed a hole through all layers of the quilt at the top edge.  These dogs sure do keep me busy, don't they?!  I neglected to get a good "before" phot of the entire quilt before I started working on it, but here's what it looked like when it was nearly ready to go home again:

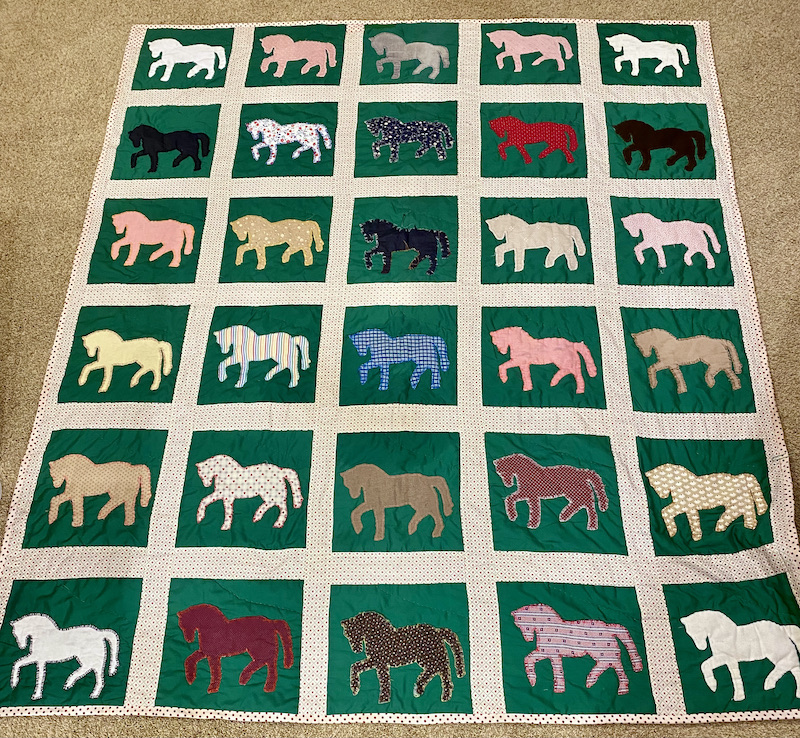
74 x 84 Vintage Equestrian Applique Quilt, After Repair

Julie cherishes this quilt because her husband had it custom made for her as a surprise gift many years ago.  Their family is involved with equestrian sporting and I believe he may have even drawn the horse silhouette for the applique shapes himself.  He found a quilter to make it and was given a shopping list of how much fabric was needed, then went to the fabric store and picked everything out himself -- hence the assortment of calicos, corduroys, and poly blend fabrics in this quilt.

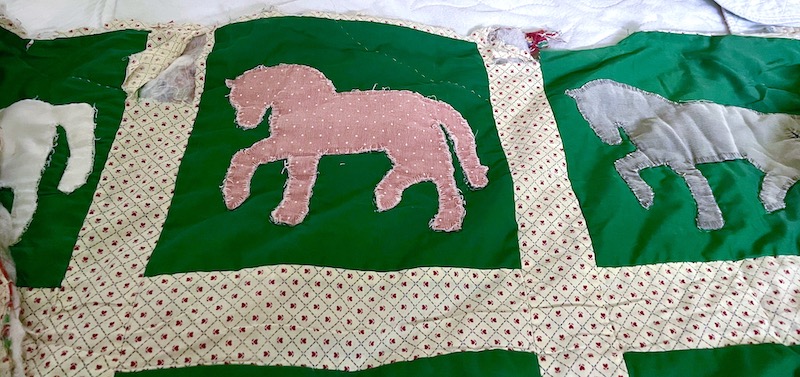
Detail of the Worst Damage Area

This quilt was made with a wide sashing between the blocks and a narrow, 1/2" finished width outer border in the same fabric that simply wrapped to the back of the quilt and was machine stitched in lieu of traditional binding.

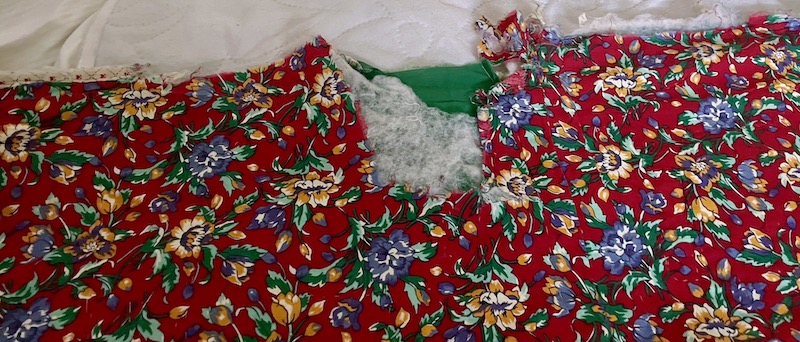
Same Spot On the Quilt, Backing Side

Here's what that section of the quilt looked like after I'd repaired it:

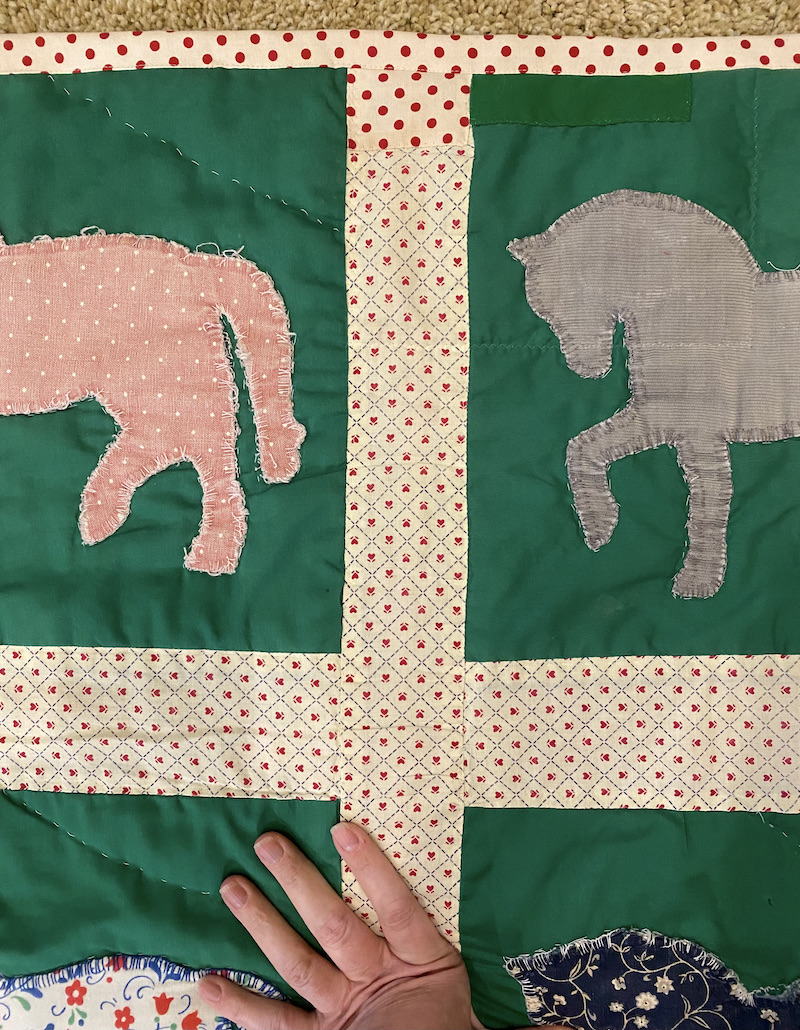
Repairs Completed, All Machine Stitched

My client's budget dictated that all of the machine repairs would be machine stitched for this project.  The binding was damaged and falling off on all four sides of the quilt and would need to be replaced, and finding a suitable fabric was the biggest challenge.  I'd initially told Julie that I'd use a solid red for the binding, but I couldn't bring myself to do it.  My goal in restoring a family quilt like this is to have it look as much like it did originally as I possibly can, and although a red binding would look good on the quilt, it would definitely draw your eye and look different to its owners.  I could not find anything like the original ivory/red/blue print calico fabric in any of the local quilt shops I visited, but I did find a red and white polka dot fabric.  I was able to tone down the bright white background of the new fabric to better match the original fabric by coffee staining it before using it to repair the quilt.

Tuesday, April 21, 2020

Spirit Song Quilting Commences: Monofilament Invisible Stitching in the Ditch

Good morning and happy Tuesday!  My quilting goal for the past week was to complete all of the SID (Stitch in the Ditch) quilting along the seam lines of my Spirit Song quilt.  I'm about halfway there as of when I switched off the machine last night.


Invisible Monofilament SID Halfway Completed
For the SID work, I'm mostly using my 2 1/2" x 6" Quilter's Groove ProMini ruler, with Nexcare clear first aid tape on the backside of the ruler to reduce the slip-and-slide action without sacrificing visibility.  I also have the larger 10" version.


10 inch Pro and 6 inch ProMini Rulers from Quilter's Groove, Lisa Calle's Ruler Line
What I love most about Lisa Calle's Quilter's Groove line of rulers is that they all include helpful reference lines.  As I'm using this ruler for my SID work, I'm using those perpendicular straight lines and 45 degree angle lines on the ruler to line up with my piecing lines, helping me to keep the edge of the ruler nice and straight a quarter of an inch away from the stitching line.  I have a couple of other straight rulers without these reference lines that I bought before I took Lisa's ruler class, but this little ProMini has become my favorite.


How I Use the Ruler's Reference Lines for SID Quilting
You can see in the photo above how my palm, ring finger, and pinky are all resting on the surface of my quilt and acting as a "brake" in case that ruler decides to slide from the pressure of my hopping foot riding along the ruler's edge.  In the closeup below, you can see those etched lines on the ruler that I've aligned with my piecing seams to keep everything nice and straight as I'm stitching.


The Markings Are What Make These Rulers My Favorites!
And of course, when SID is done well and stitched in invisible monofilament thread, it truly disappears into the quilt, providing structure and support kind of like how a good foundation garment can make you look so much better in your dress!


Invisible Stitch In the Ditch: The Wonder Bra of Quilting!
...But from a distance, it looks like I haven't done any quilting yet at all:


Tedious, Invisible, But Crucial
SID takes a LONG TIME, and it doesn't give you that instant gratification of seeing your quilt transform before your eyes with beautiful designs and texture.  Done well, SID should be invisible -- we don't want to see those stitches at all, which is why I'm using Superior's Monopoly invisible monofilament thread in my needle.  By doing all the SID quilting first, I'm doing two things: First, I'm stabilizing my quilt and locking the three layers (quilt top, batting and backing) together with all of these seam lines as straight as possible and the edges of the quilt perfectly square.  That's going to drastically reduce the potential for things shifting and getting stretched out of whack during the fun quilting that comes later.  Also, SID along the seam lines gives more definition to the piecing lines, subtly accentuating those crisp points I worked so hard to create.  If I skipped the SID, the seam lines would actually puff UP after surrounding areas had been quilted down, which would have the opposite effect of obscuring or diminishing the piecing lines.  


Those Needle Holes Will Close Up When the Quilt is Washed
In the above photo, I've stitched on the low side of every one of those seams except the vertical seam between the yellow and hot pink fabrics at top right that extends down to the lower right corner between the mustard color print and the pink daisy print.  SID sinks the seam lines down into the quilt, but the only way to know the stitches are there are the needle holes (those will close up when the quilt gets washed).


Love Seeing the Backing Fabric Starting to Wrap Around the Pickup Roller!


I love seeing the backing fabric start to peek around the pickup roller at the back of my frame as the quilting progresses enough to advance the quilt!

I probably would already be done with the SID if I hadn't had a tension snafu.  Despite having tested and adjusted tension off to the side of my quilt before starting, I noticed with the first advance of the quilt that I had some flatlining (top thread too loose or bobbin thread too tight, causing the bobbin thread to lay flat on the back of the quilt rather than meeting the top thread in the center of the quilt batting to form a balanced stitch) on the back.  


Poor Tension, Bobbin Thread "Flatlining"
In this case, I knew my bobbin case tension was already set very loose (TOWA 150-ish and bypassed the little pigtail guide on my bobbin case) for my Bottom Line bobbin thread, so the upper thread was definitely the culprit.  I'd loosened it so much that it was being pulled all the way through the batting and the backing fabric, creating little loops that suspended a straight line of bobbin thread along the surface of the backing fabric.  I think my monofilament was getting caught on the edge of my thread net at one point, creating resistance, and I loosened my top tension repeatedly to try to "solve" that before I realized that it was a thread path issue.  Whoops!


So anyway, these really lousy tension stitches are very easy to remove from the backing side, just snip at either end of the bad stitching line and pull; the thread comes right out in one piece.  However, after pulling out the bad stitches on backing side, I had a horrible time figuring out which of my invisible seams had been ripped out and needed restitching when I got back to the FRONT of the quilt!  Really all I could see were the needle holes to begin with, and the bad stitching left holes that looked exactly like the good stitching.  I had pulled out the bobbin thread from the bad stitching, but the top thread still needed to be pulled out and clipped away in some cases...  I had to check EVERY STINKING SEAM, and I accidentally requilted a few seam lines by accident because I thought I'd pulled out the stitching there even though it was perfectly fine -- just couldn't SEE it.  Major time suck!  


Testing, Testing, 1, 2, 3...

These string pieced scraps, above, were good for testing stitch tension as well as for a quick refresher on SID, since I haven't done anything with my quilting machine for a few months.  It's also a good way of previewing what my thread is going to look like on a variety of different fabric prints.  I'm using the clear monofilament thread rather than the smoke because most of my fabrics are light colors, but the clear monofilament is slightly visible on the darkest blue fabric strips.


Not Quite 6 Months Old, Already 70 lbs of Sweetness!
This post has been a particularly boring one, even for me, so I'm ending on a high note with a puppy picture of my little Samwise Puppy-Pants.  He'll be 6 months old in 10 days, and this morning he weighed in at a whopping 70 pounds of sweetness!  :-)

So, what are my sewing goals for the coming week?


Tuesday To-Do List:

  • Finish SID quilting on Spirit Song
  • Change needle from 3.5 (for monofilament thread) to either 4.0 (for Bottom Line 60 weight or So Fine 50 weight thread) or 4.5 (for King Tut or YLI 40 weight cotton quilting thread), rethread machine (thread path is different from monofilament), and adjust tension as needed
  • Begin additional straight line ruler work quilting with thread that is meant to be seen!
Stay safe, everyone, and happy stitching!  I'm linking up today's post with:


·       To-Do Tuesday at Home Sewn By Us
·       Let’s Do Some Ruler Work at The Quilt Yarn
·       Midweek Makers at Quilt Fabrication
·       Wednesday Wait Loss at The Inquiring Quilter

·       Tips and Tutorials on the 22nd at Kathleen McMusing

Tuesday, October 1, 2019

How I Achieved Machine Binding Without Shame: Victory at Last!

I am SO excited about the most boring quilt that I finished last night -- because I completed the binding entirely by machine and, for the first time ever, it doesn't look hideous.  OH RAPTURE AND JOY!!


I'm Not Ashamed of My Machine Sewn Binding Anymore!
I pieced this top myself during the Charlotte Quilters Guild's Christmas In July Sit-and-Sew.  The idea was for us to get a head start on some holiday themed outreach quilts for patients who are hospitalized over Christmas, Hanukkah, and Kwanzaa.  I didn't choose the fabrics or the the simple alternating squares layout, and wasn't able to be as adventurous with the quilting as I'd hoped since my longarm machine was misbehaving (I think she's fixed now, though!).  So I went with a simple 1" grid with rulers in the red blocks and a large amoeba stipple in the white squares.  I have to say, I was a lot happier with the quilting after washing it than I was when I first took it off the frame.  It's simple but so soft and snuggly, with the bumpy quilt texture that I love!  I used a variegated red and green King Tut cotton thread in the needle (Industrial size 4.5) with a Forest Freen So Fine thread in the bobbin, and the batting that was provided to me by our guild's Outreach Committee.


40 x 40 Charity Baby Quilt in Christmas Fabrics
There are tons of binding tutorials on the Internet, and I've tried (and failed) with a few of them before.  What finally worked for me this time was a method shared with me by Vivian, who blogs over at Bronx Quilter.  I'm writing this up while it's fresh in my mind and storing it on the Internet so I can find my notes when I need it again.


How Closely Must You Look To Tell The Binding Was Not Hand Stitched?
My criteria for an acceptable machine binding may be different from yours.  I prefer the look and the process of hand stitched bindings for most of my quilts, but after timing how long it takes me to hand stitch all the way around the perimeter of a large quilt (?!!) I realized that not every quilt needs or warrants that level of handwork.  The quilts I'll be binding by machine will be charity outreach quilts for my guild and baby quilts that need to get done and out the door before the baby in question heads off to college.  


It's Easier to See Threads in the Fabric Weave Than It Is to See the Machine Stitches From the Back
What I wanted from a machine stitched binding was a fast(er) process that would look as much like my usual hand stitched binding as possible, and that's what I got with Vivian's method.  THANK YOU, VIVIAN!


So I remember for next time, here are the steps I took to bind this quilt:


  • I trimmed my binding strips to 2 1/4" wide.  The Outreach Committee precuts binding strips in kits at 2 1/2" wide. I have no idea what I'm supposed to do with binding that wide, as I normally cut my binding anywhere from 1 7/8" to 2" wide for hand stitched binding, but never wider than that!  2 1/4" was plenty wide enough for me, for this method.
  • I joined the binding strips together as usual with diagonal seams, pressed open, and pressed the entire length of the binding in half.
  • With my walking foot, using black 50/3 cotton thread and a 2.5 stitch length, I sewed the binding to the BACK side of the quilt instead of to the front of the quilt as I normally would, mitering the corners as I went along.  
  • THIS IS CRUCIAL -- sew a few inches with a quarter inch seam allowance, and then take the quilt out from under the machine, wrap the binding around to the front of the quilt, and see whether it's covering the stitching line adequately without too much excess.  Now is the time to adjust that seam allowance a smidge wider or narrower, to get it just right!
Stitching the Binding to the Back of the Quilt First, Mitering Corners As I Reached Them


Note that, even with the binding trimmed to 2 1/4" wide, I still felt that it looked lopsided when I stitched it down with a quarter inch seam allowance and wrapped it around to the front of the quilt.  The folded edge of the binding went WAY past the stitching line it was meant to cover, which would have made the binding noticeably wider on the front of the quilt than on the back.  It also would have moved the final machine stitching line farther away from the binding on the back of the quilt, making it more noticeable.  So I moved my needle one position to the LEFT of center, enabling me to continue using the quarter inch mark engraved on my walking foot as a guide, but evening out the amount of binding on both sides of the quilt.  This was a fairly thin batting this time, however.  If I was doing this on a puffier quilt, say with wool batting or a double batting, I'd probably be safer with the 2 1/4" width.  But I would want to test this first on a scrap quilt sandwich using my actual battings in the event that my quilt had piecing lines that met a quarter inch away from the raw edge of the quilt top.  I'd hate to have my generous-quarter-inch binding chop off any of my precious triangle points!


  • I left a 12" gap between where I started sewing my binding to my quilt and where I stopped stitching, with 10" tails of loose binding at both ends.  Then I used my trusty Binding Tool to mark, trim, and stitch those loose ends together with a perfect diagonal seam.  When I use that little acrylic guide tool, the joined bit of binding always  fits the 12" gap perfectly so I can sew the opening shut without any stretching or easing required and no one can tell where I stopped or started the binding.
  • Next, I pressed the binding away from the seam line with a hot iron so the folded edge stuck out beyond the edges of the quilt.  I folded the miters of all four corners by hand and pressed them firmly with steam, and then pressed the binding around the edge of the quilt, ensuring that it just barely covered the black line of stitches on the front of my quilt.  I used those nifty Wonder Clips to hold the binding in place after pressing.  (I'm aware that some quilters glue baste their binding before machine stitching it down, but I went with the clips because I'm interested in a fast-and-dirty method for utility quilts, not a guaranteed-perfection-at-a-price method for show quilts).
  • Time to change the needle and rethread the machine!  I put Smoke invisible monofilament thread in the bobbin due to my black backing fabric (YES you can wind on your bobbin -- just only fill the bobbin halfway and slow your bobbin winding speed down if possible) and Clear monofilament thread in my size 60/8 needle.  In retrospect, I probably should have used Smoke in the needle as well, since my stitches were landing on the binding fabric rather than on the fabrics of my quilt top.  I used YLI monofilament thread on this project, but I also like Superior's MonoPoly and Aurifil's invisible monofilament as well.

And now, for a BAD decision: I thought it would be helpful to switch the sole of my Bernina walking foot for the next step to the sole with the center guide, but that was a bad decision.  Next time I'll stick with the open view sole that I was using initially, since that would give me a better view of where my stitches are landing.  Also, the guide blade in the center of the other sole wanted to pull my mitered corners apart as I was trying to stitch them down.  Aaargh!!  No more center guide sole for this technique!  That sole is designed for stitch-in-the-ditch quilting, and that's what I'll reserve it for from now on.


Machine Stitching Binding to Quilt Front With Monofilament (Do NOT Use This Guide Sole Next Time!)
As you can see in the photo above, my binding wrapped around to just comfortably cover my black stitching line without too much struggling or too much excess, just as I'd hoped.  Again, this wasn't some magical happy accident -- it's because I tested the seam allowance and adjusted it to get it just right for this particular quilt before I continued sewing the binding all the way around the quilt!


Stitch Settings for Sewing Binding with Monofilament on My Bernina 750QE


  • Per Vivian's suggestions, I sewed the binding to the front of my quilt with a narrow zigzag stitch.  I started out with Vivian's preferred stitch length of 3.0 but, since this quilt is destined for a hospitalized baby, I decided I wanted to have the binding more securely attached with the zigzag "bites" closer together.  I ended up with a stitch length of 2.25 and a stitch width of 1.5, but I could make the stitch width smaller next time if I use the open toe sole on my walking foot so I can see what I'm doing!  As you see in the photo above, I've got my needle position moved two clicks to the right of center, but again, that's because of the center guide on my presser foot sole.  I had to do that to ensure that my zigzag was actually on my binding.  The only other setting change I made was to reduce my tension to 2.25, which I honestly don't remember doing (this was late at night) but it was a good "autopilot" decision for the monofilament thread.  Too-tight tension is what makes invisible thread look objectionably shiny and not-so-invisible.


Not Bad, Right?!
And that's it, folks!  The Smoke monofilament thread would have disappeared even more against my dark binding fabric than the Clear, and if I reduced the zigzag width to 1.0 or went with a blind hem or invisible appliqué stitch instead, I bet I could make the binding look even more like it had been hand stitched, with the same speed and ease of application.  I can experiment with other stitches next time.  For now, I'm celebrating that I have a finished Christmas outreach quilt ready to turn in at our guild meeting on Wednesday.  I'm really pleased.  YAY!


Back View of Machine Stitched Binding, PRIOR to Laundering
Interesting side note: in the photo above, my quilting tension looks pretty wretched, but it really is not.  Those white dots you're seeing are the off-white quilt batting showing through the giant needle holes of the larger needle I used for quilting in order to accommodate the King Tut cotton thread, which is a slightly heavier weight.  After laundering the finished quilt, those holes closed almost completely and I can only see specks of batting here and there, where it was actually pushed out on the backing side where the thread passed through.  When I use dark fabric for my personal quilts, I like to use Hobbs Heirloom 80/20 BLACK batting to prevent that problem.  With this quilt's combination of black backing fabric and white squares on the quilt top, though, if I was hell-bent on making my life difficult that way, I would probably have put the black 80/20 on the bottom with a thin layer of white batting on the top to ensure that the black batting didn't shadow through the white fabric and make it look dingy gray.


After Laundering
See what I mean? I wash all my quilts as soon as I finish binding them as a personal preference, but this one DEFINITELY needed to be washed, since it's headed to a hospital NICU.  

Updated October 4th, 9 AM: WOW -- when I shared this binding technique, I didn't expect to stir up a huge controversy about the "safety" of invisible monofilament threads.  In addition to the comments here on my blog post, I've received numerous direct emails, direct messages through my Facebook page and from the Yahoo groups that I belong to or manage, etc.  Keep them coming, but please be specific.  If you're telling me that you have personal experience with quilt guilds, hospitals, or other charitable organizations that do not accept donation quilts that have any monofilament thread in them, I would like to know WHICH guild, WHICH hospital, or the NAME of the charity to which you're referring.  I would also like to know of any other restrictions that organization may have (do they require all cotton batting, for instance?  Or do they require fire-retardant batting?), and the reasons behind those restrictions.  Please know that I am never offended by someone who disagrees with me and I know that people are voicing concerns about this with the best of intentions, and I thank you for that.  However, I strongly suspect that 1) these restrictions are coming from quilt guild members and officers rather than from the charities and hospitals themselves and 2) the restrictions reflect concerns about the much thicker, much stronger nylon threads that have been used by commercial workrooms serving the hospitality industry (think quilted bedspreads and drapery panels in hotel rooms) or for mass-produced bedding that you might find at a big box store.  

I've started researching the tensile strength and melting points for a variety of threads so I can compare them to the monofilament threads that I use and recommend.  I'll be looking at 100% cotton 50 weight thread, the "all-purpose" polyester sewing threads, the lighter weight polyester quilting threads that are used almost universally by longarm quilters, as well as the heavier 40 weight cotton threads that designed for quilting by machine and the glazed cotton threads used for hand quilting.  From my personal experience, I can tell you that I can snap off a piece of .004 monofilament invisible thread MUCH more easily than I can snap off a piece of glazed 100% cotton hand quilting thread.  When I've compiled my research, I will share my findings here.  


40 x 40 Baby Quilt, Off My To-Do List and Ready to Donate!
That's all for today, folks!  I'm linking this post up with:

WEDNESDAY

·       Midweek Makers at Quilt Fabrication

THURSDAY

·       Needle and Thread Thursday at My Quilt Infatuation  

FRIDAY

·       Whoop Whoop Fridays at Confessions of a Fabric Addict
·       Beauty Pageant at From Bolt to Beauty
·       Finished Or Not Friday at Busy Hands Quilts
-->
·       TGIFF Thank Goodness It’s Finished Friday, rotates, schedule found here: http://tgiffriday.blogspot.ca  

Saturday, August 3, 2019

Machine Applique Progress and Continued Long Arm Tweaking

Testing, tinkering and troubleshooting makes for boring blog posts, which is why I haven't posted in awhile.  Last night I took a break from all of that and spent some time playing with the machine appliqué project from Karen Kay Buckley's workshop.


Leaf By Leaf, KKB Workshop Project Coming Together
I'm enjoying the prepared edge, invisible machine stitched technique and the prep time really is minimal compared to other methods I've tried.  The reason this project isn't finished yet is that I've been having so much fun (and wasting so much TIME!) digging through scrap bins to find the perfect fabric for each little leaf.  But then, once I've preturned the edges of each piece and glue-basted it in place on my background fabric, the actual stitching part is a breeze.  Since I brought my Bernina 475QE Goldilocks machine to the workshop, I've been continuing with that machine now that I'm working on this at home.


Bernina 475QE Settings for Invisible Machine Applique
I have YLI Wonder invisible monofilament thread in the needle as well as in the bobbin, and I'm using a size 60 Microtex needle.  I am using a modified version of the Invisible Machine Appliqué stitch found in my machine's Quilting menu, with the stitch width reduced to 0.7 and the stitch length reduced to 0.55.  With monofilament thread in the top AND bobbin, no tension adjustments were necessary.  Once I got the length and width dialed in, I saved the altered stitch in my Personal Programs folder so I can get to it quickly whenever I'm doing this technique.  For this project, since my background fabric is very dark in some places and very light in others, I'm alternating between the Clear and Smoke monofilament depending on the background fabric in the area where I'm sewing down each shape.  I'm using Open Embroidery Foot #20 to give me a really clear view of where every stitch is landing, and of course, since this is a sideways motion stitch, I've got the regular 5.5 mm stitch plate on my machine rather than the straight stitch needle plate that I like to use for piecing.


Open Embroidery Foot #20 for Great Visibility
Meanwhile, on the other side of the studio...

The fine-tuning and tweaking of my APQS Millennium longarm quilting machine continues.  My husband Bernie gave her a thorough maintenance and cleaning as per APQS Tech Support instructions and she's moving more smoothly along the rails.  Upper tension adjustments are working much better since he disassembled and rebuilt the tension assembly.  And the erratic motor speed issue has improved since he replaced a cable, but I'm not sure it's completely resolved.  He replaced my L "Smart Hook" assembly with the larger M Hook assembly and retimed the machine, and I'm still deciding how I feel about that.  I feel like there's more noise under there now, like rattling operation, but when I take out the bobbin case and check for any play in the hook collar area everything is tight and rock-solid, just as it should be, and the timing is perfect.  So now I'm wondering whether a brand new hook needs more oil right out of the gate and that's why it seems loud or whether I'm paranoid and imagining things now??  I'm hoping to get a charity cuddle top on the frame this afternoon so I can see how the machine does quilting an actual project rather than a sample sandwich of muslin.

Another thing I'm still on the fence about is the Texas Hold 'Em Bracket I got so I could remove the quilt top roller from my frame.  Here's what Millie looked like before, with the top roller in place:


My APQS Millennium with Quilt Top Roller in Place
The quilt top roller is the one with blue painter's tape on it.  I've experimented with pinning my quilt tops to that roller versus doing a full float method where nothing gets attached to that roller at all, and I've found that the full float method is working better for me.  Since I'm not using that roller at all, it's kind of in my way when I'm quilting, and the Texas Hold 'Em bracket was designed to preserve the functionality of the hand brake with that top roller removed:


APQS Texas Hod 'Em Bracket, Place Holder for the Quilt Top Roller
What's going to take some getting used to is relearning how far I can keep quilting before the throat of my machine hits the pickup roller.  Just because the top roller is gone doesn't mean my machine can reach farther forward than it did before:


This Is the Closest the Machine Reaches Before the Pickup Roller Hits the Machine Throat
See what I mean?  It's not that I actually have less workspace, it's just that I was using the quilt top roller as a visual reference before and, now that it's gone, it LOOKS like I should be able to quilt another 6" closer to my tummy.  So that will take getting used to!  The quilt top roller was really annoying me on the Mission Impossible quilt, when I was quilting all those horizontal lines with rulers and I had to reach my hand over the quilt top roller and hold my wrist in weird positions to use the rulers.  I'm also thinking that it might be easier to work with wool batting and double battings without that bar there, since I'll be able to lift the quilt top out of my way and visually check that the batting is smooth and even each time I advance the quilt.  But it's easy enough to put that quilt top bar back on the frame if I ever decide I want to use it again.

So anyway, I have two possible outreach cuddle quilt tops that I could load today, one that is just giant checkerboard squares in Christmas prints and the other is the purple novelty fabric I Spy  top that my mom pieced a few months ago.  A friend from my quilting bee loaned me a set of Groovy Boards to try and I was thinking of using those on one or both of these tops, but with so many new variables at play I'm not sure I'm in the right mindset to learn how to use the new tools, if you know what I mean.

Meanwhile, we're moving my oldest son into his college dorm for the first time in less than TWO WEEKS!!  I'm not going to really believe that until we're driving away from the college, leaving him behind.  Weird, weird, weird!!  And then we have a family wedding the following weekend, and then school starts up again for my youngest son, the rising high school Junior.  Summer goes faster every year, doesn't it?

I'm linking up with:

SUNDAY

·      Oh Scrap! at Quilting Is More Fun Than Housework http://quiltingismorefunthanhousework.blogspot.com

MONDAY

·      Design Wall Monday at Small Quilts and Doll Quilts http://smallquiltsanddollquilts.blogspot.com 
·      Main Crush Monday at Cooking Up Quilts http://www.cookingupquilts.com/
·      Monday Making at Love Laugh Quilt http://lovelaughquilt.blogspot.com/
·      Moving it Forward at Em’s Scrap Bag: http://emsscrapbag.blogspot.com.au/
-->
·      BOMs Away at Katie Mae Quilts: https://www.katiemaequilts.com/blog/