Showing posts with label Design. Show all posts

Wednesday, May 21, 2025

Second Thoughts on Scrappy Celebrations, Emma Louise Muslin Background for Stonefields + New Specs for Rebecca

Good morning, Quilty Peeps!  How is it Wednesday already?!  And how is it nearly the end of May when it was just February the other day?!!  Time doesn't just march on at a steady pace.  Time is picking up speed, taking shortcuts, and leaving me in the lurch.  All of which warrants a new practice for me: Reevaluating whether or not to keep working on a project all the way to the bloody end, just because I started it!

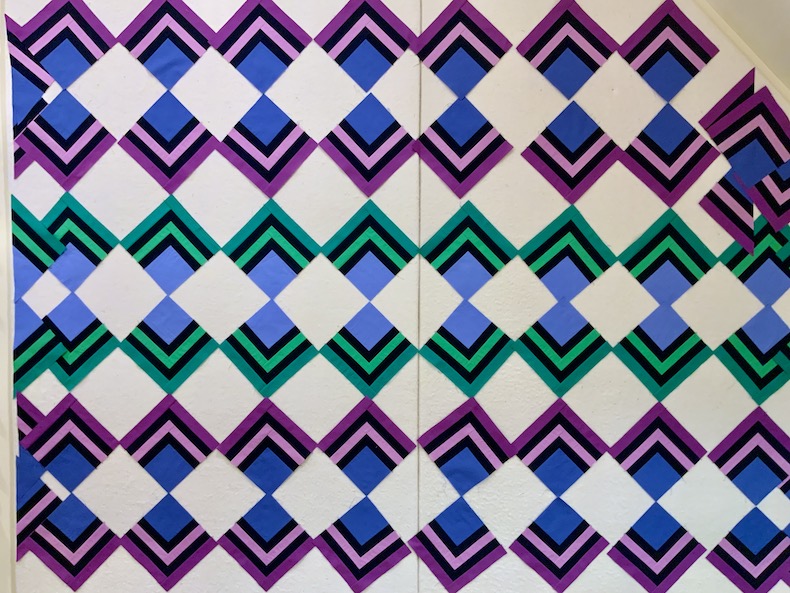
Here's your last glimpse of my inspired-by-Scrappy-Celebrations project on the design wall before I take it down and put it into a crypt prison project box from which it may or may not ever emerge:


I Celebrate Abandoning This Project Today!


This project has been tried and found guilty of Failing to Sufficiently Challenge and Engage My Brain, Wasting My Time, and Wasting My Tilda Precuts!  That last charge was the most serious, and I'm afraid I was an accomplice in this crime against my creative energy.  

Two things initially appealed to me about the Scrappy Celebrations quilt when I first saw it: The quilt "breaks the rules" about combining 4-patch and 9-patch blocks in the same quilt, but it works because only squares and rectangles are used in all the blocks.  I still find that interesting, but as I've been making the blocks I've been thinking ahead and dreading what a pain in the tush it will be to sew them together with all these seam allowances going different directions.  So I had already been toying with the idea of adding scrappy sashing strips between my blocks, but sashing increases the size of a quilt so I'd have fewer blocks (and less variety in my quilt) if I did that:

54 x 64.5 Tilda Celebration With Scrappy Sashing

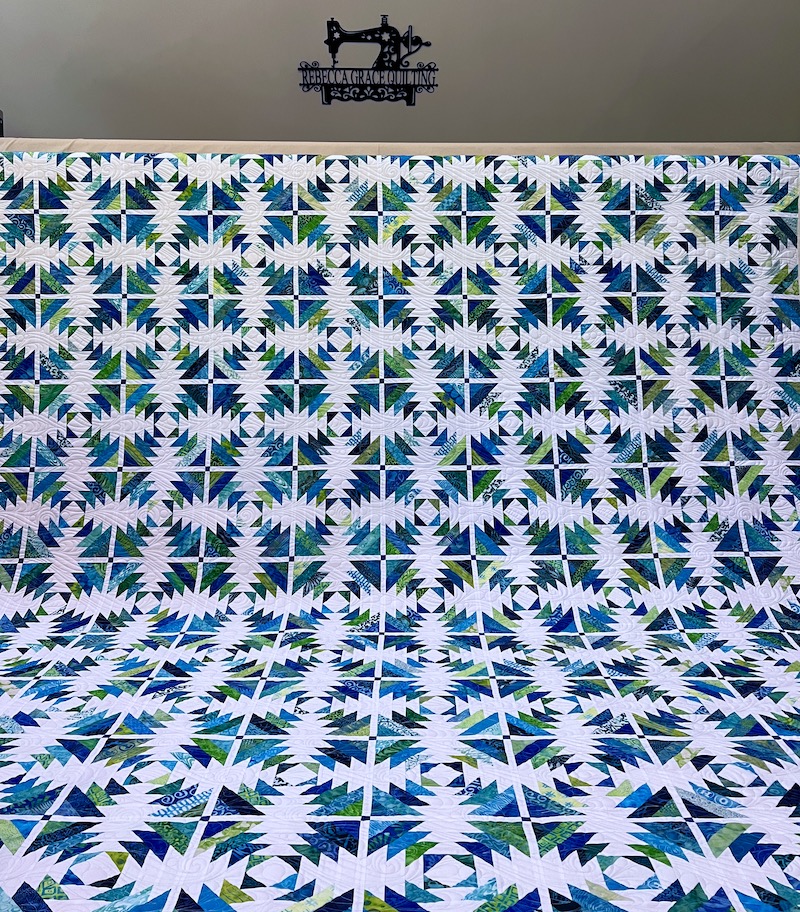
In the EQ8 rendering above, I've arranged the 21 9" blocks that I've already sewn along with 9 more block mockups and "painted" my sashing randomly with prints from the Tilda Sunday Brunch collection to get an idea of what that would look like.  Meh.  I don't hate it, but I wish I hadn't made so many blocks using the same fabrics!  

Wednesday, March 19, 2025

Deep Dive Tangent: Exploring the 1934 Cleopatra's Fan Block

Happy Tuesday, my Lovelies!  Today's post is a break from the Lo & Behold Deco quilt I've been working on (just four more rows to stitch together before that's a finished quilt top!), but we're not veering into totally unrelated territory.  Brittany of Lo & Behold Stitchery, who designed my Deco quilt pattern, says she was inspired by the Art Deco style of the 1920s-1940s in 2019, when she realized that we we were coming up on the centennial anniversary of this iconic design movement (and all of the dizzying cultural, social, and technological transformations that happened during its heyday).  

Despite the great number of surviving quilts dating to the 1920s-'40s, not many of these quilts reflect the Art Deco style that was dominant when these quilts were being made.  Perhaps that reflects who was (and who wasn't) making quilts during those years and what sewing and quilting symbolized at that time -- a traditional female domestic activity and not something the giddy modern flapper girls were excited about.  Were the "Modern Girls" of the 1920s and '30s too busy exploring new social and economic opportunities outside the home, working in shops or factories during the day and dancing their nights away in jazz clubs, challenging traditional Victorian gender ideals (and giving their mothers plenty to worry about as they stitched more traditionally styled quilt blocks by the fire)?  ;-). That's my theory, anyway.  Sometimes I just make things up as I go along.

In any case, we don't have a great many examples of the Art Deco style influencing quilters in the surviving vintage quilts from the period, but we do have some and the Cleopatra's Fan design is one of my favorites.  I'm taking you on a Deep Dive into the Cleopatra's Fan block today, because I own (but have not yet used) the AccuQuilt GO! 12" Cleopatra's Fan BOB (Block On Board) die (this post contains affiliate links) and I'm trying to decide whether to actually make a quilt with it -- or just rehome my die to someone else who will use it!


52 x 69 Cleopatra's Fan in Kaffe Fassett Collective Prints, 12 inch Blocks

Above is a Cleopatra's Fan quilt rendering that I created in my EQ8 Quilt Design software using Kaffe Fassett Collective print fabrics with coordinating solids.  I've said it before and I'll say it again -- my Electric Quilt software is the best value for the money of any quilting tool I own, including my Bernina sewing machine and my long arm!  With most of my quilts taking multiple years from the time I cut into fabric until I finish the binding, the ability to experiment with design ideas and see what a quilt would look like in the actual fabrics I'm considering ahead of time saves me from sinking time and money into quilts that disappoint me when they don't turn out looking as great as I imagined when I pulled those fabrics at the quilt shop.  So, in that rendering above, these are 12" finished Cleopatra's Fan blocks just like my 12" AccuQuilt die will cut out for me, and those Kaffe Fassett fabric prints are to scale as well, so the design rendering is actually giving me a pretty good idea of how those large scale botanical prints will look when they are cut into the actual size patches of these blocks.  Do I like this enough to make it?  I haven't decided yet; we'll circle back to that at the end of the blog post!  Next I want to explore the original Cleopatra's Fan pattern as it was published in 1934 in the Cincinnati Inquirer by Laura Wheeler Designs (note that "Laura Wheeler" was one of several fictitious byline used by a New York City pattern syndication company that also went by many different names; you can read more about the company on Barbara Brackman's blog here):


Cleopatra's Fan Pattern Attributed to Laura Wheeler Designs, First Published in 1934


Up until fairly recently, the vast majority of quilts were designed and made as bed coverings rather than as wall hangings or throws.  Just to give you some context, here's an example of "modern" Art Deco bedroom furniture from a 1934 advertisement.  (I was unable to find a source attribution for this image but will update in the future if possible):


1934 Ad for Art Deco Bedroom Furniture


Isn't that fun?  And now, can't you just imagine this vintage Cleopatra's Fan quilt (below) on the bed in the magazine ad, with the sleek radiating curves of the quilt block's piecing lines echoing the radial seams in the headboard's veneer?  You may need to zoom in to see that on the photo if you're reading this on your mobile phone.


Vintage Cleopatra's Fan Quilt circa 1940s, Augusta Auctions


This is actually the first Cleopatra's Fan quilt I ever saw, an image from Augusta Auctions that I stumbled across on Pinterest years ago.  I was intrigued because I'd never seen the block before and the auction house didn't identify the quilt pattern in their auction description.  They just dated it to circa 1940s based on the fabrics.  

Wednesday, September 18, 2024

Maria Shell Workshop In Progress + Carrie's Traverse Row Quilt

The second half of my two-part Making Prints improvisational piecing workshop with Maria Shell was this past Monday evening via Zoom.  Our assignment from Part One of the class had been to create a palette of solid color fabrics and then construct a bunch of different units using those fabrics and techniques that had been demonstrated in class.  Despite being down with Covid all week, I managed to get a bunch of these chunks made, slapped them on my design wall in the main hallway of my house, and then every time I walked by I either stopped to scowl at everything but left things along, or started rearranging the units.  Here's what I had going on the last time I touched it, on the morning before the last class:


My Design Wall, 11 AM on Monday


In Part Two of the workshop Maria introduced several techniques involving triangles and I might make some of those to mix in with what I've got here so far, or I might make some additional units like what I already have so I can balance things out with a little repetition.  I do want to finish the workshop piece and put enough thought and effort into the composition to get everything I can out of the class, but the danger for me with an open-ended assignment like this -- and no grades or deadlines to rein me in -- is that I could easily go on and on, arranging and rearranging ad infinitum and never actually finish the project!

I haven't moved anything or made any new units in the last two days.  Still feeling low-energy and needing daily naps from the Covid and just decided to let what's on the wall marinate for a bit while I am resting.

However, the portion of Monday's class where Maria discussed different composition structures (grid, row, medallion etc) reminded me of a client's quilt that I long armed about a year ago and never shared with you.

Carrie's Traverse Quilt, Pattern by Tara Faughnan

This gorgeous Traverse Quilt is a kit designed by another modern quilter I admire, Tara Faughnan.  I just checked on Etsy and found lots of options available if you'd like to make one of your own, from complete Traverse kits in these exact fabrics still available, to patterns only, to completed quilts for sale.  (This post contains affiliate links).  


Detail of Traverse Quilt, Designed by Tara Faughnan, Pieced by Carrie, Quilted by Me


Looking at these photos again after taking Maria Shell's workshop, I'm seeing some similarities between these two quilters: Both are working exclusively in solids, and both use a large palette of solid fabrics with a nice assortment of hues and values.  Both are creating print-like patterns in patchwork stripes of fabric.  Maria sometimes sets her pieced strip units in rows like Tara has done in Traverse.  

Thursday, September 12, 2024

The Power of a Really Great Stripe: Maria Shell Workshop + Only Murders In the Building

Good Morning, Stitchy Peeps!  I am feeling clammy and gross and drowning in mucus quantities that have not been seen since the ectoplasm in the movie Ghostbusters.  I have an appointment at Urgent Care in an hour and a half, fingers crossed that whatever ick I've got is something that they can treat with medication.  Most likely it's COVID since my son just had it and I started getting sick several days after he tested positive, but my husband is just as sick as I am and he has tested negative for COVID four times.  Blech, blech, BLECH!

Meanwhile, here's what my design wall looks like three days after Part One of my 2-part Making Prints workshop with Maria Shell:


My Design Wall, 9 AM on Thursday


Our assignment between classes was to make a bunch of units based on the techniques/"prints" that she demonstrated in class, and put them up on our design walls.  Students are permitted to cut their fabric with rulers, but encouraged to try cutting without rulers in order to create more organic, irregular lines with their patchwork.  I'm cutting my fabric without rulers and finding that it's more difficult than you'd think to cut crooked and sew crooked on purpose!  


My Design Wall, 9 AM on Wednesday


The irregular striped units above were pieced the first day after class, and they incorporate all of the colors from my palette.  Initially we were told to create a 12-color palette, but I asked if I could sneak in more and got permission to do so during the class.  The extra colors allowed me to have three shades of brown instead of one and a royal blue as well as light blue.  I think I have 15 colors going on.  Anyway, when I did this first exercise of randomly pairing up my colors I was really pleased that I liked how pretty much every color looked with every other color in my palette.  I struggled to sew my strips together, though -- somehow even though I hadn't cut them straight, they were annoying me by looking straighter after I sewed them together and pressed the seams.  

Thursday, August 29, 2024

September Stitching Goals: FrankenBerries, Setting Quandaries + Seven Sisters

Stuffed berry production is happening!  Preparing all 96 of the remaining stuffed berries needed for my FrankenWhiggish Rose quilt is my September stitching goal (and if I get any of them stitched onto the blocks as well, that will be "gravy"!).  

Tip: Pencil Eraser Holds Perfect Circle Template for Tracing


I'm using my Karen Kay Buckley Perfect Circles templates to make my berries (this post contains affiliate links) along with leftover Quilters Dream Poly Select quilt batting and Wonder Under fusible web (using up an old package I had on hand).  I discovered that I can prevent the Perfect Circle template from slipping if I hold it in place with a pencil eraser in my left hand while tracing around the template with a mechanical pencil held in my right hand; that photo above is to remind Future Rebecca of these neat trick the next time I am tracing around small template shapes.

I traced all 96 berry circles onto the paper side of my Wonder Under paper backed fusible web, fused the marked Wonder Under to my batting scraps, then rough cut around groups of 12 (12 berries per block) just to help me keep track of how many were needed and how many were finished.  I experimented with three different pairs of scissors before deciding that I like my ApliQuick 4" microserrated scissors best for cutting out these tight circles (that I probably shouldn't have crammed so close together when I was tracing them).

And So It Begins: Cutting Out Fused Batting Circles for Berry Stuffing


Appliqué prep work does seem to go faster for me when I do it assembly line style, so I'm going to cut out all of my berries before I proceed to the next step of fussy-cutting my larger fabric circles.

Meanwhile, I've been walking past these nine blocks on my design wall every day, marveling about how those broderie perse rosebuds didn't take me nearly as long as I thought they would, and realizing that I am going to have all of my blocks completely finished and ready to set if I just keep working on it a little bit every day.  That makes me want to revisit, reevaluate, and overcomplicate my plans for setting the blocks and finishing this quilt!

I could add one inch diamond sashing, a wide neutral border for a quilted formal feather design, and an outer one inch diamond border, as visualized in this EQ8 software rendering below:

66 x 66 FrankenWhiggish Setting with Diamond Sashing


Sunday, June 2, 2024

Rebecca's New Sewing Room Tour

I don't have much appreciable progress on any of my personal quilts in progress to share with you.  I have been really busy with remodeling and furnishing our new home, since we got rid of so much worn and outdated furniture when we moved.  I'm still working on piecing those double nine patch Tilda blocks that I wrote about in March, just in 5-10 minute increments here and there when I get a chance.  I've managed to finish piecing only two of the six double 9-patch blocks that I cut out eight weeks ago.  How's that for "slow stitching?!"  

Two Nine Inch Blocks Completed, Four More In Progress

Much more progress has been made in the Herculean task of trying to fit all of my sewing and craft goodies from our 3-story home in North Carolina into our MUCH smaller home here in Florida.  The solid maple butcher block top that I had for my giant 97" x 42" cutting table in North Carolina underwent a major amputation in order to repurpose it for a cutting table that would fit in my new 11' 4" x 11' 6" sewing room:

Bernie Sawing My Butcher Block Cutting Table In Half


You can read all about my old cutting table in this blog post from 2013 if you're interested.  

New Cutting Table, 42 W x 61 L x 39 H

My new cutting table utilizes the same custom MDF base units that Bernie built for me in 2013 in a different configuration, and it measures 42" wide by 61" long.  I'm about 5’7” tall and my cutting table height is 39".  

Tuesday, December 12, 2023

Custom Deco Quilt Palette for 2024 + QAL Week 4, 108 Weeks Behind Schedule

56 x 68 Deco Throw Quilt, PANTONE Pairings Palette for 2024

This is the time of year for sleigh bells, twinkling lights, caroling... and complaining on social media about how much we disagree with the design industry's color forecasters' predictions for Color of the Year.  PANTONE Europe's Color of the Year for 2024 is Peach Fuzz:


And Robert Kaufman's Kona Solid Color of the Year for 2024 is a pale aqua they're calling Julep: 


Looking at these two "new" color trend predictions side-by-side, many of us are getting flashbacks of  Margo and Todd's bedroom decor from the 1989 holiday movie National Lampoon's Christmas Vacation.  

Pantone Peach Fuzz Walls with Kona Julep Vase and Window Blinds

"Why is the floor all wet, Todd?"

"I don't know, Margo!!"  

"Why does Pantone think our 1989 bedroom set will be the embodiment of global lifestyle trends at the macro level in 2024?"

"I DON'T KNOW, MARGO!!!" ðŸ˜†

Sunday, November 26, 2023

FrankenWhiggish Setting Options: To Further Complicate, Or To Finish In This Lifetime?

Hello, Quilting Friends, and Happy Thanksgiving weekend to those of you in the United States!  In between the cooking and the baking and the holiday decorating of the past few days, I've been spending an inordinate amount of time in my EQ8 quilting design software, exploring my options for the Frankenwhiggish Rose hand stitched needle turn appliqué blocks that I started in March of 2014 (you'll find that post from nearly a decade ago here).  

At this point, all that stands between me and the end of making the nine identical Whig Rose appliqué blocks is 48 broderie perse rosebuds and 96 fussy-cut stuffed berries.  However, I remain undecided about what I'm going to do with those nine blocks once they are finished.  I have tried out so many options in EQ8, each one more complicated than the last:

70 x 70 On-Point with Mariner's Compass and Pieced Setting Triangles

In the EQ8 rendering above, I've just duplicated a photo of one finished appliqué block and the EQ8 software lets me see how all nine appliqué blocks will look together when they are finished, combined with any combination of thousands of other blocks, borders, sashings, etc.  It's one of my favorite ways to use EQ8 software, and although designing on the computer can suck up a lot of time, every 10 minutes trying something out on the computer saves me weeks/months/years of cutting up fabric, sewing it together, putting it all together on the wall and then hating what it looks like!  So in this version of the quilt, I'd be making four mariner's compass blocks using scraps of my applique block fabrics mixed with other fabric scraps from the same color family and style.  The centers of the mariner's compass blocks could even be the birds from my Vervain Monado-Havana fabric, the luxe drapery fabric I've been chopping up for my broderie perse rosebuds.  Although the mariner's compass blocks look complicated, the EQ8 software lets me print out foundation paper piecing templates in exactly the right size for my quilt, directly onto newsprint paper (I get mine on Amazon here; this post contains affiliate links), which makes it so easy to get sharp, crisp, perfect points.  I'd appliqué the center circle to each compass.  As of right now, I like the way the pieced setting triangles create an illusion of scallop curves to frame the body of the quilt, but they feel a little heavy -- might reduce the scale and use smaller strips and squares for those so as not to overpower the dainty rosebuds and berries.  

But how nice it would be to just be FINISHED with this already once I have the blocks done?  This quilt, like the 8-year skirt project I finished a couple weeks ago, really has no purpose other than educational.  I wanted to try needle turn appliqué, and I know how to do it now, so it's a "win" for me already and I'd like to move on to something else!  So this is the other, simpler option I'm considering:

Keeping It Simple, 66 x 66 Straight Set with Harlequin Border

In this version, I trim my appliqué blocks to finish at 16" square and set them straight with a harlequin border and little X corner blocks to repeat the X shape of the tulip stems in the appliqué blocks.  Then I've slapped on a 6" wide plain outer border, for feather quilting or whatever.

Saturday, October 14, 2023

Deco QAL Week 3, Completed Only 101 Weeks Behind Schedule!

You guys, if this was the year 2021 instead of 2023, I would be SO AHEAD OF SCHEDULE for my Deco QAL!!  Here it is, only October 14th, and I have finally finished all of my log cabin blocks for Week 3 (Nov. 1-8, 2021) of Lo & Behold Stitchery's Deco Quilt Along.  

16 Blue-Green Blocks, 32 Blue-Purple Blocks, and 12 Half Blocks

Unfortunately, it is NOT 2021, so instead of being ahead of schedule I'm actually 705 days behind schedule, or 100 weeks plus 5 days behind schedule.  Sadly, I am no longer eligible for winning any of the prizes.  ðŸ˜†. Good thing I still like this quilt!

My 102 x 102 Deco Bed Quilt, pattern available here

In case anyone out there is interested in making a Deco Quilt of their own, the pattern from Lo & Behold Stitchery is available as an instant PDF download on Etsy here (this post contains affiliate links). 

I'm making the largest 102" x 102" bed sized version of Deco, but the pattern also has instructions for making the more manageable baby and throw sized versions and those are striking, too.  I quilted a baby sized Deco for my client Liz back in 2021 and a throw sized Deco more recently for my client Megan.  I've seen this quilt made up in so many different color combinations and I haven't seen any that I didn't like.  I had a great time coming up with my own color palette of Kona Solids and then tweaking it to complement my Anna Maria Horner floral print backing fabric (it's Hindsight "Honorable Mention" in Turquoise from Free Spirit Fabrics, available on Etsy here).

(Note to Self: It would have saved a lot of time to pick the backing print FIRST and then just pull the solid colors from the selvedge instead of coming up with a custom palette first and then trying to find a print that had exactly the same colors in it!)


My Deco Quilt Fabrics with Anna Maria Horner Backing Print

Wednesday, August 16, 2023

Progress on My Scandi Deco Quilt + Florida Deco Quilt Finish for Megan

No, I don't have a 100% finished Halo quilt to show you yet.  I'm still working on hand stitching the binding.  Meanwhile, though, I've finished piecing the first sixteen "Block One" log cabin blocks for my Scandi Deco bed quilt.  Look how cute they look, lined up in crooked rows on my design wall!  The Kona Solids colors I'm using for these blocks are Copen, Indigo, Leprechaun and Kale.

All 16 Blue/Green Log Cabin Blocks Completed!

In my custom coloring from EQ8 (below), you can see that these are the blue and green log cabin blocks needed for the center row of my bed size quilt.  I still need to make the four half blocks that go at the row ends, and then I need to make 32 full blocks and eight half blocks for the ends of the top and bottom rows.

My 102 x 102 Scandi Deco Plan in Kona Solids

Deco Quilt is a pattern by Brittany Lloyd of Lo & Behold Stitchery and it's available in three sizes: Baby, Throw, and Bed.  The pattern is available to purchase as an instant PDF download directly from the pattern designer on Etsy here (this post contains affiliate links).  Brittany's Deco pattern includes instructions for either a 2-color version or a 5-color version, and -- because I like to make my life difficult -- my version of the quilt is made up of 12 different Kona Solid colors: Indigo for the background with Willow, Cactus, Amber, Thistle, Citrus, Tangerine, Magenta, Hyacinth, Leprechaun, Kale, and Copen for the blocks.  I should note that the pattern directions would have been much, MUCH easier to follow if I'd limited myself to either two or five colors.  Brittany gives yardage requirements and cutting charts for both of those options, but my rogue plan of twelve different colors meant I was on my own to calculate yardage for each color and to figure out how many of each shape needed to be cut from each color.  Do as I say, not as I do...  ðŸ˜‰.  I am a willfully disobedient quilter who doesn't follow all of the directions anyway, so I'll be pressing my seams to the side instead of open and disregarding some of Brittany's instructions (which are geared toward frugal use of fabric and ease/speed of construction) in favor of wasting more fabric and time (personal preference!).

I've actually quilted two versions of this Deco quilt already, for two different clients.  My client Liz made a two-color baby sized Deco quilt back in 2021 (see that one here), and my client Megan recently made a multicolor throw sized Deco quilt inspired by the vibrant pastel Art Deco buildings in historic Florida neighborhoods.  That's the finished quilt I'm sharing with you today.

Sunday, May 28, 2023

Halo Progress, Welcome Home Kit NewFO, and A Creative Tangent with the PhotoSketcher App

Hey there, quilty peeps!  Hope you are enjoying a wonderful Memorial Day weekend if you're in the United States, and I hope the weather is nicer where you are than it is in Charlotte, North Carolina right now.  Rain, rain, and more rain!  Good thing I have a bright and cheerful project on my design wall since the view outside my window is so drab and dreary.  

Halo Blocks Still In Progress

This is a Jen Kingwell pattern that is suitable for either hand or machine piecing.  The pattern is found in Kingwell's Jenny From One Block pattern booklet and you can find that on Amazon here (this post contains affiliate links).  

I'm fascinated by the way Kingwell organizes her seemingly random scrappy compositions so studying the way she alternates between "organized chaos" vs careful control within the same quilt is my primary fascination with this project.  The curved piecing challenge is just the icing on the cake.  In Kingwell's version of this quilt, most blocks are totally scrappy except for three blocks that are created with all one fabric for the backgrounds, all one fabric for the rings, and all one fabric for the triangles surrounding the center square.  Whereas the circles at the block intersections predominate throughout most of her quilt, those three blocks that have planned matching fabrics pop out as squares that help your eye travel across the surface of the quilt.  Here's one of my blocks that I'm hoping will function that way in my version of Halo:

One of My Favorite Recently Finished Halo Blocks

The dark pink arcs were cut from one of the Tilda fabrics in the fat eighth precut pack that started me off on this tangent.  The rest of the fabrics in this block are treasures from my stash.

Friday, April 14, 2023

Ramona's Pineapple Log Cabin, Betsy's Sea Glass Pinwheels + Pesky Little Halo Curves

Good morning and happy April, quilters!  I hope everyone who was celebrating enjoyed a wonderful Easter or Passover last week.  The Spring weather has arrived in Charlotte and there is a little gold butterfly fluttering around in the sunshine outside my window as I'm writing this.  It's so hard to stay inside and get work done on a day like today!  Of course, it helps when the work that keeps me indoors is as beautiful as Ramona's pineapple log cabin quilt!

Ramona's Pineapple Log Cabin with Radiance E2E, Glide Thread in Sea Foam

I just love her watery blue and green batik fabrics against that crisp white background, and the skinny sashing with sapphire sashing posts is absolute genius.  It's a beautiful variation on the traditional pineapple log cabin that also eliminates having to match up all those seams when the blocks are sewn together.  Brilliant!  

Ramona's 95 x 95 Pineapple Log Cabin Quilt

We used Hobbs Tuscany 80/20 Cotton/Wool batting for Ramona's quilt, a luxury all-natural alternative to the more common 80/20 cotton/poly blend batting (this post contains affiliate links).  The Cotton/Wool blend has a little more loft, a little less weight, and breathes better than a cotton/poly blend.  

Saturday, March 25, 2023

Halo Quilt Value Study: Making a Messy Start

Happy Weekend, quilters!  I have an itty bitty amount of progress on my new Halo quilt to share with you today.  For those who missed my earlier post about this NewFO project, Halo is a Jen Kingwell pattern that can be found in her Jenny From One Block pattern booklet, available on Amazon here (this post contains affiliate links).

Unsewn Halo Blocks On My Design Wall


For the last couple of weeks, I've been working on cutting out shapes and rearranging them on my design wall without any sewing.  When I searched #haloquilt on Instagram, I found lots of different versions of this quilt, in all kinds of colorways.  What struck me immediately was that it's the muddled values in Jen Kingwell's original version that drew me in, the way that her "halo rings" appear to come forward in some places and recede in others, creating an illusion of depth.  Other quilters have made some very striking and modern versions of this quilt by increasing the value contrast, limiting the color palette, or restricting themselves to solids, but I was really intrigued by the way Jen broke the conventional "quilt police" rules about value and contrast in her quilt, creating something that feels fresh and modern but also somehow nostalgic and vintage.  I want to recreate that in my version of the quilt.

Jen Kingwell's 66 x 66 Halo Quilt


I printed a full page, grayscale photo of Jen's quilt and taped it up above my cutting table so I can refer to it as I'm chopping up my fabric pieces:

Grayscale Photo of Jen Kingwell's Halo Quilt


It's so much easier to see what's going on with value when you take color out of the equation!  

Saturday, March 4, 2023

A Color Plan and Fabric Shopping for Stars Upon Stars + TODAY is the Last Day of the Carolina Lily Quilt Show!

Good morning, quilt lovers!  Just a quick post from me this morning before I dash off to the Union County Agricultural Center because our Carolina Lily Quilt Show opened yesterday and TODAY IS THE LAST DAY!  The show is open until 4 PM with 200+ quilts to see, a full vendor mall with all of the area's best quilt shops and sewing machine dealers gathered on one place for convenient shopping (with show specials), and a boutique of handmade gift items for sale.  Four of the six personal quilts I entered are sporting ribbons and several of my clients' quilts ribboned as well (more about that in my next post, I promise).  I hope to see you there!

And now, the real focus of today's post -- I made some decisions and did some online shopping a couple days ago, and THIS QUILT IS HAPPENING, YOU GUYS!!!  I'm so excited!

Star Upon Stars Quilt: Decisions Made, Fabrics Ordered!

I wrote about this antique 19th century quilt back in November of last year (you'll find that blog post here) and how I was considering it as a new challenge project for myself in 2023.  Well, Edyta Sitar recently announced that she is starting a QAL (Quilt-Along) for Star Upon Stars on March 15th with weekly blog posts and videos on her YouTube channel.  

Edyta is Doing a Star Upon Stars QAL in March!!!

The QAL will run for just three weeks, covering the three components of the quilt: the diamond pieced center stars, the smaller Lemoyne stars, and the sashing.  (No, I don't think anyone is going to finish the entire quilt during the three week QAL!). In her intro video for the QAL Edyta suggested that anyone who is worried that this quilt might be too difficult for them should just try making one sample block in the QAL and if they don't want to continue, that can become a pillow cover or a small wallhanging.  She also announced that she has a new template set available for this pattern, including one template for the exact size that each of the eight multi-diamond star segments is supposed to finish, which perked my ears right up -- in Jan Krentz's book Lone Star Quilts and Beyond, she recommends making a template for the desired finished size of those units out of template plastic.  The idea is to check each of those units after piecing them and correct any discrepancies before sewing them together.  You can find the template set and pattern for this quilt on Laundry Basket Quilts' web site here if you'd like to join me in this madness!


Original 67 x 74 Star Upon Stars Quilt (left) with My Fabric Picks (right)

One of the reasons I was vacillating about this quilt is that I was undecided about whether I'd attempt a faithful recreation of the original or reinterpret the quilt in a modern palette of solids, which would tone down the visual busyness and show off my piecing skills better (prints tend to camouflage seam lines).  I was also on the fence about the size of the quilt, because 67" x 74" is too small for a modern bed but this is way to elaborate to be a couch throw for the dog to curl up in (sorry, Samwise!).  

In the photo above, the original quilt made in 1846 is on the left, and you can see the contents of my shopping cart from Laundry Basket Quilts on the right.  

Friday, January 27, 2023

Star of North Carolina: AccuQuilt vs. Electric Quilt Software

Happy Friday, Quilty Peeps!  I took a little design detour yesterday, playing around with a historical quilt block called Star of North Carolina in an updated color scheme of Kona Solid fabrics.

My 58 x 74 Star of NC Design, Using 8 Inch Blocks

I became aware of this block recently when AccuQuilt reintroduced their limited edition 12" North Carolina Star BOB (Block On Board) die as a permanent offering.  "Block On Board" (BOB) refers to AccuQuilt dies that are designed to cut all of the shapes needed for a particular quilt block with a single pass through the die cutting machine.  (By the way, all of AccuQuilt's BOB dies are on sale 20% off, now through January 30th.  This post contains affiliate links).

AccuQuilt's 12 Inch North Carolina Star BOB Die

Barbara Brackman's definitive reference book, the Encyclopedia of Pieced Quilt Patterns, 3rd Ed., identifies this as Block #473 in the Ladies' Art Company Catalog that was published from 1889 through the 1970s.  

Wednesday, November 9, 2022

Where Are My Lone Star/Star of Bethlehem Quilter Peeps??? Rebecca Needs a New Challenge Project!

 Alright, y'all -- from time to time I have to subject you to one of these posts where I get carried away by the wild, delirious possibilities of new projects that I may or may not be starting.  Today is one of those days, and I'm about to drag you around the inside of my brain like you're on Willy Wonka's wild ride through the chocolate factory!!

Having recently finished my Nanu Nanu! Retro '80s Building Blocks Sampler quilt that I started in 2016, and having finished my mammoth Pineapple Juice Nostalgia pineapple log cabin quilt last year that I'd been working on since 2014, I am feeling like I have earned the right to start a challenging new project.   Especially since I have another major long-term WIP quilt, my Jingle applique sampler that I started in 2013, scheduled to go back on the longarm the week of Thanksgiving so I can finish custom quilting it.  Nevermind that I am still not done with my Frankenwhiggish Rose needleturn applique blocks or that I have yet to start any of the three Sarah Fielke BOM projects that I signed up for this year.  We have a saying about that in the South: I'm FIXING to start them...  ;-). Seriously, though -- I've decided to wait on those until the end of the year, when the entirety of all three patterns is available to me, so I can confidently ignore all of the directions and do whatever I want with them, out of order, as I please.  And so, this reproduction pattern from Edyta Sitar of Laundry Basket Quilts came sauntering by, shaking its tail feathers at me, and I am feeling smitten:

Behold, Stars Upon Stars!

Stars Upon Stars 64 x 74 19th Century Reproduction, Pattern available here

Stars Upon Stars is a late 19th century quilt owned by the Grand Rapids Public Museum in Michigan, and Edyta Sitar obtained permission from the museum to draft her pattern.  You can read more about this quilt and zoom in on high resolution photos on the museum's web site here.   You can purchase the Laundry Basket Quilts pattern to make your own version of this quilt on Etsy here (and yes, this post contains affiliate links to help pay for the asylum to which I'll likely be committed if I actually start this quilt and it doesn't go well...  ðŸ˜…)

Monday, September 5, 2022

Note To Self: There Are No Magical Border Elves Who Finish Quilts While You Are Sleeping

Oh my gosh, y'all -- I would so much rather be making blocks for a new quilt rather than putting seven borders on this WIP (Work In Progress) project that I've been puttering around with for the past six(!) years!  When I came up with this bright idea of Mork's rainbow suspenders for a quilt border, I was only thinking about how cool it would look and not thinking at all about actually having to go to all of this bother at the tail end of the project when I just want to be DONE with it already!  I procrastinated cutting the border strips after I cut the black inner border a couple months ago -- swiftly remembering how much I hate cutting long lengthwise strips for a big bed quilt.  Well, I finally cut them all and have been piecing them together and attaching them to my Retro '80s Building Blocks sampler.  This is where I left off last night, with only the final purple border strips waiting to be attached:

Only One More Border to Go!

First, I'd joined the Kona Lipstick and Kona Black borders together, pressing the seam allowance towards the black on the top and bottom strips and towards the red on the left and right side strips.  That way, the seams nested and locked together nicely when I mitered the red+black border corners.

Trying to Keep Organized...

Then the next four colors were strip pieced together to apply as a single border: Kona Tangerine, Kona Grellow, Kona Peridot, and Kona Ocean.  

Sunday, August 21, 2022

Lucky Stars and Oriana for Ramona: Behind the Scenes with Backing, Design Choice, and Thread Selection

Good morning, my lovelies!  I have missed you!  These past few weeks have been busy for me with travel, family celebrations, and moving Son-the-Elder into his off-campus apartment at Appalachian State, and as a result I have quite a backlog of quilts to share with you.  Today we're looking at two gloriously colorful quilts, both made by my client Ramona who blogs at Doodlebugs and Rosebuds Quilts.  

Ramona's Lucky Stars Quilt

Detail of Lucky Stars with Grecian E2E

First up is Lucky Stars, a pattern by Atkinson design that you can find here on Etsy (this post contains affiliate links).  Lucky Stars is a fat-quarter-friendly pattern that is perfect for showing off Ramona's collection of Kaffe Fassett prints and batiks.  I love how the sawtooth star blocks are designed so the stars float just within the background fabric -- no risk of losing your star points if your piecing is less than perfect, which makes this a great pattern for beginners, too.  I am adding this to my own ever-lengthening list of wanna-make-its!  Wouldn't this be great as a baby quilt? 

Ramona's 76 x 91 Lucky Stars Quilt with Grecian E2E

This quilt was unusual for me in that, after some initial back-and-forth with design options, Ramona ultimately left the choice of the quilting design completely up to me and she had no idea how I was quilting her Lucky Stars until it was finished.  Ordinarily I consult with clients and make design recommendations, but get their approval on the final selection.  

Monday, June 20, 2022

Fancy Peacock Tail Feathers on The Road Home BOM for Mildred: Making a Subtle Impact With a "Busy" Quilting Design

Peacock Tail E2E Stitched in 40 wt Glide Thread, Color Warm Grey 4

 
"I love that design, but will it look too busy on my quilt?"  That's a question I often hear from my longarm quilting clients, especially when we're considering a newer design and I don't yet have photos of what it looks like stitched out.  Just looking at line drawings of quilting designs, they ALL look really busy because of the high contrast of the solid black stitching line against a white background.  However, in real life it's almost always the relationship between the fabrics in your quilt top and the thread color we choose that will determine how subtle or dramatic the quilting appears on your finished quilt.  This beautiful batik quilt (It's The Road Home BOM from Wilmington Prints) that I finished recently for my client Mildred, pictured above, is a really good example of this. 

Peacock Tail E2E for Subtle Texture

On Mildred's Road Home, I've quilted out Peacock Tail E2E, one of those designs that looks like it might be "too much going on" when you look at the line drawing:

Line Drawing for Peacock Tail E2E Quilting Design by Nancy Haacke

A couple things to note about this design.  First, it's a very large scale design, and the image above is showing six repeats nested together.  You're not looking at the design anywhere near the size I'd actually stitch it out, either -- the purpose of this drawing is to give an overall view of how the design will repeat and "flow" across the surface of the quilt.  I love the sense of movement this design creates and I love how the rows nest together so well -- you don't look at the finished quilt and see "rows" of quilting at all.

For Mildred's quilt, we wanted the dramatic movement and fabulous texture, but didn't want the quilting lines themselves to jump out and compete with the elaborate medallion patchwork design.  With that objective in mind, I chose Warm Grey 4 Glide thread (this post contains affiliate links) because it blends into her blue and gray tonal batik fabrics so well.  You just see fabulous swirling movement that leads your eye through the patchwork design and brings it to life.