|
| Set up and Ready for Machine Quilting |
Welcome to my sewing studio, bloggy friends! No, I haven't started quilting yet, but I did spend some time in the studio yesterday, clearing the mountains of fabric, rulers, sewing magazines, tools, and mending off this folding table so I could move it in front of my sewing cabinet. I would have moved the table even closer to my chair, except the back end of the table is already hitting my mammoth cutting table and that's way too heavy for me to move. I already had another folding table set up behind my red sewing machine cabinet (which is a Bernie-Built exclusive, in case you're wondering), so now the weight of the quilt will be supported on all sides while I'm quilting. It's really important that the quilt isn't hanging onto the floor, so you don't have to fight the force of gravity while you're trying to quilt. My sewing machine is lowered so it's flush with the top of the cabinet, with a clear acrylic piece filling the gap between the machine and the table top. I ordered the acrylic insert from one of the major sewing machine cabinet manufacturers, made to fit my machine make and model, and then I had Bernie cut the hole in the cabinet top to fit the acrylic insert.
 |
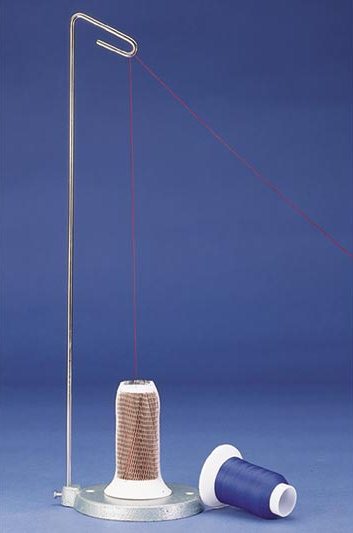
| Nylon Monofilament Thread on Thread Stand |
I wanted to share some tips for working with nylon monofilament "invisible" thread, since so many people seem to struggle with it. Because I prefer to learn from the mistakes of others whenever possible, I did a little research into the best practices others have come up with for working with this thread. Most of what I'm about to tell you came out of either Harriet Hargrave's Heirloom Machine Quilting book or out of Diane Gaudynski's Guide to Machine Quilting. I strongly recommend both books.
I'm using a high quality invisible thread from SewArt International, which is always the first step towards success. Cheap thread is never worth the grief it causes, and neither is old, brittle thread. Second, I've put the invisible nylon thread on a silly thread stand contraption that hooks onto the back of my sewing machine, the Multiple Spool Holder accessory. The thread stand is silly only because it holds a ridiculous number of thread spools, and the sewing machine only has one needle -- at most, you might use three spools at once with a triple wing needle. It's supposed to facilitate machine embroidery work, and I bought it thinking that I would line up different color threads in order of stitching for embroidery designs, but in reality, I rarely ever embroider designs with enough color changes to warrant the stand. So the Multiple Spool Holder is overkill for quilting, but I'm using it so the nylon monofilament thread can sit vertically on the stand and, although it comes off the spool kind of curled and kinky, the thread has plenty of opportunity to relax and learn some manners as it travel up to the loop at the top of the thread stand, then back down to the machine and its tension disks, preventing the snarling and kinking problems that can sometimes happen with this thread.
If you don't have a funky thread stand like mine, you can get a simple cast iron cone thread stand online here from Clotilde for less than $10, and just set it on the table next to your sewing machine; it will work just as well.
 |
| Invisible Nylon Thread in the Guide Attached to my Sewing Machine |
Next, one of my books recommended taping a little safety pin to the edge of the sewing machine as an additional thread guide for monofilament nylon thread. Lo and behold, my Bernina Artista 200E/730E sewing machine already has a little metal guide loop already attached in exactly the right spot! Never noticed that before! I love it when my sewbaby is one step ahead of me! So my invisible thread is going straight up off the spool to the top of my thread stand, down to the little metal loop guide on the right side of my sewing machine, just above the hand wheel, and from there it follows the regular thread path. My horizontal spool pin is holding the Mettler 60 weight 2-ply cotton embroidery thread that I'm using in my bobbin. Remember, if your machine doesn't have this extra thread guide, just tape a small safety pin in the same spot on your machine and use that as your thread guide.
As I'm editing photos for this post, trying to adjust the brightness so you can actually SEE the invisible thread, I feel like one of the bogus tailors in The Emperor's New Clothes. It's the most beautiful thread in the world, but alas, fools cannot see it... ;-) Don't feel too bad -- I can't see it, either.
Okay, now for the tension samples! Did you think you could thread your machine up with magical invisible nylon thread and sew beautiful stitches without having to make any tension adjustments? Think again, sister! Invisible nylon thread stretches as it goes through the tension disks of your machine, so you are going to need looser needle tension than the standard setting, which is calibrated for sewing with regular weight cotton or polyester construction thread in both the needle and the bobbin. I can't tell you exactly what setting you should use, because the tension numbers are completely arbitrary and vary widely by machine, even within the same brand. The only universal tension truths are that higher numbers equal tighter tension, and nylon thread is going to need looser tension than whatever your standard setting is.
 |
| Monofilament Tension Sample, Top Row is Normal Tension, Gradually Reduced to Bottom Row at 1.25 |
When I used the invisible nylon thread a few weeks ago to blind applique the Scrabble quilt label to the backing fabric, I just dropped my needle tension down to 3.0 and that seemed fine. So I thought 3 was my magic monofilament number, until I started stitching parallel test rows down a sandwich of backing fabric and batting scraps. The bobbin thread on the back of this sample is very easy to see and looks great at every setting. It's really tough to tell what you're looking at on the invisible nylon side, though. I couldn't get this to photograph well, either, but I finally determined that I needed to reduce my needle tension all the way down to 1.25 with this thread. With higher/tighter tension, the nylon monofilament was laying in a flat line across the top of the fabric, pulling the bobbin thread all the way to the top to lock and form the stitch, instead of meeting the bobbin thread halfway in the middle. When my needle tension is too tight, the invisible nylon looks really shiny because it's a straight, unbroken line of thread reflecting the light. When I reduced the tension sufficiently, the shiny effect was greatly reduced because the nylon thread was bending between each stitch and disappearing into the quilt sandwich instead of laying tautly across the top of the fabric. Does that make sense? If your monofilament thread looks too "shiny," which is a common complaint from those who don't want to use it, I suggest you lower your needle tension until you can tame the shine. You can keep reducing needle tension as long as the bobbin thread still looks good on the back. If you start to have a "line" of bobbin thread on the back instead of individual stitches, you'll know you've gone too far.
Another point about the bobbin thread: Looking back at my sample stitches again, I can see a tiny dot of bobbin thread between each stitch on the top of my quilt sandwich. This effect was more pronounced when my needle tension was too tight and pulling the bobbin up to the top, but it doesn't completely go away even once my tension is balanced. I'm using a #60 sharp needle to make the smallest hole possible, and that should help, but it's a good reason to select a bobbin thread color that will blend with fabrics in your quilt top instead of a thread color that only looks good with the backing.
I also happily discovered that my sewing machine has a built in quilting straight stitch programmed with 5 tiny little stitches at the beginning and end to lock off stitches. I don't think I've used that in the past, I've just manually turned the stitch length adjuster at the beginning and end of each line of stitching. I'm not sure if I'll use the built in stitch or not -- it's nice at the beginning of the row, because you just tap the "pattern begin" button on the touch screen and start sewing, and the machine automatically increases to the correct stitch length after locking in the stitches without having to take your hands off the fabric. The annoying part is at the end, when my foot is on the pedal and I reach up to hit the "pattern end" button to tell the machine to go back to the tiny stitches to end the row. If I don't tap the button just right with my fingertip, the machine keeps sewing the longer stitch length while I tap it again and again, waiting for the chime that means "yes, Master" in Sewbaby Speak. We'll see how that goes.
So much for the "quick blog post" I planned to write this morning! Hopefully next time I post, I will have made some progress with the actual quilting.
UPDATED February 18th, 2014: I did some quilting with monofilament nylon on my Bernina 750 QE for the first time a couple of days ago. She handled it beautifully, with cotton thread in the bobbin and top tension reduced to 2.0. I did place the monofilament nylon on my thread stand behind the machine and did everything else the same way I did on my previous Artista 200/730 E.
PSST!! I'd Love to Quilt for YOU!
By the way, if you or any of your quilty friends has a quilt top or two that needs quilting, I'd be delighted to quilt for you! My turnaround for edge-to-edge quilting is currently running about 2 weeks, and you can click here to find out how to book your quilt with me.