Showing posts with label Art. Show all posts

Tuesday, April 1, 2025

Say My Name: "In War Time, 1863," by Jane A. Stickle

Good morning, Quilty Peeps!  Today's post is another in a series exploring and organizing my thoughts around the many quilts I hope to make "Someday," in order to deter myself from wasting time chasing the so-called Squirrel Projects that sometimes distract me.  The idea is that, before I purchase a new pattern or project materials, I'll consult my new Future Quilt Plans page at the top of my blog and decide whether I really want to invest the time in that new distraction project, or whether I really would be happier digging into one of my Bucket List quilts instead.  It has recently dawned on me that I probably won't live long enough to make every single quilt that strikes my fancy, so I want to be more intentional about which quilts I admire from a distance and which ones I choose to make for myself.

"In War Time, 1863" by Jane A. Stickle

"In War Time, 1863" 80.25 x 80.25 Original Antique Quilt by Jane A. Stickle


So much has been written about this iconic quilt.  You can see it in person at the Bennington Museum in Bennington, Vermont (check first before traveling as it's not always on display) and the best history of the quilt maker Jane A. Stickle can be found in the Summer 2013 issue of the Walloomsack Review on the museum's website here.  I know some of you have already made one or more versions of this quilt and others of you have it on your own Wanna-Make lists, but you're likely calling the original antique quilt by a different name.


Jane A. Stickle Named Her Quilt "In War Time, 1863."  NOT "Dear Jane"


One of the many remarkable things about Stickle's quilt is that, very unusually for the period, her quilt includes a label that names her quilt "In War Time, 1863" as well as the number of pieces in the quilt (5,602) and her name, Jane A. Stickle.  The "Dear Jane Quilt" moniker derives from a 1996 book by Brenda Manges Papadakis in which the author extols the virtues of the Stickle quilt and presents self-drafted line drawing reproductions of the blocks interspersed with extensive imaginary correspondence with the quilt maker.  Papadakis was so smitten with the Stickle quilt that she was inspired to learn everything she could about the quilt maker, the world she inhabited, and what was happening around her during the time she made the quilt.  However, Jane Stickle was an ordinary woman of declining fortunes living in times when ordinary women's lives tended to go undocumented.  We know she was childless, we know she was married but living apart from her husband at one point in their marriage when the census listed him as living with some other, much younger wife.  Later censuses show Jane living with her husband again, filing for bankruptcy, and ending her life as a ward of the state.  "In War Time, 1863" was a project she devised to pass time when she was bedridden.  

Papadakis' book Dear Jane: The Two Hundred Twenty-Five Patterns from the 1863 Jane A. Stickle Quilt  and the many classes she taught have been instrumental in sharing Stickle's exquisite masterpiece with hundreds of thousands of quilters worldwide, both challenging and encouraging readers to attempt reproductions and variations based on the original.  If Papadakis had not written about and popularized this quilt, I probably wouldn't even know it existed.  And, to her credit, Papadakis herself refers to Jane's quilt reverentially as "The Quilt" and only nicknames her students and their quilts as "Baby Janes."  The quilt only became known as "The Dear Jane Quilt" colloquially subsequent to the publication of the Papadakis book as quilters around the world fell in love with the quilt and began the journey of making “Dear Jane” quilts themselves.  

Which is all well and good, except what would that look like if Jane Sickle had been a male artist, working in a highly esteemed medium like oil painting rather than the oft-denigrated “women’s work” of needle craft?


The Dear Leonardo Portrait

The "Dear Leonardo" Portrait (instead of Mona Lisa or La Giaconda) by Leonardo Da Vinci?


My beloved Leonardo,

         I dreamed of you with longing today whilst working on my replica of The Portrait.  Who was this woman you painted, and what did she mean to you?  She must have sat in your presence for hours on end as you painted, close enough to breathe the same air, staring directly into your smoldering eyes and inhaling the intoxicating scent of your manhood.  Was she your mother, as some have supposed, the wife of your father's merchant friend Giaconda, or your own secret paramour, smirking at you playfully?  Perhaps she tried to keep a straight face as was customary in portraits of the time, but your ribald stories and dirty jokes broke down her maidenly reserve.  You lived through such an amazing time, what with the Renaissance and the Medici family's campaign to Make Florence Great Again...  Oh Leonardo, if only we were not separated by the centuries, I know you and I would be lovers as I am truly your soul mate now that I am copying your painting and thereby gaining access to your very soul!  I long to lick your paint brushes clean and will never stop searching for more of your precious paintings.

                                                     Your Playmate,

                                                      Rebecca Grace

Now seriously -- Isn't that WEIRD when it’s me writing letters to Leonardo Da Vinci instead of Brenda Papadakis writing letters to Jane Sickle?  Writing to "My beloved Jane" and signing off "your playmate Brenda" comes straight out of the Papadakis book.   (There are no sexual overtones in Papadakis’ letters to Jane, however.  I got carried away with my letter to Leonardo…)

Monday, March 24, 2025

Deco Quilt Top FINISHED!

Well, THAT took a bit longer than I thought it would.  😐.   Behold the idiocy of my own words, mocking me from my November 1, 2021 blog post when I started this quilt

"...So, yes -- my Weekly Goal is to cut and sew 54 Block One log cabin blocks for my Deco Bed Quilt, and my OMG (One Monthly Goal) for this quilt is to complete the entire quilt top!"

HAHAHAAHAHAHA!  Spoiler alert, to those just joining me -- it took me a lot longer than a week to cut and piece 54 log cabin blocks.  If my life depended on accurately predicting how long it would take me to make a quilt, I'd just be dead already with no quilts to show for myself at all.


102 x 102 Deco Quilt Top is Finished


Finishing this quilt top (FINALLY!) nearly three and a half years after starting it was my OMG (One Monthly Goal) Part I for March, as in THIS March, 2025, so I'm glad it's together and off my design wall.  I finished it late last night after Bernie had already gone to bed and I couldn't get it back up on my design wall without his help, so I just spread it out on this bed in a guest room instead.  Photos taken with morning light.  This is probably the room where this quilt will "live" once it's quilted and bound.


Deco Quilt Top Awaiting Quilting


I did the perimeter stay stitching 1/8" from the edge on all four sides of the quilt top, so it is ready for quilting.  I have backing fabric already; I bought it and prewashed it three years ago when I finalized the color palette for the quilt top.  

Tuesday, September 3, 2024

Upcoming Zoom Workshop With Maria Shell, "Making Prints Out of Solids" + Picasso Landscapes: Out of Bounds Exhibit

You guys, I am SEW excited to be taking a 2-part Zoom workshop this month with quilt artist Maria Shell!  And there are still a few spaces available in the class in case any of YOU would like to join me, from wherever you are in the world!  But hurry if you're interested -- Maria will be lecturing at the guild meeting tomorrow night and the class will probably sell out once members see her work and hear her speak.


Maria Shell, "Making Prints Out of Solids" Workshop September 9th and 16th


This workshop, "Making Prints Out of Solids -- Lines, Tracks & More" is being offered by the Charlotte Quilters Guild and I helped our Programs Director set this up months ago when I was still the guild President, before moving to Florida.  I believe there are still spaces available and registration has now opened up for nonmembers.  At just $50, this is an absolute steal for a two-part workshop with a teacher of this caliber.  The workshop will be conducted via Zoom from 7-9 PM Eastern Standard Time on Monday, September 9th and Monday, September 16th, and you can register here.  There is no kit or pattern required for the class; you just need a copy of Maria's book Improv Patchwork that is available on Amazon here (affiliate link).  

So...  I have the book, I read the book, and I'm nervous about cutting without rulers (!!!) but excited to give it a try and see what happens.  My homework to prepare for class was to put together a palette of solid colors to work with, all pulled from my stash, and prewash half yard pieces of each color.  Here's what I have so far, subject to change of course.  I did have to dash out to JoAnn's for a half yard of brown fabric: 

My Fabric Pull for Maria Shell's Workshop


I have lots of other options littering my worktable, too.  Who knew I had so many solids tucked away in those fabric bins?!

Sunday, May 28, 2023

Halo Progress, Welcome Home Kit NewFO, and A Creative Tangent with the PhotoSketcher App

Hey there, quilty peeps!  Hope you are enjoying a wonderful Memorial Day weekend if you're in the United States, and I hope the weather is nicer where you are than it is in Charlotte, North Carolina right now.  Rain, rain, and more rain!  Good thing I have a bright and cheerful project on my design wall since the view outside my window is so drab and dreary.  

Halo Blocks Still In Progress

This is a Jen Kingwell pattern that is suitable for either hand or machine piecing.  The pattern is found in Kingwell's Jenny From One Block pattern booklet and you can find that on Amazon here (this post contains affiliate links).  

I'm fascinated by the way Kingwell organizes her seemingly random scrappy compositions so studying the way she alternates between "organized chaos" vs careful control within the same quilt is my primary fascination with this project.  The curved piecing challenge is just the icing on the cake.  In Kingwell's version of this quilt, most blocks are totally scrappy except for three blocks that are created with all one fabric for the backgrounds, all one fabric for the rings, and all one fabric for the triangles surrounding the center square.  Whereas the circles at the block intersections predominate throughout most of her quilt, those three blocks that have planned matching fabrics pop out as squares that help your eye travel across the surface of the quilt.  Here's one of my blocks that I'm hoping will function that way in my version of Halo:

One of My Favorite Recently Finished Halo Blocks

The dark pink arcs were cut from one of the Tilda fabrics in the fat eighth precut pack that started me off on this tangent.  The rest of the fabrics in this block are treasures from my stash.

Monday, November 21, 2022

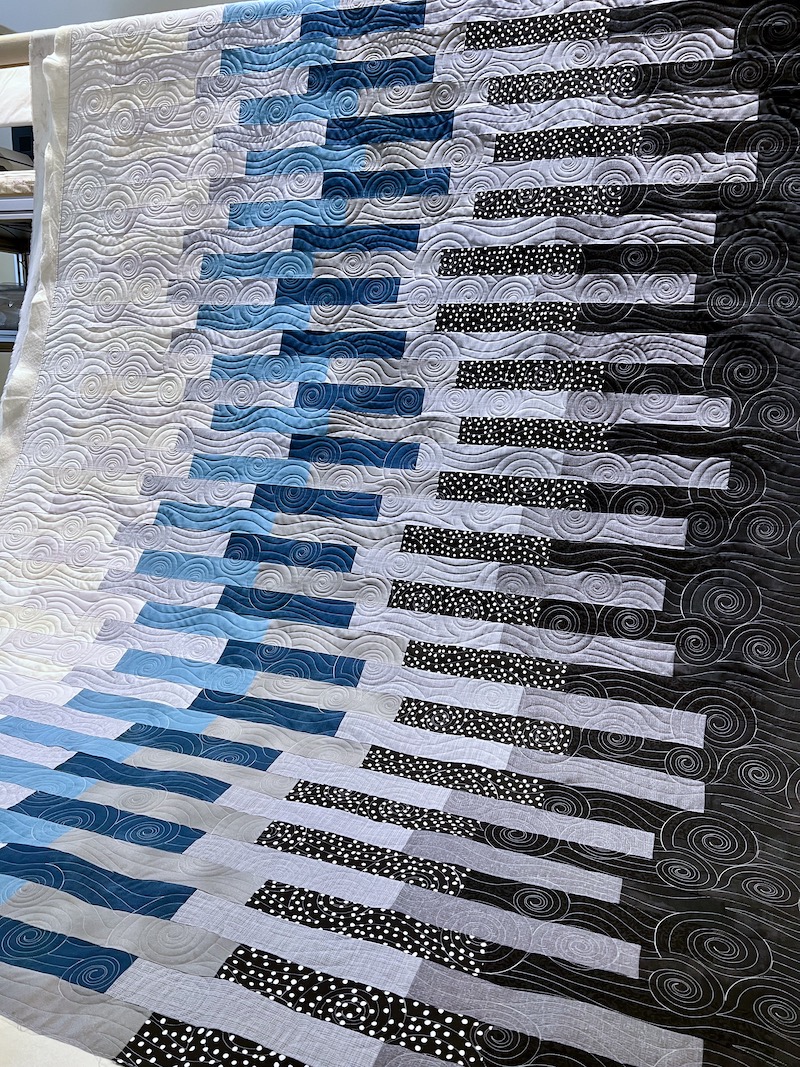
Move Over: A Modern "Klimt" Strip Quilt Finish for Julia + A FMQ Refresher for Rebecca

And now, back to our Regularly Scheduled Programming...  Look at this beautiful Move Over quilt that my client Julia brought me for quilting a few months ago!  Back in the Summer when I was quilting this, the staggered strips of turquoise blue in this quilt reminded me of ocean waves crashing on the shore -- the white strips were the foam.  But now, with all the snow getting dumped on the Northeastern United States, I see a blizzard in Julia's quilt, and the black and white polka dots are snowflakes!

Julia's 60 x 77 Move Over Quilt with Rolling Waves E2E

Move Over is a pattern by Mari Martin for Connecting Threads that is available as an instant download here.  It's a beginner-friendly pattern that would go together quickly for a more experienced quilter, and I can envision it looking great in a mix of red, green and white fabrics for the holidays.  I quilted this for Julia with Rolling Waves E2E, a digital design that can definitely suggest waves as the name implies.  On Julia's quilt, this quilting design in conjunction with the straight line "bars" and irregular speckled polka dot fabric also reminds me of a recurring motif in Gustav Klimt's fabulous Art Nouveau paintings from early in the 20th century:

Bildnis Emilie Flöge by Gustav Klimt, 1902, Wien Museum


See those wavy lines with swirls in the woman's dress?  

Thursday, January 4, 2018

Behold! My First Finished Quilt Top of 2018: "Paint Me A Story"

Some wise Internet sage proposed that how we spend our New Year's Day would characterize how we would spend our time and what we would accomplish throughout the entire year.  Well, the only thing I accomplished on New Year's Day was to bake a new scone recipe that no one liked.  Baking Fail!  I also slipped and fell down the stairs while carrying a laundry basket down on New Year's Day, and that's not a very promising augur for the new year either.  But yesterday I finally, FINALLY finished a quilt top that I started working on way back in May of 2014That was three and a half YEARS ago, for those of you who are insufficiently caffeinated to do math this morning.  

65" x 65" Finished Quilt Top, "Paint Me A Story"
Those of you who have been following my blog for awhile are probably sick of this quilt already.  I honestly can't explain why it took me so long to get around to adding the final border to this top, but I have to be in the right mood to do borders for some reason, which is silly because borders are nowhere near as difficult as sharp little triangle points!  This quilt started out with nine 10 1/2" bear paw blocks using a large scale floral Anna Maria Horner print called LouLou Thi Clippings in Passion colorway.  I rotary cut my bear paw patches without paying attention to the print as an experiment in breaking the rule about how big prints shouldn't be chopped up into small pieces because that "loses" the print, that is, you can't tell what the print is supposed to be when you cut a large scale print into small pieces.  I really liked the effect, though -- kind of abstract, kind of like gobs of paint in some places, with recognizable flowers or butterflies in other places.  I used an orchid pink batik fabric for the center of my bear paw blocks, and I was originally just going to set them with alternate plain white blocks so I could do something challenging with the quilting...


10 1/2" Finished Bear Paw Block

Original Layout Plan
But then I had this idea that I wanted to do wide white sashing and sawtooth star cornerstones in hand marbled fabrics, and I spent some time fiddling around with different sizes, running red dye on one sawtooth star, and trying out different methods of piecing the stars to figure out which one would give me the best accuracy with the least frustration.  I ended up foundation paper piecing most of these 4" blocks.


4" Finished Paper Pieced Sawtooth Stars
I'm glad I added the sawtooth stars.  I liked the bear paw blocks, but in the end I couldn't bring myself to make a quilt using just the one print fabric.  I felt like I didn't get enough artistic input, you know?  Like it was all about Anna Maria Horner's fabric design.  Combining Horner's print fabric with Marjorie Lee Bevis's marbled hand dyed fabrics enhanced that gobs-of-paint vibe that I was loving from my bear paw blocks, and any time I start combining fabrics that "don't go together" (not from the same fabric collection, batiks/hand dyes with prints, traditional and reproduction prints with modern prints, etc.) I feel like I'm much more involved in the creative process, like the resulting quilt is a collaboration between me and each of those fabric designers rather than me just executing something that reflects one fabric designer's artistic vision.  I have nothing against quilters who love to make quilts from all one collection or from kits -- don't get me wrong!  But as an interior designer by trade, combining different fabrics and furnishings and lighting from all different sources to create something new and unique is what I DO; that's how I best express myself artistically, and that's what is most fulfilling to me personally in my hobbies.  I am never content to just follow the directions.  :-)

So once I had the bear paw blocks, the sashing, and the sawtooth stars, I started thinking about the borders.  I started making blocks for this quilt before I had my EQ quilt design software, but by the time I got around to border options I was able to audition several possibilities on my computer.


Pieced Border Possibililties, EQ7 Mock Up
The pieced border options were ultimately rejected, however, because I felt like they were all too busy-looking.  I wanted a clean, fresh, modern feel for this quilt, with plenty of negative space for custom quilting.  And as I was stitching the top together, enjoying the bright splashes and swirls of vivid color, I found myself thinking back to my elementary school art classes in the late 1970s, remembering how all of us kids clustered around big, donut shaped communal sinks to clean our paintbrushes and all of our paint colors swirled together in glorious rainbow streams of color in the basin, swishing down the drain.  Man, I can even smell the acrylic paint right now; that's how strong the memories are.  I have to show you the sink I'm talking about now.  Gotta love the Internet -- I now present to you the round, communal sink from Birchview Elementary School in Wayzata, MN:


I Found the Sink!!!
I apologize for the urinals.  They had this same sink fixtures in the boys' and girls' restrooms as in the art room, and they may have even had one in each of the lower grade classrooms as well, but I could only find this picture from the boys' bathroom to share with you.  These sinks are sized for little kids, low to the ground, and they allow for lots of little hands to be washed simultaneously with minimal wasted water.  To give you some perspective, here is a photo of some adults using one of these sinks:


Scaled for Use By Children
I think the edge of the sink basin was almost up to my armpits when I was in kindergarten.  There's a rubber ring on the floor that you step on to turn the water on and then it sprays all the way around the deep, donut-shaped basin like a fountain. 


You Have No Idea How Excited I Was to Find This Picture
OMG, people!  THAT IS MY SINK FROM BIRCHVIEW ELEMENTARY SCHOOL THAT I HAVEN'T SEEN SINCE 1983!!!  I can't believe I was able to find it so easily on the Internet!Now you have to imagine that same sink in an art classroom instead of in the boys' restroom, and you have to imagine it all splattered with paint like this:


Painted Dumped In Some Random Sink for Illustrative Purposes
And imagine a dozen or so little second graders clustered around that sink, diligently cleaning their paint brushes at the end of class, and one little girl with long, tangled hair is using her paint brush to swirl the colors together in the sink until they look very much like the fabrics in a certain quilt top that she would make nearly 40 years later...


Do You See the Paint Splotches and Swirls That I See?
The other thing that the bright colors and streaky paints remind me of is captivating children's book illustrations by artists like Eric Carle:


The Inimitable Eric Carle
And so, throughout all of the hours over the past three years that I was working on this quilt, as I cut and stitched fabric, ripped stitches out and redid them, threw up different border fabrics on the wall for audition, and considered all of the possibilities of what this quilt could be, I reconnected to a much younger version of myself and to all those hours, so many years ago, learning to create in elementary school art classes and learning to read, to imagine, and to dream from the picture books that were read to me by my mother and by my teachers (thanks, Mom!).  That's why I'm naming this quilt "Paint Me a Story."  It makes me happy.

You know, when I first started this quilt (before finishing another one that was in progress), my then-6th-grader son Anders was indignant about my "poor work ethic" (starting a new project when the last project wasn't finished yet), and he wanted to know for whom I was making this quilt.  He had seen me make quilts for him, for his brother, for his dad, and as gifts for other people's children.  I told him this one was just for ME -- and it really was.

Of course this is a finished quilt top only, not a finished quilt.  I've pressed it, folded it neatly and hung it on a hanger in the guest room so it will be ready for my long arm frame once my long arm quilting skills are ready to tackle it.  This quilt is going to get some custom quilting for sure, and I need to think some more about whether I want to try to tell more of the story through the quilting design.  It needs to percolate in a back corner of my mind while I work on something else.  Also I need to wait for an online fabric order to arrive because I ended up doing wider borders than I had originally planned and I came up 5" short on my chosen backing fabric.  Because no, I never learn, and I always, ALWAYS need more fabric than I think I do!  The backing fabric for this one is aptly named, though, don't you think?


"Slow and Steady" Backing Fabric by Tula Pink
"Slow and Steady," indeed!!  Now, why did I procrastinate so long on the borders?  Because I much prefer chopping up fat quarters of fabric into small pieces to wrangling with long lengths of border fabric that need to be prewashed, pressed, straightened, folded, and cut very carefully to ensure border strips that are straight when unfolded rather than zigzagged.  I have always hated cutting out plain borders, but I think I have a method that works for me now so hopefully my future projects won't be as likely to stall out at this stage.

First, I measure the length and width of my quilt top through the center to determine the cut lengths of my border strips.  I snip into the selvage of my fabric about an inch into the not-quite-straight edge that was cut from the bolt and rip straight through the opposite selvage to have a perfectly straight, on-grain fabric edge.  Then, in order to work with a piece of fabric that is as small and as manageable as possible, I add a few inches to my required border length, take a snip through the selvage at measurement of my border fabric yardage, and then I tear straight across through the other selvage.  Then I multiply my cut border width times four, again adding a little bit for a fudge factor, and then I take a snip at the torn fabric edge and rip all the way down the lengthwise grain.  So for this quilt top that finished up at 65" x 65", wanting to add four borders that were each 5" finished width, I tore my prewashed border fabric into a piece that was approximately 24" wide by 70" long.  I folded the rest of the fabric and put it away for future use, and took my rectangle of rough-ripped fabric over to the ironing board for pressing and straightening.  Much easier to get everything aligned properly for cutting with the pre-ripped fabric than it would be if I tried to press, straighten, and fold the 3 1/2 yard length of 44" wide fabric or whatever it was.

Then, instead of measuring the center of my quilt top and then measuring and cutting my border strips to that same measurement, I now skip the measuring.  I just lay my starched and pressed quilt top on my work table, lay my border strips straight through the center of my quilt, aligning it with seam lines so I know it's straight, and smooth all of the fabric layers with my hand.


Measureless Measuring for Final Borders
Then I use a ruler to draw a chalk line on the border strips even with the edge of the quilt top, still with the border strip lined up down the CENTER of the quilt top, and cut along the chalk line with scissors.


Just Cut Along the Yellow Line
So fast, and so accurate, too!  And then I pin those border strips to the edge of the quilt where they belong, matching the centers and ends and then filling in with pins in between those reference points.  Because the rainbow striped border was pieced from several fabrics, I chose to pin my outer border strips so they would be on the bottom when sewn, next to the feed dogs. 

Border Pinned, Ready for Stitching
That way I could babysit the seam allowances on the rainbow border to make sure none of them got flipped the wrong direction.  Do you notice how my pins are oriented, with the glass heads on the left side and no part of the pins jutting out beyond the raw fabric edges?  That's so I can use my 97D patchwork foot with its accompanying seam guide:

Patchwork Foot 97D with Dual Feed and Seam Guide
This setup on my machine helps me get a perfectly straight, perfectly accurate 1/4" seam all the way down the long border seams, resulting in a nice, flat border and a quilt top with 90 degree angles at all four corners.  Notice also the Band-Aid I'm modeling in the photo above, because OF COURSE my stupid finger has to start bleeding when I'm sewing on WHITE borders!

And now that I have chronicled the finished quilt top and documented my process for sewing quilt borders, I am moving on to the Tabby Mountain project that I told you about last time. 
"Tabby Mountain" by Tula Pink for Free Spirit, Free Pattern Available here
This is a quilt that I stumbled across online, really love exactly as-is, and even already own all of the pictured fabrics in my own stash, so I'm hoping it goes together much, MUCH more quickly than Paint Me A Story did. 


My Ruler and My Fat Quarters, Ready to Go!
I was able to find that 30 degree triangle ruler that I needed wanted, and now that my design wall is FINALLY EMPTY FOR THE FIRST TIME SINCE IT WAS INSTALLED, I have a place to lay out all of my triangles as I'm cutting them out!  I might have to deviate ever so slightly from the quilt as it's pictured, though, since the pattern calls for 1/3 yard of each of the solids and I have fat quarters of each color instead.  Not sure if I'll be able to get all of the solid triangles out of the same solid fabrics or not.  The goal for this one is to KEEP IT SIMPLE and to GET IT DONE!

Wish me luck with that, since I can't even write a quick and simple blog post...

Since I've rambled on for this long, there's one more thing I'd like to share with those of you who have stuck with this post all the way to the finish line:

My son Lars, who just turned 17 (how did THAT happen?!!) the day after Christmas, and my two Rottweiler furbabies, Otto and Lulu, who will both turn 7 years old tomorrow:


My Babies, Minus One: Lulu, Otto, and Lars-Of-Ours
So much love in one picture!  I could just eat them up -- but that would be cannibalism.  Okay, I think we're done here for today.

I'm linking up with:


·       Let’s Bee Social at www.sewfreshquilts.blogspot.ca/

·       Midweek Makers at www.quiltfabrication.com/

·       WOW WIP on Wednesday at www.estheraliu.blogspot.com 
·       Needle and Thread Thursday at http://www.myquiltinfatuation.blogspot.com/
·       Finish It Up Friday at www.crazymomquilts.blogspot.com

·       Whoop Whoop Fridays at www.confessionsofafabricaddict.blogspot.com

·       Off the Wall Friday at Creations: http://ninamariesayre.blogspot.com/

·       Finished Or Not Friday at http://busyhandsquilts.blogspot.com/

Thursday, June 1, 2017

What Kind of Coat Costs $51,500? A Closer Look at Melania's Stunning Dolce & Gabbana Floral Jacket

Melania's Exquisite Floral Jacket by Dolce & Gabbana
This blog is my happy place where we escape from the harsh realities of politics by submerging in art and design, especially textile art and design. Melania Trump's decadently embellished floral jacket, designed by Stefano Gabbana of Dolce & Gabbana, is an unquestionable triumph of textile design.  Garments like this are why I love couture fashion, even though I can't afford to wear it.

So, people have been asking, what kind of jacket costs $51,500?  Isn't that crazy?  Like, what could it possibly be made of that justifies that price tag?  Isn't it just wrong that ANYTHING made of mere fabric should command that kind of coin?

...Except...

"The Women of Algiers" by Pablo Picasso, Sold at Auction for $179M
Art has always been about so much more than the value of the materials used to create it.  Check out Pablo Picasso's 1954 record-breaking oil painting, "The Women of Algiers," which recently sold at auction for a whopping $179 MILLION dollars ($160M plus commission).  It's a canvas with oil paint on it, right?  I can buy everything I need to make that painting for under $50 at Michael's, right?  And the anonymous buyer who bought the Picasso will want to buy my amateur painting entitled "The Rottweilers of Ballantyne" for a hundred million dollars, too... Uh, WRONG.  

I think that when we express outrage over the high prices of couture fashion we are doing a disservice to all textile artists, whether they are fashion designers, art quilters, costume designers, or weavers.  Fine fabrics and threads cost MORE than oil paints, after all, and at least as much artistry and skill go into transforming bolts of silk and a handful of beads into a masterpiece like Melania's jacket:

Silk Ribbon Embroidery, Beading...  All Done By Hand
Click on that picture to enlarge it.  Isn't that just stunning?  The entire surface of this jacket is encrusted with the most painstaking heirloom embroidery techniques.  The padded satin stitched leaves accented with metallic thread veins.  An exuberant garden of three-dimensional silk ribbon embroidered flowers.  Thousands of shimmering seed beads scattered over the flowers like so many drops of morning dew, each one stitched in place by hand.  This garment is magnificent.

But beyond the cost of the materials and the skill of the embroiderer, it's really the "Picasso element" that makes this piece worth so much more than a simple equation of materials plus labor.  It's the creative genius of Stefano Gabbana, who obviously loves traditional hand embroidery as much as I do -- the artist who reimagined a stuffy old-fashioned needlework tradition from ball gowns of centuries past and transformed it into a garment that is fresh, edgy and modern, utterly original and unique.

As Seen On the Runway at D&G
And what about Melania, the First Lady so many love to hate?  We don't know her that well, but it seems to me that she is most comfortable expressing herself creatively through her fashion choices.  Who can forget the fuschia Gucci Pussy Bow blouse she wore for the debate that took place right after the "grab-'em-by-the-P____" scandal broke?

Melania's Gucci "Pussy Bow" Blouse
Dressing well is an art in and of itself, and it takes more than a big bank account to put together outfits that are flattering and appropriate for high-profile events.  Don't believe me?  Think back to some of Cher's notorious Oscars ensembles.  That's why most celebrities today are professionally styled for red carpet events.

Cher's Notorious 1986 Oscars Ensemble
The First Lady of the United States of America would look ridiculous wearing this gorgeous D&G coat the way it was styled on the runway, but paired with a simple ivory dress, the look is elegant and iconic.  Seriously, I predict that someone is going to come out with a creepy collectible Melania doll wearing a miniature version of this outfit.  If I had only seen this jacket on the runway, in a fashion magazine, or in a shop, I would have admired the embellishments but would have had no idea what to wear with it or whether I could "pull it off."  Although she can certainly afford to hire a professional stylist, Melania chooses to "style herself," telling Elle magazine "I style myself and choose what to wear based on what I feel good in it [sic]."

As Worn By Melania Trump in Sicily
She's not Michelle, Barbara or Hillary, she's not Wonder Woman, and she's not Mother Theresa, but she's definitely a snappy dresser.  I look forward to seeing what she wears next!  And as for the designer of this Coat of Many Colors?  Stefano Gabbana is a self-made billionaire, an entrepreneur and a creative genius whose father was a factory worker and mother was a laundress.  Geography aside, the Dolce & Gabbana label is the epitome of the American Dream.  I'm happy for his success, and glad that his beautiful designs are getting the exposure and recognition they deserve.

Happy Thursday, everyone!

Saturday, February 14, 2015

In Which Rebecca Eats Crow, As Long As It's Decaf

I have been known to say things like, "Never trust people who drink decaf coffee, nonalcoholic beer, or who have fake tattoos."  We can talk booze and tattoos some other time, but today I'm coming clean on caffeine.

I've been drinking coffee almost as long as I can remember, definitely going back to high school, maybe even 7th or 8th grade.  As a young adult I was drinking strong coffee all day long, convinced that the caffeine had no effect on me because, after drinking a few pots of coffee a day, if I tried to drink even MORE coffee to pull an "all-nighter" it would make me so ill that I had to go to bed anyway (and would fall immediately asleep). 

I have also "not been a morning person" for as long as I can remember.  I thought I was just an outlier on the bell curve, someone whose body needed 10 hours of sleep to feel rested...  Except that I never did wake up feeling rested and energetic, no matter how long I slept.  When my alarm went off, my subconscious would harness my imagination and use it against me in a desperate plea for more sleep-- I have had so many dreams where I am standing in front of my home security system panel, trying to shut off the alarm, and I can't remember the code so the alarm is blaring away...  Or it's the smoke detector going off and I'm on a step stool trying to smack it with a baseball bat and it keeps going off anyway.   Sometimes the dream is a little more honest, and I'm standing in front of the alarm clock and can't find the button to turn it off.  But eventually I wake up and realize that the alarm clock actually has been going off for an hour and I am still in bed.  And no matter how long I did sleep, I would wake up groggy and irritable, looking forward to that first cup of coffee that would make me feel sharp again and get me going.


Rebecca With Latte
Aside from the caffeine-free interludes of pregnancy and breastfeeding (I developed a strong aversion to coffee with both boys -- go figure!), the caffeinated coffee cycle continued for years.  When I was juggling my interior design business with home and family, I was drinking an average of eight to ten shots of espresso per day, stopping at Starbucks once or even twice every time I got in the car.  My kids thought that I-485 was a toll road and that the Starbucks drive-through was the toll booth.  My husband added up the Starbucks charges on my American Express statement and we decided that we would SAVE money by installing a commercial espresso machine and a commercial coffee grinder in our kitchen so I could make my own lattes at home.  Bernie even hooked the machine up to the plumbing so I would be spared the inconvenience of ever having to fill the water tank.  And I discovered Lavazza, a strong, intensely flavored Italian espresso that makes Starbucks coffee taste like wet cardboard.
My Crazy Espresso Machine


So a few months ago I was annoyed that my jeans were fitting tighter than I'd like, and after adding up the calories in those four or five lattes per day (130 calories in each Starbucks grande nonfat latte), I decided to cut back.  First I cut off the coffee after 3 PM, then pushed it back to noon and allowed myself two double-shot lattes each morning -- one when I first woke up, and another as I headed out the door.  I didn't notice any kind of caffeine withdrawal or anything -- so again, I felt that the caffeine did not affect me, that the nice, hot lattes in the morning were more of a comfort ritual than a true need for caffeine to wake me up, and that I was drinking "high test" coffee instead of decaf because the decaffeination process strips too much flavor and makes the coffee taste bad.

Meanwhile, I finally listened to my father and joined our church choir at Christ Lutheran this past Fall.   I have been having some difficulty with the upper range of my singing voice for the last few years for whatever reason, so my plan was to hide out in the Alto section and blend in.  I did not know about the choir hazing that happens at our church, whereby new choir members are randomly assigned to sing solos.  There are no auditions for solos, no calls for volunteers -- Mark just passes out the music and says "Rebecca please sing the solo" in the same tone of voice that my father used to say "Rebecca please wash the dishes" or "Rebecca please be home by eleven."  And so I find myself on the Internet, googling things like "performance anxiety" and "how to sing better in the morning."  And I find that not only is caffeine bad for singers because it dries out your throat and tightens your vocal folds, but caffeine has also been shown to relax the lower esophageal
sphincter muscle, which can lead to gastroesophageal reflux disease (GERD) (Boekema, P. J., Samson, M., van Berge Henegouwen, G. P., et al (1999) Coffee and gastrointestinal function: facts and fiction. A review. Scandinavian Journal of Gastroenterology Supplementum, 230, 35–39):


This could explain the acid reflux diagnosis I got from my ENT doctor, who stuck a camera down my throat two years ago and informed me that stomach acids have been coming back up my throat while I'm sleeping, burning and inflaming my vocal folds.  Incidentally, I know of at least two other coffee-swilling Lutheran singers whose doctors attributed their voice problems to this same silent acid reflux disorder.  Hmmm...  And here I thought those ENT doctors were just getting really good kickbacks from the pharmaceutical company that makes Nexium!  Granted, one cup of Folgers every morning probably doesn't instantly cause GERD, but remember I was drinking four or five double-shot lattes per day for years, each one containing somewhere between 80-100 mg of caffeine.  Even when I cut back to two lattes in the morning, that was still probably close to 200 mg of caffeine on a daily basis.

But the thing that really got my attention was when I read about the connection between caffeine and anxiety:

"Clinically, caffeine may be involved in the precipitation, exacerbation or maintenance of anxiety disorders (Kruger, 1996). Sensitivity to caffeine is increased in people with panic disorder and social phobia, and administration of caffeine can provoke panic attacks in these individuals (Charney et al, 1985; Tancer et al, 1991, 1994). There are clinical reports of anxiety symptoms improving on caffeine withdrawal or limitation (Greden, 1974; Bruce & Lader, 1989), and people suffering panic attacks may benefit from a reduction in their intake (Charney et al, 1985)".  You can read the full text of that article here.

I do have some general social anxiety that escalates into full-blown panic just THINKING about singing a solo, especially when the song sits near the register shift where I've been having trouble with my voice cracking.  What if that happens during the solo, in front of everyone?  My heart pounds, my hands get sweaty, and my breathing is shallow -- I can't get enough air.  The muscles in my neck, shoulders and throat get tight and rigid.  I feel like I'm going to vomit.  None of this is conducive to good singing technique!  So now I'm thinking about my Sunday morning routine -- Get up, turn on espresso machine, feed dogs.  Guzzle down 100 mg of caffeine.  Shower and get dressed.  Make another double shot espresso beverage to drink while driving to church and imagining all the horrible things that could go wrong with the solo, and all of the nasty things people will probably think and say if I mess up the anthem for everyone.  Instead of "The Scream," let's call this "The Solo":


Der Schrei der Natur  or "The Scream," by Edvard Munch (1893)
Norwegian painter Edvard Munch wrote the following poem and inscribed it on the back side of a later pastel version of "The Scream":

"I was walking along the road with two friends – the sun was setting – suddenly the sky turned blood red – I paused, feeling exhausted, and leaned on the fence – there was blood and tongues of fire above the blue-black fjord and the city – my friends walked on, and I stood there trembling with anxiety – and I sensed an infinite scream passing through nature."  -- Edvard Munch, 1895

That's exactly how I was feeling about an upcoming solo entitled "Let There Be Peace On Earth."  How was I supposed to sing about peace on Earth while feeling anxious and terrified, and fighting the urge to flee the sanctuary?!  I figured it was at least worth experimenting to see whether cutting out caffeine might help with my anxiety.  I could always have a triple espresso as soon as I got home from church, right?


So I stopped by Rush Espresso Café with Bernie on a Thursday and rather reluctantly ordered a decaf nonfat latte, which tasted like a cup of warm milk flavored only weakly with coffee, but better than no latte at all.  On Friday morning I made myself a decaf skim latte, took one sip, and dumped it down the drain.  Then I made a half-caff latte by putting one scoop of ground Lavazza Dek decaf coffee and one scoop of Lavazza Gold regular espresso in the filter basket.  It didn't have that instant "zing" of a fully caffeinated latte, but it was tolerable.  I turned off the machine for the day.  And on Sunday morning, I didn't turn on the espresso machine at all.  The solo went better than the last one, but that could be attributed to the wonderful sermon about not listening to negative voices in our heads that say we aren't good enough, or maybe nerves just diminish on their own from getting up and doing the thing we're afraid of again and again. 

[NOTE: Interested friends and family can listen to the anthem and/or Kevin Vandiver's inspiring sermon on the church as the body of Christ by going to the Christ Lutheran Church web site's Online Worship page here, clicking "On Demand Video" and scrolling down to the Feb. 1st 2015 Traditional Service video.  Kevin's sermon starts about 22 minutes into the service, and the Let There Be Peace On Earth anthem with my solo starts around the 50 minute mark.] 

I couldn't be sure that caffeine was the sole culprit behind my anxiety attacks, but to my surprise, I wasn't experiencing any of the caffeine withdrawal symptoms I had expected.  And I had bought a whole bag of decaf espresso beans...  So I continued with my experiment, making just one half caff latte each morning and then shutting off the machine for the day.  And something really weird started happening to me, within just a few days.  I have been waking up EARLY in the morning, BEFORE the alarm goes off, feeling wide awake and CHEERFUL!  Between 5:30 and 6 AM!  Before having ANY coffee!  Me, who could sleep undisturbed until noon -- I am seeing SUNRISES every morning!  It turns out, I LIKE sunrises!

Winter Sunrise in the Carolinas
And I am dumbfounded.  My caffeine had not been keeping me awake at night.  I never had insomnia.  I fell asleep as soon as my head hit the pillow, and I was usually pretty good about getting at least 8 hours of sleep in each night.  Could all that caffeine have been messing with my sleep cycle somehow?  Back to the Internet, more research -- and I find studies showing that yes, caffeine inhibits our ability to develop and sustain the deeper non-REM stages of sleep.  So all these years that I thought I was just genetically wired to require 9+ hours of sleep, maybe caffeine was causing me to "sleep shallow" so that I never woke up fully rested no matter how long I slept.  Despite my late morning snoozing, I've been chronically sleep-deprived for decades.  This sounds bizarre, right?  But it has been two weeks now since I had a full-caffeine latte, and I am consistently waking up on my own, without an alarm, after only about 7 1/2 hours of sleep, and I have never felt better in the morning.  I don't drink any soft drinks or energy drinks, so my total daily caffeine intake is below 50 mg per day for the first time in probably 25 years.  And it is making such a huge difference for me that even my husband is cutting down his own coffee consumption -- and that man couldn't drink more coffee if he was hooked up to a coffee IV!

I'm not saying everyone should immediately stop drinking coffee or completely eliminate caffeine from their diet.  Most of the studies concede that genetic differences result in a lot of variation in the way that caffeine affects different individuals.  Apparently I'm one of those people who are very sensitive to caffeine, because most of the subjects in those studies did not have diminished sleep quality as long as they cut off their caffeine 8 hours prior to going to bed, and I didn't see this weird personality change (going from Oscar the Grouch to Ernie in the space of two days!) until I had almost completely eliminated caffeine consumption.  I plan to continue with my half-caff lattes while I experiment with different decaffeinated espresso roasts.  Hopefully I'll find one that tastes good enough that I can enjoy a decaf latte without mixing in any of the high-test beans.  And I'll take life one sunrise (and one solo) at a time.

Happy Valentine's Day, everyone!