Showing posts with label Machine Applique. Show all posts

Monday, September 1, 2025

September Goals: Stonefields, FrankenWhiggish, Inherited UFO + BIG News for Rebecca

Happy Labor Day in the United States and Happy September, everyone!  I have a lot going on right now and my Big News (which I shall reveal towards the END of today's post) is going to dictate which projects and tasks take priority this month.

Stonefields Quilt

First, let's talk about my Stonefields quilt, because I am delighted with this project so far.  These blocks have been such a treat to work on!  All 13 of the blocks from Month One are now completed and on the design wall.  All blocks will finish at 6", but the applique backgrounds were cut oversized and will need to be trimmed down.  Because I use starch and glue in my applique preparation methods, I am thinking I might wash my applique blocks before trimming them down to size.  The serged edges will prevent them from fraying whether I hand wash them in a little dish pan or -- gasp! -- put them in a lingerie bag and run them through the washing machine on the Hand Wash Delicates cycle.  Honestly, that is probably exactly what I will do, because I know the washing machine will get all the glue and starch out very efficiently and I am more curious about what will happen in the washing machine than I am worried about what will happen in the washing machine.  


Stonefields Blocks 1-13 Completed, Appliqué Blocks Need Trimming to Size


My Sawtooth Star blocks were foundation paper pieced on the sewing machine, most of my applique blocks were stitched by hand, but the final Posy Pot block is a mixture of some shapes stitched by hand and other shapes stitched with my Bernina B990 sewing machine:


Stonefields Block 13 "Posy Pot"


I am absolutely delighted with my customized invisible machine appliqué stitch and how closely I got it to resemble the look of my own personal hand stitching.  

Sunday, August 24, 2025

Keeping Up With the Gretchens: Hand Stitching vs Bernina B990 Invisible Machine Appliqué Experiment for Stonefields Blocks

Good morning and Happy Sunday, everyone!  After my reckless but ultimately successful experiment on my Deco quilt last week (read about it in this post, which I edited and updated after coming back to the quilt and realizing that all was well after all), I decided to conduct another Mad Scientist Experiment on my Stonefields quilt project.  You may have heard of Keeping Up With the Joneses or Keeping Up With the Kardashians, but I'm all about trying to keep up with my blogging friend Gretchen who is cruising through her Stonefields quilt and leaving me behind in the dust!  Just kidding; I am delighted that Gretchen, Chris, and Hanne were all successfully cajoled into starting or resuming their Stonefields quilts (pattern by Susan Smith available here) as a very informal quilt along with me.  I know it's not a race, but I must be the slowest stitcher ever to have threaded a needle and it can be discouraging to put in so many hours and see so little progress -- especially since there are so many challenging and intense quilts that I want to make (I am thinking of YOU, Star Upon Stars, Down the Rabbit Hole, Simple Folk, and Happy Days!).  Behold my design wall with Blocks 1-12 completed.  Block 13 is another appliqué block that is prepped and ready for hand stitching in the coming days.  (This post contains affiliate links).


Completed Month One Blocks for Stonefields Quilt, One More to Go

Earlier in the week, out of mild curiosity, I timed how long it took me to stitch the 3 1/2" diameter cheddar print circle in one of my Pomegranate blocks.  Wanna take a guess?  


Hand Stitching a Pomegranate Block for Stonefields


It took one hour and seven minutes for me to stitch down that circle.  That was uninterrupted continuous stitching, not including threading the needle, trimming away the backing fabric, and not including stitching the light blue orange peel shape that I've started on in the photo.  No wonder I'm not able to keep up!  I am the snail of stitching!  

Monday, October 2, 2023

Margaret Willingham's Reverse Appliqué Workshop, Charlotte Quilters' Guild + My Deco Quilt Progress

Happy Fall, Quilters!  Guess what -- I took an actual, in-person workshop with the Charlotte Quilters' Guild last month AND I finished my workshop block after I got home!  I'm so proud of myself for 1. Taking a day off, 2. Trying something new, 3. FOLLOWING DIRECTIONS during the workshop 😬, and then 4. Adapting what I learned in class to suit my personal preferences once I got home to my own studio.  

My 12 x 12 Block from Margaret Willingham's Reverse Appliqué Workshop


I'll tell you more about the workshop in a minute.  First, I have other news to share -- I've made some progress and gotten over the Cutting and Kitting Hurdle with my Deco Quilt that has been in-progress/abandoned for the past two years!  Well, better late than never.  I am supremely pleased with my clear plastic tote bag containing all of the pieces for all of the blocks, neatly organized and labeled in little Ziplock bags.  Our guild has lots of social sewing opportunities throughout the month and, as President of the guild, I try to attend as many of them as possible.  Having a project packed up and ready to go (versus strewn around my studio!) is my biggest challenge, but now I'll just be able to grab a Ziplock bag of block pieces and wheel my travel machine out the back door.  I have a feeling this project is about to pick up STEAM!

My Deco Quilt Completely Cut Out and Kitted, Block One Variations In Progress

Now that I've finished ALL of the cutting for my Deco Quilt, I am officially caught up with Week Two of the Deco QAL (Quilt-Along) that I committed to in the Fall of 2021!  😂. Week Two was cutting out all of the fabric pieces for the entire quilt.  I am like that last straggling marathon runner who crosses the place where the finish line used to be, two years after the race has ended...  Not only am I caught up with Week Two, but I'm also about a third of the way through with Week Three of the Deco QAL, which is the week where you piece all of the Block One log cabin variations.  All 16 blue/green log cabin blocks are finished and all 12 of the half blocks in both colorways are finished and I have 32 blue/purple log cabin blocks remaining to be sewn. The cutting for this quilt was monotonous, but the actual sewing is pretty easy.  I think that completely finishing this quilt top was supposed to be my OMG (One Monthly Goal) for November of 2021; maybe I can get it finished by November of 2023 instead!

Monday, July 24, 2023

Halo, Modern Double Wedding Ring, and Baby Moose Quilts

Hey there, Quilter Peeps!  Behold, my Halo quilt top is finally nearing completion:

Center Blocks Sewn Together, Border Blocks In Progress

I hesitate to set personal sewing goals with actual deadlines, but doesn't it look like I could get this quilt top finished by the end of this week?  Now that I've said that out loud, my house will probably be carried off to Oz by a tornado.  Or my sewing machine will blow up.  I'm not even sure which of those scenarios would be more catastrophic -- that would depend on how backed up my Bernina dealer is for repairs, and whether or not there are any good quilt shops in Oz.

For those who haven’t seen this one before, Halo is a pattern by Jen Kingwell that is sold in the pattern booklet Jenny From One Block, available on Amazon here.  (This post contains affiliate links).  If you’re local here in Charlotte, North Carolina, the QuiltPatch shop in Matthews has been offering classes for this quilt (taught by the fabulous Teresa Raleigh), but if you’re already comfortable with curved piecing you will do just fine on your own with the pattern as I did.  The Halo acrylic template set is optional but really helpful for accurate cutting of these shapes, along with a 28 mm rotary cutter (the standard 45 mm rotary cutting blades don’t work well along curved edges).

It never ceases to amaze me how much smaller a quilt gets when the blocks are actually sewn together compared to how big it looks when the individual blocks are stuck on the design wall side by side.  All of those quarter inch seam allowances really add up.  Or rather, they really “subtract up” from the size of the quilt top.  So much work for such a relatively small lap quilt!  I think this is supposed to finish at 66” square.  Well, thank goodness I wasn’t trying to enlarge it to King size this time!

I always enjoy making blocks more than sewing them together, for whatever reason.  Maybe I’m just impatient by the time I’ve finished making enough blocks.  Still, these went together without too much trouble, just careful pinning where the seams need to match up.

Making Blocks is More Fun Than Sewing Them Together

So now all 36 Halo blocks have been sewn together into the main body of the quilt top and I'm just working on those rectangular pieced border blocks.  Which, by the way, is an interesting design choice from pattern designer Jen Kingwell -- the border blocks complete the half circles that would otherwise land on the outer edges of the quilt, deemphasizing and obscuring the block construction in favor of rings and squares that seem to float on a scrappy pieced background.  The borders also enlarge the quilt to a more useful size and create outer edges that can be easily bound without fretting about losing any triangle points or turning rings into flat tires.

That’s about all I have to say about Halo for now.  So let’s have a glimpse of the most recent client’s quilt fresh off my long arm frame:

Tara Faughnan’s Double Wedding Ring for Cheryl

Now, you only get a sneak peek at this one, because this quilt is still on a UPS truck headed back to my client Cheryl in Minnesota.  This is Tara Faughnan’s Double Wedding Ring pattern, and Cheryl’s version is a massive king size made up in Cherrywood hand dyed solid fabrics.

Glimpse of Cheryl's Double Wedding Ring Quilt

I just love the color palette Cheryl created for this one!  This quilt is truly magnificent in person.  I used Hobbs Tuscany Cotton/Wool batting for Cheryl’s DWR and quilted it with YLI 40 Tex cotton thread in variegated Pastels.  Pattern designer Tara Faughnan was new to me before Cheryl sent me this quilt, but I checked out her Instagram and her online shop and I really like her work.  

Sunday, July 9, 2023

It's Easier to Get Forgiveness Than Permission: Quilting The Godfather for Marguerite

The quilt I’m sharing today was made by my friend and fellow Charlotte Quilters’ Guild member Marguerite.  It’s a project she started during the Pandemic, experimenting with using Terial Magic in lieu of traditional tearaway or cutaway stabilizers, various decorative threads, programmed stitches on her Bernina sewing machine, etc.  When I saw this unquilted top hanging forlorn and forgotten in her studio, I asked if I could quilt it for her as payback for a HUGE favor she did for me in a time of need (that’s why I call this one The Godfather, because “Some day, I will ask of you a favor…”  😅)  Not only did Marguerite agree to let me quilt it, but she uttered the most dangerous words imaginable...

“Just Do Whatever You Want With It!”

Marguerite’s 60 x 60 Appliqué Quilt with Bee and Lady Bird E2E Quilting

I very rarely agree to select a quilting design without any input at all from the client.  My usual practice is to consult with clients about quilting designs, batting and thread options when they drop off their quilt top (or once they’ve shipped it to me), and then I make recommendations based not just on what I see but also on what drew the client to select that pattern and those fabrics, who the quilt is for, and how it will be used.  I can usually envision two dozen totally different quilting designs that would look great on every quilt top I see.  Listening to a client talk about her quilt is just as important as looking at her quilt if I want the client to be over-the-moon delighted once the quilt is finished.  But Marguerite insisted, "Just do whatever you want."

I Quilted Bugs All Over Marguerite’s Quilt, And She’s Still Friends With Me

I briefly considered custom quilting on this one: You know, this design for the sashing, that design for the corner squares, quilting some additional “ghost flowers” along the border vines and subdividing the center of the quilt with different fills in different sections.   But Marguerite does a fantastic job of her own custom quilting using rulers and free motion motifs on her hand guided sit-down long arm machine, and if she wanted it quilted that way she could have done that beautifully herself.  Moreover, in addition to saying "just do whatever you want," she'd also said "just do an edge-to-edge," so I settled on this Bee and Lady Bird design from Scottish designer Dastardly Line.  

Thursday, July 6, 2023

Aurifil 40/2 vs Forty3 Cotton Quilting Thread: Mary's My Happy Place, Ramona's Escher Connected + A Sneak Peek of Mary's Mid Century Mod Quilt

Good morning and welcome to the sultry, sweaty, swampy month of July!  Today I'm sharing two beautiful but very different quilts (and giving you a glimpse of a third gorgeous quilt) that were all quilted with "forty-weight" Aurifil cotton threads.  I'll be showing you the enormous difference between forty weight TWO-ply versus forty weight THREE-ply thread.  

When comparing two spools of thread that are labeled with the same weight but different ply, the 3-ply thread is a full 50% thicker than a 2-ply thread of the same exact weight.

There's a common misconception that if two cotton threads are both labeled "forty weight," they should be approximately the same thickness and should look and behave the same when stitched out.  In reality, that weight designation only refers to the weight and thickness of a single "ply" or strand of that thread, and the cotton threads we use for piecing and for quilting are typically either 2-ply (two strands twisted together) or 3-ply (three strands twisted together).  This explains why Aurifil's popular 50/2 cotton thread (the one on the orange spool) creates less bulky seams and performs better with smaller needles and sometimes different tension settings compared to 50 weight 3-ply threads such as Mettler, Gutermann, etc.  When comparing two spools of thread that are labeled with the same weight but different ply, the 3-ply thread is a full 50% thicker than a 2-ply thread of the same exact weight.  (This post contains affiliate links).

Aurifil 40/2 (Green Spool) Natural White Blends and Disappears Across Applique

In the photo above, I've quilted the Chantilly Lace E2E design across a client's appliqué sampler quilt using Aurifil's 40/2 cotton thread in Natural White.  This is their popular 2-ply forty weight thread that comes on a green spool and is widely available in quilt shops.  Although Aurifil 40/2 is a thicker, more pronounced thread than the Aurifil 50/2 that comes on orange spools (confusingly, bigger weight numbers indicate skinnier and finer individual strands or plies), 40/2 cotton is still what I consider a lightweight blender thread for long arm quilting.  Notice how the quilting stitches take on a greenish tint where this thread crosses green fabrics, but the thread seems to be a pale pink where it's stitched across the pink petal fabric.

Aurifil Forty3 Black Stands Out Dramatically, Even Against Busy Print Fabrics

In the photo above, I've quilted the Wishbone E2E design using Aurifil's Forty3 cotton thread in Black.  Aurifil has created this thread specifically for long arm quilters, it’s only available on giant yellow cones (not spools), and it’s not as widely available at quilt shops as their 50/2 (orange spool) and 40/2 (green spool) cotton threads.

I selected Aurifil Forty3 cotton thread for Ramona’s Escher Connected quilt because busy prints like these are notorious for rendering quilting designs all but invisible and we wanted a thread that would disappear against the black background fabric but show up more dramatically against the prints.  

Saturday, October 29, 2022

Edge-to-Edge Quilting Over Machine Appliqué: Megan's Fiesta de Talavera + Debbie's Modern Rectangular Chevron Quilt

Good morning and happy Tuesday Wednesday Thursday Friday Saturday!  I've been working on this post in fits and snatches throughout the week.  😉  

So, the Barnful of Quilts show in Waxhaw that I told you about in my last post went off without a hitch a couple weeks ago.  It was a perfect early autumn Saturday, the air crisp without being cold, all the trees in peak foliage and beautiful sunshine filtering into the barn to illuminate the quilts on display.  Many thanks to host and organizer of the show, Valerie Fox of Fox Family Farms, and to her co-organizer (and my client) Megan Shein and their small army of volunteers who scrubbed the barn spotless, climbed ladders to hang quilts, and saw to the myriad details that made the event a smashing success!

Megan’s Glorious Fiesta de Talavera Quilt

One quilt that I especially enjoyed seeing at the show was this machine appliquéd quilt, Fiesta de Talavera made by my client Megan.  This was one of several quilts I’ve quilted for Megan that were exhibited in the show, but it's the only one I hadn't shared yet on my blog.  Doesn’t it look fantastic hanging from the barn rafters?  

Megan's 67 x 67 Fiesta de Talavera Quilt with Denali E2E Quilting

Fiesta de Talavera is all fusible raw edge appliqué, satin stitched, done completely "in the hoop" using machine embroidery, and Megan made this quilt in a class at a local shop that specializes in machine embroidery.  The Fiesta de Talavera pattern and digital machine embroidery designs are by J. Michelle Watts for Anna's Awesome Appliqué Designs, available here on Etsy (this post contains affiliate links).  I should mention, for those who haven't done any machine embroidery -- just because it's computerized doesn't mean it is instant!  This quilt required hours and hours of cutting and stitching over weeks and weeks to create all of these intricate blocks, and once all of the embroidery was finished the blocks still needed to be sewn together the same as any other quilt top.  I'll circle back to this quilt and give you more details about it later in this post, but first I want to show you another client's completely different style of machine appliquéd quilt that I also quilted with an allover, edge-to-edge design.  We tend to associate appliqué with traditional quilt styles, but it's a useful technique for modern quilts, too.

Debbie's Stunning Rectangle Chevron Quilt


This next quilt was made by my client Debbie, who told me it was a UFO (UnFinished Object) project that she'd begun in a workshop at one point and was glad to be finally finishing and crossing off her list.  I don't know the name of the workshop or who taught it, but the the techniques involved were traditional piecing and fusible raw edge appliqué (of the skinny, lighter valued rectangular shapes).  Whereas Megan's raw edge appliqué was satin stitched "in the hoop" with an embroidery machine, Debbie's raw edge appliqué was stitched on her regular sewing machine with a blanket stitch, pivoting and turning the project under the needle at every corner.  

Debbie's 54 x 59 Rectangle Chevron UFO Quilt with Starlight E2E Quilting

Isn't this gorgeous?  Debbie's quilt was hanging in my office for a few days before she got back from vacation and was able to pick it up, everyone who saw it was oohing and aaahing over it.

So, instead of talking about just one of these quilts at a time, I thought it would be fun to share these two quilts together, both machine appliqué, both edge-to-edge quilting designs, one in a traditional floral album appliqué style and the other very contemporary and geometric.  

Sunday, April 3, 2022

Two Sweet Baby Boy Quilts for Julie

Good morning, my lovelies!  I am taking some vacation time away from my studio, but I've scheduled a few blog posts to publish while I'm gone since I have quite a few fabulous clients' quilts to share with you.  Today I want to show you two adorable baby quilts, both made by my client Julie and quilted by Yours Truly.  

Julie's 47 x 49 Blue Diamonds Quilt

Julie is one of my favorite clients to quilt for and she blesses the new moms in her life with the sweetest baby quilts that are beautiful, practical, and so very on-trend.  I'll bet the recipients of these baby quilts get asked all the time, "Where did you get that awesome quilt?"  

Her 47" x 49" diamond quilt is made up of simple strip pieced triangles alternated with plain white triangles, so the top came together fairly quickly (while the baby was still a baby!).  This is one of those "why-didn't-I-think-of-that" shower gift projects.  All you really need is a jelly roll (an assortment of 2 1/2" wide x width of fabric strips in coordinating prints) and some solid white.  And it's fabulous!  I love these bold Kaffe Fassett fabrics she used, and the high contrast, graphic prints are perfect for captivating the attention of a newborn whose vision is still developing.  If you want to make your own version of this quilt, there are plenty of Etsy sellers offering jelly roll precut strips in Kaffe Fassett prints like the ones Julie used here (this post contains affiliate links).  However, I personally have a TON of leftover strips from my pineapple log cabin project that would work well for this.  It would make a nice RSC (Rainbow Scrap Challenge) project too, don't you think?  I believe Julie used a 60 degree triangle ruler like these.

Modern Mix Quilting Detail, Stitched in Omni Thread, Color Natural White

We chose Anita Shackelford's Modern Mix quilting design because it repeats many of the shapes in those Kaffe Fassett prints, and because the soft curves and spirals are such a nice counterpoint to the straight lines of the diamonds.  

Tuesday, September 15, 2020

LAL#7: Inspired by Online Ruler Work Classes, Bathroom Tile Projects, and Chasing Butterflies

 Oh my gosh, you guys -- how is it Tuesday AGAIN?!  Last week, my big focus was on finishing up the quick and easy (NOT!) baby quilt top that I dreamed up in December of 2018.  It was for a baby who is now nearing two years old and who will become a big sister on or about October 1st.  
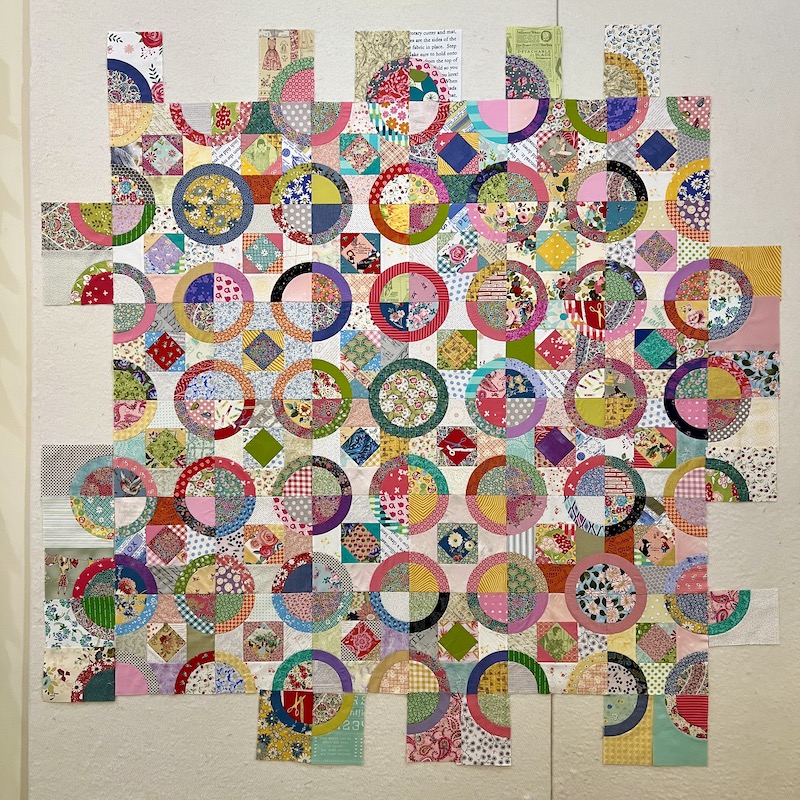
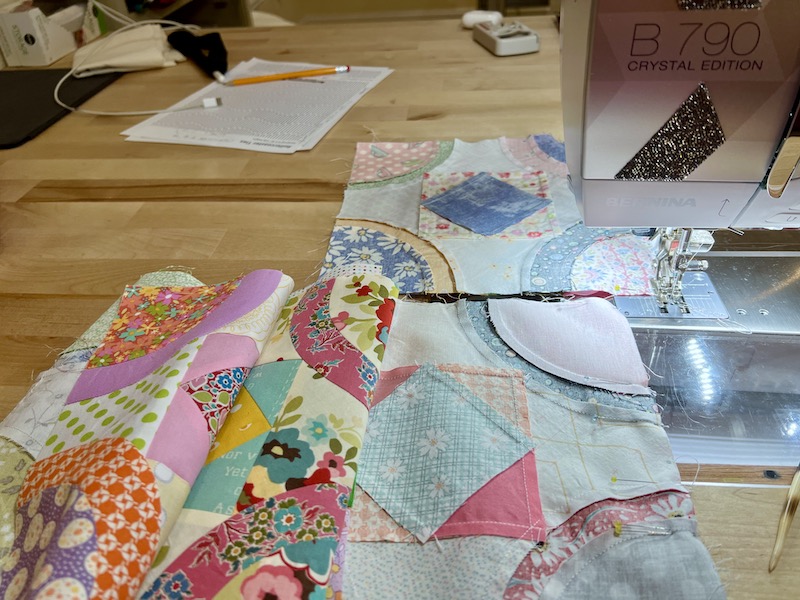
I finished the curved piecing of these 9 1/2" giant clam shells last week and added a 2" outer border matching the background fabric, just enough so the clam shells float away from the binding when it's finished.  And then I went off chasing butterflies...


...Like, LITERALLY chasing butterflies, because I had this idea that I wanted butterflies to look like they were flying across the quilt top, as though the printed fabrics were flowers in a garden.  I considered machine embroidery and had a design all picked out to embroider, but I couldn't bring myself to do it for two reasons.  First, this is a baby/toddler quilt and form needs to follow function.  The 7" butterfly design I almost embroidered would have created large stiff areas in what I intended to be a smooshable, cuddly little kiddo quilt.  Second, I was concerned that machine embroidered butterflies might make the quilt appear more store-bought and commercial versus a handmade gift, and when I considered everything I know about this particular baby's parents, machine embroidery just didn't feel like a fit.  


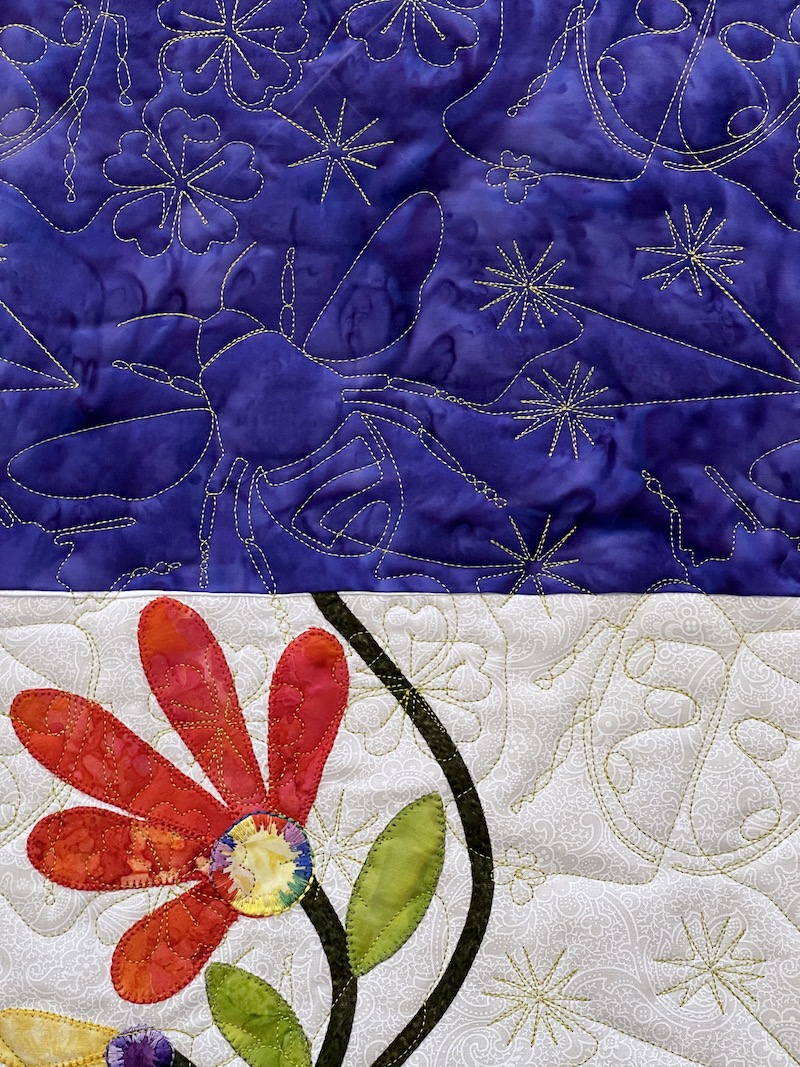
And then I stumbled across this butterfly print online, took a chance and ordered a remnant of it on eBay, and then spent a ridiculous amount of time figuring out how to do a turned edge, broderie perse, blanket stitched appliqué.  I won't bore you all with the details.  I'm just glad the top is finally DONE, with nice, soft butterflies that are just as soft and supple as the rest of the quilt.  Edges are turned under for durability and to avoid the use of any kind of fusible web.  Backing fabric is trimmed away.  The butterflies were a much bigger hassle than anticipated, but the quilt looked like something was missing to me before.  Now it feels "done."


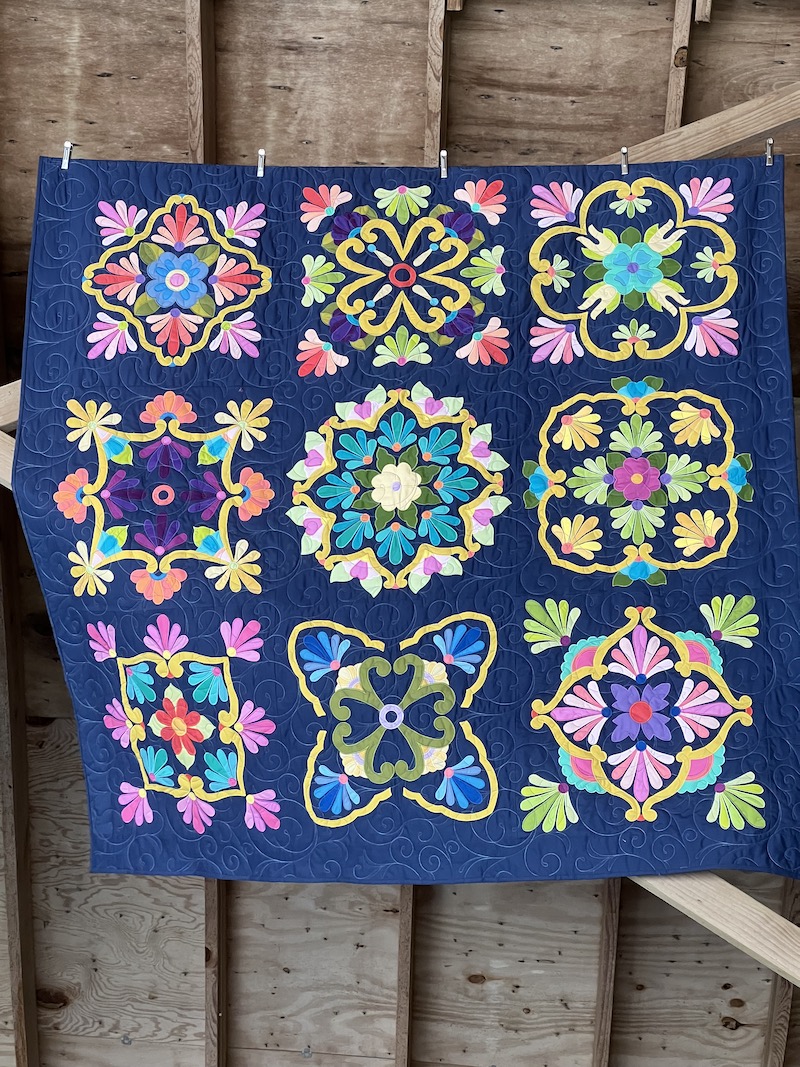
I love that big Monarch butterfly SO MUCH!!  The backing for this quilt is seamed and ready to go, but first I have that outreach top that I showed you last week, still waiting to be quilted.  Planning to load that one up and start quilting tomorrow, promise!

I also designed and ordered fabric for a second baby quilt last week, a quilt for the baby brother whose arrival is expected October 1st.  No curved piecing or appliqué in that one!  Oh, and I convinced my husband to rip up the kids' Jack & Jill bathroom and start laying new tile:


We figured that the pandemic is as good a time as any for a little renovating, since all of hubby's overnight work travel is on hold.  This bathroom was SO nasty before that I can't even bring myself to show you the before pictures!  White subway tile will go on all of the walls to just above the light switches, as well as on the side walls of the tub/shower.  Small black hexagon tile will go on the back wall of the shower, and the offending shower curtain that led to all of the mold etc. is getting replaced with a sliding glass door that will keep the water IN the shower, where it belongs!  I'm not actually in the bathroom with power tools (that would not be healthy for my marriage), but I am heavily involved in the selection of tile, shower doors, fixtures, etc.

Last Week's Quilting Goals:

  • ❌ Quilt pantograph on Veteran's Quilt
  • ✅ Finish borders & fix backing shortage for Modern Baby Clam Shells
  • ✅  design for baby brother quilt & purchase fabrics


To Do This Week:


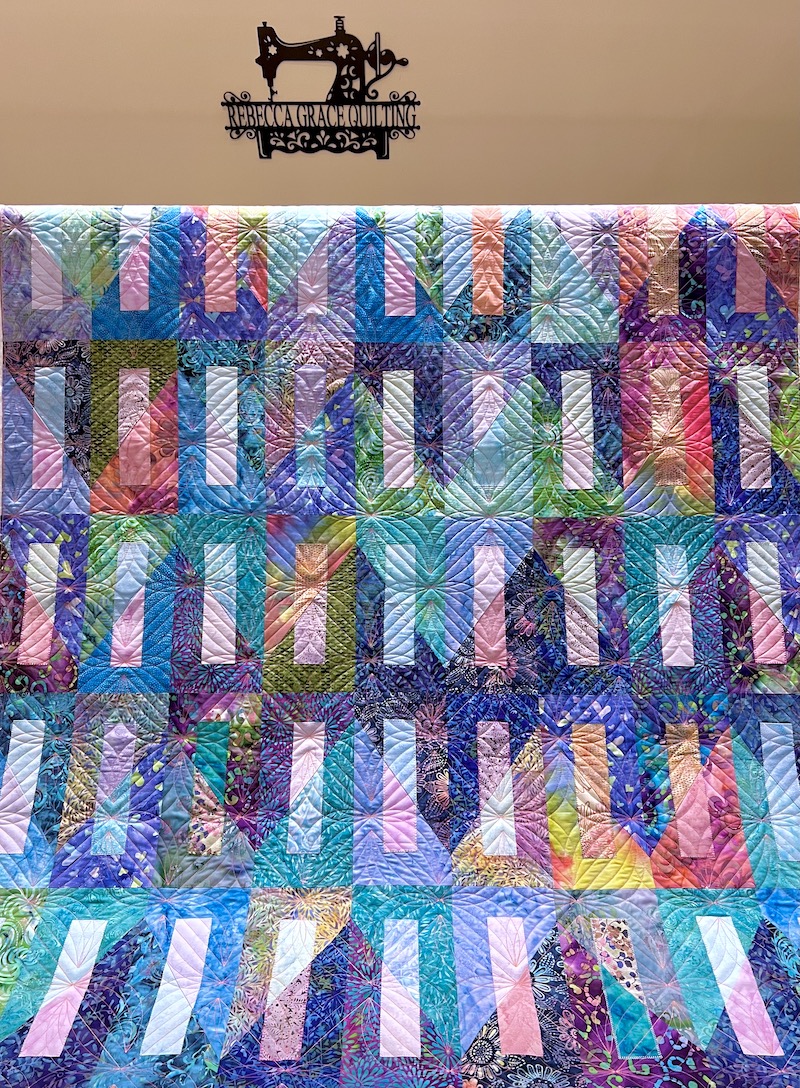
Cheeky Cognoscenti is Now Rebecca Grace Quilting

Oh, I nearly forgot -- the other thing I've been working on is a name change for my blog and my social media accounts, from Cheeky Cognoscenti (that no one can pronounce or spell) to Rebecca Grace Quilting.  Because I'm Rebecca Grace, and I write about quilting...  It was time!  I still need to create a new banner image for the top of the blog with the new name.

Highlights From Last Week's Linky Party

But some of you came here today looking for some legit long arm learning, so let's get on with that!  We had lots of great posts linked up last week, everything from free motion skill building projects to Julie Stocker's fabulous custom quilt job combining computer assisted motifs with extensive ruler work that was all done by hand.  Totally swooning over that one but not reposting her images here since her client will be submitting the quilt for publication.  If you missed it last week, be sure to check that one out on Julie's Pink Doxies blog here.


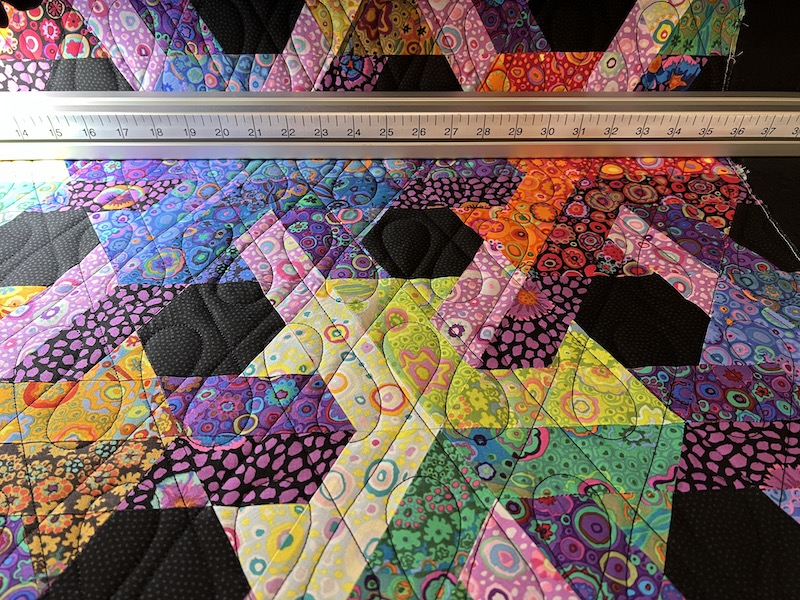
Next, I wanted to sprinkle some quilty love on Karin of The Quilt Yarn and CAMapleLeaf on Instagram 
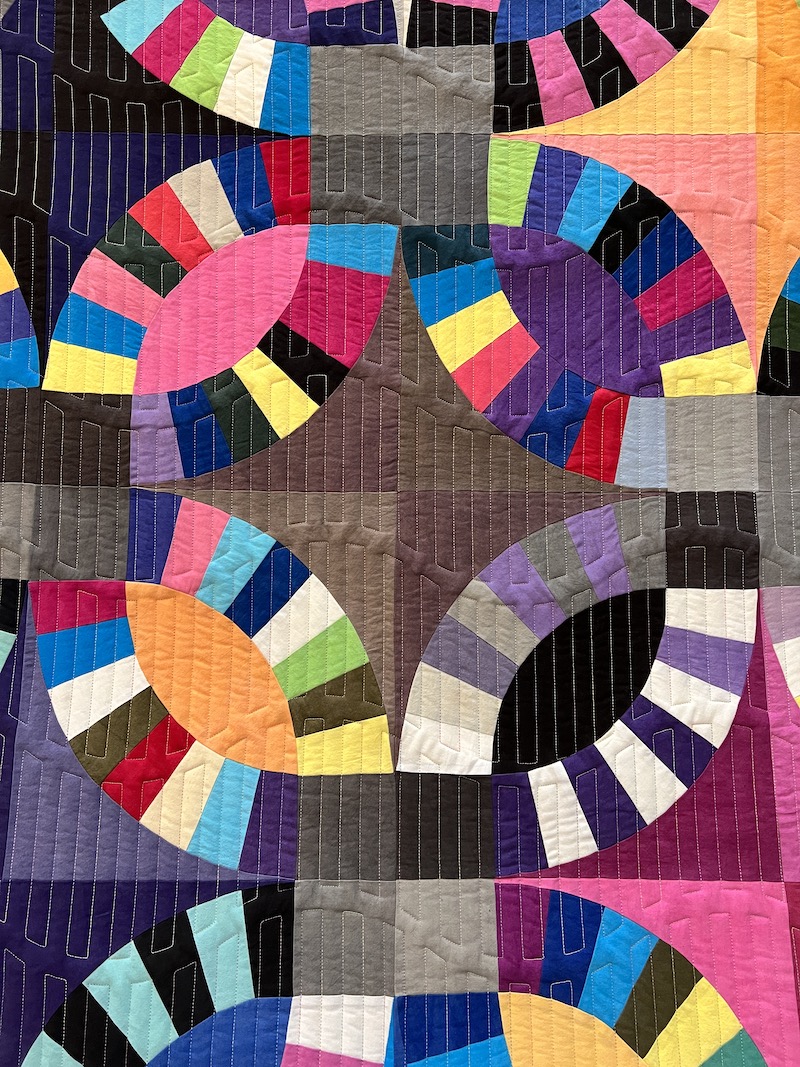
(don't know her/his name!).  That's Karin's raspberry and plum block that you see above, and CAMapleLeaf's block pictured below.  They are both working through the same online ruler work class with Natalia Bonner right now, the 9 Patchalong.  


If you're looking for an online machine quilting skill builder, the 9 Patchalong Quilt Along looks like a really fun option.  It just started at the beginning of September and it's completely free.  You know, top notch quilting teachers like Natalia Bonner all around the world have had their teaching schedule upended by this pandemic and they are all being forced to explore new ways of leveraging technology to teach from their homes and studios.  This could end up being a silver lining for the quilting industry, because once these teachers have invested in the necessary equipment and worked out the kinks of this teaching model, I don't expect virtual quilting workshops to completely disappear once the COVID-19 crisis has passed.  And that means MORE options for quilting teachers to make a living with less time on the road and away from their families, as well as more opportunities for us quilting students to take classes with top-notch instructors.  

I know that Bethanne Nemesh and Lisa Calle are also experimenting with some different models for paid online classes.  Are any of you readers signed up for either of those?  Have you discovered any other terrific online learning resources for machine quilters that I should know about?  Please tell me about it in the comments.

I'm linking up today's post with the following linky parties:

TUESDAY

·       To-Do Tuesday at Home Sewn By Us

WEDNESDAY

·       Midweek Makers at Quilt Fabrication

·       Wednesday Wait Loss at The Inquiring Quilter

THURSDAY

·       Needle and Thread Thursday at My Quilt Infatuation  

FRIDAY

·       Whoop Whoop Fridays at Confessions of a Fabric Addict

·       Peacock Party at Wendy’s Quilts and More

·       Finished Or Not Friday at Alycia Quilts

·       Off the Wall Friday at Nina Marie Sayre

·       TGIFF Thank Goodness It’s Finished Friday, rotates, schedule found here: http://tgiffriday.blogspot.ca/p/hosting-tgiff.html

Long Arm Learning Linky Party #7

Now it's YOUR turn to link up and share your machine quilting projects from the past week!  Remember that all machine quilting counts, whether it's a domestic, sit-down mid arm, or a long arm on a frame.  If you, like me, were busy doing other things last week, feel free to link up an older post about machine quilting that you haven't linked here before.  Have a great week, and happy quilting!


You are invited to the Inlinkz link party!

Click here to enter

Sunday, August 11, 2019

Machine Applique Sample Finished + Another Grandma's Quilt to Rescue

You guys -- I finished my machine appliqué project from Karen Kay Buckley's workshop last month!  Well, I finished the top, anyway.  I plan to add borders and then I need to quilt it, but still.  All the appliqué is stitched down and the stabilizer is all ripped off the back, so I'm feeling like I've accomplished something!


I Call it "Underwater Sunrise Garden With Alien Bubbles."  12 x 18
This is a project that I started in a 6-hour workshop hosted by the Charlotte Quilter's Guild.  Here's what Karen's class sample looks like:


"Circles Squared" by Karen Kay Buckley, 14 x 20
So, as you can see, I monkeyed around with it a bit to try to make it my own.  First I chose the ombre fabric for the background, then I spent ridiculous amounts of time digging through my scrap bins to select different fabrics for leaves, flowers, and whatever those bazillion 3/4" circles are supposed to be.  Beads?  Marbles?  Dormant alien seed pods drifting down from the Mother Ship, about to hatch and annihilate the Earth?  Karen is an amazing teacher and I learned a lot from the workshop, but I don't like making the exact same project as all of the other students in the class.  I brought this downstairs to the kitchen on Monday so I could work on it with my quilting bee, and then I couldn't STOP working on it after my quilter friends left, so this is what my kitchen island looked like all week:


Ain't No One Cookin' NUTHIN' 'Til This Project is DONE!
My husband didn't complain once -- no snide comments about "why is all this stuff down here when I built you a giant studio upstairs," either!  It was nice to be prepping and glue basting the appliqué while he was watching TV a few feet away from me to keep me company.


Applique Picking and Prepping In Progress
So I experimented with fussy cutting and layering, and learning about how different a fabric looks when I cut a TINY piece for appliqué ..  This is primarily a learning exercise for me.  I have no idea what I'm supposed to do with this thing once it's finished.  However, I did want to finish it for the following reasons:

  1. To practice invisible machine appliqué -- a technique that I hope will enable me to make MORE appliqué quilts than I could ever finish by hand.
  2. To decide how I like the stabilizer Karen had us using.  I wanted to see whether this iron-on stuff would stay on well enough and long enough for me to finish all of the appliqué stitching, and I wanted to find out how easy it was to remove the stabilizer from the back of the work once stitching was complete (that part was NOT fun, folks!).
  3. To find out whether or not the tracing paper marks on the background fabric wash out completely from the finished quilt.  I'm REALLY nervous about the dark lines against the lighter areas of my fabric in particular.  Evidently it was not necessary for me to be pressing so hard when I was tracing the pattern onto my fabric!  Some of my friends who were also in this class have tried and failed to remove those lines from their projects, but I don't know of anyone who has actually quilted it and washed it in the laundry to see if the lines come out.   Meanwhile, the longer the marks stay on my fabric, the better a test it is of whether I'd be able to get the marks out of a large quilt once I was finished quilting it.
  4. This is going to be good longarm quilting practice for me, too.  I've got some other applique quilts in my pipeline that are important to me, but my longarming skills are not ready to tackle them yet.  So the final reason for finishing this piece is so I can use it to practice quilting around appliqué on the longarm machine.

Dark Placement Lines from Dressmaker's Transfer Paper
See what I mean?  But, worst case scenario, I'll just add some kind of embellishment around the alien marbles with heavy decorative thread at the tail end of the project if those lines don't come out, and then I'll know for next time.


Removing Stabilizer With Tweezers
Removing the stabilizer from the back was really annoying, by the way -- much worse than removing foundation paper piecing patterns, because the size 60 needle we used for the invisible machine applique makes much tinier holes than the size 90 needles I use for foundation paper piecing.  So the stabilizer isn't perforated quite as well as I'd expected, even though the stitches are super tiny and the needle holes are much closer together than they are for paper piecing.


Invisible Machine Applique Stitch, Tweaked Again
By the way, I tweaked that stitch again and made it even shorter when I was going around those 3/4" circles.  I just felt like I needed the swing "bite" parts of the stitch closer together to secure the circles properly.  Honestly, once the circles are prepped and glue basted, they would have been so much easier to stitch by hand than constantly pivoting around that tight curve on the machine.  However, larger shapes with straight lines and gentle curves are much faster to stitch by machine.  I was glad that Karen mentioned in class that she sometimes combines hand stitched and machine stitched appliqué in the same project; that makes perfect sense.


Hey, Have any of you made a Double Wedding Ring quilt before?  Any advice, suggestions, or tutorial links to share?  

Let me know in the comments!   Because there's one more thing I want to show you guys.  A woman recently contacted our quilt guild after discovering a WIP/UFO (Work In Progress/UnFinished Object) in her late grandmother's attic.  She is looking for someone to finish it for her, and it's a bed size Double Wedding Ring.  Of course no one raised their hand, because most people know enough to keep their hands down and their mouths shut to stay out of trouble.  But I was curious and couldn't resist at least taking a look at it.


I Do Know Better, But Still...
I made no promises and told the woman I'd need to see the project in person to make recommendations and give her a quote, but she sent me this photo in the meantime.  The resolution isn't good enough to blow it up any larger, but it looks well-pieced and pretty flat, don't you think?  Pretty, cheerful colors, too, and that makes a HUGE difference because I hate working on projects that don't appeal to my personal aesthetics.  When I see it in person, I'll discuss options with the granddaughter.  She did tell me that everything is all cut out already and she thinks her grandma finished piecing all of the rainbow arcs.  If the cutting and piecing are accurate and the completed portions are laying nice and flat as they should, this should be doable, right?  I can give her some options, too -- even if grandma intended to make a bed quilt, we could just add enough to what she's done to get it to a throw or wall hanging size, or even make a couple of pillows from the already pieced section.  I do seem to have a soft place in my heart for rescuing grandma quilts, especially the ones that have the most potential to become a can of worms...

Anyway, you'll have to wait until the end of the month to find out whether that quilt is coming home to my vintage quilt hospital studio, because next week is Anders' 16th birthday on Tuesday and then we are moving Lars into his freshman dorm at Appalachian State University on Friday.  YIKES!!  

Have a wonderful week, everyone!  I'll be linking up with:

SUNDAY

·      Slow Sunday Stitching at http://kathysquilts.blogspot.com/  
·      Oh Scrap! at Quilting Is More Fun Than Housework http://quiltingismorefunthanhousework.blogspot.com

MONDAY

·      Design Wall Monday at Small Quilts and Doll Quilts http://smallquiltsanddollquilts.blogspot.com 
·      Main Crush Monday at Cooking Up Quilts http://www.cookingupquilts.com/
·      Monday Making at Love Laugh Quilt http://lovelaughquilt.blogspot.com/
·      Moving it Forward at Em’s Scrap Bag: http://emsscrapbag.blogspot.com.au/
·      BOMs Away at Katie Mae Quilts: https://www.katiemaequilts.com/blog/ 

TUESDAY

·      Colour and Inspiration Tuesday at http://www.cleverchameleon.com.au

WEDNESDAY

·      Midweek Makers at www.quiltfabrication.com/
·      WOW WIP on Wednesday at www.estheraliu.blogspot.com

THURSDAY

·      Needle and Thread Thursday at http://www.myquiltinfatuation.blogspot.com/  

FRIDAY

·      Whoop Whoop Fridays at www.confessionsofafabricaddict.blogspot.com
     Beauty Pageant at www.frombolttobeauty.blogspot.com
·      Finished Or Not Friday at http://busyhandsquilts.blogspot.com/
-->
·      TGIFF Thank Goodness It’s Finished Friday, rotates, schedule found here: http://tgiffriday.blogspot.ca/p/hosting-tgiff.html