Showing posts with label Curved Seams. Show all posts

Tuesday, April 2, 2019

Mission Impossible: How to Machine Applique Something to Nothing

Good morning, my lovelies!  I am happy to report that I actually achieved my goal of completing all 48 foundation paper pieced flying geese arcs by the end of March.  I had to cut back on some other commitments to free up for sewing time, but Lars's graduation quilt (which I had tentatively named Geese In Circles but have now renamed Mission Impossible: Graduation 2019) is now on schedule again.  Yay!


Four 12 Inch Blocks Done, Forty-Four More Blocks to Go


My To-Do Tuesday Goal for This Week is to complete the inner and outer curved piecing on at least 24 of the 48 blocks

As you can see above, I've already got four of those 24 blocks sewn together.

And...

My One Monthly Goal for April is to complete the inner and outer curved piecing on all 48 blocks, AND get the blocks sewn into a finished top.  

Mission Impossible, 72 x 96, My Original Quilt Design Created in EQ8

Oh, and for me, April only has 21 days because I'm leaving for Spring Quilt Week in Paducah the day after Easter.  But now that I've tinkered around and figured out the fastest, easiest, and most accurate method of piecing each of those curved seams, I am expecting nothing but smooth sailing ahead, seriously!  Who knew I could put a quilt together from start to finish in less than a year?!  (There is NO WAY I could do this without my mom helping me and keeping me on task.  She'll be here at 1 PM today and she's not going to let me leave the studio until 5 PM).

But, before I get back to sewing, I wanted to document for myself -- and share with anyone else who's interested -- my sneaky method for sewing the inner curve of this block.  Sewing the outer curve -- the skinny L-shaped piece that gets sewn to the flying geese -- is easily accomplished via traditional curved piecing using plenty of pins.  


This Outer Curve Is Easy
But the other curve was giving me all kinds of grief because the foundation paper pieced geese are stiff as cardboard from all of the starch I used (and I'm NOT giving up my starch, so don't go there!) and I was having a horrible time trying to manipulate that stiff, flat pieced section in order to pin it to the quarter oval circle piece.  


...But This Inner Curve Was A Monstrous, Miserable Mess!

Appli-Piecing, Curved Piecing a la Applique, or the Fast and Easy Way to Applique Something to Nothing

First of all, let's give credit where credit is due.  I did not dream this up completely on my own (which gives me great confidence that, as kooky as it seems, this IS a legitimate way to sew a quilt together successfully).  I'm borrowing from the methods that Harriet Hargrave teaches and shares in her (sadly out-of-print) book Mastering Machine Applique: The Complete Guide Including Invisible Machine Applique, Satin Stitch, Blanket Stitch, and Much More , the method that Caryl Bryer Fallert-Gentry once taught and now offers as a free tutorial on her web site here, and the method that Vicki Pignatelli explains in her book Quilting Curves: An Innovative Technique for Machine-Piecing Curves with Incredible Ease. I'm not following any of these teachers' methods exactly, but I would never have dreamed I could piece a block this way if I hadn't read their books, taken the class, and stored their techniques away in the back of my mind for a rainy day like today when I needed to come up with a better way of getting these blocks sewn together quickly.  I stand on the shoulders of giants!


Step One: Print the Quarter Moon (Convex) Curve Shape Onto Heavy Cardstock, With Seam Allowances

Since I designed my quilt using EQ8 software, I have all kinds of options for printing out templates for the nonstandard shapes in my quilt design.  I printed this particular template out WITH 1/4" SEAM ALLOWANCES.  My curved piece is too large to fit on a single 8 1/2" x 11" sheet of card stock and I didn't have any legal size card stock on hand for my printer, so I printed it on two sheets of card stock, matched up the registration marks, joined those together with packing tape, and then glued that template onto a big sheet of poster board left over from the kids' school projects.  I cut my template out carefully, leaving the seam allowances on the outer edges of the block -- the straight sides that meet at a right angle -- but I cut right on the seam line along the curved edge, as smoothly as I could manage.

Double Card Stock Template With Curved Seam Allowance Trimmed Away
Placing the template UPSIDE DOWN, I traced it onto the dull side of my freezer paper 48 times.  I might be able to use these freezer paper templates more than one time, but for speed and convenience' sake I opted to just trace one for every block and rolled the paper right back up into the box.  I'll cut them out one at a time, as needed.

At first, I was annoyed that my traced line was landing slightly outside of the template rather than right on the edge due to the thickness of the tip of the pen or the angle of the sharpened pencil point, but then I tried a cheap mechanical pencil and was delighted to discover that I could get my traced line to land exactly at the edge of my double card stock template, without any sliver of white paper showing in between.

Mechanical Pencils Worked Best for Tracing Templates Onto Freezer Paper
My purple quarter oval pieces had been previously rotary cut (I'll show you how we made our own acrylic templates for rotary cutting soon, I promise!), so my next step was to carefully cut out one of the traced freezer paper templates -- cutting just INSIDE the pencil line -- and iron it to the back side of one of the purple quarter oval fabric pieces.  Because I only removed the seam allowance from the curved seam line, I can line the two straight sides of my freezer paper up with the raw fabric edges on the fabric.  The curved seam allowance extends beyond the edge of the freezer paper and there's no need to worry about whether it's exactly a quarter of an inch or not, as long as the freezer paper lines up exactly with those two straight edges.  I ironed the freezer paper to the fabric with a hot, dry iron.
Freezer Paper Ironed to Wrong Side of Purple Shape, Shiny Side Down

Step Two: Pre-Turn the Seam Allowance Using Starch or Starch Alternative and a Hot Iron

Next, I used a small stencil paintbrush to dab Mary Ellen's Best Press Starch Alternative just along the exposed curved seam allowance, and then used the tip of the hot iron to swipe the  seam allowance back over the edge of the freezer paper, careful to maintain that smooth curve that I worked so hard to trace and cut accurately.  (This is how I learned to do "starch and press" applique from Erin Russek's tutorials, but on itty bitty leaves and bird beaks -- it's MUCH easier to manage on a large, gentle curve like this one).  I could spray regular starch into the cap to liquify it for this step, but I like to use Mary Ellen's Best Press instead because it smells like lavender and who doesn't like a little aromatherapy in the sewing room?
Using Freezer Paper, Best Press and a Hot Iron to Pre-Turn the Seam Allowance

And now comes the scandalous part, because everyone who knows what they are doing uses some kind of foundation or background fabric for their machine applique, even if it gets cut away after stitching.  Go ahead and tell me all of the 10 million reasons why this won't work in the comments, but I'm going to keep on doing it anyway because it worked for me!  ;-)

The challenge comes from the need for these blocks to all finish at exactly 12 1/2" so they will fit together accurately when I sew them into a quilt top.  So for each block, that easy outer curve gets sewn first using the traditional piecing methods.  After piecing that curve, I carefully press the pieced unit with the seam allowance pressed towards the purple fabric, moving my iron only in the direction of the fabric grain with NO steam, and checking that the outer edge of the block remains at a nice right angle.  Then it gets set with STARCH because, as you know, I am in love with starch and will not give it up no matter what anyone says.  (Didn't a band called S.O.S. have a hit song about starch back in the '80s?  I think it was called "Just Be Good to Me."  People always talkin' bout the bad things you do, You never do them to me... But I digress.)


Okay, now that we've danced our sillies out with my favorite Love Anthem to Spray Starch, we can get back to quilting!  Because I can almost guarantee you that if you try this without using starch to stabilize your fabric to a paper-like crispness, you are going to have trouble appliqueing the sections together in thin air.  The freezer paper backing on my curved inside purple piece makes it stiff and stable like a piece of paper, and the heavy spray starch on the rest of the block makes that part as stiff and stable as a piece of paper, too.

Smooth, Stiff, Square, Starched, and STABLE!  Ready to Go!

Step Three: Line Up the Block Sections and Glue Baste the Seam Together

I take the crisply starched, completed section of my block over to the cutting mat on my worktable and I line the right angle corner up with the 12 1/2" marks on both the top left and bottom right corners of the block, and then I use pattern weights to hold the block in place.  [NOTE: I was not able to find a link to my own pattern weights on Amazon, although they do have others and I know you can get some at your local JoAnn's as well.  I probably purchased my yellow donut-shaped pattern weights from a drapery workroom wholesaler years ago. ]

Lined Up On the Cutting Mat Grid and Trapped In Place With Pattern Weights
Next, I take the purple inner curve piece, the one with freezer paper ironed to the back side and the seam allowance already starched and pressed smoothly over the curve, and I lay that piece on my cutting table with the right angle right on the zero lines at the X and Y axes, like so.  

My purple shape with its preturned seam allowance overlaps the partially pieced portion of the block by -- you guessed it -- a quarter of an inch!  When the purple piece is aligned just right, I weight it down with the pattern weights to hold it in place, too.  

Perfectly Aligned, Firmly Weighted In Place, Ready to Glue Baste
Now, on my cutting mat, all I have to do is temporarily secure those two seam allowances together using Roxanne's Glue Baste-It and a very fine tip glue nozzle.  With the already pieced section of the block remaining flat on the cutting mat, I'm lifting up the curved edge of the quarter oval piece just enough to apply glue to that preturned seam allowance.  

Gluing the Preturned Seam Allowance of the Convex Curve to the Flat Seam Allowance of the Concave Curve
I want small dots of glue spaced closely together all along the seam line rather than large globs of glue spaced farther apart, because nothing else will be holding these block sections together on the way to my sewing machine.  The freezer paper backing is stabilizing the purple curved piece and the rest of the block is stabilized with a reckless amount of spray starch applied throughout my piecing process, and this final curved seam is held together with nothing but those tiny droplets of water soluble glue.  Terrifying, isn't it?!  I heat set that glued seam with my hot iron just to dry and set that glue, and then I take the block over to my machine for stitching.

Step Four: Stitch the Curved Seam from the RIGHT Side Using Monofilament Thread and Invisible Machine Applique Blindstitch

On my Bernina 750QE, I'm stitching this seam using Vari-Overlock Stitch #3 with stitch length reduced to .90, stitch width reduced to 1.0, Mirror Image engaged, and needle reset to center position.  I'm using Open Embroidery presser foot #20D with Dual Feed engaged, my 5.5 mm stitch plate (that's why the Security Function icon is lit up) and I've also engaged the Memory function to remember my settings in between sewing sessions.  

Stitch Recipe for Curved Applique Piecing on My Bernina 750QE
I'm using invisible monofilament thread in my needle, the Smoke color this time due to my very dark fabrics, and that's why I've reduced my tension down to 2.5.  (MonoPoly and YLI are my favorite brands).  My needle for this extremely fine thread is the smallest size you can buy, a Schmetz size 60/8 Microtex needle, to make the smallest possible hole and to position those stitches as close to the edge of my appliqued fabric as possible, and I'm using Mettler 60 weight cotton embroidery thread in a neutral medium beige color in my bobbin.

Sewing the Seam from the Right Side of the Block
Sewing with the purple quarter oval section on the left and the flying geese on the right, I position my needle on the flying geese section but rubbing up against the raised ridge of the preturned seam allowance of my purple fabric, just like I was going to do Stitch-In-the-Ditch quilting.  As my machine sews the straight stitches, I want to keep that needle as close to the hump of the seam allowance as I can without accidentally catching any purple fabric in the stitch.   


Straight Stitches Go On the Low Side of the Seam, But the Needle Rubs Right Up Against the Purple

After every two straight stitches, the needle swings to the left and catches just a few threads of that purple fabric, enough to secure the seam but not enough to be visible with my monofilament thread.  
Catching Just a Few Threads With the Zigzag Swing "Bite"
I had to zoom in a ridiculous amount to show you that because I am seriously grabbing only two or maybe three threads of that purple fabric in the zigzag stitch.  I would make the stitch even narrower to only grab 1-2 threads if I was just doing regular machine applique for little leaves and flowers or whatever.  I decided on a deeper swing bite because these are construction seams and I didn't want to have to go back and restitch anything if I missed the edge of the purple fabric altogether in some spots.


Stitching Merrily Along...
I'm running my machine at a fairly slow speed for this, since the placement of every needle hole is of paramount importance.  The bright LED lighting on this machine is a huge help, as is the FHS Free Hands System that lets me raise the presser foot slightly to pivot around the curve without removing either hand from the work.  (A friend of mine who has the same Bernina model uses the Hover feature in the same way -- I need to try that one of these days!)
The Invisible Seam Has Been Sewn
Check out my lovely finished seam, that I had to zoom in on a ridiculous amount in order for you to see it in the picture at all.  By the time this quilt is layered with batting, quilted, and washed to remove all the glue and starch and markings, those needle holes will close up and only the most obnoxiously eagle-eyed quilt police with magnifying glasses will ever know that I didn't piece this curve the "normal" way.


Same Seam Viewed Up Close, But Without Magnification
Even now, it's pretty darned invisible.  It was fast and easy to stitch, too -- faster and easier to stitch than it was to explain in a blog post!  And, because I'm working from the right side of the block and used the grid on my cutting mat to ensure a square, perfectly sized block, there's no room for goofing and NO SEAM RIPPING.  Did you see those beautiful triangle points, by the way?  That was a cinch, since I could see them while I was sewing instead of having them hidden inside a gathered and pinned seam allowance.

Step Five: Peel Away the Freezer Paper Backing and Give the Block a Final Pressing and Starching!

Back of Block After Stitching
As you can see in the photo above, that purple piece really is securely attached to the flying geese section of this block.  Remember that the straight stitches you see in the flying geese seams are super small 1.5 mm stitches in order to perforate the foundation paper well enough for easy removal.  There are two very strong, very tiny straight stitvhes between each of the zigzag swing bites, and those swing bites are close enough together that they really are creating a strong seam.  Imagine if this was an invisible applique stitch someone had done by hand, but they were knotting to secure the thread before and after each and every applique stitch -- THAT's how strong this seam is.  Much stronger than a hand pieced straight stitch seam would be.  Maybe as strong as a hand pieced backstitched seam would be...  Anyway, it's good enough for me!


The First Four Blocks Completed!
Since I used starch to press the seam allowance over the freezer paper edge rather than glue, and since the zigzag bite is so tiny, the freezer paper comes off easily all in one piece with no straggly bits left behind in the seam allowance, and without any distortion of the curved seam.

Voila!

So, now that I've worked out the kinks in my methods, the plan is to sew all of those outer curves(traditionally pieced) first on my Goldilocks Bernina 475QE, which is set up for traditional curved piecing, and then sew the inner curves on my Big 'Nina 750QE, which is all set up for the invisible machine applique.  

I'm off to the studio for some mad sewing, but first I'm linking up with:


MONDAY

·      Design Wall Monday at Small Quilts and Doll Quilts http://smallquiltsanddollquilts.blogspot.com 
·      Main Crush Monday at Cooking Up Quilts http://www.cookingupquilts.com/
·      Monday Making at Love Laugh Quilt http://lovelaughquilt.blogspot.com/
·      Moving it Forward at Em’s Scrap Bag: http://emsscrapbag.blogspot.com.au/
·      BOMs Away at Katie Mae Quilts: https://www.katiemaequilts.com/blog/ 

TUESDAY

·      Colour and Inspiration Tuesday at http://www.cleverchameleon.com.au
·       To-Do Tuesday at Stitch ALL the Things: http://stitchallthethings.com

WEDNESDAY

·      Midweek Makers at www.quiltfabrication.com/
·      WOW WIP on Wednesday at www.estheraliu.blogspot.com

THURSDAY

·      Needle and Thread Thursday at http://www.myquiltinfatuation.blogspot.com/  
-->

Monday, May 14, 2012

Plodding Along, In Circles

Hello, friends and family!  I hope everyone had a wonderful Mother's Day yesterday. 

I think I'm about halfway done with the free motion ditch quilting around the circles on Lars's "Drunken Dragons" Drunkard's Path quilt.  Thanks to the invisible nylon monofilament thread, the stitching is practically invisible on the front of the quilt -- oopses and all -- but on the back of the quilt you can see the grid of straight stitching that I did along the straight seamlines and the outlines of the circles.  I'm not using that BSR thing to control the stitch length, but I feel like I'm doing alright without it for this task.  The hardest thing is controlling the bulk of the big, heavy quilt while I try to move it in a big, huge circle without any jerks or tugs.  I have lots of jagged spots on my circles if you look closely on the back, so we won't be posting any more close ups of the back from here on out.

One of the sales ladies at the Bernina dealership has agreed to give me a one-on-one lesson on Thursday to show me how to stop and start the expensive BSR Bernina Stitch Regulator contraption and how the different modes work, because the directions that came with the darned thing are atrocious.  People look at me like I'm crazy when I say I can't get the BSR to work for me, which means there must be something REALLY EASY that I'm missing.  My issues are:
  1. I'm unclear about how to start and stop a line of quilting stitches in each of the two stitching modes of BSR.  I need the first 5-7 stitches and the last 5-7 stitches of every line of quilting to be really tiny so they don't pull out when I clip the thread tails.  How do I secure my stitches in Mode 1 if the sewing machine is going to make all of the stitches the same length? 
  2. I'm trying to stitch 11" diameter circles, but I can only control an area of about 4-6" at a time.  That means I slowly sew for a few inches, then need to stop to reposition my hands.  When I pick up my hands to reposition them, the fabric always moves just a smidge, and the BSR laser contraption picks up on the fabric movement and starts sewing again before I'm ready.  How do I disengage the BSR long enough to move my hands?
  3. I tried to use my needle stop down function to make sure nothing shifts when I use my hands, but that's a problem, too -- with BSR, the machine starts stitching when the fabric MOVES, but when I'm ready to start sewing again I can't move the fabric when the needle is sticking down into it.  Am I supposed to use needle stop down, and then manually raise the needle again when I'm ready to stitch?  Then I have to take one of my hands off the quilt to raise the needle, and then the fabric shifts again and my quilting line gets a crooked little snag.
  4. Finally, on  my 18" practice sample, I was not getting even stitches with my BSR at all.  For one thing, most of the stitches were much shorter than the length I had set the machine to.  Then there would be random LOOOONNNNG stitches here and there.  Maybe I was moving the fabric too fast at that point?
Anyway, I'm keeping an open mind about the BSR until I have the dealer walk me through it on Thursday.  Then on Friday I'm taking a beginner machine quilting class at a store about an hour away from me while the kids are in school, and that class won't have anything to do with the BSR because it's a Brother dealership, not Bernina hosting the class.  One way or another, I'm going to learn how to do this.  Saturday morning I have another embroidery software mastery class.  The irony is that, with all these sewing classes, there isn't much time left over for actual sewing!

Have a wonderful week.

Tuesday, May 8, 2012

Free Motion Circle Quilting FINALLY In Progress!

Free Motion Ditch Circle, Backing Side
Lars's Drunken Dragons quilt has been languishing in my studio untouched for the past three weeks, ever since my disastrous initial attempt to quilt "in the ditch" along the 11" diameter circular seamlines.  I experimented briefly with both Mode 1 and Mode 2 of the Bernina Stitch Regulator (BSR) attachment, which is supposed to make free motion quilting easier by automatically regulating stitch length.  For me, at least with the task of trying to place stitches precisely along the seamline, the BSR felt like a crazy robot driving the sewing machine out of control.  Every time I stopped to reposition my hands on the quilt, the machine started sewing again before I was ready.  Maybe I need more practice with the BSR, and the instructions that came with it are horrible -- maybe I wasn't using it correctly.  For instance, the instructions say "disengage the BSR function" but NOWHERE in the instructions does it say HOW to disengage the BSR function.  Tap the foot control?  Press a button somewhere?  Your guess is as good as mine!

Bernina Freehand Quilting Foot #29
Anyway, yesterday I removed the BSR foot and replaced it with Freehand Quilting Foot #29 to try some old school free motion quilting.  Feed dogs down, upper tension reduced for the monofilament nylon thread, and we're flying without a safety net!  There are a number of different feet you can use for free motion quilting.  What they all have in common is that spring in the shank.  Foot #29 is the one Bernina recommends for freehand quilting without the BSR function, and the clear plastic sole of the foot is supposed to give you great visibility so you can see where you're stitching.  Sounds great in theory, but when I was using this foot yesterday I found that the sewing machine light on the shiny clear plastic created a terrible glare that made it impossible to see my seamline accurately through the clear plastic foot.  I pulled out my Feetures books and discovered that there's another foot, Freehand Embroidery Foot #24, that would probably work better for this task.  Amazingly, I do not already own this presser foot.  My Bernina dealer is out of stock but expects it to come in with their next shipment in a few days, so meanwhile, I'm stuck with my clear foot.

Free Motion Quilting "In the Ditch" with Foot #29
Bernina Freehand Embroidery Foot #24
See what I mean about the glare?  The foot I'm waiting on has an open toe front, which should make it a lot easier to see the seamline I'm trying to follow.  I don't have any idea why they call it an embroidery foot -- I would think the ends of the open toe would get caught in long satin stitches if you were using it for embroidery.

Oh, and notice the gloves in the photo above?  I have a couple pairs of quilting gloves with rubber fingers, which are supposed to make it easier to grip the fabric of the quilt.  I hate wearing gloves, but I'm trying to be open-minded so I'm wearing them for now. 


Close Up of my Non-BSR Free Motion Stitching, Backing Side

The stitching itself is far from perfect as you can see in this picture from the backing side.  I am really happy with the busy print I chose for the backing, because from a distance the wobbly lines aren't noticeable at all. 

Close Up Non-BSR Free Motion Ditch Quilting, Top Side with Invisible Thread


From the front of the quilt, the mistakes and unevenness are even harder to see, thanks to the monofilament nylon invisible thread.  When the quilt is washed for the first time, it should shrink and pucker a little even though the fabrics are prewashed and the batting is a silk blend, and that will camouflage the ooopses even more.  It's not perfect, but it's good enough.  I have a feeling that each circle will come out a little smoother than the last one as I work my way through the quilt.

I don't forsee any quilting time today, though.  I have to get in the shower now so I can vote against Amendment One, even though the latest polls indicate that it's likely to pass.  Honestly, I don't see what the fuss is about.  Why do so many straight people feel threatened by gay marriages? 

After voting, I'll head straight to my piano lesson, and from there I pick up the kids from school.  We'll be rushing through homework and dinner tonight so we can make it to Night of the Arts, where Lars and Anders will be playing trombone and recorder with their classmates in their school's annual arts extravaganza.  Less than 5 weeks of school remain before summer vacation! 

Sunday, May 6, 2012

Bernina Embroidery Software v6: Manual Digitizing Homework


Bernina Embroidery Software Homework Completed!

Ta da!  Behold, my completed manual digitizing homework for my Bernina Artista Embroidery Software v6 class!  We started with this palm tree artwork (seen below) in the background, and built the embroidery design one object at a time, with right-clicks and left-clicks and stitch angles, oh my!  This simple exercize took me several hours to complete, both inside and outside the classroom.  I have new appreciation for the talents and abilities of professional digitizers!

Palm Tree Artwork Used in this Exercize
I am not going to bother with stitching my wonky palm tree out on the machine.  Truth be told, I doubt I would ever go to all the trouble of creating an embroidery design completely from scratch.  The software manual is almost 600 pages long; it's pretty complicated stuff.  I mostly use my embroidery software for combining or editing professional designs, or for embroidering with lettering.  Still, it's good to go through all the classes because you never know where you might pick up a useful morsel of information.  For instance, on the Drunken Dragons quilt that I'm temporarily avoiding, I was planning to use my embroidery module to quilt fancy designs in the center of each pieced circle, but wasn't sure how to handle the half circles on the edges of the quilt.  I learned that I can open the professional quilting design in my embroidery software, convert the embroidery design to vectors, use the eraser tool to erase half of the quilting motif, and then reconvert it to embroidery and save as a new design to use on those half circles.  So that's one hurdle that I can deal with -- if only I can get the free motion quilting down so I can stitch in the ditch on the curved circular seamline!

I should send my kids to the classes and have them learn how to use the software.  They'd be scanning in pictures of Lego Ninjago warrios and filling them in with all kinds of funky stitch patterns!  Speaking of Lars and Anders, they have been busy performers lately.  They were in four performances of Beauty and the Beast Jr. at their school last week, and their piano recital was earlier this afternoon.  They will be performing on their recorder (Anders) and trombone (Lars) with their classes again on Tuesday evening for the school's annual Night of the Arts, and I understand they will each have artwork for sale prior to the concert.  Busy, busy boys!

Sunday, October 23, 2011

Quilting at the Speed of Natural Selection: The Drunken Dragons Quilt Continues

First Seven Blocks of Lars's Drunken Dragons Quilt Completed
There's no such thing as "Quilt-In-A-Day" at my house.  I like to quilt at the speed of natural selection, so slowly that progress is barely perceptible...
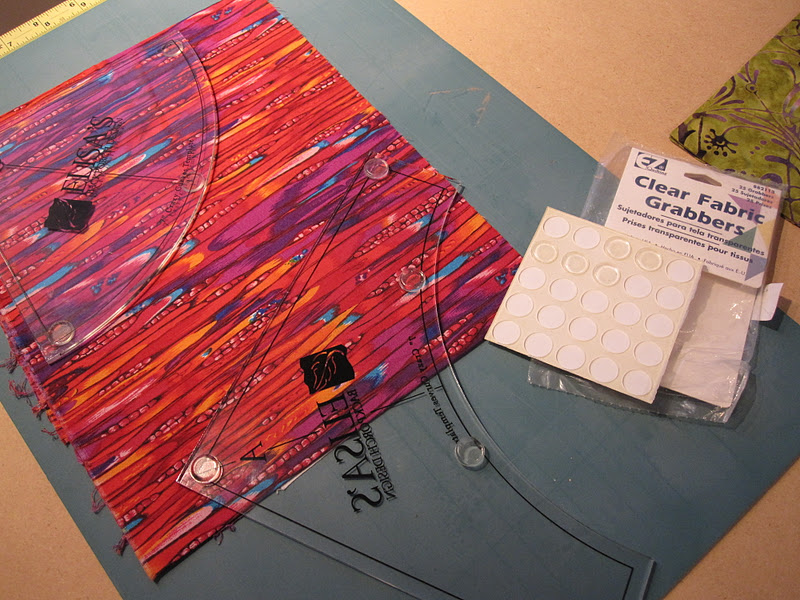
Anyway, I had seven blocks finished by this afternoon.  I'm starting to get the hang of this.  Initially, I was having some issues rotary cutting with my templates -- the templates were slipping, shifting slightly on the fabric between cuts.  I tried out these Fabric Grabbers, which remind me of the little rubber stickies that you put on the edges of cabinet doors to prevent slamming. 
Fabric Grabbers applied to Drunkard's Path Templates
I haven't made up my mind about the Fabric Grabbers yet.  They completely eliminate the slipping and sliding -- BUT-- they raise the acrylic templates about an eigth of an inch from the fabric surface.  So now I'm getting a little distorion and movement of the fabric between grabber dots.  In order to eliminate this problem, I would need to put a lot more dots around the edges of the templates, and I don't have any more of the dots.  I really wish there was a flatter, thinner version of the fabric grabber product out there.  One of my acrylic rulers comes with grabby areas already on it; I wish I could make these little templates like those rulers.  Anyway, the Grabber dots are on the templates for the time being. 

UPDATED December 3, 2011:  I ended up taking the Fabric Grabber dots off all of my templates and rulers and I will not use them again.  Because they raise the templates up off the fabric, use of this product results in fabric shifting under the template while I'm cutting, creating a level of distortion that is unacceptable to me.  I'll be on the lookout for something thin and flat that I could put on my rulers and templates to reduce slipping without sacrificing accuracy, and I'll post about it if I find something that works.  I'm considering trying plain old double stick Scotch tape, but I'm guessing that so much fabric lint would get on the tape that I'd have to replace the tape on my ruler after each and every cut, which would be really annoying...

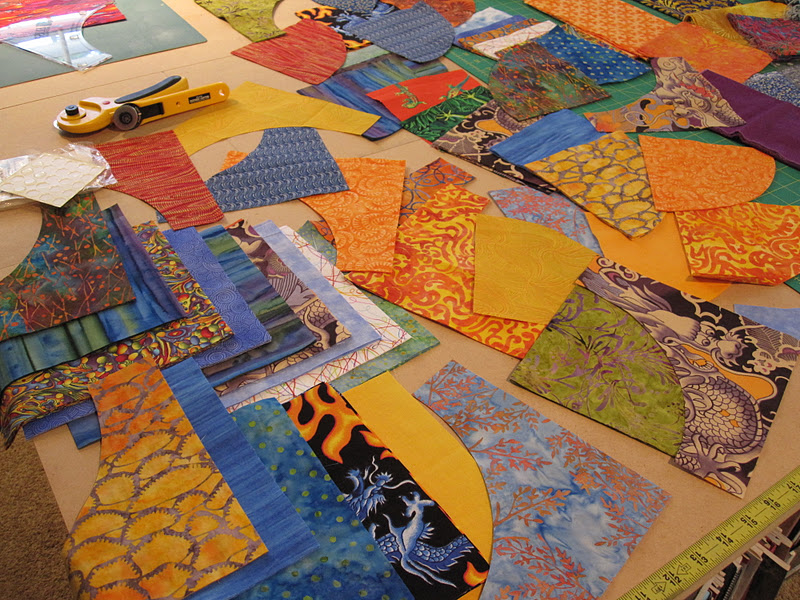
Here you can see I have quite a few pieces cut.  I'm not keeping count, but I've cut four of each shape from most fabrics.  Now I'm playing around with them, matching them up as I go along.


The batiks are my favorites, and because they tend to be a little stiffer and more tightly woven, they are also more stable on the bias curved edges than some of the other fabrics. 

You know, when I was researching construction options for these blocks, I found some sources who said pinning the pieces together prior to sewing them was "optional," but for me, it's been absolutely crucial.  With these 7" blocks I'm getting the best results when I use eight pins.  First I fold each piece in half to locate the center, and then I fold the edges in to the center mark to find the center of each half.  I line up the fold marks on the two pieces (making sure the straight fabric edges remain parallel to one another), and the first pin goes in the center, like this:

Next, I pin the outside edges together, like this:

Then I match up the quarter marks on the top and bottom pieces and put a pin there as well.  The pins I'm using are extra-fine silk pins, and they go perpendicular to the fabric edge and go through the fabric twice.


In the photo above, you can see how the opposite curved fabrics still twist away from one another on the left, where I haven't yet placed the final pin, but the curves are lined up nicely on the right where the additional pin is in.


There, now this block is completely pinned and ready to stitch.  It's important to pin in this order -- center, end, quarters, and then eighths -- because it helps evenly distribute the fullness so you have a nice, flat edge to stitch.  You'll use your finger to flatten the area between pins as you stitch, making sure those fabric edges remain perfectly aligned with one another and with the edge of your presser foot (if you're using Bernina Foot 37) or whatever else you're using for your scant 1/4" seam guide.
I know my fingers look creepy so much larger than life, but I wanted you to see how my left hand is keeping any pleats or creases from forming in the stitching line.  Honestly, the trickiest thing about these Drunkard's Path blocks is getting them pinned together well, and after that it's as easy to sew them together as any straight-edged pieces would be.

My eyes started to get tired and the little crease marks I was making to divide my fabric pieces into halves and fourths were difficult to see on some fabrics, so I eventually started to mark little ticks with a piece of tailor's chalk in the seam allowance instead of folds.  I have a big cigar box full of these little wedges of tailor's chalk that my mother-in-law gave me -- my husband's grandparents on both sides were tailors and this box of fabric markers belonged to them.  So Lars's quilt is being made with notions used by his great grandparents.  How cool is that?
MUCH easier to see then little folded crease marks!
Here's that block from before, all sewn together.  There's just a sliver of the blue fabric peeking at the edge, but the seam is pretty darned accurate.  Let's press it open and take a look at the finished block:
Ta-da!  Piece of cake!

You know, I've thought about it some more, and the oversized Drunkard's Path blocks I'm making might actually be MORE difficult than the smaller ones, because the curved seam is longer and if you don't get it pinned well, there's a greater chance something will slip or stretch along the long, bias-curved seam.  The bigger blocks are probably easier to cut with the rotary cutter, but maybe the smaller blocks would be easier for begginers to sew after all.

Now that I've worked out my process, I don't have to continue one block at a time.  I sat down and pinned several blocks at once so I could chain-stitch the patches.  Here they are, all ready to be fed to the Sewbaby:

When I called it quits for today, I had a total of seventeen blocks finished for Lars's quilt:

By the way, this is not how I intend to lay the blocks out in the quilt.  I'm just moving them around right now to get a sense of what colors and values I have, so I know what to make more of and what to back away from.