Showing posts with label Sewing. Show all posts

Saturday, June 28, 2025

Legacy of Love: Mom's Life, in Stitches

Friends, I have been procrastinating writing this blog post, just as I have been postponing calling the probate attorney and the banks and the insurance companies and everyone else you're supposed to notify when someone dies and you've been assigned these responsibilities in their will.  Honestly, I just want to call my mom and complain about how everything sucks right now, but she won't answer.  Her phone is right in front of me in a ziplock bag on my desk, along with her Apple watch, her drivers license, her passport, and her car keys.  All of this is very weird and feels very, very WRONG.


Me and Mom, Naples Zoo, December 28, 2024


My mom, according to the funeral home lady, is "in the lovely blue urn you selected," which makes it sound like she's Barbara Eden in "I Dream of Jeannie" and she will pop out wearing harem pants and granting wishes.  Which is exactly what I would tell my mother if I could call her right now, because that would make her laugh.  My brain understands that my mom is gone and that death came as a blessing to end to her suffering.  However, my heart wants to believe that, if I call her tomorrow, she will answer her phone.  


Last Selfie With Mom, June 4, 2025


This was my last selfie with Mom when I got to Austin late in the afternoon of June 4th.  She had been in bed for three days straight before that, but insisted on getting dressed and moving to the recliner in the living room because I was coming.  I had no idea she only had three days left, two days really because she was unresponsive for most of the day Saturday before she passed.  Her decline over that 72 hour period was just unbelievably fast, even catching the hospice team by surprise -- they did not have the morphine available in the house yet because they had "staged" her as not being close enough to needing it.  Anyway, I don't want to dwell on those few days because that's not how my mom would want to be remembered.  I did write her obituary and it's online here, but there were a few more things I wanted to share here:


The Kangaroo Costume Mom Made for My Son Lars in 2018


That's a kangaroo costume my mom sewed for my son Lars, for one of his high school theatre class projects.  She also sewed some costumes for a middle school production of Legally Blonde that my son Anders was in, dozens of figure skating costumes for my sister Susan...  I wish I had photos of more of mom's projects to share with you.

Sunday, July 7, 2024

Planning (and Overthinking) a Style Arc Nova Midi Dress

Hello, my Lovelies, and Happy Summer (to everyone in the Northern hemisphere)!  Happy Independence Day Weekend to everyone in the United States!  Today's post is going to contain zero quilting, because my creative brain is chasing a different rabbit today.  I don't have enough "Florida Clothing" in my closet and I hate the way everything looks/feels/fits that I've tried on in stores.  My sister bought me a couple dress patterns that I've had on my wish list for awhile and I've decided to sew up the Nova Midi Dress from the Australian indie pattern company Style Arc  (this post contains affiliate links).


One of the coolest things about garment sewing in the Internet age is that it's so easy to find pictures, reviews, tips and tweaks suggestions from people of all shapes, sizes, and ages who have already sewn up the pattern you're considering.  The photo montage above shows two images of the dress sewn up from the Style Arc web site (the long orange dress with 3 tiers and the short black dress with 2 tiers), but the other images came from sewing blogs and a 3rd party online shop based in the U.K. (Minerva) that sells this dress pattern as a kit in a variety of fabrics.  So, special thanks to Carolyn of Sewing Fanatic, No Idle Hands, Geri In Stitches, Indoor Shannon, and the many other makers who take the time to post their sewing finishes online along with feedback and suggestions so that others can learn from their experiences.

Sunday, November 19, 2023

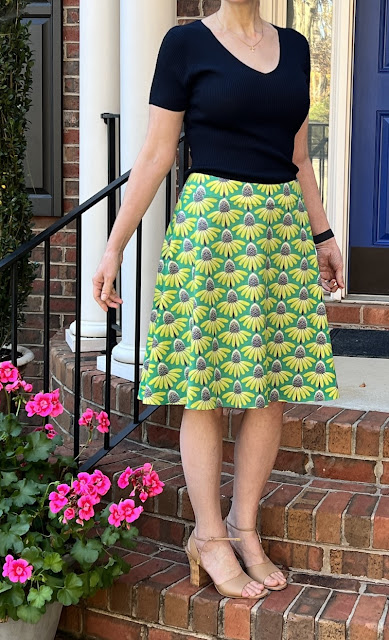
New Look 6708: The Eight-Year Skirt Project is Finally Finished

If you only come here for the quilting, be forewarned -- today's post is not for you.  Today's post will be all about how I spent $78 and eight years of my life making a skirt that I will probably only wear a handful of times, using a pattern (New Look 6708, now out of print) that I have no intention of ever making again.  Today I will relate the saga/review the pattern of what my mom and I have been calling "That Dumb Skirt!"  

New Look 6708 Skirt Finish

New Look 6708 (OOP) View B

I made my skirt using New Look pattern 6708, which is out of print from the manufacturer but you can still find uncut used copies for sale.  At the time I'm writing this, you can get a copy of this pattern on Etsy here and I saw a few copies available on eBay as well (This post contains affiliate links).  This A-line, lined Misses skirt with side zipper did not actually take 8 years to sew -- it just got abandoned for long intervals while I was sidetracked by other projects.  If you want to read the post from June of 2015 when I first started this skirt, you can find that here.


I made View B, the above-knee version of the skirt, and I used "Pretty Potent Echinacea" cotton voile fabric from Anna Maria Horner with solid navy cotton voile for the lining.  Although I was unable to find an online source for my skirt fabric in voile today, Anna Maria Horner has reissued this print in new colorways for Free Spirit Fabrics recently, calling it simply "Echinacea," and you can find those on Etsy here.  (Just be aware that the current versions are printed on quilting weight cotton fabric that has more body and less drape than the voile I used for my skirt).  I prewashed both my fashion fabric and my lining fabric prior to cutting out my skirt.

I used Pellon Shape Flex Woven Cotton Interfacing SF101 in White for my waistband and I'm happy with that interfacing choice for the cotton voile, but wish I'd chosen the same SF101 interfacing in Black in hindsight.  Because my fashion fabric is semi-sheer, the waist yoke with the white interfacing behind it looks like a slightly different color than the body of the skirt that has navy lining fabric behind it:

White Interfacing Makes Waist Yoke Look Lighter/Brighter than Navy-Lined Body of Skirt

Ah, well.  It's subtle and no one else is going to notice this or care.  I've only tucked my shirt in to show the top of the skirt for these project review photos; normally the waistband or waist yoke or whatever you want to call it won't even be visible.

Friday, April 17, 2020

Finished On Friday: Soft Contoured Face Masks For the Finicky Ones

Grocery Chic: My Modified Olson Face Mask in Produce Aisle Print
Good morning, and happy Friday!  I'm stunned to be typing those words, because I was convinced that it was Tuesday all day yesterday.  This quarantine thing is a lot like being stranded on a desert island or locked up in a dungeon -- if you don't keep track of the days with little tick marks carved into the walls of your cell, you can lose all sense of how long you've been there very easily.

An Ordinary 45-60 Inch Shoe Lace Makes A Strong, Soft, Easy Mask Tie
Of course, there are many other aspects of the quarantine/stay-at-home/shelter-in-place that are not at ALL like being in a dungeon or stranded on a desert island.  I know this is temporary, I still have my espresso machine to keep me properly caffeinated and a well-stocked wine fridge, for dealing with the 24/7 horror show that the news has become.  My dungeon/island is well-stocked with fabric, sewing machines, and books to read, and the idea of feeling "imprisoned" in a big climate-controlled house with a puppy to follow you around and play with you, television and Internet and books to read for entertainment?  Well, that doesn't sound like much of a punishment after all, does it?  Okay, so it's not a dungeon -- it's like we're all emperors in exile on tiny private islands, and we're pacing around impatiently because we are NAPOLEON, damnit, and we've got Big Things we'd rather be doing out in the Real World!

Napoleon in 1814, Exiled to the Island of Elba.  Probably All Dressed Up for a Zoom Conference
Anyway, unlike Napoleon, I get to leave my island paradise periodically to procure food for the family, as long as I'm wearing a face mask.  My two teenaged sons get to leave our island several times a week to work as cashiers and cart sanitizers at our local grocery store, where they need to wear masks as well.  Since mask wearing in public has become almost as necessary as PANTS wearing in public, I finally decided to make some for my immediate family members.

Assembly Line Mask Production Happening on the 'Nina 750QE
...And so, after that very long-winded and totally off-topic introduction, I am now ready to share a few of my mask finishes with you:

One of Anders' Masks
One of My Husband's Masks (Why Did I Ever Buy That Fabric?!)
These contoured face masks are based on the Olson Mask pattern that was developed by a hospital up in Iowa, I believe, but with the addition of a lining fabric (super-soft, old T-shirts) and with the filter pocket eliminated.  I found the FREE pattern download on the Instructables web site here.  All of these masks for myself, my 6'8" husband, and my 6' sons, are the Large size.

Kaffe Fassett Fabric!  I Think This One Is My Favorite
I had plenty of fabric in my quilting stash to choose from for the outside of the masks, but was really wishing I had kept the super-soft outgrown Hanna Andersson T-shirts from when the boys were little.  I raided everyone's closets for old T-shirts to cut up for mask linings, but the color options were very limited and anyone who knows me will understand that the lining fabrics absolutely had to complement the face fabric for each mask.

A UNC Chapel Hill T Shirt Died to Make This Face Mask Lining
I had a few packages of single fold, 1/2" wide bias tape stashed away from projects that were planned but never executed, and that's what I used for the nose wire casing at the top of each mask.

My Husband Says My Face Masks Look Like Bikinis
Bernie says my face masks look like bikini bathing suits.  Maybe for an alien woman who only has one giant boob...  Note to self: Do NOT allow the Husband to pick out my swimsuits!

Okay, I know that everyone on the Internet who has a sewing machine has been churning out a bazillion face masks over the past few weeks, so I'm not going to take you through mine step-by-step.  I will say, these masks do not whip up in a few minutes.  Each one took several hours, so if you're looking to mass produce masks for donation purposes, you're better off with the pleated rectangle versions.  However, these masks give a great custom fit, show off your favorite fabrics better than pleated versions, and they are extremely soft and comfortable against your face.  If you know anyone whose child has heightened clothing sensitivities (this is a common symptom for intellectually gifted children, twice-exceptional, Autism/Asperger's, etc), this is the perfect mask for them because there are no rough edges, no seam allowances against the skin, all 100% cotton fabrics, and the shoe lace or ribbon strings are infinitely adjustable for that child who freaks out when clothing is either slightly too tight or slightly too loose.  Using an old T-shirt for the lining that has been through the wash a gazillion times ensures that the inside of the mask is as soft as -- well, as soft as their favorite old T-shirt!  All of those children (and adults!) who are tormented by the seams in their socks, who feel like their skin is crawling with ants when wearing clothes made of synthetic fabric, and whose mothers have to go searching from store to store to find the exact same underpants as the ones that were outgrown because it's the only kind their kid can stand to wear -- those families are having an even harder time dealing with the need to wear masks than the rest of us.

Here are a couple of things that I did differently from the mask tutorial on Instructables.  

First, I eliminated the filter pocket for several reasons.  It simplified the pattern, for one thing, and I was not making masks for a healthcare environment where the need for filters is really warranted.  Furthermore, I wanted to keep the masks as light and breathable as possible.  One of my friends who works in an assisted care facility advised me that we need to take the masks down to get a good breath of fresh air periodically, because the thicker our masks are, the more they have us reinhaling our own CO2, so it's a balancing act.  I knew that, for my finickiest family members, if the masks were extremely uncomfortable and difficult to breathe in, they would not be worn at all.  Multilayered masks also take longer to air dry after washing.  So, no pockets in my masks, just the 100% cotton quilting fabric on the outside and the 100% cotton knit T-shirt fabric on the inside.  When sewing the two mask layers together around the perimeter of the mask, I sewed with the woven quilting cotton on top and the knit T-shirt fabric on the bottom, so the feed dogs could control the stretch of the knit fabric.

Also, for some strange reason, the pattern I was following told me to press that contoured, vertical seam in the center of the mask OPEN rather than pressing it to one side.  Pressing a curved seam open is a royal pain, plus it doesn't make sense from a protection standpoint,  since seams pressed open leaves gaping holes (from the virus's perspective) down the front of the mask between the stitches.  Much safer and easier to press the seams to opposite sides; that way the fabric is overlapped at the seam line in the finished mask.

Bernina Edge Stitch Foot #10, Needle 3 Clicks Left of Center on my 750QE
After sewing the mask together around the perimeter and turning it right side out, the side edges get folded in 3/4" and stitched down to form a casing for whatever you want to use for  attaching the mask to your face -- elastic loops, bias tape ties, T-shirt ties, ribbon, 45" to 60" shoe laces, twill tape, selvages that have been trimmed off of fabric yardage -- really, anything goes.  Because this seam will receive stress from the ties or elastic loops, I used the Triple Straight Stitch (Stitch #6 on my Bernina 750QE) to sew these casings, with Edge Stitch #10D and my needle three clicks to the left of center position.  Although my fabrics are 100% cotton, I still used all-purpose polyester sewing thread for strength and durability.

Side Casings Sewn With Bernina Triple Straight Stitch #6
I also used the Securing Knot feature at the beginning and ending of these seams rather than reversing to secure the seam, for a neater finish.

The next thing I did differently from the Instructables tutorial was an accident the first time, but I liked it so I kept it for the rest of my masks.  Instead of inserting a nose wire between the two mask layers and stitching a channel to secure it before closing up the sides of the mask, I accidentally skipped that step and had to make my own little channel on the lining side.  I cut a 7" length of 1/2" single fold bias tape, turned the ends under 1/4", and pinned it in place along the top edge of the mask.

Bias Tape Casing for Nose Wire
I secured the bias tape with Edge Stitch #10 and my needle 3 clicks to the left of center.

Nose Wire Casing Stitched In Place
I used thread matched to the face fabric of my mask to edge stitch the nose wire casing, since those stitches show on the right side.

Right Side View of Nose Wire Casing Stitches (Mask Shown Upside Down)
Then I cut a 6 1/2" length of pipe cleaner from our crafts supply bin, and bent the tips of the wires back to create tiny loops at the end with a pliers (this step is important; it prevents the sharp wire ends from poking holes through the mask fabric).  

Inserting Pipe Cleaner Nose Wire
And then I inserted the pipe cleaner into the casing, tucking the ends of the wire into the bias tape fold at each end to keep it in place.

Pipe Cleaner Ends Tucked Into the Folded End of the Bias Tape Channel
I used a pink satin ribbon tie for this mask.  You just thread a single string of whatever kind through both side casings, like an upside-down U, and that makes it easy to take the mask on and off with a single bow to tie.

Found a Soft Satin Ribbon in the Right Shade of Pink
Now, how cute is that?!

Finished Face Mask, Ready to Wear
The danger of making cute face masks is that, once you have one, you feel this overwhelming urge to put it on and GO SOMEWHERE instead of STAYING HOME as we've been advised/ordered...

My Other Favorite Face Mask
I've only had two occasions for mask wearing this week.  The first was the big grocery shop, and the second was the trip to the pet store to stock up on dog food, treats, toys, and to exchange Sam's too-small harness for the correct size.

Side View of My Other Favorite Mask
In addition to creating a better fit at the top of the mask, with less opportunity for those respiratory droplets and virus goblins to get in around the mask, the nose wire is also key for those who wear glasses -- it prevents your glasses from fogging up from your breath coming out at the top of your mask.  

Making two masks each for my four family members took me three whole days, and I'm really glad to be crossing that off my list!  I'm washing the masks after each wearing in a mesh lingerie back in the washing machine with warm water, then reshaping them and hanging them up to line dry just like I do with lingerie.  I want these masks to last as long as possible before I have to make new ones.  Oh, and one more tip -- you might want to get some unscented laundry detergent if your regular laundry detergent is strongly fragranced.  A scent that smells nice to you when you're folding fresh laundry can be overpowering when it's right on top of your nose and mouth and you have to breathe through it!

So, if you want to make a mask like mine, you can find the FREE pattern and instructions on  Instructables here.  If you're looking for fabulous prints for the outside of your masks, I recommend supporting the small businesses on Etsy.  A fat quarter of quilting fabric is more than enough to make a single mask, with extra fabric for your project stash, and there are plenty of options for buying assortments of these pretty Kaffe Fassett fabrics on Etsy.  You can also find novelty prints there that are sure to coax a reluctant child to put on a mask, whether they are into super heroes, princesses, Star Wars, or whatever.  You can get basic colored shoe laces at your local grocery or pharmacy, or any color shoelaces under the sun on Amazon here.  Lots of pipe cleaners available on Amazon as well as the 1/2" single fold bias tape for the nose wire casing, and we all have an old T-shirt or two lying around the house that can be sacrificed for the lining.  

And of course, if you want a cute mask but you don't have the time or ability to make one yourself, there are tons of Etsy shops that are selling adorable handmade face masks in every color, pattern and style imaginable, at very reasonable prices.  Seriously; Etsy sellers are pricing their masks so low that they are barely covering the cost of materials.  So no, I'm not making these masks for people outside my immediate family and I'm definitely not making more of them to sell -- my creative time is worth a lot more to me than the going rate for handmade face masks!  If the masks I've already made wear out before this pandemic has petered out, I might be buying replacement masks from some of those Etsy sellers myself.

I'm linking up today's post with the following linky parties, and then I'm getting right back to quilting!

·       Needle and Thread Thursday at My Quilt Infatuation  
·       Whoop Whoop Fridays at Confessions of a Fabric Addict
·       Peacock Party at Wendy’s Quilts and More
·       Beauty Pageant at From Bolt to Beauty
·       Finished Or Not Friday at Alycia Quilts
·       Off the Wall Friday at Nina Marie Sayre
·       TGIFF Thank Goodness It’s Finished Friday, rotates, schedule found here: http://tgiffriday.blogspot.ca/p/hosting-tgiff.html  

·       UFO Busting at Tish in Wonderland

Sunday, March 29, 2020

The One Where Rebecca Performs an Emergency Rhinoplasty on a Stuffed Unicorn

Keeping Me Sane: My Husband (Bernie) and My Puppy (Sam)
Greetings, y'all.  Happy Sunday.  I wish I had something fabulous to share with you today, but I am not one of those people who is productive and thriving under the current circumstances.  I have not deep-cleaned my home, reorganized my closets, or remodeled any bathrooms.  I have not been sewing masks or other PPE for medical personnel.  I am not creating gourmet meals from scratch, nor is my family enjoying idyllic, Rockwellesque "family time" together as we play board games, engage in craft projects, or worship together online.  (Tried that last one this morning -- my husband refused to participate, and my sons were cracking jokes and talking and generally making fun of the whole idea of online worship to the extent that I could not even hear the prayers).  Both of my sons are supposed to be doing "online learning," one for his college courses and the other for his high school classes, so I'm stressed out about how all of that is going and how it will impact them academically, yet they are too old for me to really be "in the loop" and know what's going on, let alone for me to be creating schedules (that no one would follow anyway) or attempting to "home school" them.  In short, I am NOT the Martha Stewart of COVID-19.


I Am Not an Instagram Mom (photo from lindsaycz via Instagram)

From what I see on social media, it looks as though a lot of people are using the unexpected extra time on their hands to tackle home improvement projects or to be productive in their sewing rooms.  I'm personally feeling a lot of stress and anxiety that has sapped my motivation, making me feel like showering and putting on clean clothes is a huge accomplishment.  

Channeling My Inner Roseanne Barr Through the Coronavirus Pandemic

I've got nothing against those Instagram supermoms; it's just way more than I can muster right now.  And I know that everyone, and I do mean EVERYONE, is experiencing stress, uncertainty  and disruptions in their lives right now, and I do appreciate that many people are going through much worse than what we're experiencing.  We don't have job loss, no one in my family is sick, and we have plenty of food and toilet paper.  Our biggest stressors are probably too much TV news and too much "together time."  Nevertheless, when I dragged my sorry self into my studio yesterday to mend a stuffed unicorn toy for my dog, it felt like a major victory against ennui and inertia.


Emergency Unicorn Rhinoplasty in Progress
This is one of Sam's favorite plush squeaky toys.  He likes to grab it, shake it, tug with it (when I'm holding the other end of it) and chase it around the kitchen when I toss it just out of his reach.  He had chewed the toy open at the front of its face and was pulling stuffing out through the nose when I took it away from him -- eating that stuffing is dangerous and could result in emergency veterinary surgery.


What the Unicorn's Face Looked Like Before He Met My Puppy
By the way, this particular unicorn is one of those toys that are advertised as being "virtually indestructible," and invariably there is a picture of a Rottweiler on the packaging to make shoppers think that this is a toy that a Rottweiler won't destroy.  


False Advertising!!!

Hahahaha...  Maybe that's why they call it the "Mighty Liar" Unicorn!


I considered sewing up the unicorn's face with the sewing machine, which would be a stronger seam than a hand stitched repair, but I decided against that because machine sewing would create a seam allowance ridge protruding on the outside of the unicorn like a scar.  I'm pretty sure that my dog would be attracted to that ridge and would deliberately chew the new line of stitching, so that's why I opted to hand sew the hole shut instead.  I used some heavy duty polyester upholstery thread and sewed the hole shut as tight as possible, with all of the loose fabric tucked inside of the plushie for a smooth seam on the outside of the toy.


Unicorn After Receiving Major Nose Job Surgery

So the unicorn looks pretty disfigured now, but puppy Sam was very happy to have him back again:
First Sam Batts the Unicorn With His Paw...


...and then, CHOMP!!!
Methinks the unicorn be not long for this world.

How are all of YOU coping with this pandemic situation that we all find ourselves living with?    Have you found something that helps to keep you sane or that helps you hold on to a little bit of normalcy in these bizarre times?  Anyone else, like me, feeling like their feet are stuck in cement and they just can't seem to put a plan into action lately?  I have GOT to get away from the news but my husband keeps checking the TV multiple times throughout the day, and even if I leave the room to get away from it, he has to report to me about how it's all getting WORSE AND WORSE by the minute...  This just feeds my anxiety because there is absolutely nothing I can do about it!

So I take a deep breath, and play with my dog.  My big sewing goal for this afternoon will be to cut the backing fabric for Spirit Song and seam the lengths together, maybe even get the backing loaded on the longarm.  Wish me luck!

-- Hey, by the way -- today is the 10th anniversary of my blog!  If you're interested, you can read that very first blog post, "Gardens of Deceipt," right here.

I'm linking up with
·       Slow Sunday Stitching at http://kathysquilts.blogspot.com/  
-->
·       Oh Scrap! at Quilting Is More Fun Than Housework http://quiltingismorefunthanhousework.blogspot.com

Monday, January 6, 2020

Monday Updates: Spirit Song Quilt, Frankenwhiggish Applique, a New Fabric Shop, and a Puppy Portrait

Hello and happy Monday!  The "little one" (my 6' tall 16-year-old son) is back to high school today, but I still have my 19-year-old son home for a few more days before he heads back to college.  Now that it's Epiphany and Christmas has officially ended, Bernie is taking down our Christmas trees today.  I've been sewing 4" Birds in the Air blocks together over the weekend for my Spirit Song quilt (whose color palette was inspired by the contemporary choir dress code colors for which I never have anything to wear).

First 16 inch Block Sewn Together for Spirit Song Quilt
I'll need twelve of those 16" blocks in a 3 x 4 layout for this throw-sized quilt.  This is a total procrastination project, by the way.  I have no intended use or recipient in mind for this quilt. But, since it's Design Wall Monday, here are all of the blocks (before I started sewing them together) laid out on my design wall:

192 Four Inch Blocks on the Wall, Final Layout
Colors are weird in that photo because I took it late at night and then tried to correct shadows and yellow cast from incandescent lighting, etc.  But that's the photo that I printed out to use as a placement guide as I'm assembling the blocks into a quilt top.  

I'll be working on my never-ending Frankenwhiggish Rose needle turned applique project this afternoon with my SouthSide Stitchers Bee amigas.  I feel like I've been making little green leaves FOREVER...

Hand Stitching for Today's Sewcializing Bee
Colors in that photo are weird, too.  Here's the first completed block:

Block One of Nine for Frankenwhiggish Rose Quilt
Colors are more accurate in this photo.  I completed the first block in its entirety to see how I liked it, and then started making eight more identical blocks assembly-line style: all of the stems, all of the large petals, all of the circle centers, and now I've been bogged down with putting sixteen leaves on each block for aeons...  I am so looking forward to finishing the leaves and moving on to the reverse appliquéd tulips, stuffed berries, and broderie perse rosebuds at the center of each block!

One of my quilting friends and I checked out a new local shop yesterday afternoon, and I came home with some goodies:

Shopping Treasures from a New Local Shop, Stash Charlotte
The store is called Stash (located in the Plaza Midwood area, for those of you who are fellow Charlotteans), and they used to sell only yarn and knitting supplies until they were bought by new owners who decided to add fabrics and Janome sewing machines.  I found out about them at the Charlotte Quilters' Guild, because Stash is one of our sponsors for our upcoming March quilt show (they've donated a Janome sewing machine as a raffle prize) and I've been meaning to check them out ever since.  It turns out that they are the ONLY non-chain quilt shop near Charlotte that is open on a Sunday afternoon, a crucial piece of information that I will be storing away for sure...

Stash is a very small shop and they have a lot more yarn than fabric...  BUT...  the fabric that they do carry is an interesting mix with an aesthetic that I like, and the manufacturer names on the bolts were kind of off-the-beaten-track, not the same lines that are carried by other quilt shops in our area.  I noticed a few Japanese fabric companies that I've only seen in online shops before, and OH MY GOODNESS, y'all -- they carry LIBERTY OF LONDON!!!  I have eyed those fabrics online, but with a skeptical eye due to the higher price point.  Now, having seen the fabrics in person, I'm officially a groupie.  

Liberty's Strawberry Thief Print on Tana Lawn
The crisp clarity of Liberty's highly detailed prints reminds me of the magnificent (and stratospherically expensive) screen prints from Scalamandre.  And the cotton lawn fabric that Liberty prints on has the softest hand and drapes like silk charmeuse.  I know that Liberty is a favorite with quilters and crafters, but I'm thinking of using it for a light-as-a-feather blouse, skirt, or dress -- maybe in Spirit Song colors so I'll finally have something to wear to church!  :-). Wouldn't this fabric be luscious for a blouse like this one from the Danish pattern designer Personal Pattern?  

Blouse 4253 from Personal Pattern, available here

You might have noticed some yarn in that photo of my shopping treasures, too, even though I have never even considered learning to knit.  I picked two of the thinnest, most interesting variegated wool yarns because I couldn't stop petting and squeezing them like I was that crazy lady in the "Don't Squeeze the Charmin" commercial!  I'm planning to experiment with them in my bobbin with decorative machine stitches, and if that doesn't work, I'll play with them in my serger loopers, and if THAT doesn't work, well, I might have to sign up for a knitting class at Stash!

I have one final picture to share with you before I wrap up this post.  I have to show you what one of our pastors surprised me with after church yesterday.  He had seen my Facebook post about losing our dog Otto to cancer just before Christmas, and he painted this for us from one of my photos:

Painted by Drew Goodson, Associate Pastor at Christ Lutheran Church in Charlotte, NC
I was so overwhelmed.  I had no idea that Pastor Drew was gifted with artistic talent in addition to his gifts for ministry.  I so appreciate the outpouring of love and compassion from my blog readers as well.  Thank you all so very much.

Well, once again I've lost track of time while writing a "quick blog post" and I'm on the verge of being late for my sewing bee!  

Linking up today's post with:
·       Slow Sunday Stitching at http://kathysquilts.blogspot.com/  
·       Oh Scrap! at Quilting Is More Fun Than Housework http://quiltingismorefunthanhousework.blogspot.com
·       Design Wall Monday at Small Quilts and Doll Quilts  
·       Monday Making at Love Laugh Quilt
·       Moving it Forward at Em's Scrap Bag
·       BOMs Away Katie Mae Quilts