Showing posts with label Tutorial. Show all posts

Friday, June 23, 2023

Nann's Scrappy Largesse, Halo Quilt Progress + A Mini Curved Piecing Tutorial

I don't know about you, but when I've been slogging along forever on a project, trying to combine the same old scraps from my scrap bins in new ways to create blocks that don't look exactly like all the others on my design wall, there's nothing like a fresh injection of someone else's scraps to make the work feel fresh and exciting again.  

A month or so ago, Nann who blogs at With Strings Attached mentioned to me that she'd just finished reading a 1932 novel called The Sheltered Life by Ellen Glasgow.  When I expressed interest in reading the book, she offered to mail me her copy -- and she stuffed the flat rate postage box full of fabric scraps!!  I felt like I'd hit the scrappy jackpot!  I've been working in as many of Nann's scraps as possible and having a grand time with it.  Don't you love this sweet Wizard of Oz fabric?  The orange and blue arcs, pink quarter circle, blue and white dot, larger blue floral quarter circle, and the pink mini floral print are all Nann's fabrics in the block below.

This Block Contains 5 Scraps from Nann

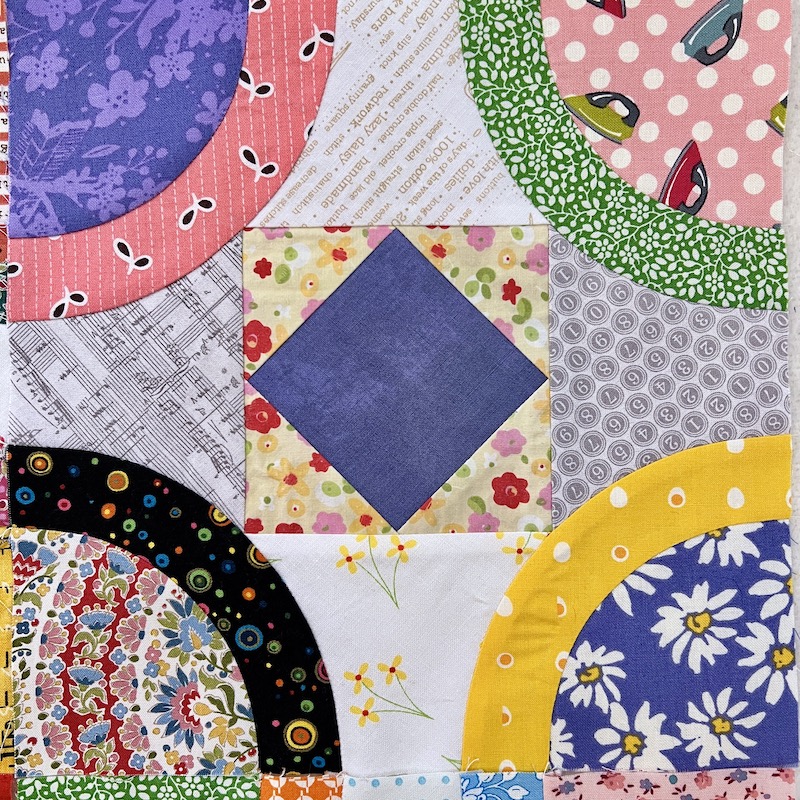
In the block below, the yellow floral HSTs surrounding the blue center square are definitely Nann's, and I think that curved tumbler patch at the bottom that has sprigs of yellow flowers on a white background might also be from Nann.

Yellow Floral Print HSTs are Also Scraps from Nann

Although I've been busy long arm quilting this month, I've also had more social sewing opportunities on my calendar lately and that has really helped me keep the momentum going with this project.  Below you can see I have my Jen Kingwell Block Wrap all packed up with six different blocks planned out, ready to piece at a recent guild Sit & Sew event (this post contains affiliate links).  

Sunday, January 23, 2022

Wild Animal Kingdom, Quilters' Edition: A Wolf, a Lion, and a Realignment Tip for Tricky Pantos

Good morning, friends!  I'm so excited that I can finally share this incredible Wolf Abstractions quilt with you, pieced by my client Mary who blogs at Quilting Is In My Blood.  Isn't this amazing?!  Mary made this quilt as a surprise 50th birthday gift for a dear friend.

60 x 65 Wolf Abstractions, pattern by Violet Craft available here on Etsy

Mary used the Wolf Abstractions foundation paper piecing pattern designed by Violet Craft to piece this stunning quilt.  You can find the pattern on Etsy here (affiliate links).  I suggested 40 weight Omni matte polyester thread in Cream so the thread would blend into the fabrics in the wolf's face and contrast softly with the dark gray background fabric.  The batting is Quilters Dream 80/20 and the quilting design is Sound Wave by Jessica Schick.

Tuesday, September 22, 2020

LAL#8: Fast & Frugal Method for Joining Batting Scraps by Machine


After loading the backing of my Modern Baby Clam Shells quilt on my frame a few days ago, I discovered that the package of crib sized batting I was planning to use was going to be too small for my 42" x 42" baby quilt.  Why do the batting manufacturers assume that everyone is making rectangular baby quilts, anyway?

With no nearby quilt shops open on a Sunday evening, I was determined to come up with a solution that didn't require shopping.  I briefly considered hacking a piece out of one of the batts I'm saving for larger projects, but then I started noticing all of the nooks, corners and cubbies throughout my studio where I had odd-shaped batting scraps squirreled away.


What you see pictured above is only what was left after I tossed the really skinny strips, the bits of batting that I couldn't identify, as well as remnants from battings that I tried but didn't enjoy using.  This left me with the remnants of Quilter's Dream Wool, Quilter's Dream Cotton Select in Natural and in White, Hobbs Heirloom 80/20 blend in natural, Hobbs Heirloom 80/20 in Black, and Hobbs Tuscany Wool.

I've been hoarding saving these batting scraps for about 20 years.  The smallest batting scraps are useful for cleaning the rails of my long arm machine, and I do use the bigger pieces sometimes for samples or for checking and fine-tuning tension, but I have not been using them up at a rate that keeps up with new batting scraps being trimmed away from finished quilts!  Desperate times (no batting for the baby quilt + batting scraps taking up WAY too much space in the studio) called for desperate measures.

How to Join Leftover Batting Scraps by Machine

First things first, I had to do my best to identify and sort the batting scraps.  If I cobbled together a Frankenstein batting that was part wool, part 100% cotton, part polyester, and part 80/20 blend, then the loft and feel of the quilt would be totally different from one section to another.  Even worse, those battings would shrink at different rates the first time the quilt was washed -- disaster!  So do as I say, not as I did, and try to get into the habit of bagging and LABELING your batting scraps as soon as possible after trimming them from a finished quilt, while you still remember what kind of batting they are!

Pictured below are two fairly large remnants of Quilter's Dream Cotton Select batting in Natural, perfect for my baby quilt once they're joined together.  I laid both pieces on my cutting table, side by side, both with the right side up (dimples up, pimples down for needle punched batting) and overlapped the two rough-cut edges slightly in the center.  Then, I used my longest acrylic ruler and my rotary cutter to cut a clean, straight line through both layers of batting to create edges that abut perfectly.


The bits I'd just trimmed from each batting remnant were perfect for testing stitch settings, to see which stitch would hold the batting edges together securely without puckering or creating a ridge along the join.


I tried a few different stitches, but I was happiest with the 3-step zigzag (stitch #16 on my Bernina 750QE), once I'd maxed out the width at 9 mm and stretched out the length to a bit beyond 3 mm.  I'm using 50/2 Aurifil thread in a creamy Ivory to match the batting.


This is one of those tasks where I really appreciate the extra throat space in a 7 Series Bernina. You can't join batting with right sides together because you don't want any seam allowance at all, just raw edges butted together with a light stitch holding them together.  Once the batting is quilted into a quilt, the quilt stitches will be what keeps the batting where it belongs inside the qult.


I started out using my Open Toe foot #20D for this with my Dual Feed engaged, and that did work, but I quickly realized that the walking foot would be better because the walking foot helps feed the fabric from either side of the needle, whereas Dual Feed rides along in dead center position behind my needle -- right on top of the gap between the two batting pieces that I'm trying to make disappear!


It was a lot easier to keep the two batting edges right up against one another with the walking foot, so that was worth the minute it took me to dig it out of the drawer and pop it on my machine!


Ta-da!  Can YOU see the vertical seam going down the middle of that batting?  I'm not necessarily going to do this on a show quilt, but this is going to be just perfect for my baby quilt!


There it is on the frame, ready for the quilt top to go on next.  I'll spritz the batting with some water first and let those wrinkles hang out overnight.

But Rebecca, Aren't There Other Ways to Join Batting Scraps?

OF COURSE there are other ways to do this!  I'm writing this post so I can remember how I did it the next time I need to do it again, not because this is the only right way to do it.  Some quilters like to whipstitch the edges together by hand.  Some quilters prefer to use a regular zigzag or some other utility stitch built into their sewing machines.  There is a fusible batting tape that some quilters love using -- BUT -- you must be 100% certain that you have correctly identified your batting fiber before you go anywhere near it with an iron!  Wool batting should not be ironed, and neither should any of the polyester fibers, as they would melt.  If you know it's 100% cotton because that's the only kind of batting you have ever used, then go ahead and try the fusible tape method.

Speaking of wool, I haven't tried my machine stitched joining method on a lofty wool batting.  I am definitely going to have to join batting for my monster-sized 120" x 120" pineapple log cabin quilt when I get around to quilting that one, because I need at least 128" x 128" of batting and backing and batting doesn't come that wide.  I think I'll whipstitch the extra length I need by hand to ensure my stitching doesn't flatten the loft along the join.

PSST!!  I'd Love to Quilt for YOU!

By the way, if you or any of your quilty friends has a quilt top or two that needs quilting, I'd be delighted to quilt for you!  My turnaround for edge-to-edge quilting is currently running about 2 weeks, and you can click here to find out how to book your quilt with me.

What do YOU do with Your Batting Scraps?

I'd love to know what you all do with YOUR batting scraps.  Do you save them at all or throw them out?  Do you use them in small projects or join them together?  Do you have a good system for keeping your batting scraps organized so you know what kind they are, what sizes they are, and so you can find the right piece when you need it?  Let me know in the comments!  Meanwhile, it's Tuesday again...  And that means it's time for the Long Arm Learning linky party!


You are invited to the Inlinkz link party!

Click here to enter

Friday, March 20, 2020

Y-Seam Reality Check and a Refresher Tutorial


You guys, how did I look at this block yesterday and think there were only 8 Y-seams?  


My 20" Block
There are SIXTEEN Y-seams in this block!  See below.  Ugh.  I liked the Y-seams better when I thought there were only going to be eight of them.


The Wicked Block Diagram
So this block is kind of like the news lately -- it's twice as bad today as it was last night, and the only way to get through it is to just focus on ONE seam at a time instead of worrying about the whole block at once.  

I'm Piecing These Corner Squares First

This shot is for my own future benefit, because I never remember how I decided to press the seam allowances:

How Did I Press Those Seams?
You know, as I'm looking at this, I'm thinking that those Y-seam points would be crisper and flatter if I pressed these two seams towards the outside of the block instead of pressing them towards the red center square.  I was thinking "Press to the Dark Side" but now I'm second guessing myself...

Okay.  Two Y-seams waiting to be sewn:

Ready for Y-Seams
As you see in the photo above, I did NOT sew all the way to the raw edge of the fabric when I attached the green triangles to the white pieces.  I stopped 1/4" in, right where those seams are all going to meet up.  I also removed the stitches from that last 1/4" in the seam where the dark blue and red fabrics are joined in the foundation pieced unit.

The Piece In My Hand Gets Sewn On First
Just one seam at a time...  Pinning the first bit up to the Y-junction, with my final pin exactly where the seams are all meeting up and the green triangle folded neatly out of the way so it can't get caught in my stitching:

Here's How I've Pinned It
These are extremely fine pins (Clover Extra Fine Patchwork Pins) that I'm using, by the way, so I have no qualms sewing over them, especially as slowly as I'm running the machine for this precision work.  It's kind of like hand piecing with a machine needle.  If my sewing machine needle does strike one of these hair-thin pins, it shifts out of the way or maybe bends; nothing breaks and definitely no timing disasters!  

You Can See the Stitching Better Here
In the photo above, you can see how that previous line of stitching ends precisely where the next stitching will meet up with it.  After stitching along the pinned white side, I take out the pins, flip the seam allowance the other way, and tuck the white fabric out of the way so it doesn't get caught in the next line of stitching.  Pins are repositioned along the green triangle edge like so:

Ready to Stitch the Next Bit
Stitching down the next side, I backstitch right up to the previous seamline without crossing it, adjusting where that final stitch lands with the hand wheel if necessary.  This is why I'm using my Featherweight for the Y-seams instead of a modern computerized machine -- the manual Featherweight never takes an extra stitch when I'm reversing directions.

This is SLOW Stitching, Not Full Speed Ahead!
By the way, I've got a vintage Singer "cloth guide" screwed into the bed of the machine exactly 1/4" from the needle so I can use the original Singer multipurpose foot that came with the machine for piecing instead of a generic foot.  I have almost identical Patchwork Seam Guides for my modern Berninas that I also position exactly 1/4" from the needle on those machines, enabling me to switch back and forth between any of my sewing machines on the same project, knowing that my seam allowance and finished block sizes will be identical regardless of which machine was used.

After Stitching
The backstitching is necessary because we can't cross the seams to secure stitching lines with a Y-seam.  Since we're sewing right up to the seam intersection but not a single stitch beyond, the backstitching ensures that those stitches don't come loose.

One Down, One To Go (For This Corner Section, Anyway!)
Then the other side goes on the same way.  One of the reasons I pressed that red/white seam allowance toward the red square was so these two seam allowances (Red/white and white/teal) would nest together nicely, but I could have reversed the seam allowance on the white/teal...)

Same Process As Before
Sewing the first leg, you can see how I connect my new line of stitching to exactly where the previous stitching line left off.  From there I took 2-3 back stitches before pulling the work out of the machine, clipping the threads, and repositioning for the second leg of the seam:

Sewing Right Up To Connect to the Previous Stitching Line, then Backstitch to Secure
Pinning the Second Leg
...And then the threads are clipped, the work comes out of the machine, and the seam allowance is flipped out of the way so you can sew the second side.  I start a few stitches beyond that seam junction, backstitch right up to the point where all three seams converge, and then continue sewing forwards the rest of the seam.  At the Y-seam intersection, all three seam allowances are completely free from the seams.

Ready to Sew
Again, I've very carefully folded and positioned the white fabric out of the way so none of it gets inadvertently caught in the next leg of the seam.

Stitching Lines Meeting Up Nicely!
In the photo above, I've just stitched the left side of that green triangle.  Next I pull out those two pins from the green fabric, pull the green fabric out of the way to the left, and flip that seam allowance to the left so I can sew the next leg of the seam in the white fabric.  

Ready For the Last Side
See how that seam allowance on the left is still loose?  That's the whole Secret Magic of the Y-Seam.  You sew right up to the seam allowance but never INTO the seam allowance, and then you get a nice, smooth, pucker free finish on the right side of your block.

Two Y-Seams Later, This Is What I've Got
There are a couple of inexpensive gadgets that I use to make Y-seams easier.  First, in addition to printing foundation paper piecing patterns on newsprint from my EQ8 software, I also printed traditional piecing templates (with 1/4" seam allowances) for these chisel and quarter square triangle shapes onto heavy card stock.  Then I used a 1/16" hole punch to cut tiny holes in my templates at the corner points of the seamlines, just big enough to fit the point of my Sewline mechanical pencil.

Sewline Pencil and Mini Hole Punch for Marking Start/Stop Points
My yellow Sewline ceramic pencil shows up nicely on the dark fabrics.  For my light colored fabrics, I mark that start/stop point where the seams match up with a single dot from a Frixxion heat erasable pen.  (The dot is on the wrong side of the fabric right where the seams all meet up, and it disappears as soon as I iron the finished block unit.). You could also use a dot of regular graphite mechanical pencil instead.

Black Dot On Pale Blue Fabric is Frixxion Heat Erasable Ink Pen
What you want is a very tiny, very distinct dot that will not smudge with handling, indicating EXACTLY where that first/last stitch needs to land.  The black Frixxion dot above is very easy to see on light fabrics, and the same is true for the yellow Sewline dot on the darker fabrics, as seen below.  My final stitch will sink directly into the center of that dot, then I'll sew in reverse for 2-3 stitches to secure the seam.

Yellow Dot on Green Fabric is Sewline Ceramic Fabric Pencil
So anyway, I finished all four of these corner sections today.  I'm not sue which seams should be sewn next, and that's okay.  One day -- and one seam -- at a time, remember?  I will figure out which seam to sew tomorrow!

Stay safe everyone, and happy stitching!  I'm linking today's post with: ·       UFO Busting at Tish in Wonderland

Monday, November 4, 2019

EQ8 Software Tutorial: Drafting a Star Quilt With Hexagons and Equilateral Triangles

First off, I need to thank Matt at Electric Quilt Tech Support for figuring out how to create a layout for this quilt in EQ8.  I am not taking credit for his solution, just writing it down before I forget how I did it and sharing it with other EQ users who want to play with similar quilt designs on their own.

EQ8 Quilt Design Using Hexagons and Equilateral Triangles


When you go into EQ8 to start a new project, you see a bunch of different layout options -- horizontal square blocks, on-point square blocks, variable on-point diamond shaped blocks, baby blocks, variable blocks, horizontal or vertical strips, one patch, photo patchwork, custom set...  But none of those is an obvious choice when you want to make a TWO patch quilt, using hexagons and triangles.  The fastest and easiest way to get this layout in EQ so you can audition fabrics is to choose Variable Point layout style and then create a diamond shaped block that encompasses one hexagon with one triangle at the top and one triangle at the bottom.  


Choose Variable Point Layout Style
Next, click on the Layout tab to tweak the dimensions of the diamonds to match your desired hexagon size.


Set the Width and Height to Match Your Templates
I had acrylic cutting templates that I wanted to use to actually cut my fabrics for this project, so I used the measurements of my actual templates to ensure that fabric prints would be represented to scale on my computer screen.  In the Width field, you want to enter the point-to point measurement across your hexagon from seamline to seamline.  But, for the Height field, you want the height of one hexagon with triangles attached at the top and bottom, not the height of the hexagon alone.  For those of us who haven't seen the inside of a geometry classroom in a few decades (ahem!), there are nifty online calculators that will automatically give you the measurements for hexagons here and for equilateral triangles here.  In order for your triangles and hexagons to fit together in a quilt, the sides of the hexagons need to be the same length as the size of the equilateral triangles.  If you already have a set of acrylic templates that you'll be using like I did, it's easiest to just measure your actual template (making sure to exclude the seam allowances).  Using my hexagon and equilateral triangle templates, those measurements are 7.5" Width and 13" Height.  


Now we need to create that block by opening up the Block Worktable.

This Block Magically Transforms Into a Hexagon When It's Stretched Into Our Diamond Layout
And this is the ridiculously easy block that will magically turn into a hexagon with a pair of equilateral triangles once we plop it onto our diamond quilt layout and the EQ software stretches it to fit the diamond.  I drew this as a 6" x 6" block, with diagonal lines going from the 3" center points.  It doesn't matter what size the block is on the block worktable because EQ is going to resize it to fit the block size stipulated in the quilt layout.  What matters is that the diagonal lines go from the exact center of one side to the exact center of the adjacent side of that block.

Same Block, Colored With Fabric
Next, I clicked on the color tab and put a lovely Anna Maria Horner fabric in the center for my hexagon, with two different gold print fabrics for my triangle star points.  Then I added the block to my project Sketchbook and switched back to the Quilt Worktable.

Setting My New Block In My Variable Point Quilt Layout
In the screenshot above, I've set just one of these new blocks into the quilt layout that we set up in the first step.  See how my center floral fabric has stretched to fit the dimensions of my diamond block, creating a perfect hexagon?  Now look what happens when I fill all of the other diamonds with the same block:

Ta-Da!  Hexagon Stars!
How cool -- yet simple -- is that?!  That's how I created the different fabric combinations for my Kaffe Fassett Mediterranean Hexagons workshop in last week's post.

I'm linking up today's post with:

·       Design Wall Monday at Small Quilts and Doll Quilts  
·       Monday Making at Love Laugh Quilt
·       Moving it Forward at Em's Scrap Bag

Tuesday, October 1, 2019

How I Achieved Machine Binding Without Shame: Victory at Last!

I am SO excited about the most boring quilt that I finished last night -- because I completed the binding entirely by machine and, for the first time ever, it doesn't look hideous.  OH RAPTURE AND JOY!!


I'm Not Ashamed of My Machine Sewn Binding Anymore!
I pieced this top myself during the Charlotte Quilters Guild's Christmas In July Sit-and-Sew.  The idea was for us to get a head start on some holiday themed outreach quilts for patients who are hospitalized over Christmas, Hanukkah, and Kwanzaa.  I didn't choose the fabrics or the the simple alternating squares layout, and wasn't able to be as adventurous with the quilting as I'd hoped since my longarm machine was misbehaving (I think she's fixed now, though!).  So I went with a simple 1" grid with rulers in the red blocks and a large amoeba stipple in the white squares.  I have to say, I was a lot happier with the quilting after washing it than I was when I first took it off the frame.  It's simple but so soft and snuggly, with the bumpy quilt texture that I love!  I used a variegated red and green King Tut cotton thread in the needle (Industrial size 4.5) with a Forest Freen So Fine thread in the bobbin, and the batting that was provided to me by our guild's Outreach Committee.


40 x 40 Charity Baby Quilt in Christmas Fabrics
There are tons of binding tutorials on the Internet, and I've tried (and failed) with a few of them before.  What finally worked for me this time was a method shared with me by Vivian, who blogs over at Bronx Quilter.  I'm writing this up while it's fresh in my mind and storing it on the Internet so I can find my notes when I need it again.


How Closely Must You Look To Tell The Binding Was Not Hand Stitched?
My criteria for an acceptable machine binding may be different from yours.  I prefer the look and the process of hand stitched bindings for most of my quilts, but after timing how long it takes me to hand stitch all the way around the perimeter of a large quilt (?!!) I realized that not every quilt needs or warrants that level of handwork.  The quilts I'll be binding by machine will be charity outreach quilts for my guild and baby quilts that need to get done and out the door before the baby in question heads off to college.  


It's Easier to See Threads in the Fabric Weave Than It Is to See the Machine Stitches From the Back
What I wanted from a machine stitched binding was a fast(er) process that would look as much like my usual hand stitched binding as possible, and that's what I got with Vivian's method.  THANK YOU, VIVIAN!


So I remember for next time, here are the steps I took to bind this quilt:


  • I trimmed my binding strips to 2 1/4" wide.  The Outreach Committee precuts binding strips in kits at 2 1/2" wide. I have no idea what I'm supposed to do with binding that wide, as I normally cut my binding anywhere from 1 7/8" to 2" wide for hand stitched binding, but never wider than that!  2 1/4" was plenty wide enough for me, for this method.
  • I joined the binding strips together as usual with diagonal seams, pressed open, and pressed the entire length of the binding in half.
  • With my walking foot, using black 50/3 cotton thread and a 2.5 stitch length, I sewed the binding to the BACK side of the quilt instead of to the front of the quilt as I normally would, mitering the corners as I went along.  
  • THIS IS CRUCIAL -- sew a few inches with a quarter inch seam allowance, and then take the quilt out from under the machine, wrap the binding around to the front of the quilt, and see whether it's covering the stitching line adequately without too much excess.  Now is the time to adjust that seam allowance a smidge wider or narrower, to get it just right!
Stitching the Binding to the Back of the Quilt First, Mitering Corners As I Reached Them


Note that, even with the binding trimmed to 2 1/4" wide, I still felt that it looked lopsided when I stitched it down with a quarter inch seam allowance and wrapped it around to the front of the quilt.  The folded edge of the binding went WAY past the stitching line it was meant to cover, which would have made the binding noticeably wider on the front of the quilt than on the back.  It also would have moved the final machine stitching line farther away from the binding on the back of the quilt, making it more noticeable.  So I moved my needle one position to the LEFT of center, enabling me to continue using the quarter inch mark engraved on my walking foot as a guide, but evening out the amount of binding on both sides of the quilt.  This was a fairly thin batting this time, however.  If I was doing this on a puffier quilt, say with wool batting or a double batting, I'd probably be safer with the 2 1/4" width.  But I would want to test this first on a scrap quilt sandwich using my actual battings in the event that my quilt had piecing lines that met a quarter inch away from the raw edge of the quilt top.  I'd hate to have my generous-quarter-inch binding chop off any of my precious triangle points!


  • I left a 12" gap between where I started sewing my binding to my quilt and where I stopped stitching, with 10" tails of loose binding at both ends.  Then I used my trusty Binding Tool to mark, trim, and stitch those loose ends together with a perfect diagonal seam.  When I use that little acrylic guide tool, the joined bit of binding always  fits the 12" gap perfectly so I can sew the opening shut without any stretching or easing required and no one can tell where I stopped or started the binding.
  • Next, I pressed the binding away from the seam line with a hot iron so the folded edge stuck out beyond the edges of the quilt.  I folded the miters of all four corners by hand and pressed them firmly with steam, and then pressed the binding around the edge of the quilt, ensuring that it just barely covered the black line of stitches on the front of my quilt.  I used those nifty Wonder Clips to hold the binding in place after pressing.  (I'm aware that some quilters glue baste their binding before machine stitching it down, but I went with the clips because I'm interested in a fast-and-dirty method for utility quilts, not a guaranteed-perfection-at-a-price method for show quilts).
  • Time to change the needle and rethread the machine!  I put Smoke invisible monofilament thread in the bobbin due to my black backing fabric (YES you can wind on your bobbin -- just only fill the bobbin halfway and slow your bobbin winding speed down if possible) and Clear monofilament thread in my size 60/8 needle.  In retrospect, I probably should have used Smoke in the needle as well, since my stitches were landing on the binding fabric rather than on the fabrics of my quilt top.  I used YLI monofilament thread on this project, but I also like Superior's MonoPoly and Aurifil's invisible monofilament as well.

And now, for a BAD decision: I thought it would be helpful to switch the sole of my Bernina walking foot for the next step to the sole with the center guide, but that was a bad decision.  Next time I'll stick with the open view sole that I was using initially, since that would give me a better view of where my stitches are landing.  Also, the guide blade in the center of the other sole wanted to pull my mitered corners apart as I was trying to stitch them down.  Aaargh!!  No more center guide sole for this technique!  That sole is designed for stitch-in-the-ditch quilting, and that's what I'll reserve it for from now on.


Machine Stitching Binding to Quilt Front With Monofilament (Do NOT Use This Guide Sole Next Time!)
As you can see in the photo above, my binding wrapped around to just comfortably cover my black stitching line without too much struggling or too much excess, just as I'd hoped.  Again, this wasn't some magical happy accident -- it's because I tested the seam allowance and adjusted it to get it just right for this particular quilt before I continued sewing the binding all the way around the quilt!


Stitch Settings for Sewing Binding with Monofilament on My Bernina 750QE


  • Per Vivian's suggestions, I sewed the binding to the front of my quilt with a narrow zigzag stitch.  I started out with Vivian's preferred stitch length of 3.0 but, since this quilt is destined for a hospitalized baby, I decided I wanted to have the binding more securely attached with the zigzag "bites" closer together.  I ended up with a stitch length of 2.25 and a stitch width of 1.5, but I could make the stitch width smaller next time if I use the open toe sole on my walking foot so I can see what I'm doing!  As you see in the photo above, I've got my needle position moved two clicks to the right of center, but again, that's because of the center guide on my presser foot sole.  I had to do that to ensure that my zigzag was actually on my binding.  The only other setting change I made was to reduce my tension to 2.25, which I honestly don't remember doing (this was late at night) but it was a good "autopilot" decision for the monofilament thread.  Too-tight tension is what makes invisible thread look objectionably shiny and not-so-invisible.


Not Bad, Right?!
And that's it, folks!  The Smoke monofilament thread would have disappeared even more against my dark binding fabric than the Clear, and if I reduced the zigzag width to 1.0 or went with a blind hem or invisible appliqué stitch instead, I bet I could make the binding look even more like it had been hand stitched, with the same speed and ease of application.  I can experiment with other stitches next time.  For now, I'm celebrating that I have a finished Christmas outreach quilt ready to turn in at our guild meeting on Wednesday.  I'm really pleased.  YAY!


Back View of Machine Stitched Binding, PRIOR to Laundering
Interesting side note: in the photo above, my quilting tension looks pretty wretched, but it really is not.  Those white dots you're seeing are the off-white quilt batting showing through the giant needle holes of the larger needle I used for quilting in order to accommodate the King Tut cotton thread, which is a slightly heavier weight.  After laundering the finished quilt, those holes closed almost completely and I can only see specks of batting here and there, where it was actually pushed out on the backing side where the thread passed through.  When I use dark fabric for my personal quilts, I like to use Hobbs Heirloom 80/20 BLACK batting to prevent that problem.  With this quilt's combination of black backing fabric and white squares on the quilt top, though, if I was hell-bent on making my life difficult that way, I would probably have put the black 80/20 on the bottom with a thin layer of white batting on the top to ensure that the black batting didn't shadow through the white fabric and make it look dingy gray.


After Laundering
See what I mean? I wash all my quilts as soon as I finish binding them as a personal preference, but this one DEFINITELY needed to be washed, since it's headed to a hospital NICU.  

Updated October 4th, 9 AM: WOW -- when I shared this binding technique, I didn't expect to stir up a huge controversy about the "safety" of invisible monofilament threads.  In addition to the comments here on my blog post, I've received numerous direct emails, direct messages through my Facebook page and from the Yahoo groups that I belong to or manage, etc.  Keep them coming, but please be specific.  If you're telling me that you have personal experience with quilt guilds, hospitals, or other charitable organizations that do not accept donation quilts that have any monofilament thread in them, I would like to know WHICH guild, WHICH hospital, or the NAME of the charity to which you're referring.  I would also like to know of any other restrictions that organization may have (do they require all cotton batting, for instance?  Or do they require fire-retardant batting?), and the reasons behind those restrictions.  Please know that I am never offended by someone who disagrees with me and I know that people are voicing concerns about this with the best of intentions, and I thank you for that.  However, I strongly suspect that 1) these restrictions are coming from quilt guild members and officers rather than from the charities and hospitals themselves and 2) the restrictions reflect concerns about the much thicker, much stronger nylon threads that have been used by commercial workrooms serving the hospitality industry (think quilted bedspreads and drapery panels in hotel rooms) or for mass-produced bedding that you might find at a big box store.  

I've started researching the tensile strength and melting points for a variety of threads so I can compare them to the monofilament threads that I use and recommend.  I'll be looking at 100% cotton 50 weight thread, the "all-purpose" polyester sewing threads, the lighter weight polyester quilting threads that are used almost universally by longarm quilters, as well as the heavier 40 weight cotton threads that designed for quilting by machine and the glazed cotton threads used for hand quilting.  From my personal experience, I can tell you that I can snap off a piece of .004 monofilament invisible thread MUCH more easily than I can snap off a piece of glazed 100% cotton hand quilting thread.  When I've compiled my research, I will share my findings here.  


40 x 40 Baby Quilt, Off My To-Do List and Ready to Donate!
That's all for today, folks!  I'm linking this post up with:

WEDNESDAY

·       Midweek Makers at Quilt Fabrication

THURSDAY

·       Needle and Thread Thursday at My Quilt Infatuation  

FRIDAY

·       Whoop Whoop Fridays at Confessions of a Fabric Addict
·       Beauty Pageant at From Bolt to Beauty
·       Finished Or Not Friday at Busy Hands Quilts
-->
·       TGIFF Thank Goodness It’s Finished Friday, rotates, schedule found here: http://tgiffriday.blogspot.ca