Showing posts with label Pressing Plan. Show all posts

Friday, January 26, 2024

Deco Quilt Block Three Interrupted, Quilting Studio Dismantled

Well, I got nine of Block Three for my Deco Quilt completed in the green/indigo colors before I had to take all of the blocks off my design wall and pack this work-in-progress up in a moving box last night.  Here's one last glimpse of the design wall:

Deco Quilt In Progress, 9 of Block Three Finished

The only reason I'm sneaking time for a quick blog post when I still have so much packing to do is so I can refer back to this once our move is completed and the dust settles -- I really want to finish my Deco quilt this year and I don't want to waste a lot of time looking for the fabric pieces I cut out, misplaced pattern instructions, and otherwise reinventing the wheel.  I packed everything I need for this Deco quilt as well as everything I need for my next NewFO Star Upon Stars (fabrics, templates & pattern) into one box labeled "Current WIPs" or something like that.  Fingers crossed that I didn't miss anything!

Okay, here's the real reason for today's blog post, a quick photographic reminder to myself of how I decided to press my seams for Block Three because I'm very pleased with how nicely it turned out:

My Personal Pressing Plan for Deco Block Three

You may recall that I'm not following the pattern instructions for this block.  The Deco Quilt Pattern from Lo & Behold instructs you to press all of the seams open, and I don't do that because I want crisp, sharp points and corners and perfectly matched seam intersections and that is much easier to accomplish when your seam allowances are pressed in opposite directions so they nest and lock together when joining rows of patchwork.  So I've pressed my seams towards the Indigo fabric in each of the strips.  However, to reduce bulk and ensure my blocks lay nice and flat, I did press the seams between rows open as shown above.  The Indigo strips that frame the patchwork have their seams pressed to the outside.

Another point I should mention is that I did not employ strip piecing techniques per the pattern instructions for these blocks.  Instead, I cut out little squares and rectangles and pieced each strip of each block individually.  Honestly, I don't 100% remember why I decided to do it this way.  I think it was because I wanted to make Block Three A and Block Three B in two different colors, whereas the pattern instructions call for all of these blocks to be the same.  It was easier for me to calculate how much dark green and light purple I'd need for these blocks with old-fashioned slow poke cutting and piecing than it was for me to figure out how many of the different strips and strip sets I'd need to make in each colorway if I was following the directions.

I'd show you a picture of the front of the block but I forgot to take one, and now it's packed away!  I have made 9 of these green/indigo Block Three and will need to make 27 more of them.  Then I'll need to make 18 Block Three in the purple/indigo color combination.

Wanna see a scary picture of chaos and destruction in my (former!) quilting studio?

This Used to Be My Playground...

That's what my studio looked like this morning.  My husband is in the process of completely disassembling my Bernina Q24 long arm quilting machine so the machine head can be safely packed for transport in the original shipping carton.  All my quilting thread and rulers for rotary cutting are off the walls but I still need to pack up my acrylic quilting ruler templates that you see on the wall behind my long arm frame.  My vintage Singer Featherweight machine, all of my AccuQuilt GO! dies and my Bernina 475QE machine are already in Florida, but today I'm packing up my Bernina 790 Plus, my 700E embroidery machine and the embroidery module into their protective luggage bags.  I have the original shipping cartons for my Baby Lock serger and cover stitch machines but I need to figure out how to get the thread stands off those machines in order to fit them back into the styrofoam packing inserts.  

My house in Florida is only about half the size of my house in North Carolina and my sewing room is going to be a LOT smaller than this one so I'm going to have to get really creative with how I set up and use the space that's available.  Wish me luck!

Oh and by the way -- if you have subscribed to receive my blog posts automatically in your email and you're wondering why this one didn't show up that way, no worries -- I paused my email delivery service so I don't have to pay for it while I'm more preoccupied with moving than with writing blog posts.  I'm switching back to MailChimp and I don't have time to get that all set up and tested right now.

Also, quick reminder for my long arm quilting clients that I am not able to accept any customer quilts until further notice -- see photo above of my dismembered long arm machine!!  Please do not ship any quilt tops to my address in North Carolina.  I will let you know when my studio in Naples, Florida is set up and give you my new address.  

Happy quilting, everyone!  I'm linking up today's post with my favorite linky parties:

MONDAY

Design Wall Monday at Small Quilts and Doll Quilts  

TUESDAY

To-Do Tuesday at Quilt Schmilt  

WEDNESDAY

Midweek Makers at Quilt Fabrication

Wednesday Wait Loss at The Inquiring Quilter

THURSDAY

Needle and Thread Thursday at My Quilt Infatuation  

FRIDAY

Peacock Party at Wendy’s Quilts and More

Can I Get a Whoop Whoop? at Confessions of a Fabric Addict

Finished or Not Friday at Alycia Quilts

Off the Wall Friday at Nina Marie Sayre

Beauty Pageant at From Bolt to Beauty

 TGIFF Thank Goodness It’s Finished Friday, rotates, schedule found here: TGIF Friday

SUNDAY

Frédérique at Quilting Patchwork Appliqué

Oh Scrap! at Quilting Is More Fun Than Housework


Monday, November 1, 2021

November OMMG, Lightning Round: One Million Monthly Goals for Rebecca

 Hello, friends -- I've missed you!  Happy November!  

The longer it's been since writing a blog post, the more I have to share, the longer it would take to write about everything I'm working on, and the less time to get anything finished.  I have a folder on my computer desktop where I keep photos of things I want to post about and if it was a REAL folder, it would be splitting at the seams and pictures would be falling off the desk and onto the floor.  I've been working on so many different quilts for clients lately that I'm dying to share with you, but since it's a brandy-new month I've decided to keep it personal and just share my own projects and plans with you today.  I'll be linking up today's post with One Monthly Goal (as if) and To-Do On Tuesday linky parties in addition to my other favorite parties. 

Deco Quilt-Along: Behind Schedule Already

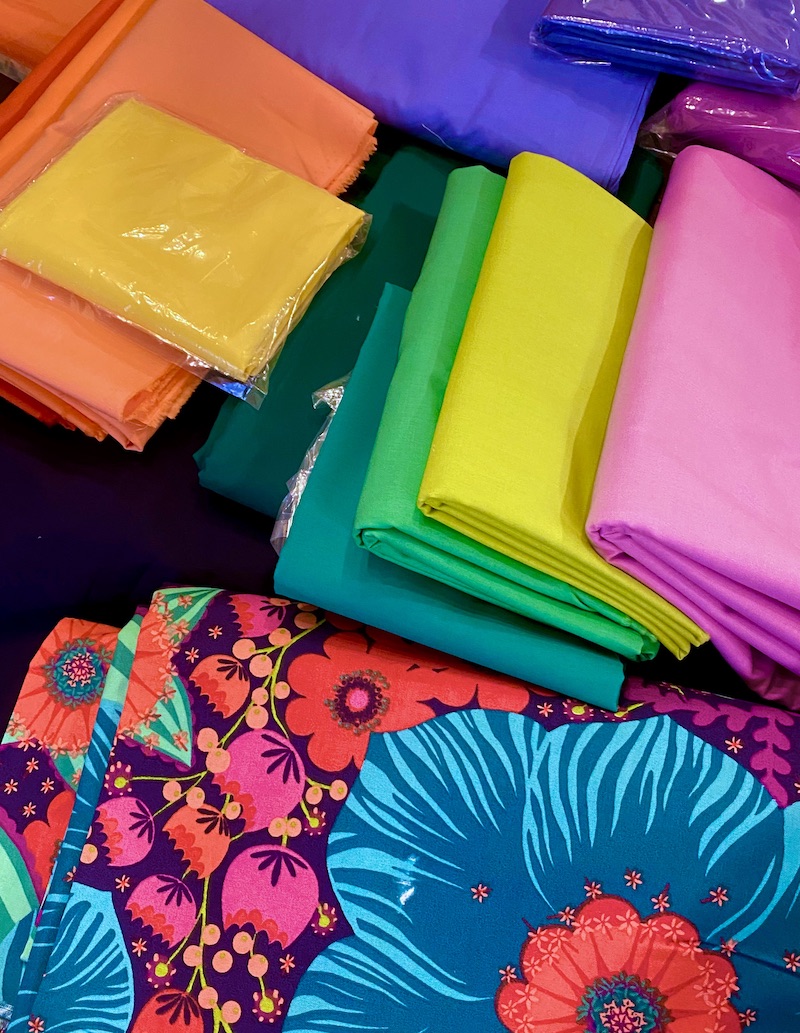
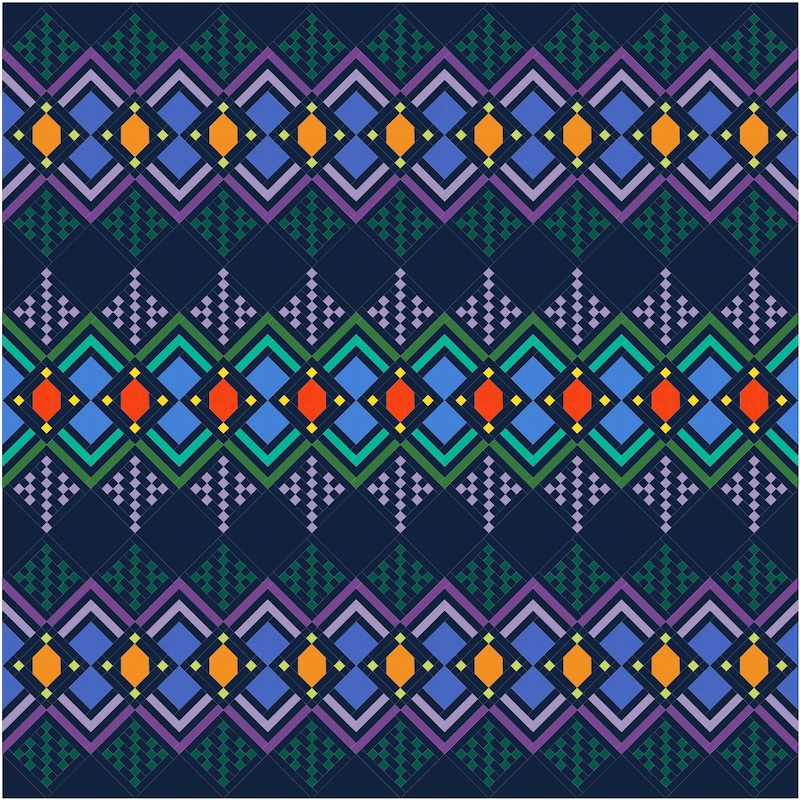
The Deco Quilt QAL hosted by pattern designer Brittany Lloyd of Lo & Behold Stitchery is running from October 18th through November 29th, and I was hoping to keep up with the QAL schedule to prevent this project from turning into yet another languishing UFO (UnFinished Object) hanging around my studio.  I had a delay with the fabrics I'd ordered online, then when they got here I didn't love some of the colors with the Anna Maria Horner backing print I'd fallen in love with while waiting for the solid quilt top fabrics to show up.  But I finally made it out to a bricks-and-mortar quilt shop about 40 minutes away from me a few days ago, and now I'm happy with my "fabric pull."  (Side note: Pulling Fabric (out of quilt shops) is MUCH MORE FUN than Puling Teeth (out of your face).

My Deco Bed Quilt Fabrics, Revised to Coordinate with Anna Maria Horner Backing Print

Obviously I could have saved myself a lot of aggravation and time if I'd chosen the backing print FIRST and THEN pulled solid fabrics to match colors in the print.  I'll still be using these fabrics more or less as shown below in my original color plan, with that inky dark Kona Solids Indigo as my background fabric.  I love bright colors with dark background fabrics!  

Deco Bed Quilt Will Finish at 102" x 102"

According to the Quilt Along schedule, I was supposed to be Planning the first week, then Cutting and Organizing ALL the fabric for the whole quilt last week, and this coming week is supposed to be making all of the Block One blocks (those are the ones that are like log cabin blocks -- in my version, they will have large dark or medium blue squares and logs of Indigo alternating with either purple or green).  In order to get back on schedule somewhat, and because of my track record in the past when cutting EVERYTHING out first, I think I'm going to just cut and piece as I go along.  

Tuesday, February 18, 2020

Spirit Song Quilt: Are We Done Yet? (NO). But Blocks On the Move is Ready to Debut at Quilt Show!

My progress on the Spirit Song Dress Code quilt has slowed way down because I'm at a tedious point in the construction.  After spending so much time planning my mix of colors and prints in my design software, I barged ahead with my piecing without bothering to create  a pressing plan...  So now as I'm joining the 4" inch Birds in the Air blocks together to form the large 16" composite blocks, none of my seam allowances "nest" where the blue triangle points touch one another.  As you can see in the completed block below, that happens EIGHT times in every single block.  Therefore, every time I'm joining two units together with blue triangles that need to touch, I've got six layers of fabric stacked up on one side of those triangle points and only two layers of fabric on the other side, and the nasty little triangles want to slide apart as they pass under the presser foot, and even pinning them is a vicious business involving savage stick pin wounds and a fair amount of swearing.  UGH. Therefore it's taking me a lot longer than expected to join 16 four inch units into one 16" block -- about 2 hours or more per block, including pinning, stabbing myself with the pins, seam ripping, fudging, swearing, pressing...


Block 6 of 12.  This is Getting Tedius.
I left this project in Time Out for a week while focusing on the needs of our new puppy, but I started piecing again a few days ago and I'm feeling better about it now that I'm past the halfway point!  

Yesterday I decided that, for the remaining blocks, I should just bite the bullet and stitch every one of the blue points together by hand first before machine stitching the rest of the seams.  I think it's the only way to get them to line up precisely without shifting when that mountain of bulk passes under my presser foot, and that hand tacking up front will save me a lot of time in the long run, ripping and restitching over and over again!  


NOTE TO SELF: ALWAYS MAKE A PRESSING PLAN FOR THE WHOLE QUILT BEFORE I START PIECING IT!

The best explanation of how and why to create a pressing plan is in Donna Lynn Thomas's book Quiltmaking Essentials 1: Cutting and Piecing Skills.  When I'm looking at a quilt block, or an entire quilt that I've designed on the computer, trying to decide the best way to press seams in order to get crisp points, matched seam intersections and a flat quilt top free of speed bumps, I always consult this book for a refresher.  Highly recommended!


I should be back to smooth sailing with nesting seams at every intersection once I'm assembling those big blocks into rows, if I can only get the rest of these stinking blocks pieced together...


Eight 16 inch Blocks Completed, Four Left to Piece
The Spirit Song quilt was meant to be a "quick detour" project, just to try out the Accuquilt GO! half square triangle dies, before loading and quilting my Jingle appliqué quilt.  And here we are, several months later, with nothing finished and one more work-in-progress!

Meanwhile, Thoroughly Modern Millie (my APQS Millennium longarm machine) is going to be awakened from her deep slumber within the next day or two, because I need to quilt and finish a couple of 16" mini quilt tops that other guild members made to contribute to the Blocks On the Move program I'm launching as Community Education chair of the Charlotte Quilters' Guild.  (I got this idea from Donna Shervington's blog where she mentioned making a 16" block for the Modesto California Country Crossroads Quilters' Guild Blocks on the Move program).


One of Two Blocks On the Move Displays Built by Bernie
Loisann and husband Sig, the geniuses behind the Country Crossroads Quilters' Guild in Modesto, have been so unbelievably kind and generous, providing detailed plans and photographs of exactly how their display units were built so that my handy husband Bernie could recreate them for our Charlotte Quilters' Guild in North Carolina.  Pictured above is one of our two display units, designed to hold mini quilts of 16 to 16 1/2" square.  Because these displays will be set up and left unattended in public spaces, the quilts are mounted with sleeves on dowels that screw into the sides of the display unit and you can't get them out without a screwdriver -- that will significantly reduce the chance of mischief/theft of the beautiful donated mini quilts.  Isn't that COOL?!  We're going to "debut" our Blocks On the Move display at our upcoming Carolina Lilies Annual Quilt Show on March 6-7.  


My Husband Bernie, Fixer of Longarm Machines and Builder of Quilt Displays
The idea behind Blocks On the Move is to move this display throughout the city, setting it up for a month at a time at venues such as assisted living facilities, libraries, hospitals, museums, etc.  I think this will be a great way to raise awareness about who we are and what we do in the community.  Readers who are members of quilt guilds, I'd love to hear what YOUR guild does for community education -- please share those great ideas in the comments!


To-Do List for Tuesday:

This week I'm hoping to accomplish the following:

  • Finish piecing all of my Spirit Song blocks
  • Quilt the two 16" Blocks On the Move flimsies that were pieced by another guild member
  • Go through all of the tax receipts (blech!) and fill out my accountant's tax prep packet
  • Work on an assignment that's due March 1st for a seminary class I'm taking

Well, that puppy isn't going to nap all morning -- if I want a shower today, I'd better get off the computer and do that right now!  Have a wonderful week.
I'm linking today's post with:

MONDAY

·       Design Wall Monday at Small Quilts and Doll Quilts  
·       Monday Making at Love Laugh Quilt
         BOMs Away Katie Mae Quilts  

TUESDAY

·       Colour and Inspiration Tuesday at Clever Chameleon
·       To-Do Tuesday at Home Sewn By Us

WEDNESDAY

·       Midweek Makers at Quilt Fabrication
·       “WOW” WIPs on Wednesday at Esther's Blog

THURSDAY

Needle and Thread Thursday at My Quilt Infatuation

Saturday, July 8, 2017

Do As I Say, Not As I Do: Why I Should Have STARTED With a Pressing Plan

Good morning and Happy Saturday!  Check out this lovely HOLE in the center of my bear paw block.  Nice, right?


There's A Hole In My Quilt Top, Dear Liza a Hole!
Up until yesterday, I had four of these holes at the center of every single one of my bear paw blocks, as well as holes at the four corners of most of my sashing star blocks.  When I started making this quilt several years ago, I just started sewing and "pressing to the dark side" rather than making a pressing plan. 

The goals of a pressing plan are:
  • to reduce bulk
  • keep points crisp and sharp, and
  • create the flattest possible quilt top sans thick, knobby bumps where too many seam allowances stacked up, and
  • most importantly, to create nesting seam allowances wherever possible for perfectly matching seam intersections.  
(If you're following a pattern that includes pressing instructions, the pattern designer has already done this for you).  I realized the error of my haphazard ways after sewing this quilt top together, and came up with a delusional plan to fix it (late one night when bad decisions are made and it's best to leave the studio!).  I just popped the seams at all of the offending intersections so I could press the seam allowances in different directions.  Now my quilt top was nice and flat, but there were a bazillion HOLES in it!


See?  I ripped out the stitching to free the seam allowance.
I couldn't leave it that way (although I was tempted to!), because those holes were hazards waiting to trip up my presser foot during the quilting process, and then RRIPPP!!  It was piddly, fiddly, annoying work, but I did restitch all of those blocks closed and repressed the quilt top yesterday and it's so much better now.


The Final pressing Solution
See how I ended up pressing those intersections where my sawtooth star, sashing and bear paw block comes together?  I split the difference and pressed them into little squares.  Who knows whether the mythical Quilt Police would approve, but it's nice and flat and looks good (to me, anyway) from the right side:


Same Sawtooth Star, from the Right Side
One More, 'Cause They're So Cute
After that, I added my inner white borders:


Pinning Borders, Easing Top Slightly to fit Border
Ever since I started thinking about teaching new quilters, I've had a different mindfulness to my quilting.  I typically would be thinking ahead to the next steps, or even to the next project, but now I'm more focused on what I'm doing in this step, this moment, thinking about how I'm going to teach it to someone else. 

A lot of quilters struggle with keeping their quilt edges flat and square, especially if they have multiple borders.  I deliberately included the sashing strips and border in my class project so I can teach them how to do those steps successfully. 

I did talk with my dealer and she agreed that I could teach this as a two-day class, which I feel much better about.  I'm going to continue to think about ways to streamline the process and divide things up, and will probably put together a couple more sample tops as I do that.  I'm also going to corral some family members as guinea pigs and attempt to teach them the project in the allotted class time. 

My stitching has lagged behind a bit this week due to an unfortunate illness afflicting my 2nd floor air conditioning, turning my studio into a sauna.  It's fixed now, but I'm headed out of town after church tomorrow and that's the perfect opportunity for my 'Nina 750QE sewbaby to go in for her annual wellbaby visit.  I think there's an update that I haven't downloaded, too.  Then, when I get back, she'll be in tip-top shape and ready to sew up a storm! 

Enjoy your summer, and happy stitching, everyone!