Showing posts with label Vintage Quilts. Show all posts

Sunday, April 20, 2025

Custom Digital Quilting with Q-Matic: The 1984 Sampler Quilt Continues

 Happy Easter and Passover to all those celebrating this weekend!  I quilted this block over a week ago and wanted to jot down what I learned before I completely forget what I did.  Doesn’t the green airplane look great with the swirly computerized quilting design in the background, but not crossing over the airplane itself?


Q-Matic Masking Tool for Airplane Block


Of course there are quilters out there who could freehand quilt those swirls and spirals just as beautifully as the computer, but sadly I am not one of them.  ;-)  Since a computerized long arm machine is like a talented but blind quilting assistant, it’s necessary to precisely program and “mask out” the areas where you do and do not want the design to be stitched by physically moving the machine along the patchwork seams and clicking at the points to map out boundaries that the computer can follow.  This is a slow process, as I learned when I did it on this earlier block in the same quilt:


Also Done Using Q-Matic Masking Tool


Looks great, but I learned a lot about what NOT to do with that block!  I set up that circles and spirals as a repeating design right across the block as though it was an edge to edge design going across a whole quilt, mapped out the tumbling blocks appliqué, and told the computer to just stitch it all at once.  Then I watched in horror as the many many stitches went in to create beautifully round circles and spirals balls, but every time the machine encountered a seam line it stitched back and forth multiple times to travel to the next stitching line.  There were jump stitches all over the place that I had to go back and trim and way too many places where the design stitched securing stitches.  Not only is this a less tidy look than I hoped for on the back, but it took me a good hour after I’d finished stitching to clean it all up and trim all those jump stitches from both sides of the quilt.  Very discouraging!

Wednesday, March 19, 2025

Deep Dive Tangent: Exploring the 1934 Cleopatra's Fan Block

Happy Tuesday, my Lovelies!  Today's post is a break from the Lo & Behold Deco quilt I've been working on (just four more rows to stitch together before that's a finished quilt top!), but we're not veering into totally unrelated territory.  Brittany of Lo & Behold Stitchery, who designed my Deco quilt pattern, says she was inspired by the Art Deco style of the 1920s-1940s in 2019, when she realized that we we were coming up on the centennial anniversary of this iconic design movement (and all of the dizzying cultural, social, and technological transformations that happened during its heyday).  

Despite the great number of surviving quilts dating to the 1920s-'40s, not many of these quilts reflect the Art Deco style that was dominant when these quilts were being made.  Perhaps that reflects who was (and who wasn't) making quilts during those years and what sewing and quilting symbolized at that time -- a traditional female domestic activity and not something the giddy modern flapper girls were excited about.  Were the "Modern Girls" of the 1920s and '30s too busy exploring new social and economic opportunities outside the home, working in shops or factories during the day and dancing their nights away in jazz clubs, challenging traditional Victorian gender ideals (and giving their mothers plenty to worry about as they stitched more traditionally styled quilt blocks by the fire)?  ;-). That's my theory, anyway.  Sometimes I just make things up as I go along.

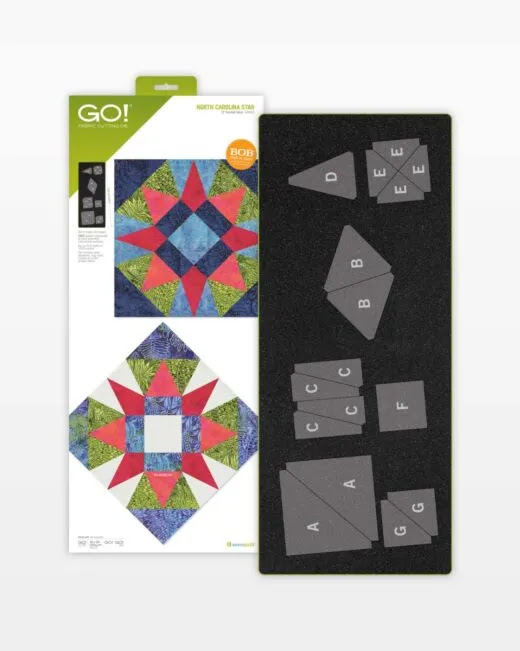
In any case, we don't have a great many examples of the Art Deco style influencing quilters in the surviving vintage quilts from the period, but we do have some and the Cleopatra's Fan design is one of my favorites.  I'm taking you on a Deep Dive into the Cleopatra's Fan block today, because I own (but have not yet used) the AccuQuilt GO! 12" Cleopatra's Fan BOB (Block On Board) die (this post contains affiliate links) and I'm trying to decide whether to actually make a quilt with it -- or just rehome my die to someone else who will use it!


52 x 69 Cleopatra's Fan in Kaffe Fassett Collective Prints, 12 inch Blocks

Above is a Cleopatra's Fan quilt rendering that I created in my EQ8 Quilt Design software using Kaffe Fassett Collective print fabrics with coordinating solids.  I've said it before and I'll say it again -- my Electric Quilt software is the best value for the money of any quilting tool I own, including my Bernina sewing machine and my long arm!  With most of my quilts taking multiple years from the time I cut into fabric until I finish the binding, the ability to experiment with design ideas and see what a quilt would look like in the actual fabrics I'm considering ahead of time saves me from sinking time and money into quilts that disappoint me when they don't turn out looking as great as I imagined when I pulled those fabrics at the quilt shop.  So, in that rendering above, these are 12" finished Cleopatra's Fan blocks just like my 12" AccuQuilt die will cut out for me, and those Kaffe Fassett fabric prints are to scale as well, so the design rendering is actually giving me a pretty good idea of how those large scale botanical prints will look when they are cut into the actual size patches of these blocks.  Do I like this enough to make it?  I haven't decided yet; we'll circle back to that at the end of the blog post!  Next I want to explore the original Cleopatra's Fan pattern as it was published in 1934 in the Cincinnati Inquirer by Laura Wheeler Designs (note that "Laura Wheeler" was one of several fictitious byline used by a New York City pattern syndication company that also went by many different names; you can read more about the company on Barbara Brackman's blog here):


Cleopatra's Fan Pattern Attributed to Laura Wheeler Designs, First Published in 1934


Up until fairly recently, the vast majority of quilts were designed and made as bed coverings rather than as wall hangings or throws.  Just to give you some context, here's an example of "modern" Art Deco bedroom furniture from a 1934 advertisement.  (I was unable to find a source attribution for this image but will update in the future if possible):


1934 Ad for Art Deco Bedroom Furniture


Isn't that fun?  And now, can't you just imagine this vintage Cleopatra's Fan quilt (below) on the bed in the magazine ad, with the sleek radiating curves of the quilt block's piecing lines echoing the radial seams in the headboard's veneer?  You may need to zoom in to see that on the photo if you're reading this on your mobile phone.


Vintage Cleopatra's Fan Quilt circa 1940s, Augusta Auctions


This is actually the first Cleopatra's Fan quilt I ever saw, an image from Augusta Auctions that I stumbled across on Pinterest years ago.  I was intrigued because I'd never seen the block before and the auction house didn't identify the quilt pattern in their auction description.  They just dated it to circa 1940s based on the fabrics.  

Monday, February 10, 2025

Custom Quilting Marybeth's circa 1984 UFO + Cranking Out Deco Blocks

Happy Monday, everyone!  Congratulations to the Eagles fans out there, and my condolences to the Chiefs fans.  Not that I watched even five minutes of the Superbowl -- I'd rather sit in my laundry room for four hours watching the clothes go round and round than sit in front of a television watching grown men run around and clobber each other over a weird-shaped, ugly ball.  So HAH!  My husband and sister-in-law are from Philly, however, so while they were up at the house cheering their team I snuck off to the quilting studio to start quilting the borders on my friend Marybeth's UFO sampler quilt that dates back to 1984.


Wasatch Bella Bella Feather Border and Corner Quilting Design


When Marybeth showed me these blocks and told me the story of the quilt, I promised her that if she finished the quilt top I would custom quilt it for her.  This was supposed to be a "big boy" quilt for her son Nathan, who is now a married father in his forties.  The blocks are hand pieced and hand appliqued in neat, even stitches and it would be an intolerable shame if the quilt never got finished at all.  

Challenges for Marybeth included finding suitable border fabric, because she didn't have enough left of the fabrics from the blocks and may have used the fabric for some other project over the years.  Although there is no purple in her quilt blocks, I think the solid purple border fabric she chose works really well because it's the right value and hue to coordinate with the other colors well.

Challenges for Rebecca included coming up with quilting designs that would complement the vintage 1980s style of the sampler blocks and fabric without overpowering them, and without skewing too modern or too formal.  Another challenge was remembering how to lay out and size a border design to fit the quilt border and to accommodate for the quilt drawing up during stitching...  Too bad I didn't revisit this Q-Matic border quilting tutorial on Bernina's We All Sew blog before I loaded this quilt.  I loaded, basted, and did all of the stitch in the ditch quilting with monofilament thread a couple of months ago, and I did not remember Bernina Educator Denise Jones' tips about marking the center and quarters of the long sides of the quilt to make placing the border designs easier.  Next time!  Here's a shot of Marybeth's quilt on my frame where it languished for weeks, waiting for me to pick a design and get up the courage to start quilting it already!


Post-SID, Pre-Border Quilting Paralysis Syndrome


Friday, January 27, 2023

Star of North Carolina: AccuQuilt vs. Electric Quilt Software

Happy Friday, Quilty Peeps!  I took a little design detour yesterday, playing around with a historical quilt block called Star of North Carolina in an updated color scheme of Kona Solid fabrics.

My 58 x 74 Star of NC Design, Using 8 Inch Blocks

I became aware of this block recently when AccuQuilt reintroduced their limited edition 12" North Carolina Star BOB (Block On Board) die as a permanent offering.  "Block On Board" (BOB) refers to AccuQuilt dies that are designed to cut all of the shapes needed for a particular quilt block with a single pass through the die cutting machine.  (By the way, all of AccuQuilt's BOB dies are on sale 20% off, now through January 30th.  This post contains affiliate links).

AccuQuilt's 12 Inch North Carolina Star BOB Die

Barbara Brackman's definitive reference book, the Encyclopedia of Pieced Quilt Patterns, 3rd Ed., identifies this as Block #473 in the Ladies' Art Company Catalog that was published from 1889 through the 1970s.  

Sunday, January 15, 2023

Vintage Little Boy's Britches for Bobbie + Brandon's Breeches (Just for Fun!)

Hello, my lovelies!  Now that I've wrapped up both of my Christmas quilt projects, I've resumed working on my FrankenWhiggish Rose needle turn appliqué project and I'm continuing to weigh my options for a new machine piecing project.  At the moment, I'm feeling wickedly inspired by a vintage hand pieced quilt top that my client Bobbie rescued from abuse and neglect and brought to me recently for longarm quilting.

Rescued and Redeemed: Bobbie's Vintage Little Boy's Britches Quilt

98 x 98 Little Boy's Britches (Vintage) with Basketweave E2E

Bobbie isn't a quilter; she's an interior designer who loves and appreciates vintage quilts.  When she spied this quilt top in a secondhand shop, she says it was black with filth and they were using it to wrap motor parts in or something like that!  Can you imagine anyone doing that to a quilt top that somebody spent hours and hours piecing by hand?!  I feel like the cops ought to have been called, or Social Services, or at least the Quilt Police!  

Sunday, January 16, 2022

The Velveteen Rabbit, Quilters' Edition: A Quilt Becomes Real, and Then Becomes Whole Again

Good morning, Quilty Peeps!  Instead of the "snowstorm" promised by the weatherman, I'm looking out my window at a sloppy mix of ice and sleet.  But at least the sky looks like winter even if the ground looks like a mess!  

On Becoming Real, from The Velveteen Rabbit

One of my favorite books when I was a child was The Velveteen Rabbit by Margery Williams, first published in 1922.  This year marks its 100th anniversary!  Reading the Skin Horse's description of how toys become Real, I realized that Becoming Real is exactly what happens to a treasured family quilt that has been loved and tattered until it's falling to pieces.  A quilt whose binding is worn through and falling off, with threadbare spots where the batting is coming out and split seams and holes and tears and stains "can't be ugly, except to people who don't understand."  Real is what happens to a quilt when someone loves it for a long, long time.  It's the Real quilts, the ones that have been truly loved, that their owners can't bear to part with no matter how shabby they have become.

Although I'm no longer accepting vintage quilts for repair, I still have a couple more waiting in my queue, like this one that I finished last night for a gentleman in Minnesota:  

91 x 87 Vintage Quilt, After Repair/Restoration

Thursday, November 11, 2021

Two Very Special Clients' Quilts, and a Movie Star Moves Into My Studio

Happy Thursday, Friends!  I just finished writing a different blog post for TGIFF (Thank Goodness It's Finished Friday) that I've scheduled to publish automatically at 6 PM EST this evening, since that's when Friday begins for those linking up from Australia, so be sure to check back for that one and link up your own finishes, even if it's a small finish like a single block completed.  Meanwhile, I have a couple of extra-special client quilts that I've been wanting to share with you.  

Julie's Vintage Equestrian Applique Quilt Repair

This first one belongs to Julie, whose puppy chewed a hole through all layers of the quilt at the top edge.  These dogs sure do keep me busy, don't they?!  I neglected to get a good "before" phot of the entire quilt before I started working on it, but here's what it looked like when it was nearly ready to go home again:

74 x 84 Vintage Equestrian Applique Quilt, After Repair

Julie cherishes this quilt because her husband had it custom made for her as a surprise gift many years ago.  Their family is involved with equestrian sporting and I believe he may have even drawn the horse silhouette for the applique shapes himself.  He found a quilter to make it and was given a shopping list of how much fabric was needed, then went to the fabric store and picked everything out himself -- hence the assortment of calicos, corduroys, and poly blend fabrics in this quilt.

Detail of the Worst Damage Area

This quilt was made with a wide sashing between the blocks and a narrow, 1/2" finished width outer border in the same fabric that simply wrapped to the back of the quilt and was machine stitched in lieu of traditional binding.

Same Spot On the Quilt, Backing Side

Here's what that section of the quilt looked like after I'd repaired it:

Repairs Completed, All Machine Stitched

My client's budget dictated that all of the machine repairs would be machine stitched for this project.  The binding was damaged and falling off on all four sides of the quilt and would need to be replaced, and finding a suitable fabric was the biggest challenge.  I'd initially told Julie that I'd use a solid red for the binding, but I couldn't bring myself to do it.  My goal in restoring a family quilt like this is to have it look as much like it did originally as I possibly can, and although a red binding would look good on the quilt, it would definitely draw your eye and look different to its owners.  I could not find anything like the original ivory/red/blue print calico fabric in any of the local quilt shops I visited, but I did find a red and white polka dot fabric.  I was able to tone down the bright white background of the new fabric to better match the original fabric by coffee staining it before using it to repair the quilt.

Monday, July 19, 2021

Vintage Economy Quilt is Headed Home: The One About the Super-Wide Binding

Good Monday Morning, Quilt Lovers!  This vintage Economy Block quilt is finally all stitched up and ready to ship back to its owner this morning.  I really love how modern and fresh this 80+-year-old quilt looks after all these years, and I'm glad to have extended its useful life so the granddaughter of the original quilt maker can continue to enjoy it.

Vintage Economy Quilt Repaired, Ready to Go Home

Although there's another, more familiar quilt block named Economy, I identified this quilt block as the Economy pattern that was first published in the Kansas City Star in 1933 using Barbara Brackman's definitive Encyclopedia of Pieced Quilt Patterns, 3rd Ed.

Economy Block, First Published in the Kansas City Star  (1933)

I think this quilt was made sometime during the 1930s-1940s, based on the the date the block pattern was published, the color scheme, and clues from the construction methods and materials used in the quilt.  It was well cared for by its owner and looks great for its age. 

Monday, July 12, 2021

Vintage Quilt Repairs Continue + Millie Goes Home to Minnesota

Good Monday morning!  I'm still working on that vintage quilt repair that I wrote about last week (here).  At this point, I've finished all of the hand stitched repair work in the quilt's interior and all I have left is the binding.  This is a hand pieced quilt that had open seams to be stitched shut in almost every block, as well as a few other minor holes and one serious hole where something acidic had spilled on the quilt and eaten through the cotton fibers.  When deciding how to deal with this hole, I tried to address it the way the original quilt maker might have done, so I looked to the repairs on this antique Oak Leaf and Reel quilt for inspiration:

75.75 x 69 Oak Leaf and Reel Quilt, circa 1860


I photographed this quilt at the Paducah museum in 2019, when it was the inspiration quilt for a New Quilts from an Old Favorite challenge.  This hand pieced, hand appliquéd antique quilt is part of The Richardson Collection belonging to the Kentucky Museum at Western Kentucky University.  

What really fascinated me about this quilt was the way it had been repaired long ago:

Sunday, July 4, 2021

The High-Tech, Low-Tech, Good News and Bad News Update

Happy Sunday, Happy Independence Day to those of you in the United States, and Happy July, everyone!  Today's post will be a smorgasbord of high-tech and low-tech excitement that has accumulated over the past week.

The Charlotte Modern Quilt Guild hosted a Zoom lecture with Canadian quilter Libs Elliott a few days ago, which was fabulous!  Libs is best known for her use of computer code to generate random geometric designs for modern quilting.  She shared that her parents were antique dealers and that she'd discovered and fallen in love with old quilts at auctions and estate sales.  As she related her journey from trying to replicate traditional patchwork with hardly any instruction through creating ideas of her own on paper and then trying to figure out how to make a quilt that looked like her sketches, I really appreciated her spirit of adventure and the way her style and her process have evolved over time.

Enjoying Libs Elliott's Lecture on Quilt Design with Computer Code

I got some good news last week, and I got some bad news.  Good news first!  I found a buyer for my APQS machine, a quilter from Northern Minnesota who was delightful to talk to on the phone.  She will be driving over 1,300 miles come and pick up the machine this week, and I wish her a safe and smooth journey!

Bad news: I already sold the IntelliQuilter computer robotics that I had on my APQS Millennium, because my Q-Matic computer robotics for the Bernina was supposed to be here at the end of June.  Well, guess what?  The Q-Matic is now pushed back until at least August, due to the global shortage in microchips.  ðŸ˜§ Yikes!  That means I can't stitch any digital edge-to-edge quilts for another month!  My Bernina dealer, Creative Sewing & Vacuum, has graciously offered to let me use their demo Q24 machine at the store for computerized quilts that  I need to get done in the meantime.  The only catch there is that, to conserve floor space in the shop, their demo Q24 is set up on the smallest 8' frame and the widest quilt that will fit that frame is about 71".  Not big enough for the queen quilts in my queue!  I had a customer's baby quilt that needed to get done, though, so I brought it over to quilt it with Q-Matic at the store.  I can't show you this quilt quite yet -- the client is picking it up on Wednesday -- but I'm hosting TGIFF Thank Goodness It's Finished Friday this week and I'll show it to you then, okay?  Pinky promise!  For now you just get this little tantalizing glimpse:

Borrowing My Bernina Dealer's Demo Q24 with Q-Matic

Tuesday, June 15, 2021

Vintage Corn and Beans Quilt Repairs, Part 3

I made some more progress on the vintage Corn and Beans quilt repair project.  The second of the two blocks that needed to be completely remade and patched over has now been made, attached to the quilt, and requilted.  In case anyone is curious, it took me two and a half hours to piece each of these corn and beans blocks from start to finish, including cutting and pressing the blocks.

Two Blocks Replaced and Requilted

The turquoise and pale blue block was the one that my client's dog had chewed through.  The block next to it needed replacement because both of the fabrics in the original block were disintegrating:

Original Block with Disintegrating Fabrics

I could not find exact matches for these fabrics, but I did the best I could to replicate the look and feel of this block with new fabrics.

Saturday, June 5, 2021

Vintage Corn and Beans Repair, Part Deux: How to Patch a Giant, Gaping Hole in the Middle of a Quilt

You guys, I was so proud of myself at the end of the day's work on this vintage quilt repair yesterday.  I managed to patch the gaping hole in the quilt backing, fill in the missing cotton batting from the right side, and then patch the giant hole in the front of the quilt with my recreated block -- and I did it all by machine so the repair is strong enough to stand the test of time.  Moreover, the quilt lays perfectly flat through the repaired section and there are no unwanted tucks or pleats around the repair on either the front or the backing side.  WHEW!  Fools like me rush in where angels fear to tread...

More Obvious Than I'd Like, but Better Than the Gaping Hole

There was some damage to parts of the sashing beyond the edges of the missing block and there was also a good bit of distortion of the quilt around the chewed area, such that a perfectly square block would not work as a patch by itself.  The adjacent blocks in the quilt measure about 12 1/4" finished -- who knows what size they were originally, as they have probably shrunk over the years.  

Thursday, June 3, 2021

Rebecca vs the Cavalier King Charles Spaniel: A Corn and Beans Vintage Quilt Repair In Progress

Just as I was about to type "Good Morning, Lovelies," my grandfather clock struck noon...  Ah, well -- good afternoon, then!  Today I'm sharing the first chapter of a vintage Corn and Beans quilt repair that I'm working on for a client.  

Client's Vintage Corn and Beans Quilt, With "Window" Added By Her Dog


Why, yes -- OF COURSE I can fix that!  ðŸ˜‚. I am such a glutton for punishment, aren't I?!

This vintage Corn & Beans quilt is actually in pretty good shape overall, except for worn binding, a few small holes/open seams here and there...  and a giant window chewed right through the middle of it by my client's Cavalier King Charles Spaniel!  It's machine pieced and quilted by machine (minimally, by today's standards) and I've been mulling over how to fix it for awhile now, knowing it was coming up in my queue.

My Replacement Block, Next to the Original


When working on a vintage repair for a client, I'm charging by the hour and trying to stick as closely as possible to the agreed-upon estimate, so I start with the absolute worst damage first and try to work as efficiently as possible.  This area of the quilt needs to be completely reconstructed through all three layers, so that's where I chose to begin.

Wednesday, March 31, 2021

Everything Old is New Again: EQ8 Design Inspiration From a Vintage Quilt

 Good morning!  Happy Passover to my Jewish friends, Happy Holy Week to my Christian friends, and Happy Spring to one and all!  In my house, my younger son has a half day of remote learning today and then he is off for a week of Spring break.  My older son is coming home from college tomorrow afternoon, and we are all going to attend a real, live, in-person worship service together for Easter Sunday, followed by Easter dinner with my mom.  I'm so excited; it's like seeing the light at the end of a very long, dark tunnel!  We had to sign up in advance to attend church services due to reduced capacity for social distancing, and we'll get our temperatures checked at the door and wear masks the whole time, but STILL.  ðŸ˜Š

My main focus project, Anders' high school graduation kaleidoscope quilt, is still on track, but I'm sure everyone's tired of looking at it right now and it isn't looking much different than the last time I showed it anyway.  I'm just working my way through row by row, sewing corner triangles onto blocks that you've already seen.  So I thought I'd show you something else today -- a client's vintage Economy quilt that is in my queue, awaiting repair.

62 x 80 Vintage Economy Quilt, Awaiting Repair


Don't you love how fresh and MODERN this antique/vintage quilt appears?  Other than its exceptional condition overall for a quilt that's probably 80-90 years old, what strikes me about this particular quilt is how it's a two color, pink and white quilt, but there's a subtle ombre effect from the use of at least three different shades of pink fabric, and the way the quilt maker distributed those three shades of pink in the block layout.  Secondly, what a cool quilting design!  It's similar to Baptist Fan, except that the design reverses direction in the center of the quilt to create a very modern-looking wave effect across the quilt top.  Also. the curved lines of quilting meet up with the rows above and below rather than touching the "fan" to the left as in a traditional Baptist Fan quilting design.  

Thursday, January 21, 2021

Odds and Ends: All the Amazing Things I Forgot to Tell You This Week

 Hello, my lovelies, and Happy Friday!  We made it to the end of another week!  Yay!

So, you know that drawer in your house, probably in your kitchen, that is full of random things that don't belong anywhere else?  That is your frame of reference for today's blog post.  I have a "junk drawer" full of loose ideas in my head that I meant to share with you in earlier posts.  For instance:

A Ball of Feed Sack String, Next to a Golf Ball

Feed Sack String!!!

In a recent post about a vintage quilt repair that I was working on for a client, I shared this photo of the hand piecing seams that the original quilt maker stitched in a very thick, heavy thread:

This Quilt was Hand Pieced with Feed Sack String!

I shared the same photo in a Vintage Quilting group that I belong to on Facebook, and several members identified the mystery thread as feed sack string that they remember being carefully removed from the seams of feed sacks, flour sacks etc., rolled into balls (one of the group members sent me the above photo of her own ball of feed sack string), and reused for everything from tying quilts to wrapping packages.  As someone who will get in her car and drive 30 minutes away to get exactly the right fiber, weight, and color thread for a project, that level of thrift and resourcefulness is just awe-inspiring.

Saturday, January 16, 2021

Textile Archaeology: Exploring a Vintage Quilt Through Dissection and Repair

 Yesterday morning, while drinking my latte, I read through a string of National Geographic articles about recently discovered hominid remains in the Rising Star cave system of South Africa.  On my giant desktop monitor, I clicked through slide shows of exploration scientists cramming themselves and their equipment into narrow channels of rock as they gingerly worked to free fragile, ancient fossils that would shed new light on our understanding of early human history.

Client's Vintage Summer Quilt, Prior to Repair

And then, I headed up to my studio, and began a delicate excavation of my own, the beginning of a vintage quilt repair that I'm undertaking on behalf of a client.  Although I've never thought about it this way before, I'm sure that a big part of what attracts me to these fraught and often tedious vintage quilt projects is the opportunity they afford for a bit of textile archaeology.  And yes -- that's actually a thing!  

"As fiber folk, we all know the feeling. You look at a handmade textile and you see not just a pretty object, but the hours at the loom or knitting needles, the fiber drafting at the wheel, the alchemy at the dye pot, even the shepherds with their flocks. You can see all the steps and decisions that went into creating that object, all the places where one path or another was chosen. Archaeologists are constantly trying to trace back those paths, to see those moments when a decision had to be made and why. The whys are how we learn about culture in the distant past."


         -- Christina Pappas, Textile Archaeologist 


Sunday, March 22, 2020

The Beastly Y-Seam Block Has a Name: Cathedral Window by Nancy Cabot, 1933 Chicago Tribune

When I was recreating, resizing, recoloring and revising the Moda Modern Building Blocks Sampler in EQ8 Quilt Design Software, swapping out some of the blocks for others in my EQ Block Library, I didn't pay much attention to the information contained in the software "notecard" for each block.  After toiling away at all of these Y-seams, however, I was curious about where this block I'm making came from and I went back to my software to find out.

Cathedral Window by Nancy Cabot, Originally Published in 1933 Chicago Tribune

The 20" block I'm currently working on was designed by Loretta Leitner Rising (under the pen name Nancy Cabot) and it was originally published in the Chicago Tribune in 1933.  Per the newspaper column, she named the block Cathedral Window because it was inspired by the first cathedral built in Kentucky that year, and Cabot suggested "pastel pink or blue with white" as colorways.  I've recolored the block above using a reproduction 1930s fabric so you can see it as the pattern designer envisioned it.  

In Barbara Brackman's Encyclopedia of Pieced Quilt Patterns this block is given reference number 1953, and it's also in the EQ Blockbase program that can either tie into EQ8 software or be used alone to identify block patterns and/or print templates and foundation paper piecing patterns in whatever size you need.  

Cathedral Window is Reference No. 1953 in Brackman's Encyclopedia of Pieced Quilt Patterns
A lot of the quilt block patterns that were published early in the last century involved challenging construction methods such as curved piecing, Y-seams, and partial seams.  Most American quilters would have had strong needlework skills at that time, when sewing machine sales were just beginning to take off and readymade clothing was not yet affordable for most families.  Y-seam construction would not have been as intimidating to the Tribune's readers in 1933 as it is to quilters today.  

Sixteen Y-Seams!
Even so, I was not able to locate a single example of an entire quilt made from this block on the Internet -- but maybe the images are out there, just not associated with the pattern name or designer's name that I was using as keywords?  If anyone knows of a vintage quilt -- or ANY quilt -- made from this block pattern, please let me know in the comments so I can add that to this post.  I'm all about giving design credit where it's due.

Of course, my own color choices for this block are very different:

My Version of Nancy Cabot's Cathedral Window Block in Kona Solids
I love how the exact same block can look completely different in different fabrics, don't you? Here's as far as I got with this block yesterday:

My Cathedral Window Block In Progress
I have completed eight of the sixteen Y-seams in this block, and in case anyone is interested, I wrote a step-by-step tutorial for Y-seam patchwork in yesterday's post here.  

Dashed Yellow Lines Indicate Seams Remaining to be Sewn
Even so, I can't imagine making an entire bed sized quilt from this block, can you?!  I'm linking today's post with:

·       Oh Scrap! at Quilting Is More Fun Than Housework http://quiltingismorefunthanhousework.blogspot.com
·       Design Wall Monday at Small Quilts and Doll Quilts  
·       Monday Making at Love Laugh Quilt
·       BOMs Away Katie Mae Quilts  

·       Colour and Inspiration Tuesday at Clever Chameleon

Friday, December 20, 2019

Vintage Double Wedding Ring Bed Runners Finished and Delivered!

Remember that Double Wedding Ring UFO that I told you about back in August?  A woman had contacted our Charlotte Quilters' Guild looking for someone who could finish an in-progress Double Wedding Ring quilt that she found in her mother's attic. She had a tub of assembled circular wedding ring blocks, a small section of a handful of blocks sewn together, and lots of tiny wedge pieces cut out.  Based on the client's recollection of when her grandmother had grown too ill to sew, as well as rough dating of the fabrics in the blocks and the techniques she was using (paper templates and scissor cutting), we think that her grandmother was working on this project in the late eighties or early nineties.


Vintage Double Wedding Ring Bed Runner
As is typical with vintage quilt tops, these blocks had lots of "personality" that made them difficult to assemble.  Each circular block had finished to a slightly different size, and there were signs of struggle in most of the deep Vs where the arcs join adjacent blocks.  I suspect the original maker set this project aside due to frustration and discouragement trying to fit the blocks together after she'd gone through all of that work to cut out every single patch with a scissor and then all of the curved piecing...  We've all had projects like that, haven't we, that we just need to put in "Time Out" until we're ready to deal with them again?


Vintage Double Wedding Ring with Curly Feathers Quilting Design
Instead of completing this project as a bed quilt as grandmother likely intended, we decided to select the blocks with the fewest piecing issues and use them to create two Queen bed runners, one for my client to keep, and one for her to give as a surprise Christmas gift to her cousin who shares fond memories of snuggling up under Grandma's quilts.


One Of the Two Bed Runners, Laid Out on Dining Room Table
I completed the piecing of the bed runners myself and starched them as flat and smooth as possible before passing them off to my friend Christa Smith for computerized longarm quilting.  (My machine is not yet computerized, and had been experiencing technical difficulties at the time I was making these arrangements for my client's project).  I knew Christa would do an amazing job, and she definitely came through!  We chose Jessica Schick's Curly Feathers allover design for the bed runners for a couple of reasons.  First, the labor involved in piecing the tops and doing the hand finished scalloped binding for two bed runners was significant, and an allover computerized pantograph design helped to keep this project affordable for the client.  Second, custom quilting the bed runners might have drawn attention to the imperfections of the piecing.  There also would not have been enough time to get the runners finished in time for Christmas if we'd gone with custom quilting.  But most importantly, the primary value of these bed runner quilts to the client is that it represents the last quilt her grandma made, and none of Grandma's older quilts that she remembers from her childhood have survived to be passed down.  Custom longarm quilting is definitely not the way that Grandma would have quilted this project back in 1990, and it would have made the bed runners more about the tastes and preferences of the quilters of today than about the taste and preferences of Grandma.  I think Grandma might have finished this herself with a hand quilted feather wreath of some kind in the middle of each wedding ring.  The way we quilted it gives a similar traditional look at first impression, does not upstage the piecing, and gave enough quilting to control areas of fullness in each runner so they lay nice and flat, without "overquilting" any area in a way that would look more "modern traditional" than truly vintage. 

So my amazing friend Christa of Cotton Berry Quilting quilted both bed runners and she also did the scalloped binding.  This is the friend who has the same model longarm machine as mine, who has gone out of her way to help me figure out what was wrong with my machine so I could get it up and running again -- one of the kindest, most generous and talented people I know.  (FYI, for those of you who might be looking for a longarmer -- although Christa is no longer doing custom quilting for clients, she still accepts customer quilts for computerized edge-to-edge quilting).  

Christa did the scalloped binding as well.  Then she returned the quilts to me and I personalized them with machine embroidered quilt labels.


Label Machine Embroidered on Bernina 750QEE with Mettler 60/2 Cotton Embroidery Thread
To maintain the vintage vibe, I embroidered the quilt labels with Mettler 60/2 cotton embroidery thread rather than using a shiny rayon or polyester embroidery thread.  

Digitizing the Labels On My Computer

I digitized the labels on the computer using my Bernina v8 Designer Plus embroidery software, utilizing the built-in settings for lightweight woven fabric and Run Liberty, one of the fonts included in the software.  

Digitizing the Label in v8 Bernina Designer Plus Embroidery Software

I increase the space between letters with this font to ensure the label is still legible with the font so small, and then I added a hand stitched French knot to the dot above each "i" after the machine embroidery was completed.  [Note to Self: skip the water soluble topping next time I'm embroidering quilt labels for a quilt that won't be washed immediately.  It was such a bear trying to remove all of those little stabilizer bits when I was finished embroidering!]


Second Machine Embroidered Quilt Label
Each of the two bed runners has a different backing fabric, but I went with the same fabric and thread colors for both labels.  After pre-turning the edges and pressing the creases with my iron, I glue-basted the labels in place before hand appliquéing them to the back of the bed runners.  And no, I did not put either my name or Christa's name on the quilt labels.  I know that quilt historians want to know the names, birth places, and blood types of every single person who worked on a quilt, but these are not museum pieces.  I feel like these small quilts are between a grandma and her granddaughters, and it felt wrong to put anyone else's names on the labels besides theirs.

I could not be more pleased with how these came out, and my client is thrilled with them.  As a quilter myself, I know how much it would have meant to the original quilt maker to know that her granddaughters still cherish her memory, and the memory of being wrapped in her quilts at the holidays.  These last two quilts from Grandma will surely be treasured.  But I'm also glad they are done and out of my house!  Now the only thing between me and the Jingle quilt needing to be quilted is a mountain of Christmas packages waiting to be wrapped...

I'm linking today's post with:
·       Whoop Whoop Fridays at Confessions of a Fabric Addict
·       Beauty Pageant at From Bolt to Beauty
·       Finished Or Not Friday at Busy Hands Quilts
-->
·       TGIFF Thank Goodness It’s Finished Friday, hosted this week at Home Sewn By Us