Showing posts with label Rotary Cutting. Show all posts

Saturday, March 25, 2023

Halo Quilt Value Study: Making a Messy Start

Happy Weekend, quilters!  I have an itty bitty amount of progress on my new Halo quilt to share with you today.  For those who missed my earlier post about this NewFO project, Halo is a Jen Kingwell pattern that can be found in her Jenny From One Block pattern booklet, available on Amazon here (this post contains affiliate links).

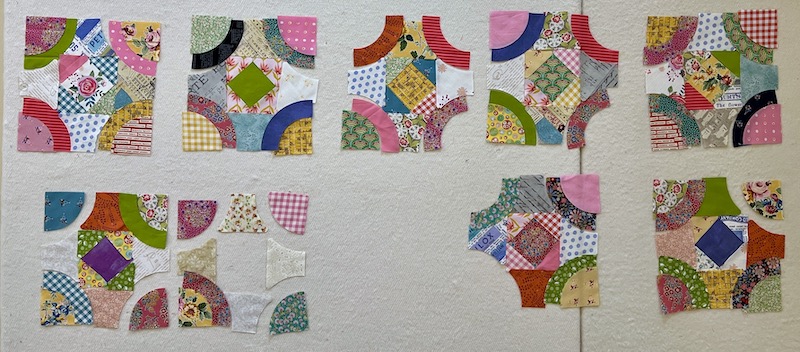
Unsewn Halo Blocks On My Design Wall


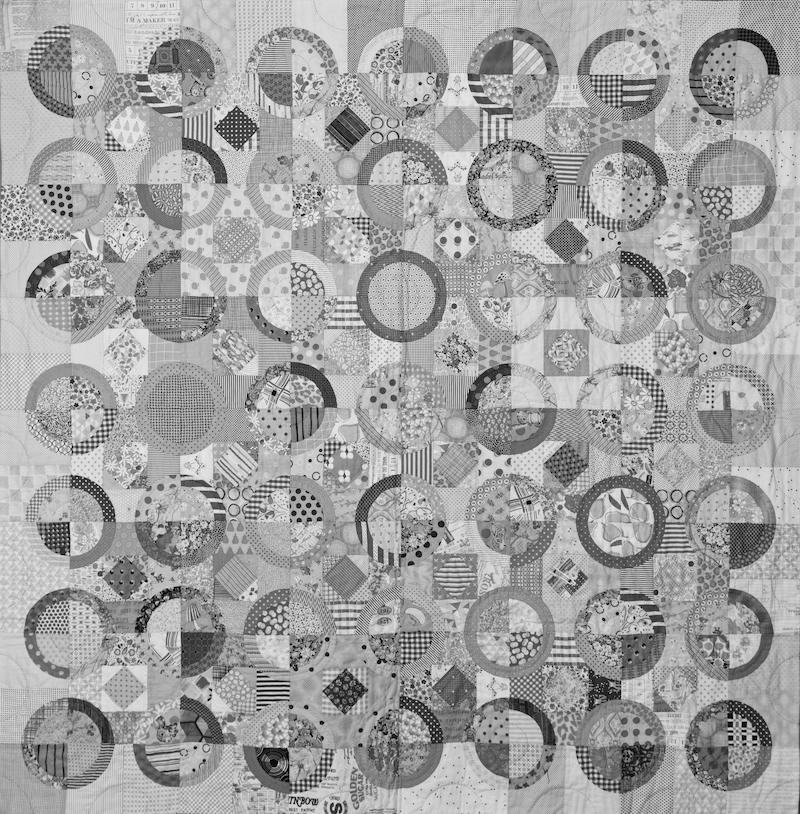
For the last couple of weeks, I've been working on cutting out shapes and rearranging them on my design wall without any sewing.  When I searched #haloquilt on Instagram, I found lots of different versions of this quilt, in all kinds of colorways.  What struck me immediately was that it's the muddled values in Jen Kingwell's original version that drew me in, the way that her "halo rings" appear to come forward in some places and recede in others, creating an illusion of depth.  Other quilters have made some very striking and modern versions of this quilt by increasing the value contrast, limiting the color palette, or restricting themselves to solids, but I was really intrigued by the way Jen broke the conventional "quilt police" rules about value and contrast in her quilt, creating something that feels fresh and modern but also somehow nostalgic and vintage.  I want to recreate that in my version of the quilt.

Jen Kingwell's 66 x 66 Halo Quilt


I printed a full page, grayscale photo of Jen's quilt and taped it up above my cutting table so I can refer to it as I'm chopping up my fabric pieces:

Grayscale Photo of Jen Kingwell's Halo Quilt


It's so much easier to see what's going on with value when you take color out of the equation!  

Saturday, February 16, 2019

Getting My Ducks In a Row, Or My Geese Lined Up In Circles

Hello there, and happy Saturday morning!  I'm pleased to report that I've actually STARTED on my son's graduation quilt.  I haven't sewn a stitch yet -- just prep work so far, but I have a feeling the upfront prep work on this project will pay off with an accelerated pace once I do start piecing.
Precut Geese Patches, Bagged and Labeled

First things first: After the Disastrous Dye Bleed Detour of 2018, my first step had to be checking each of these fabrics to make sure there was no loose dye from the dark fabrics waiting to bleed all over my yellows!


Once Bitten, Twice As Likely to Check for Colorfastness!

I just snipped off about a 2" square from each fabric and stuck it in a glass of boiling water.  The white paper towel beneath the glasses makes it easy to see whether any of the fabrics is turning its water into Easter egg dye.  Happily, there were no issues with any of my fabrics this time.  I was able to skip the step of preaching/preshrinking my fabrics because they are all Kona Solids.  Since they're all from the same line, I predict that they are all going to have the same rate of shrinkage.  I am totally cool with that shrinkage happening AFTER I quilt this, because I like that puckery texture and I'm short on time.


Bigger IS Better When it Comes to Light Boxes!

Since I designed this quilt in EQ8, I was able to print my foundation paper piecing patterns for the arced flying geese directly from the software onto newsprint.  However, these are 12" blocks and the foundation pattern is too big to fit onto a single sheet of newsprint.  I used my giant lightbox to precisely match up the registration marks on the two pattern sheets and then taped them together with Scotch Magic Tape (unlike cellophane tape, Scotch Magic Tape won't melt when ironed).


Foundation Patterns Taped and Ready to Go!
I printed and taped together six of the 48 arced geese foundations and then set them aside to start cutting into my fabric.


When paper piecing, I have best results if I roughly cut out each patch the correct shape but with an oversize seam allowance.  That makes it easier for me to tell if I'm positioning the piece correctly when I sew it to the foundation, which translates into less ripping out stitches and redoing!  Going back to my EQ8 design, I printed templates for all of the flying geese triangles directly onto card stock, but set the seam allowance to 1/2" rather than the default 1/4" that I'd use for traditional piecing.


Precutting Fabric for Paper Piecing with Oversize Template
Each triangle in the arc of flying geese is a different shape and size, and I have 14 different shades of blue, yellow and green in each one so I know I need to be organized to piece these accurately.  Since there are 48 blocks, I'm cutting out 48 patches from each template. As you see above, I use my rotary cutter and ruler to cut strips, and then I use the ruler to cut the straight edges of each triangle from the strips and freehand the rotary cutter around the curves.  This is actually going pretty quickly since the patches don't need to be exact, just roughly cut with room to spare, cutting four at a time.  I did mark my grainline on each template, though -- I want a straight grain on the bottom of every little goose unit.


All of Unit T4 in Kona Solids Oasis Have Been Cut and Bagged
All of the patches for a given template get bagged in a ziplock baggie, labeled with the template letter (generated by my EQ8 quilt design software), a number indicating the order in which the patches get sewn to the foundation, and the Kona Solid color of that fabric, in case of an oops requiring more fabric.  I am also cutting extras of everything -- it's so much faster to cut a few extra pieces up front than to have to go back and cut a replacement patch later on, interrupting your piecing groove!

Here's my quilt design again, in case you missed my previous post:


My EQ8 Design for Lars's Graduation Quilt
It's an extra-long Twin size for a college dorm.  Forty-eight blocks, each block finishes at 12" so the quilt should end up around 72" x 96" or slightly smaller, depending on how closely I quilt it and how much shrinking happens in the first wash.  I love, love, LOVE that I can design any quilt I want in my EQ8 software, color every single patch with actual fabric so I know exactly what it's going to look like from the very beginning, and then print out my own personal foundation patterns and templates to turn that idea into reality.  Seriously, my quilting software is probably my favorite quilting tool second only to my sewing machine!  


Introducing Goldilocks, my new Bernina 475QE Travel Machine!

...But, speaking of sewing machines, look who followed me home from the Bernina store last week:


Meet Goldilocks, My New Bernina 475QE!
This is the newly-introduced Bernina 475QE and she's my Goldilocks machine -- not too big, not too small; not too pricey but still fully featured, with all of the Bernina features that I use on a regular basis and nothing extra that I don't need (or want to pay for) on a travel machine.  I'm totally smitten.  I'll post a full review of the machine within the next week or so.  Meanwhile, there are more flying geese triangles to be cut out for Lars's quilt!

Have a great weekend, everyone!  I'm linking up with:


·      Design Wall Monday at Small Quilts and Doll Quilts http://smallquiltsanddollquilts.blogspot.com 
·      Main Crush Monday at Cooking Up Quilts http://www.cookingupquilts.com/
·      Monday Making at Love Laugh Quilt http://lovelaughquilt.blogspot.com/
-->
·      Moving it Forward at Em’s Scrap Bag: http://emsscrapbag.blogspot.com.au/

Monday, June 4, 2018

My Jingle Applique BOM is Back On the Design Wall

I'm going to be BRIEF today, I promise.  I've got a lot on my agenda for this week, but managed to sneak in an hour in the studio yesterday to cut some new setting triangles for my Jingle BOM (Block of the Month) from 2013.  Jingle is my oldest work in progress and it bothers my son Anders that I started it five years ago and haven't finished it yet, but now that I've resolved the bleeding red dye dilemma I'm looking forward to finishing this quilt this year.  That's right, you heard it here first -- Finishing my Jingle quilt is a GOAL for 2018!


New Setting Triangles for My Jingle BOM!
Brief recap to bring you up to speed: Jingle is a free BOM designed by Erin Russek of One Piece At A Time in 2013, and as of this writing, the patterns and instructions are still available for free on her blog here.  All of the border block patterns are free; the only pattern you need to purchase is the large center medallion and that's just a $10 download from Erin's etsy shop here.  Totally worth it, IMO.  This is my very first applique project of any kind, and all of the applique is needle turned and hand-stitched according to the excellent, amazing, unbelievably awesome instructions and video tutorials on Erin's blog.  


So this is the way blocks for this quilt are set in Erin's original design:


Erin Russek's Layout for Jingle
I love the blocks, but I don't really love setting the center medallion on point with those gigantic plain setting triangles.  I want to set my center medallion straight and fill in with some pieced inner borders.

It took me awhile to pick up where I left off, by the way.  I had cut out all of the setting triangles from the red poinsettia fabric originally, but now I've decided that I like it better with alternating red and green triangles, hence the green triangles that I cut out this morning.  There was a moment of panic, thinking that my triangles might have shrunken severely when I was soaking all the excess red dye out of them -- and then I remembered that I have Kaye England's special setting triangle ruler for Nifty Notions, and that's what I had used to cut my poinsettia setting triangles.  I really need to leave myself better notes when I pack projects away in "time out!"


Specialty Ruler for Cutting Setting Triangles
What I love about this ruler is that you can use it to cut both your setting triangles AND your side triangles from the same cut width of fabric, with the fabric grain oriented properly on both triangles, and it does the math for you based on the finished size of the blocks you're setting on point.  So in my case, these blocks are finishing at 9" and the ruler is clearly marked to indicate that 9" blocks require a 7 1/4" strip.  Easy-peasy, fairly fast once I refreshed my memory on how to use the ruler (instructions are available here), and more accurate than trying to cut out gigantic squares that are bigger than my rulers and then attempt to cross-cut them diagonally into QSTs and HSTs.  I do love my fancy toys...

The other thing I needed to refresh my memory on was how I am supposed to sew these oversize triangles to my blocks once I've cut them out. There are lots of tutorials out there explaining the math for cutting out side triangles and corner triangles from cross-cut squares, and explaining why the setting triangles need to be QSTs (with the straight of grain on the LONG side) and why the corner triangles need to be HSTs (with the straight of grain on the SHORT sides), but this is the video I found that also explained how to sew these oversized triangles to your quilt blocks once you've cut them out:


I know this is a "no brainer" for some of my readers, but one of the main reasons I document these things in my blog is for my own benefit -- so I can find those instructions and tutorials again six years from now, when I can't remember how I did it the last time!

My next step for Jingle -- and this is my To Do on Tuesday goal for the week -- is to assemble the on-point block borders with the setting triangles and corner triangles, trim the excess fabric from the setting triangles, and measure them.  My center applique medallion has an oversized, untrimmed block background, and I think it's best to see what side the borders will finish at first and then work backwards to figure out what size borders will fit between that on-point block border and the center medallion.  

Maybe I will even be able to use one or more of my Accuquilt GO! Baby dies to cut out those inner pieced borders! 

Today I'm linking up with:

Tuesday, April 3, 2018

Do I Need a Bloc Loc HST Ruler? And Which One(s) Should I Get? ENABLE ME!!

Attention, Fellow Quilters!  I made it all the way through Lent without buying any new fabric, thread, notions, or quilting gadgets.  I am just itching to try something new.  Please help me shop for Nifty New Gadget Goodies!


Bloc Loc Half Square Triangles Set 1, Six Sizes, photo from Nancy's Notions
Apparently I am the last quilter on the planet to try the Bloc Loc Half Square Triangle rulers that Arna recommended in response to yesterday's post.  Is it too good to be true?  Do these magical rulers with a diagonal groove that "locks" into the seamline of an oversized HST (half square triangle) unit REALLY make it super easy to create zillions of perfect half square triangle units without seam ripping or swearing?  


Channel On Ruler Bottom "Locks" Onto Seamline
It sounds like a genius gadget that a maniacal perfectionist such as myself ought to have in her studio, but when I went armchair shopping for this tool I was overwhelmed and kind of confused by the options.  I mean, I understand that acrylic specialty rulers can be spendy, but what I don't get is why there are so many different sizes of the bloc loc half square triangle or why they would be sold in sets of varying sizes.  I mean, can't you just buy the 5.5" or 6.5" HST ruler and use that ruler to just as easily trim any HST that is less than or equal to the size of that one ruler?  Why would anyone need a 1.5" HST ruler if they already had the 3.5" HST ruler?  Am I missing something here?


I need your help, O Ladies And Gentlemen of the Internet!  Do you own any of these Bloc Loc rulers, and if so, which one or ones do you have?  Do you recommend them for me and if so, do I need a whole set of different sizes or can I get away with just one or two of them?


As I am writing this, my second floor air conditioning is throwing a major tantrum and my husband is telling me that we need to replace the whole heating and cooling system for that floor.  Buying new quilting gadgets makes me happy, but replacing furnaces and air conditioners makes me very, very sad...

Wednesday, January 10, 2018

Ta-Da! Triangles On My Design Wall!

The past few days have been busy, so I'm pleased to report that I've made some paltry progress on my new Tabby Mountain quilt.  


Triangles!
There are more triangles on my cutting table, along with a stack of other fabrics waiting to  be cut up.


More Triangles Ready For the Wall
I know this might not look like much to show for myself, but it's not like I've been holed up in my sewing room for the past five days; I've been busy as usual with other things.  Since my last post on Friday, I've sung at three church services plus four and a half hours of rehearsals, baked a chocolate peppermint fudge Bundt cake to bring to a post-Christmas choir party that I attended with my husband: 


I Should Have Left Out the Peppermint Extract.  It Tasted Like Chocolate Toothpaste Cake.
...Cooked chicken soup from scratch (with my first-ever attempt at Matzo balls!) and delivered it to a sick friend (that soup was delicious, but alas, I forgot to get a picture for you guys).  I also managed to fit in three hours of exercise, a book study, and two doctor appointments.  All since Friday, and all in my so-called "free time" -- I'm not even listing any of the time I spent on activities pertaining to work, housekeeping, or parenting.  So although my progress may look pitiful to some, I am delighted to see those triangles slowly but steadily multiplying on the design wall.  Sewing them together will probably go faster than cutting them out, don't you think?

I prewashed my fabrics so one thing slowing down my cutting is that I have to press and starch each piece of fabric before I start cutting into it.  I'm a fervent believer in starch for precision piecing anyway, but I knew I wanted to start out with starched fabric for this project in particular to control the tendency of all of those long bias edges to want to stretch.  


My Ancient Chinese Secret: Spray Starch
Cutting the solid fabrics and a couple of the prints goes faster than cutting out stripes, directional prints, and kitty cats.  The Tabby Road print is my favorite fabric in the collection, so I'm cutting those triangles one at a time and trying to get one kitty cat in each triangle.  


Fussy-Cutting My Kitty Cats
Of course I want my stripes perfectly straight, directional prints right side up instead of sideways, and prints like the rows of cat food need to be cut straight as well.  


Fabric Edge Is Torn, Print Is Slightly Off Grain
As you can see in the photo above, despite the bottom edge of the fabric being torn so I know it's perfectly on grain, the rows of cat food cans are actually printed onto the fabric slightly crooked.  I want my Cat Snacks to be right side up and nice and straight on my quilt, so I cut my 10" strip parallel to the rows of cans.


Cutting First Pair of 30 Degree Triangles from Double Layer of Cat Snacks Fabric
...And, as you can see in this photo, there isn't a lot of room for error when cutting triangles from these FQ (fat quarter) prints.  I need four triangles from each FQ, and once I've straightened my fabric edge up and cut a 10" strip, I barely have enough to get those four triangles out of it.  Yes, I'm accumulating large fabric scraps of each print for another project, but there are no scraps large enough to cut out another 10" 30 degree triangle if I was to mess one up.


Cutting Second Pair of Triangles From The Same FQ Strip
See what I mean about not much room for error?  I'd rather cut up these luscious prints slowly and carefully than fast and recklessly.  Speed isn't worth what you lose in accuracy, or the finger you sliced off with your rotary cutter, slicing through fabric left and right like a crazy person.  


Future Triangles Waiting in the Wings: Needing to be Starched, Pressed, and Chopped Up
I am really loving working with these saturated colors and fun prints, I can tell you that.  It's like a feast for my eyeballs, calorie-free and everything, which is perfect for January!

Anyway, this was just supposed to be a "quick" post, so I'm signing off now.  I'm linking up with:


Tuesday, April 4, 2017

Burda 6911: A Sneaky Formal Pajama Dress for Comfy Choral Concerts

Burda 6911 Dress with Modifications
Not only did I make it through a week of late-night dress rehearsals and fend off a cold well enough to sing in both performances of the Bach St. John's Passion last weekend, but I also managed to sew myself a new dress to wear for the Sunday afternoon concert from a new-to-me pattern, Burda 6911:

Burda 6911 for 2-way Stretch Knits
This pattern popped up in my Pinterest feed around the same time that I was informed that the men in the VOX chorus wear tuxedos in concert, and women are supposed to wear something "black, formal and floor-length, with long sleeves, like something you would wear to a cocktail party." Maybe that's what SOME women wear to a cocktail party, but there was nothing in MY closet that fit that description!

Angelica Huston as Morticia Addams, Ready to Sing with VOX
Here's a photo of the VOX chorus (taken before I joined) so you can see what other women wear:

VOX Chorus Concert Attire, Pre-Rebecca Photo
So I got the pattern, ordered 5 yards of black 11 oz. rayon jersey fabric from Emma One Sock (UPS Next Day Air Saver), and rolled up my sleeves.

I found some well-ripened moss green jersey knit rotting away in my stash that had a similar weight, drape and stretch as my dress fabric, and decided to whip up a top version of this pattern to check the fit and figure out how the twist goes together.  I did read up on other people's experiences sewing this pattern on Pattern Reviews, and I was happy to see that most people's dresses and tops came out looking BETTER than the pattern photos, and that the style was flattering on other women with figures similar to mine.  (ah, how do I love thee, Pattern Review web site?!!!) 

Sizing: Based on the amount of fabric incorporated into the front twist, the width stretch of my fabric, and other reviewers' comments, I decided to cut a size 14 (based on my upper chest measurement +2", or what my FB measurement would be if I was a B cup like the "standard" commercial pattern fit models instead of a D). If I had used my full bust measurement as directed by the pattern instructions, I'd have been cutting between size 16 and size 18 -- I've done that before, and it always results in an unwearable, unfixable garment that is way too big in the upper chest, back, and shoulders, with necklines too big and gaping and sagging armholes.  It's so much easier to do a full/prominent bust adjustment to make more room where it's needed than it is to alter the shoulders, back, upper chest, sleeves, armholes, etc. to make them all smaller!  (This article on the Curvy Sewing Collective blog explains why). 

But in this particular case, with this pattern and this stretchy fabric, the smaller size worked beautifully with no need for any fit adjustments -- I got a fantastic fit through the shoulders and upper chest, no neck gaping or sagging armholes, yet there was plenty of room for "the girls" due to the stretch of the fabric and all of the twist gathers in the front of the top. I did grade to a size 16 through the hips on the top because I didn't want too snug of a fit through the tummy, and I'm glad I did because the top is quite fitted through the midriff. However, the top and dress are made from different pattern pieces, and the dress is cut with a lot more ease through the midriff so I was able to cut a straight size 14 on my dress.  I stopped working on the green top as soon as I was far enough along to know I had a working pattern in a good size, since I only had a few days to get my dress done and I sew VERY SLOWLY, like a sloth.  (Actually, I sew more like Hamlet, stopping every step of the way to ponder my options and research techniques before proceeding.  To be finished with my dress on time, or to squander my sewing time with mad dashes to JoAnn's in search of obscure notions and interfacing that I saw in someone's blog tutorial -- THAT is my question!)  But I digress.  Here's the green top version, 90% finished:


Burda 6911 Top, Trial Run
This is not the best picture because I had a weird balconet style bra on under the top that made the gathers go goofy, but I was in a hurry so this photo will have to do for now.  Anyway, you can see that the fit is pretty good, but if you click on the photo to make it bigger and examine the center front twist, you'll see that the wrong side of the facing wants to roll out at the top of the twist.  I still need to fix that, and then coverstitch hem the bottom of the top and the sleeves.  Eventually.

As per the recommendations of other reviewers, and to make assembly more serger-friendly, I disregarded the pattern instructions and put the sleeves in flat before sewing the side seams. This was a great idea.  On my trial top, I also ignored the pattern instructions about pressing the center front and dart seams open and just serged everything instead, because hey -- I bought the serger so I could use it on knits, and this is a knit, right?However, I think that's why I got the weirdness in the center of the twist with raw edges wanting to stick out on my top, because I had a loose flap where my serger seam stopped and the facing edge began instead of a pressed open seam allowance getting pulled back into the dress when I did the twist. So for my dress, I serged the CF seam as directed by the pattern, until a few inches before the slit, and then sewed the rest of the way with a stretch "lightning" stitch on my regular sewing machine so I could press the seam allowance open just below the slit and have the seam allowance tuck in nicely all the way around the hole. The bust dart seams I stitched the whole way with the lightning stitch and pressed them open per pattern instructions, and I was much happier with the way the twist front came out on the dress when I did it that way.


Peep Hole at Center Twist Prior to Hand Stitching
Oh, and another thing I should mention about the twist front is that you may need to add some additional hand or machine stitching after you pull the one side through the other to make sure you don't have a little peep hole in the middle of your boobage!

Do note that the arms of this pattern are asymmetrical, so you want to be careful keeping track of which is which. Also, as another reviewer noted, the pattern instructs you to baste the facing down to the shirt front before sewing the side seam, so I followed her suggestion to leave the facing edge loose and then wrapped it around when I sewed the shoulder seams for a clean finish. I also added clear elastic to the shoulder seams to prevent them from stretching out of shape.

Other Changes I Made:
This pattern is designed to finish just below the knee, but I needed it to be floor length and I'm 5'8" so I added 13" to the skirt length. (This is the first time I used a rotary cutter to cut out a garment, by the way and I am IN LOVE -- the shifty, slippery knit was cut MUCH more accurately, precisely, and easily with the rotary cutter than it would have been with scissors, and after all my cutting table has a butcher block surface intended for chopping food up with knives so the rotary cutting blade isn't going to hurt it and the butcher block won't hurt the blade, either.  No cutting mat necessary!)


Length Added at the Lengthen/Shorten Line, seam Lines Extended for More Fullness at the Bottom
I also added shirred self-fabric sashes at the waist, copied from a RTW Boden dress in my closet.


RTW Boden Anna Dress, From Which I Copied the Sash
I think the sash belt helps prevent it from looking like a nightgown, and stretch fabric plus sash means that I will be able to wear this dress comfortably even if I gain or lose a few pounds.


My Dress With Cloned Boden Sashes Sewn Into Side Seams
I also made a slight change to the shaped of the neckline at the shoulder seam. This was due to a mistake when I did a FOE on the back neck (instead of the goofy strip of fabric sewn on and folded over as the pattern instructs and as I did on my practice top), but I accidentally ate up some of the shoulder seams in my neck edges.  I compensated for that by slightly gathering front shoulders to fit the back, which gives just the slightest sweetheart curve to the top of the V-neck.  Not sure whether you can see that in the photos, but I can definitely tell the difference in the shaping  of the neckline from my top to my dress and I actually prefer the way my fixed mistake looks!

Fold Over Coverstitched Edge on Back Neck
Finally, although this pattern specifically recommends lightweight jersey knit, the hem allowances for both the bottom of the skirt and the sleeves is 1 1/4" deep. None of the RTW jersey knit dresses or tops in my closet has a hem this deep. I tried doing the deep hem with a coverstitch on my dress, and I got decent results on my rectangular sample swatch, but the dress is A-line so the circumference of the skirt is greater at the raw edge than it is at the stitching line. ROYAL pain in the butt and waste of time. I did my sleeve hems 1/2" due to where I wanted the length to hit, and it was so much easier and ended up looking much better, too. I've decided I want my dress to be a few inches shorter because the heavy jersey makes it longer when I put it on than it was on my cutting table, and when I redo the hem I'll just turn it up 1/2" and coverstitch it.

A few words about figure flattery: ...And, just when I think I'm done with this post, I think of something else to say.  While I'm really happy with this dress for me, I do want to point out that someone with either a very small or very large bust might not be happy with it.  Although the twist front makes it easier to fit a large bust, the style of the dress makes a larger bust appear even bigger, especially when you view the dress from the front:

This Dress Will Make Your Boobs Look Bigger...
See what I mean?  It helps that the dress is black because black is slimming, but all those wrinkle lines from the twist front extending from shoulder to waist can create the illusion that your boobage is more ample than it really is.  As you can see in the side view, I'm not really as big up top as this dress makes me appear:

See?  Dolly Parton from the Front, Normal Boobs from the Side
So if you're self-conscious about a large bust and that's something you want to play down, this style might not be for you.  I have an hourglass figure and my full hip measurement is a little larger than my full bust, but I think this dress makes me look a little top heavy, but it's also very slimming from the waist down.  Conversely, if you have a very small bust, you might not like this dress either.  Even in the lightweight rayon jersey that I used, the twist front creates a bulky lump in the center of the chest that might look like a third boob, or stick out farther than your boobs, if you're an A or AA cup.  On a medium to large bust, the bulky twist lies between your boobs in the cleavage zone so it isn't a problem.  I have an hourglass figure and my full hip measurement is larger than my full bust, but I think this dress makes me look a little top heavy.  Your mileage may vary.

A few more notes to myself for next time I'm sewing with rayon jersey:
The sleeve had to be basted before it was serged into the armhole, and the shoulder seam needed to be basted before it was serged, too.  I basted the side seams of the dress just inside the stitching line using a 3.5 straight stitch on my regular machine so I could check the fit prior to serging, and to keep those heavy, slippery layers aligned as they went through the serger.  I did need to pin this fabric if it wasn't already basted before it came to the serger, like so:

Serged Seams, 4-thread Overlock
The rayon jersey is heavy, so it was important not to let it hang off the sewing cabinet or pull away from the needle as I was sewing.  I used size 80 Jersey Stretch needles in my regular sewing machine, serger, and coverstitch machine, and regular Maxilock and YLI Elite serger thread in a 4-thread overlock stitch.  Next time I might go down to a size 70 Jersey needle and try wooly nylon in the loopers. 

Serger Tension Settings
On my Bernina 1300MDC serger, I got a nice, balanced overlock stitch that laid flat without rippling with tensions set as you see in the photo above, presser foot pressure reduced to low, a stitch length of 2.5, and Differential Feed set between 1.5-2.

Stitch Length and Differential Feed
On my Bernina 750QE sewing machine, I used my 5.5 mm stitch plate to prevent the jersey from getting pulled down through the needle hole into the hook area.  I reduced my presser foot pressure from 50 down to 30 and used polyester Metrosene thread, a Jersey needle, and either a long straight stitch for basting or the lightning stretch stitch where I wanted to machine stitch closer to the twist to close that boob hole. 

On my new Juki MCS-1500 coverstitch machine, I did a narrow 3-thread coverstitch hem using the left and center needle positions, again with Jersey needles, and reduced the looper tension to L, reduced the pressure foot pressure to L, left both needle tensions set at 4, stitch length 2.5, and differential feed set to 2.0.  I experimented with a couple different methods of turning up the hem before coverstitching, but I got the best results when I cut 1/2" wide strips of black tricot knit fusible interfacing, ironed them along the raw garment edges, and then turned the edge back a half inch to coverstitch.  The deeper hems suggested by the pattern instructions are a royal PITA and the narrower hem is both easier and looks much better anyway.  The tricot interfacing makes it easy to turn up a consistent hem without marking, but more importantly, it stabilizes the knit so it doesn't tunnel between the rows of stitching.

I am super excited about this pattern now that my dress is finished. It gives me a great fit without any FBA or PBA, it went together relatively quickly once I figured out the twist thing, the neckline is flattering and not too revealing because it really does stay put -- and best of all, the dress is so unbelievably comfortable that it was like I snuck into the concert wearing my pajamas!!!  Definitely a keeper!  I'm planning to make a just-below-the-knee version of this dress in red and/or a print, something I can wear more often than the concert dress.