Showing posts with label Long Arm Quilting. Show all posts

Tuesday, September 9, 2025

Should've Gone To Bed: When 20 Minutes of Careless Stitching Yields an Hour and a Half of Ripping

Greetings, Friends!  Today's tale of woe has a happy ending and is chock full of Monday Morning Quarterbacking and useful tips for Future Rebecca.  Let's start with the Happy Ending, shall we?  I finished stitching this row of alternate blocks in my Deco quilt today, so I'm nearly 2/3 finished (with the stitch in the ditch and major digital designs in this 102" x 102" bed quilt that I am custom quilting).  Tomorrow I'll pop off the computer robotics belts from my machine, snap on my ruler base, and work on the stitch in the ditch quilting around the pale purply-pink squares and the green squares in the adjacent blocks.  Doesn't that Teal So Fine thread look pretty against the dark Kona Indigo background fabric?  That is the kind of quilting that says "Notice ME!  And pay no attention to the wobbly imperfections of the stitching in the ditching!"


This Is the Row of Decorative Computerized Quilting I Completed Today


Here's what I was looking at late last Thursday afternoon, when I was tired and wanted to stop quilting for the day but pushed myself to finish out the row:


I Quilted the Wrong Design!  šŸ˜±

Thursday, August 21, 2025

Reckless Quilting: What If I Rip My Custom Quilt Off the Frame, Dump It On the Pool Table, and Try to Put It Back On Later?

Reckless driving is driving with a "willful or wanton disregard for the safety of people or property," as defined by Florida Statute 316.192. Examples include high-speed driving, swerving, unsafe lane changes, and fleeing a law enforcement officer.  Reckless QUILTING is deciding on a whim to conduct an experiment on a quilt that you've been working on (and striving for perfection on) for nearly four years.  Friends, I admit it: I am a Reckless Quilter, guilty as charged.

When one of my longtime clients reached out to me recently to ask whether I could possibly quilt this 40" x 42" baby quilt in time for her granddaughter's birthday, I had already loaded my Deco quilt for custom quilting but I was procrastinating getting started.  I actually agreed to do this baby quilt for Carrie in order to "light a fire under my behind" and force myself to get my Deco quilt either finished, or lightly quilted from top to bottom with enough stabilization and basting to secure all three layers so I could safely zip it off my frame (my Bernina long arm frame has zippered leaders for just this purpose) and zip on another set of leaders for the baby quilt.  


Carrie's 40 x 42 Strawberries Baby Quilt


But alas -- the time came when I needed to get the baby quilt on the frame and, since I had indulged myself by doing some decorative quilting as I went along instead of sticking to boring stitch in the ditch as planned, my Deco quilt only had quilting securing the three layers for the top third of the quilt, with the quilt top, batting and backing loose for the bottom two thirds of the quilt.  What would happen if I took the quilt off the frame just the way it was, I wondered?  Would I be able to get it loaded again afterwards and complete the custom quilting without any issues?  I consulted the Internet, and the Internet had no answers for me.

HYPOTHESIS: 

If a custom quilt in progress is attached to a long arm quilting frame with zipper leaders, and if it is possible to remove and reattach a basted quilt using these zipper leaders, then I should be able to remove and reattach a partially quilted, UNbasted quilt with the zipper leaders.

So I unzipped all three leaders, carried the monster quilt-in-progress over to the pool table in the room next to my studio, and dumped it there for about four or five hours while I loaded and quilted the little baby quilt with an edge-to-edge design.


Yes, I Ripped My Deco Quilt Off the Frame and Dumped It On the Pool Table


Sunday, August 10, 2025

Stonefields Applique Prepped, Blocks 5-13 + Applipops vs Perfect Circle Templates

Good morning, my lovelies!  I have been having so much fun prepping my Stonefields Month One appliquĆ© blocks this week!  You know, digging through scrap bins and working with scissors and something suspiciously similar to Elmer's School Glue to put these little blocks together makes me feel like I've been transported across space and time back to kindergarten arts and crafts.  It's magical and so cathartic.  If you are someone who admires appliquĆ© from a distance but thinks "I'd never have the patience," I urge you to give it a try sometime.  It is so much like those school projects from decades ago where we dug through old catalogs and wallpaper sample books and construction paper scraps from other projects, cutting things out with our safety scissors (we were fussy cutting!) and trying to eat the paste when the teacher wasn't looking.  I know of no other pastime that can make me forget my arthritis and my wrinkles, dissolve all the cares of the world, and make me feel like a 5-year-old again.

Here are my Stonefields Blocks 5-13, prepped and ready for stitching:


Stonefields Blocks 5-13, Prepped and Ready to Stitch


When I say that my blocks are "prepped and ready for stitching," I mean that I've made heat resistant plastic templates for all of the applique shapes, selected the fabrics, traced the shapes onto the wrong side of my fabric scraps with a pencil, cut the shapes out with an eyeballed scant 1/4" turning allowance, and preturned those seam allowance/turning allowances by wetting them with starch and pressing them back over the edges of the heat resistant templates.  Then I used the pattern sheets and a light box to position the applique shapes on my background fabric and basted them in place temporarily using tiny dots of Roxanne's Glue Baste-It (this post contains affiliate links).  I put those drops of glue about an eighth to a sixteenth inside the edge of the patch so I won't be hand stitching through the glue.  By the way, this preparatory process is exactly the same regardless of whether I was planning to stitch the shapes down by hand or with my sewing machine using an invisible appliquĆ© stitch.  If sewing by machine I would just need to slip scraps of tearaway embroidery stabilizer beneath each block before stitching to prevent puckering.  I'm not going to promise that there won't be any machine stitched applique on this quilt, but for now I'm going to stitch my applique by hand using my favorite YLI 100 wt Silk thread and my Bohin size 12 Applique Needles.  I love how these thin needles and thread create truly invisible stitches that just sink into my fabric and disappear.

Tuesday, August 5, 2025

A Spoonful of Sugar, A Capful of Starch + Quilting That Is More Fun Than Stitch In the Ditch

Well, my plan was to complete all of the SID (Stitch In the Ditch) quilting throughout the entirety of my 102" x 102" Deco quilt before starting to quilt the fancy designs.  Instead, I got this wild Mary Poppins idea in my head about how a spoonful of sugar helps the medicine go down and it probably wouldn't hurt to quilt just a few fancy designs on my quilt before I advanced to SID the next row, just to see what they will look like...


Finally Some Quilting I Can See!


In hindsight, the designs I stitched in the light blue squares are more densely quilted than I had intended.  I knew this 10% into stitching the first one, and I could have stopped the machine right then, picked out those stitches, and chosen a less dense, faster stitching design.  But I didn't want to spend 30 minutes picking out those stitches.  Now I'll have to quilt the rest of the behemoth of a quilt more densely to balance it out, which will take an extra hundred hours or so...  šŸ˜³. I have a very peculiar and inefficient laziness whereby avoiding work creates much more work.  Anyway, it's gratifying to see some quilting texture on this quilt.   As this is a bed quilt and I want it to finish softer than cardboard, I"m using 50 wt matte polyester So Fine thread in my needle paired with MagnaGlide 60 wt thread in my bobbin.  This is going to take forever...  Wicked thought: What if I just CUT THE QUILT OFF at the bottom of this row, and instead of a bed quilt it can be a TABLE RUNNER?!  

Here's how those designs look in the setting triangles across the top of the quilt stitched in contrasting Teal thread against the solid Indigo background fabric:


Setting Triangles Quilted in So Fine Thread, Color Teal Against Indigo Fabric


All day today and yesterday, in between forced frisbee outings with His Little Highness the Dog, I was working on my Deco quilt.  But wait -- there's more!  A few days ago, I started prepping appliquĆ© for my Stonefields quilt!

Saturday, August 2, 2025

Grunt Work: SID Quilting on Deco + AppliquƩ Prep for Stonefields

Welcome to today's boring blog post.  I'm bored already and I am the one writing it -- not a good sign, but let's begin.

šŸ˜‚.  Clearly I was not in a good mood when I started writing this blog post yesterday!  Good thing I left it in Draft mode or I might have driven all of you away for good!  The blog post begun with a bad attitude yesterday and revised with a better attitude today is about not-so-glamorous prep work at the front end of a project that lays the foundation for smooth sailing and a successful finish.  It's like stretching in the morning or flossing your teeth before you go to bed -- you can skip this stuff if you want to, but you'll probably pay for it later if you do!  I'll be talking about the foundational stitch-in-the-ditch quilting on my Deco quilt as well as getting my appliquĆ© templates ready for my next Stonefields quilt blocks.  

Quilting Begins on My Deco Quilt


I Loathe the Drudgery of Stitching In the Ditch Quilting!


Stitching in the ditch -- quilting along patchwork seamlines -- is utter and abysmal drudgery.  If you do it really well, you can't see the quilting at all and sometimes that results in quilting over a line you already stitched because you couldn't see it.  But if you wobble or some speck of thread or bit of gook on your carriage wheels creates a hiccup in your straight line of quilting, it will stick out at you like Pinnochio's nose or a lump on the noggin of the Wylie Coyote.  And right now I DO have something somewhere that is giving me grief.  I wish I'd done a thorough cleaning of my carriage wheels before I loaded this quilt because it's really hard to get to all of them with a quilt on the frame.  It could also be that one of the machine's cables is catching on something at the back of the frame and needs adjusting, but I can't see what's going on back there when I'm quilting manually from the front of the frame and Bernie has been too busy lately to help me troubleshoot.  

Here's a block in the top row before the ditch quilting:
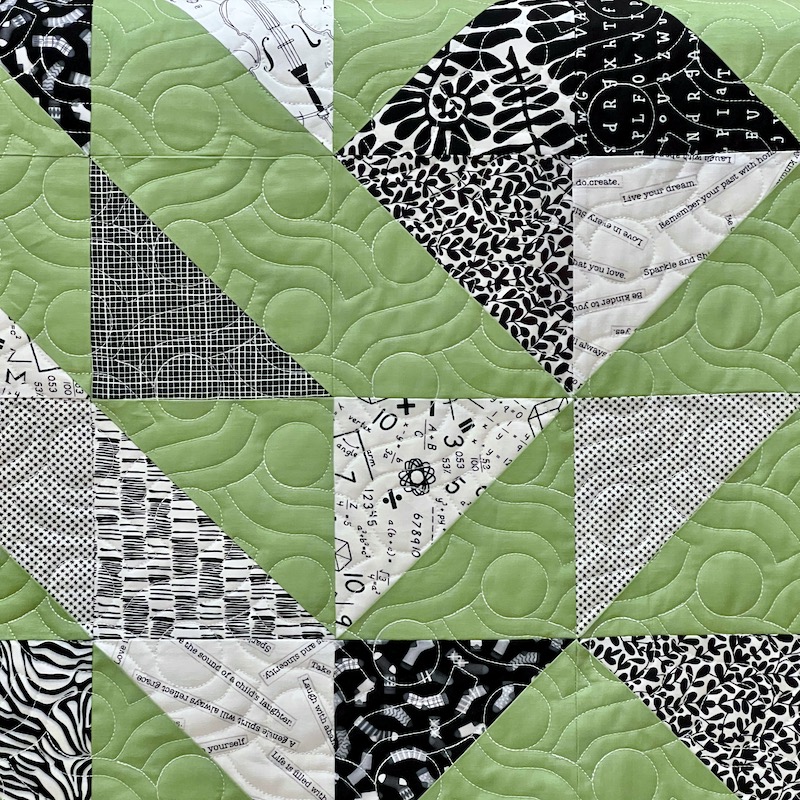

Not Quilted Yet


Below, I have outlined all of the green squares with stitching in the ditch.  Do you see those couple of wobble bumps?  Those are happening when I feel my machine catching on something ever so slightly.  I am stitching very slowly and using a straight edge quilting ruler as a guide, but then suddenly the machine gets knocked away from my ruler edge by some microscopic obstruction and Bad Words come out of my mouth.  For now I am just ignoring it and soldiering on.  Every imperfection is glaring when the quilt is on the frame under the bright lights and I am hyperfocused on every stitch.  Much of what looks like a catastrophe in the moment ends up not being a big deal in the end, and anything that is STILL a catastrophe at the end can be ripped out and restitched if it still drives me crazy.

I'm using Aurifil monofilament thread in color Smoke (this post contains affiliate links) with Fil-Tec MagnaGlide Classic 60 wt navy bobbin thread, in case anyone is interested.  If you can't find MagnaGlide Classic, it doesn't come in the color you need, or your machine can't accept prewound bobbins, Superior's 60 wt Bottom Line or Microquilter would be good alternatives.  You can even wind monofilament on your bobbin but beware -- it's prone to stretching so slow your bobbin winding speed way down, only wind your bobbin half full, and recognize that with invisible thread top and bottom it will be much more difficult to monitor your tension throughout the quilting process.  Those are the reasons I prefer not to use monofilament thread in my bobbin even though it works beautifully in my Berninas.  Oh, and I'm also using Hobbs Heirloom 80/20 Black batting. I know that if/when I wash this quilt, the needle holes will close up and my imperfections will be less visible.  You don't see the monofilament thread against my green fabric, but you do see tiny specks of black batting in the needle holes if you put your nose right up to the quilt and you have your strongest reading glasses on your face.  Ask me how I know this.  šŸ‘€


SID Finished (Sloppily) Around Green Squares


I deliberately did not SID the seams between navy patches within those blocks because I want to deemphasize those seams and do some other quilting in those areas to make the background recede and the green squares pop forward.  These are vague plans half formed in my mind; I won't decide for sure until after I see how my digital designs look stitched out.

My big, boring accomplishment for this week is that I have done this SID quilting to all of the green and navy blocks across the top row of the quilt.  I think I am going to rip off my ruler base tomorrow and start stitching the digital designs in the setting triangles between these blocks, because I am hoping that will cheer me up and distract me from my wobbly SID quilting.  Imaginary Judge's comments: "Straight lines should be straight."  Duh.  My dog thinks it looks awesome, so there!  ;-)

Sunday, May 25, 2025

Worth Finishing: Marybeth's circa 1984 Hand Pieced Sampler, Custom Quilted by Yours Truly

Good morning, friends!  I am shocked to be able to share this finish with you today, because I was fiercely procrastinating coming back to it.  I decided to load it up on the frame, fire up the long arm machine and JUST DO IT.  Behold, my friend Marybeth's oldest UFO, a hand pieced sampler quilt that she started in 1984 for her (now adult) son's "Big Boy Bed."  When Marybeth showed me the blocks a year or two ago I begged her to finish the project and promised that, if she put the blocks into a quilt top, I would custom quilt it for her.


Marybeth's circa 1984 Sampler Quilt, Custom Quilting Completed


Not gonna lie; this project was a challenge for me.  I've quilted hundreds and hundreds of quilts with edge to edge, allover quilting, but less than a dozen custom quilts on my long arm machine.  This one was a combination of digital computerized designs, hand guided ruler work quilting, and free motion quilting, and I quickly realized that I have a lot to learn when it comes to quilting computerized designs in borders and sashing.  Knowing that this quilt was really special to Marybeth and irreplaceable, I got into my own head too much with the Analysis Paralysis...  I am ashamed to confess that I have had this quilt for EIGHT MONTHS before finally finishing it and sending it back to Marybeth!


Wish I'd Used More Contrasting Thread


I've got a lot of Woulda, Shoulda, Coulda notes for this quilt.  Like, I wish I'd used the pale straw yellow thread in that green dotted fabric patch in the photo above, so you could see the quilting motifs in the "lawn" patch.  I wish I'd done a better job of keeping the amount of quilting more consistent throughout the quilt, too -- notice how the quilting lines in the red and blue block below the house are so much farther apart than in the house block, for instance.  If this had been my own quilt, I would have gone back in and added more quilting to the red and blue block to solve that issue, but I know that Marybeth prefers the look and feel of LESS quilting and I'm already worried that I may have "overquilted" it for her preferences.  

Thursday, May 1, 2025

Three Quilts for Carrie: Roam, Stars Hollow + I Spy Shadow Boxes

Today for Finished On Friday I'm sharing three beautiful quilts that I long arm quilted for my client Carrie.  First up is Roam, a BOM (Block of the Month) medallion quilt kit designed by Tara Faughnan.  I wasn't able to locate any Roam kits that I could link to, but you can still purchase the Roam pattern (with or without the accompanying video tutorials) on the designer's web site here.  The back page of the pattern lists all the fabrics used in the BOM kit for this quilt in case you wanted to make one just like it, but I think this quilt would look wonderful in any number of different fabric combinations.  In print fabrics, it would look like a completely different quilt.


Carrie's 82 x 82 Roam Quilt with Diagonal Plaid Bias Cut E2E


I quilted Carrie's Roam with Diagonal Plaid Bias Cut E2E, a simple geometric pattern that emphasizes the strong diagonal elements in the patchwork.  I used King Tut 40 wt cotton thread in Lapis Lazuli and Hobbs 80/20 Cotton/Poly Black batting (this post contains affiliate links).


Detail of Diagonal Plaid Bias E2E in King Tut Lapis Lazuli Variegated Thread


Why the black batting?  Long arm machines use larger needles than domestic sewing machines, and with the thicker 40 wt thread I was using here I needed a size 110/18 needle to get that gorgeous stitch quality in all stitching directions.  Bigger needles leave bigger holes, and with a dark thread and predominantly dark fabrics in the quilt top, those needle holes are less conspicuous when the batting isn't peeking out bright white around every stitch.  Of course needle holes close up when the quilt is washed, but not every quilt does get washed, at least not right away.

Second reason for black batting in a quilt like this is that it prevents dark stray threads from showing through the lighter fabrics in the quilt top.  The Windham Artisan Cottons fabrics in the Roam quilt are gorgeous but they are also prone to fraying.  As neat as Carrie was with her quilt top, there were still stray threads all over the place no matter how many I tried to neaten away.  In that photo above, if I'd used a regular white or off white batting, we would be seeing some stray navy threads showing through the Orchid and Yellow/Copper fabrics.  Navy thread against black batting disappears, but navy thread against white batting will show through a light colored quilt top fabric.

Saturday, March 1, 2025

March Madness (NOT Basketball!): New Tilda Fabric + Stonefields Quilts for Nanette (and for Rebecca)

Today I'm sharing Nanette's Stonefields quilt that I quilted for her in January of 2023.  This was one of fourteen quilt tops (out of a stack of many more!) that she had originally planned to quilt herself and had been feeling guilty about leaving unfinished -- you know, like quilters do!  With health challenges multiplying and the stack of quilts not getting any smaller, she decided to scale back some of that self-imposed pressure by having some of the quilts professionally long arm quilted by me.  

Nanette passed away suddenly a week ago, and that got me looking back through photos of her quilts again and thinking about how glad I am to have helped her achieve the satisfaction of seeing and enjoying her gorgeous quilts as finishes.


Nanette's 65 x 65 (Modified) Stonefields Quilt with Filigree E2E Quilting

First things first, let's credit the pattern designer.  Stonefields is an original pattern by Australian quilter Susan Smith, which she was commissioned to make by Paramount Studios for a film that was shot in Ireland.  I have no idea which film; what I've shared with you is all the info I was able to squeeze out of the World Wide Web!  Stonefields is a sampler quilt combining appliquĆ© with EPP (English Paper Piecing) and machine piecing, and Nanette shared that this was the most expensive pattern she ever purchased and that made her feel even more pressure to have a finished quilt to show for what she'd invested in it.  

So, I know what some of you are thinking -- edge-to-edge quilting over hand stitched appliquĆ©?!  I know, I know.  Nanette's original plan was to hand quilt this one, but she realized that she had more quilt tops that "deserved" hand quilting than she would ever be able to complete in her lifetime.  Custom machine quilting was outside of her own skill set and beyond her budget, especially considering the number of tops she wanted to finish all at once.  And so she sent Stonefields to me, and I recommended the simple loops of the Filigree allover quilting design.


That Bunny Rabbit Is My Favorite!


With this quilt, it was really important that the appliquĆ© and patchwork should be the star of the show and the quilting should just be a supporting element.  

Monday, February 10, 2025

Custom Quilting Marybeth's circa 1984 UFO + Cranking Out Deco Blocks

Happy Monday, everyone!  Congratulations to the Eagles fans out there, and my condolences to the Chiefs fans.  Not that I watched even five minutes of the Superbowl -- I'd rather sit in my laundry room for four hours watching the clothes go round and round than sit in front of a television watching grown men run around and clobber each other over a weird-shaped, ugly ball.  So HAH!  My husband and sister-in-law are from Philly, however, so while they were up at the house cheering their team I snuck off to the quilting studio to start quilting the borders on my friend Marybeth's UFO sampler quilt that dates back to 1984.


Wasatch Bella Bella Feather Border and Corner Quilting Design


When Marybeth showed me these blocks and told me the story of the quilt, I promised her that if she finished the quilt top I would custom quilt it for her.  This was supposed to be a "big boy" quilt for her son Nathan, who is now a married father in his forties.  The blocks are hand pieced and hand appliqued in neat, even stitches and it would be an intolerable shame if the quilt never got finished at all.  

Challenges for Marybeth included finding suitable border fabric, because she didn't have enough left of the fabrics from the blocks and may have used the fabric for some other project over the years.  Although there is no purple in her quilt blocks, I think the solid purple border fabric she chose works really well because it's the right value and hue to coordinate with the other colors well.

Challenges for Rebecca included coming up with quilting designs that would complement the vintage 1980s style of the sampler blocks and fabric without overpowering them, and without skewing too modern or too formal.  Another challenge was remembering how to lay out and size a border design to fit the quilt border and to accommodate for the quilt drawing up during stitching...  Too bad I didn't revisit this Q-Matic border quilting tutorial on Bernina's We All Sew blog before I loaded this quilt.  I loaded, basted, and did all of the stitch in the ditch quilting with monofilament thread a couple of months ago, and I did not remember Bernina Educator Denise Jones' tips about marking the center and quarters of the long sides of the quilt to make placing the border designs easier.  Next time!  Here's a shot of Marybeth's quilt on my frame where it languished for weeks, waiting for me to pick a design and get up the courage to start quilting it already!


Post-SID, Pre-Border Quilting Paralysis Syndrome


Friday, January 3, 2025

Happy New Year 2025! My Pity Party Has Concluded; Back to the Pretty Quilts...

 Alright you guys — wanna know how many personal quilts, or personal sewing projects of ANY kind, I finished in 2024?  ZERO.  But 2025 is a brand-new year full of fresh possibilities and lots of pent-up creative energy.  I quilted a quilt for myself yesterday!

42 x 45 Untitled, from Maria Shell Improv Workshop

It’s just a small baby quilt, a way to use up one of the improvisationally pieced striped units I made in my Zoom workshop with Maria Shell back in September, along with some smaller yardage pieces from my stash.  The irregularity of wonky improv piecing looks very child-friendly to me, and that inspired me to use an allover quilting design (Color B2B by Anne Bright) that I’ve owned for several years but was never able to talk a client into using on a quilt.  

Color B2B Quilting Design by Anne Bright with YLI 40 Tex Cotton Thread in Rio de Janeiro


I love how it turned out!  I chose YLI 40 Tex Cotton Thread in variegated Rio de Janeiro after carefully checking that every shade in this rainbow thread was a match to fabrics I used in my pieced stripe unit.  I wanted something with an equal amount of contrast against both the lime green and the cherry red fabrics and I’m very happy with how it turned out even though cotton thread is a linty beast to work with!  My lint brush got to see lots of action.  

Thursday, September 26, 2024

Sharon's La Passacaglia Millefiori Quilt, Laundry Room Makeover + My Workshop Project Pivot

Good morning and Happy Thursday, coming to you from the Severe Weather Epicenter of Hurricane Helene!  Okay, so I’m not exactly in the epicenter of the storm…  But this is our first hurricane since moving to Florida and it’s very nerve-wracking for me!  I bought a bunch of bottled water, stocked up on nonperishables, and now I’m biting my nails, listening to howling winds outside and getting nervous every time the power blips the lights off for a couple of seconds.  We’re nowhere near where storm surges or flooding or houses getting swept into the ocean is expected, but I still worry about losing power (Air conditioning — it’s still really hot here!  And refrigeration for our food!  And being able to cook!  And omigosh, why didn’t I think of asking my husband to hook my espresso machine up to an old treadle machine or something?).  EEK!!!  But the power and the air conditioning is on right now, my son is baking brownies and they smell amazing, my dog is snoring peacefully, and my husband is watching some football show on the television.   All is well in this moment and we’ll deal with anything tomorrow brings when it gets here.  So instead of watching the weather channel, I’ve decided to share a beautiful La Passacaglia Millefiori quilt with you that I quilted for my client Sharon last December, one of the last quilts before disassembling my long arm for the move to Florida.  

Sharon used the pattern from Willyne Hammerstein's Millefiori Quilts book available on Amazon here (this post contains affiliate links).  La Passacaglia and the other Millefiori quilts in the book have been very popular, and I found both acrylic templates for traditional hand piecing and foundation papers for English paper piecing this quilt on both Amazon and on Etsy.  


Sharon's 70 x 81 La Passacaglia Millefiori Quilt


What really intrigued me about Sharon's version of La Passacaglia is her restrained palette of neutrals and how that gives the quilt a completely different look from the brightly multicolored quilts many others have made with this pattern.  Her fabrics remind me of sandy beaches strewn with pale peach and cream seashells and sand dollars and I thought it was spectacular.  I loved the quilt top immediately, but Sharon thought her finished quilt top was a little bland for her taste, not as exciting as she'd envisioned it.  That's why I always ask clients what they like best about their quilt and whether there's anything they wish they had done differently or could change.  Knowing how Sharon felt about her quilt, I suggested an elaborate clamshell quilting design to inject textural drama into her quilt.  I used Quilter's Dream Wool batting for several reasons: it's very lightweight so it prevents a heavily pieced and weighty quilt top like La Passacaglia from turning into a super heavy quilt, the additional loft helps ease in the fullness that can be common with hand pieced quilts, and the loft of wool creates maximal dimension and texture.  I quilted it with matte, thin So Fine thread in color Pearl to ensure the quilting stitches would blend into her fabrics without upstaging the intricate piecing.  


Detail of Faceted Clams E2E in So Fine Thread, Color Pearl


By the way, fairly heavy quilting like this is not just for looks -- there's a functional benefit.  Hand pieced seams aren't always as strong as machine pieced seams, but heavy quilting secures and reinforces the patchwork seams, protecting them from stress damage throughout the life of the quilt.  Whenever someone grabs or tugs at a quilt with heavy quilting, they are pulling on all three layers of the quilt together (pieced top, batting and backing).  When someone grabs or tugs at a minimally quilted or hand tied quilt, they often grab hold of just the quilt top layer, causing those fabrics to wear and tear and the patchwork seams to pop prematurely.  Heavy quilting doesn't need to result in a stiff quilt as long as the batting is soft and supple and you use a thin, pliable thread for the quilting.

Wednesday, September 18, 2024

Maria Shell Workshop In Progress + Carrie's Traverse Row Quilt

The second half of my two-part Making Prints improvisational piecing workshop with Maria Shell was this past Monday evening via Zoom.  Our assignment from Part One of the class had been to create a palette of solid color fabrics and then construct a bunch of different units using those fabrics and techniques that had been demonstrated in class.  Despite being down with Covid all week, I managed to get a bunch of these chunks made, slapped them on my design wall in the main hallway of my house, and then every time I walked by I either stopped to scowl at everything but left things along, or started rearranging the units.  Here's what I had going on the last time I touched it, on the morning before the last class:


My Design Wall, 11 AM on Monday


In Part Two of the workshop Maria introduced several techniques involving triangles and I might make some of those to mix in with what I've got here so far, or I might make some additional units like what I already have so I can balance things out with a little repetition.  I do want to finish the workshop piece and put enough thought and effort into the composition to get everything I can out of the class, but the danger for me with an open-ended assignment like this -- and no grades or deadlines to rein me in -- is that I could easily go on and on, arranging and rearranging ad infinitum and never actually finish the project!

I haven't moved anything or made any new units in the last two days.  Still feeling low-energy and needing daily naps from the Covid and just decided to let what's on the wall marinate for a bit while I am resting.

However, the portion of Monday's class where Maria discussed different composition structures (grid, row, medallion etc) reminded me of a client's quilt that I long armed about a year ago and never shared with you.

Carrie's Traverse Quilt, Pattern by Tara Faughnan

This gorgeous Traverse Quilt is a kit designed by another modern quilter I admire, Tara Faughnan.  I just checked on Etsy and found lots of options available if you'd like to make one of your own, from complete Traverse kits in these exact fabrics still available, to patterns only, to completed quilts for sale.  (This post contains affiliate links).  


Detail of Traverse Quilt, Designed by Tara Faughnan, Pieced by Carrie, Quilted by Me


Looking at these photos again after taking Maria Shell's workshop, I'm seeing some similarities between these two quilters: Both are working exclusively in solids, and both use a large palette of solid fabrics with a nice assortment of hues and values.  Both are creating print-like patterns in patchwork stripes of fabric.  Maria sometimes sets her pieced strip units in rows like Tara has done in Traverse.  

Tuesday, September 10, 2024

Nanette's Irish Mist Quilt with Gothic Feather Quilting + Kicking Off Maria Shell Workshop

The other day, when I was writing about the formal feather quilting designs by Donna Kleinke that I'm considering using on my FrankenWhiggish quilt, I wanted to link back to my earlier blog post showing an edge-to-edge formal feather quilting design by Kleinke that I'd used on a client's quilt.  When I searched my blog for that post and came up empty handed, I realized that I never actually DID share this one with you.  Shame on me!


Nanette's 73 x 84 Irish Mist Quilt with Gothic Feathers 2 E2E Quilting

Okay, so this gorgeous quilt is called Irish Mist and it was pieced by Nanette who blogs at Do It Right Quilter.  You can read back through all of Nanette's blog posts documenting her journey in making this quilt top here.  Nanette is a very meticulous piecer and, when she realized something was off midway through making the quilt in 2014, she ordered more fabric and started all over again.  Can you imagine that level of commitment to not only finishing a quilt that was really giving you grief, but actually starting over so you could finish it to the absolute best of your ability?  And I can assure you, the finished (second version!) quilt top she sent me for quilting was pieced to absolute perfection.


Quilting Detail, Pieced Backing of Irish Mist, MagnaGlide 60 Thread in Hawaiian Blue


Irish Mist is the cover quilt for the book Six Halves Make a Whole Lot More by The Quilt Branch, and you can find both new and used copies of this book on Amazon here if you'd like to make one of your own (this post contains affiliate links).  

Wednesday, August 14, 2024

FrankenWhiggish Rosebuds, Michele's Log Cabin Stars Quilt, Laundry Room Makeover, Swedish Pancakes + A 21st Birthday Celebration

Good Morning, Quilty Peeps!  As you can see by my way-too-long blog post title, I have lots of ground to cover today.  First things first, I am happy to report that I've finished prepping ALL of the remaining broderie perse rosebuds for my FrankenWhiggish Rose blocks, they are all glue-basted in position on the blocks, and the hand stitching to secure them is in progress.  That's right; I have a portable hand stitching project again FINALLY!

All FrankenWhiggish Rosebuds Are Prepped and Ready for Stitching!

In case anyone is interested in what's in my portable hand stitching "toolbox" for this project:

  • YLI 100 wt silk thread in color 256, matched to the rosebud fabric
  • Bohin size 12 AppliquĆ© Needles (these are the only ones I've tried that don't bend or break on me)
  • Colonial Needle Company Leather Thimble Pad stickers (I use one on my right pointer finger to help grab the needle and pull it through the fabric, or to protect my fingertip when I need to exert a little pressure on the back end of the needle to force it through a spot where the glue dried stiff)
  • Thread Heaven (no longer available) or Thread Magic thread conditioner to help prevent snarling and knotting -- I don't need it when I'm using silk thread, but I have it in my hand stitching kit because it's a big help when I'm hand stitching quilt bindings with cotton thread
  • My new 2.75 magnification sewing glasses from Warby Parker, so I can thread the eye of my needle and see how many threads of fabric I'm grabbing with each stitch
  • That nail file in my kit is actually for my fingernails, because often I'll discover some little scratchy spot at the edge of a fingernail while stitching when the thread gets hung up on it
  • Not pictured, I also have a tube of Neutrogena Hand Cream in my hand sewing kit and another one in the drawer next to my sewing machine.  I like this kind because it's not greasy, has no fragrance or dye, and a tiny drop goes a long way to just barely moisten my fingertips so I can get a better grip on what I'm stitching without gooking it up with lotion
  • Either my Apliquick 4" Microserrated Scissors (pictured) or my Gingher Spring Action Thread Nippers (preferred if I'm just clipping thread and not trimming needle turn appliquĆ© shapes while stitching).  If I'm planning to take my hand stitching kit on an airplane, I'll swap out for a cheap thread clipper (in case Airport Security confiscates it and throws it away) with a pack of dental floss that I could use as a backup thread trimmer in a pinch


(Those are affiliate links, by the way).   You probably won't see much of FrankenWhiggish for a couple weeks while I'm stitching the rosebuds to the blocks because, if you've seen one of my blocks get rosebuds, you've seen them all!  My Seven Sisters pattern and templates finally arrived from Australia and I'm planning to start on that project in September.

Instead of sharing FrankenWhiggish, I thought I might share some of the backlog of long arm quilting clients' quilts that I haven't posted about before, like Michele's version of Emily Dennis's Log Cabin Stars quilt.  Here's a teaser to whet your appetite; we'll return to this quilt later in today's blog post:

Michele's Log Cabin Stars Quilt, Pattern Available here


Tuesday, July 9, 2024

Bernina Mending Magic Strikes Again + Mildred's Tarnished Star Quilt

I know mending is boring, but it's way more boring to my neighbors and to random people I approach in the grocery store than it is to the people who read my blog.  (Tip: You can scroll past my mending adventures and skip ahead to the pretty quilt at the end if you want to -- I will never even know!)

I had a ridiculously fun time reacquainting myself with some of the features of my Bernina B 790+ sewing machine yesterday while saving two of my favorite pairs of shorts, and I had to tell SOMEBODY about it.  I picked YOU!  Do you see signs of mending in the photo below?  No, you don't, because it turned out perfect!

Left Tushie Pocket of My Favorite Shorts, After Repair


These are my favorite shorts because they have an elastic drawstring in the waist so I can cinch it in just enough to avoid Back Waistband Gaposis that plagues me so much in ready to wear clothing, but also because they are made of a very lightweight and breathable fabric that doesn't get all hot and sticky in the muggy Florida summer like most of my other shorts.  They came from REI several years ago and I bought three pairs of the same style, the khaki ones pictured here as well as a light gray pair and a dusty blue green color.  I've been wearing them a lot more since I moved to Florida in February, and the buttons on the left back pocket ripped right through   the fabric on the blue pair and the khaki pair.  How do you reattach a button when there's a hole through the shorts fabric in the place the button needs to be sewn?


Mending Program 22 Stitched in Aurifil 50/2 Cotton Mako Thread

I needed to darn the hole and reinforce the area around the hole before reattaching the button, so I grabbed some Steam A Seam 2 double-stick fusible web from my appliquĆ© supplies, fused it to the back of this pink scrap of tightly woven cotton batik fabric and cut out a circle about the size of a quarter, and fused it to the wrong side of the pocket, carefully coaxing the loose threads surrounding the tear back into place to fill the hole on the right side.  

Saturday, June 8, 2024

More Scrappy Celebration Blocks + a Big Decision

Hello, Friends!  I finished all six of my double 9-patch blocks for my Tilda version of the American Patchwork & Quilting Scrappy Celebration quilt the other day, so now I have two tidy stacks, six of each style.  The center square of my double 9-patch block is a dusty pink Tilda Solid that coordinates perfectly with the tiny ditsy pink flowers on the green print, by the way.  It's looking weirdly gray in the photo, and my cutting mat that is actually pink IRL is looking more red in the photo.  Not sure if it's some difference in the camera of my new phone or something different with the lighting in the new sewing room.

9 inch Finished Blocks for Scrappy Celebration

Having no design wall (yet?) in my new house, I am using my EQ8 quilt design software (this post contains affiliate links) as a virtual design wall instead.  Below you see the EQ rendering of the Scrappy Celebration quilt from the pattern designer, and as I finish a set of blocks I just take a picture of one of them from straight on and crop it square, import it into the software and set the scale to 9" (because they are 9" finished blocks), add the block photo as a fabric, and then change the appropriate blocks in the quilt to plain blocks that I can just "paint" with the photo of my completed quilt block.  That was probably clear as mud to those of you who don't use this software, but if anyone out there is new to EQ and wants a fuller explanation of what I'm doing here, feel free to email me for more complete instructions.  

Why do I bother to do this at all?  Because swapping out the generic solid colored blocks in the pattern rendering with my actual blocks helps me to get a better sense of how my colors and prints are working together and guides me in selecting fabrics for subsequent blocks.  I'll also be able to print out the final image, once all of the plain blocks have been replaced with photos of my actual blocks, and use that as a roadmap for assembling the quilt top.

EQ8 Scrappy Celebration Rendering Showing Finished Blocks

Not that I have any idea what I'm going to do with this quilt once it's finished.  I just thought it was pretty when I saw so many versions of this quilt online during the QAL last year -- and immediately I started thinking about how I'd want to quilt it...  so I had to go ahead and start making the top just so I can quilt it!

Tuesday, December 19, 2023

Advent Parade of the Christmas Quilts, 2023!

Happy Hanukkah to my Jewish friends and Happy Final Week of Advent to my Christian friends!  Have you finished your shopping yet?  I've shopped, wrapped, packed, and shipped all the gifts that need shipping, but still have some shopping left to do for my husband my sons.  I've finished the client quilts in my queue that had holiday deadlines so now I can officially switch gears into Santa Mode!  Meanwhile, in keeping with the holiday spirit, I thought everyone might like to see a few of the Christmas quilts I've worked on this year.

Anna's Frosted Pines Tree Skirt

Up first is a Christmas tree skirt that I quilted for my client Anna.  Anna used the Frosted Pines Tree Skirt pattern by Stacey Day for Windham Fabrics, available as a FREE PDF download here.  I just love her fabric choices!

Anna's 48" Frosted Pines Christmas Tree Skirt

Quilting something round on a long arm frame is a little trickier than doing a square or rectangular quilt.  This was one of the rare times that I "floated" the quilt top, since there is no straight edge along the bottom to pin to my leader canvas.  A lot more extra backing and batting are needed, the same amounts as if the quilt top had been a 48" square instead of a circle, and it took a little longer to trim each row of the quilting design at an angle each time I advanced the quilt on the frame to ensure that the quilting fully covered the circular quilt top without wasting too much time and thread quilting beyond the edges of the skirt and onto the batting.  I used the Angle Trim feature that had just been released with an update to my Bernina QMatic software a few weeks before this quilt went on my frame.

Tuesday, December 12, 2023

Custom Deco Quilt Palette for 2024 + QAL Week 4, 108 Weeks Behind Schedule

56 x 68 Deco Throw Quilt, PANTONE Pairings Palette for 2024

This is the time of year for sleigh bells, twinkling lights, caroling... and complaining on social media about how much we disagree with the design industry's color forecasters' predictions for Color of the Year.  PANTONE Europe's Color of the Year for 2024 is Peach Fuzz:


And Robert Kaufman's Kona Solid Color of the Year for 2024 is a pale aqua they're calling Julep: 


Looking at these two "new" color trend predictions side-by-side, many of us are getting flashbacks of  Margo and Todd's bedroom decor from the 1989 holiday movie National Lampoon's Christmas Vacation.  

Pantone Peach Fuzz Walls with Kona Julep Vase and Window Blinds

"Why is the floor all wet, Todd?"

"I don't know, Margo!!"  

"Why does Pantone think our 1989 bedroom set will be the embodiment of global lifestyle trends at the macro level in 2024?"

"I DON'T KNOW, MARGO!!!" šŸ˜†

Thursday, November 30, 2023

Mary's Turquoise Stars Quilt, Preeti's Syzygy Quilt + December Quilting Goals

Good morning, quilting friends!  I have a folder on my computer desktop containing a huge backlog of gorgeous clients' quilts waiting to be shared with you, and every time I open that folder I waste at least 45 minutes trying to decide which quilts deserve to be chosen for their moment in the spotlight.  When I started long arm quilting for clients I was really good about posting each finish right away, but either I quilt too fast (not!) or I write too slow (more likely!) and at this points I have photos of at least 150 quilts in that folder and more photos of more quilts get getting added every week...

The quilts I'm sharing today were both quilted quite awhile ago and I can't believe I never wrote about them because I LOVE them so much.  Without further ado:

Mary's Turquoise Stars

Mary is one of my favorite clients to quilt for -- she ships her quilt tops to me all the way from New Mexico even though there must be a thousand long arm quilters closer to her, she chooses striking, modern patterns and beautiful fabrics, and she often reinterprets the pattern creatively to create something fresh and unique, as she did with her Turquoise Stars quilt, shown below.  Mary used the star block from the Chevron Star Quilt pattern by Lee Heinrich Designs (formerly known as Freshly Pieced, available here on Etsy (this pot contains affiliate links).  

Mary's 67 x 87 Turquoise Stars Quilt with Billowy Combo E2E Quilting

One reason I didn't share this quilt immediately is that I was frustrated with my inability to get accurate color representation in my photos -- I was probably taking these shots late at night and trying to color correct in software, with limited success.  Mary's fabrics for this quilt are Art Gallery PURE Solids, and her background fabric is a deep, muted navy blue with a gray undertone called Night Sea.  The color is a little better in the photo below, but it's still too vivid and royal blue looking: 

Billowy Combo Custom Layout E2E Quilting

More to love about Mary: She lets me do fun things with the quilting!  Instead of just picking one allover E2E ("edge-to-edge") quilting design for Turquoise Stars, I combined nine different design motifs from Karlee Porter's "Billowy" collection, setting them up to alternate in three separate rows.  It took a lot longer to set that up in the computer, but it essentially created a larger scale design repeat, exceeding the depth of the throat of my long arm machine even, that creates more interest in the vast negative space of Mary's quilt than we would have if we'd chosen just one of these motifs to repeat over and over again across the entire surface of the quilt.

Thursday, November 9, 2023

Carrie's Modern Baby Quilt with Mister Marbles E2E + Quilting Inspo from the Interior Design World

My quilting clients bring me the best quilts!  Seriously!  I am so inspired by this 40" x 40" baby quilt that I quilted for my client Carrie recently:


Mister Marbles E2E Quilting in King Tut 40 wt Cotton Thread, Color Temple


I love this quilt because it's so striking, modern, and abstract, making it a perfect choice for new  parents who prefer to avoid gender stereotypes in their nursery themes.  I also love that this baby quilt looks so sophisticated and artsy, yet the construction is simple and straightforward, ideal when the shower is next week and you're scrambling to come up with a gift.  All you need is an assortment of black and white print fabrics paired with a solid, sew a total of 64 HST (half square triangle) units that all have one solid color triangle sewn to one black and white print, and then you rearrange those units on your design wall until you have a fabulous layout like Carrie's...  And before you know it, you're done and it looks amazing.  I have quite a few black and white prints in my stash, so I'm tucking this idea away for the next time I need to make a baby quilt.

I quilted this for Carrie using my Mister Marbles design, using a heavier 40 weight King Tut cotton thread in color Temple (White) to ensure the quilting design would stand out so nicely against the solid green fabric -- I knew the quilting design would disappear in those busy black and white prints (this post contains affiliate links).  I like the energy and movement of those wiggly, ripply lines and circles in the quilting for this quilt.  The batting is Quilters Dream Bamboo, a blend of bamboo, silk, cotton, and Tencel that is my absolute favorite for baby quilts, so I stock it in the 60" wide bolts.  

Here's the whole quilt again in all of its fabulousness:

Carrie's 40 x 40 Baby Quilt with Mister Marbles E2E