Showing posts with label Threads Magazine. Show all posts

Sunday, November 19, 2023

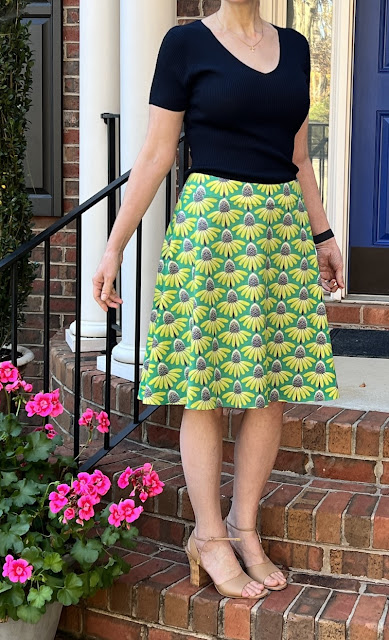
New Look 6708: The Eight-Year Skirt Project is Finally Finished

If you only come here for the quilting, be forewarned -- today's post is not for you.  Today's post will be all about how I spent $78 and eight years of my life making a skirt that I will probably only wear a handful of times, using a pattern (New Look 6708, now out of print) that I have no intention of ever making again.  Today I will relate the saga/review the pattern of what my mom and I have been calling "That Dumb Skirt!"  

New Look 6708 Skirt Finish

New Look 6708 (OOP) View B

I made my skirt using New Look pattern 6708, which is out of print from the manufacturer but you can still find uncut used copies for sale.  At the time I'm writing this, you can get a copy of this pattern on Etsy here and I saw a few copies available on eBay as well (This post contains affiliate links).  This A-line, lined Misses skirt with side zipper did not actually take 8 years to sew -- it just got abandoned for long intervals while I was sidetracked by other projects.  If you want to read the post from June of 2015 when I first started this skirt, you can find that here.


I made View B, the above-knee version of the skirt, and I used "Pretty Potent Echinacea" cotton voile fabric from Anna Maria Horner with solid navy cotton voile for the lining.  Although I was unable to find an online source for my skirt fabric in voile today, Anna Maria Horner has reissued this print in new colorways for Free Spirit Fabrics recently, calling it simply "Echinacea," and you can find those on Etsy here.  (Just be aware that the current versions are printed on quilting weight cotton fabric that has more body and less drape than the voile I used for my skirt).  I prewashed both my fashion fabric and my lining fabric prior to cutting out my skirt.

I used Pellon Shape Flex Woven Cotton Interfacing SF101 in White for my waistband and I'm happy with that interfacing choice for the cotton voile, but wish I'd chosen the same SF101 interfacing in Black in hindsight.  Because my fashion fabric is semi-sheer, the waist yoke with the white interfacing behind it looks like a slightly different color than the body of the skirt that has navy lining fabric behind it:

White Interfacing Makes Waist Yoke Look Lighter/Brighter than Navy-Lined Body of Skirt

Ah, well.  It's subtle and no one else is going to notice this or care.  I've only tucked my shirt in to show the top of the skirt for these project review photos; normally the waistband or waist yoke or whatever you want to call it won't even be visible.

Monday, September 19, 2016

Of Skirts, Blouses, and Forgotten DVDs

Well, looky what I found in my studio the other day, all brand-new, still wrapped in cellophane and nearly forgotten in a corner! 

Threads Magazine Blouse DVD
It appears that, amongst my many purchases at last year's Sewing and Quilt Expo in Atlanta, I bought a Threads DVD featuring Sandra Miller's blouse construction techniques.  In my defense, I crashed on my bike a week after returning from the Expo, smashing my collar bone into little pieces and snapping all the way through the bone at the tip of my left thumb.  Humpty Dumpty didn't get back to her sewing room for a few months, and by then I didn't remember what all I'd bought and planned to work on.


Sounds like EXACTLY the supplemental information I need to walk me through my first blouse project, don't you think?  Anyway, before I spend any money on any online blouse sewing classes, I'm going to go through this DVD and watch the whole thing.  And take notes.  And maybe practice stuff.  We'll see.

Harrison Blouse Pattern, available from Cashmerette here
Another blouse resource that I discovered this week comes from Jenny of Cashmerette, an indie pattern company that specializes in patterns that fit and flatter curves.  Jenny's new Harrison Blouse pattern, shown above, fits exactly the way I'd hoped my White House Black Market blouse would fit after alterations (didn't work out that way, though).  I really like how the double princess seams on the Harrison blouse originate from the armscye instead of being straight lines from the shoulder seams; I think that will be more flattering on me.  The Harrison Blouse is available either as a PDF download or as a paper pattern, and they even have an online "Plus Size and Curvy Shirtmaking" workshop that walks you through their pattern step by step.  The only glitch is that the smallest size the Harrison Blouse comes in is a 12 and that might still be too big on me in the upper chest, shoulders, and upper back.  But it's nice to know I have some options.

Meanwhile, my skirt looked like this a few days ago after I'd cut everything out and then walked away from the project (again):

Paralyzing Mess Prevents Progress!
You are looking at not just the skirt pieces, but stacks and stacks of fat quarters for those 6" Farmer's Wife blocks, and a pile of prewashed and folded fabric and templates for Anders' quilt.  Too much started, not enough finished -- and I hardly had any time in the sewing room all week, because I've been working on a project design for a client.  Work before play.

But I'm trying to maintain that elusive balance in my life by observing a work-free weekend rule, or at least a No Working On Sundays rule, so I did manage to sneak into the sewing room for a bit on Sunday afternoon.  Now, my skirt looks like this:

One Side Seam Accomplished
You are looking at the right side seam of my skirt, and you are supposed to be admiring the precision of my pattern matching.  So, what I accomplished so far was to stay stitch the top of the skirt front and back and the lining pieces.  Then I sewed that right side seam in both the skirt fabric and the lining fabric, and serged off the raw edges of the seam allowances.  The skirt and lining were matched up, wrong sides together, and I basted the two layers together at the top of the skirt inside the seam allowance.  This took more time than you might imagine due to the slippery, shifty voile and my determination to match that pattern as precisely as possible at the seam.  There was obsessive pinning and basting involved, and I am pleased.  My skirt is an A-line shape, so the rows of flowers converge diagonally at the seam line, but I am satisfied that the rows of flowers will appear to be straight on the finished skirt.  Now let's hope I can match up the print so nicely on the other side, when I install my invisible zipper!

I still have to make and attach the yoke thingy to the waist of the skirt before the zipper goes in, and I'm still kind of foggy on just HOW I'm going to put that zipper in, because I am adamant that it's going to be an invisible zipper (in defiance of the dorky pattern instructions) and I am determined that the zipper tape is going to be hidden between the skirt fabric and the lining, just like it would be in a nice store bought skirt.  I found a couple of video tutorials online for inserting invisible zippers into skirts, a few that even showed how to do it with lining, but I'm going to have to adapt and combine techniques from different videos to make it work for my particular skirt style.  ALL of the video tutorials say to put the zipper in FIRST, before sewing any side seams, and I have to say, it does look like that would be easier.  Too late now! 

I don't know whether I'll get a chance to do anymore sewing before the weekend, but may be able to conduct additional zipper insertion research at odd moments in the carpool line.  Wish me luck!


Tuesday, July 7, 2015

Skirt Shenanigans: Threads to the Rescue

July and September Threads Magazines
Well, now, isn't THIS timely!  I recently renewed my Threads magazine subscription, and I just received both the July and September issues in my mailbox.  One issue has a feature explaining how to clip the seam allowances prior to seaming opposing curves together.  DUH!  How long did I stare at those muslin skirt pieces, wondering why the fabric edges of the contoured waistband/yoke and the curved top of the skirt were not meeting up properly?! 

Shoulda Woulda Clipped That Curve
So now I know what to do differently with THAT when I make up the skirt in my good fabric.  Why didn't the pattern instructions tell me to clip the curves?  Moreover, why did the pattern instructions include this VERY misleading illustration that makes it seam as though the two pieces SHOULD match up without clipping?!

Misleading Pattern Illustration
The other issue had a useful article on zipper insertion that will help with my skirt as well.  I've put lots of zippers in throw pillows made of home dec weight fabrics, but the Threads article has tips for pucker-free zippers in very lightweight fabrics like my cotton voile.  So far, I'm getting my money's worth from that subscription.

As far as sizing goes...  The size 16 muslin was gigantic, so I made a size 12 waistband to try.  It fits, but too snugly for my taste, so I'm going to split the difference and try a size 14 waistband before making a final decision.  Hopefully I'll get back to the skirt today, but I need to finish up some laundry and housekeeping first. 

In quilting news, I did get my fabric prewashed, pressed, and cut out for my Math Is Beautiful quilt, based on Lars's math notebook doodle:

New Quilt Cut Out and Ready to Sew!
This should be the fastest, easiest quilt top I've ever put together, just gigantic squares and half square triangles.  I think I'm going to set one of my Featherweights up in the dining room for this one so I can work on it at the same time as my skirt.  So I have my skirt going on in the studio, my needleturn applique in the family room, and now a little quickie quilt on the side in the dining room.  I'll get back to my pineapple log cabin blocks once I've finished my skirt.

Otto Guards the Pineapple Log Cabin Blocks
Meanwhile, Mister Puppy-Pants is keeping me company and guarding the design wall.  His sister Lulu is temporarily banned from the studio for leaping at the television when Anders was watching Tom and Jerry cartoons.

I'm linking up with Show and Tell Tuesday at I Have to Say, Sew Cute Tuesday at Blossom Heart Quilts, WIPs on Wednesdays at Esther's Quilt Blog, and Let's Bee Social at Sew Fresh Quilts.  Have a great day, everyone!

Thursday, June 25, 2015

S-L-O-W-L-Y Starting the Skirt Project, Research and Discovery Phase

Making A Start: The Package Is Opened!
Ten days ago, I announced my plans to make myself a skirt.  See how much I have accomplished so far?  I actually bought my cotton voile print skirt fabric, solid navy cotton voile lining fabric, invisible zipper, thread, and twill tape over a month ago.  Then I spent several weeks procrastinating researching and agonizing over:

1. Whether and how to prewash my fabrics
2. What kind of interfacing to use for the waistband of the skirt 
3. What size should I cut out

I know my mom is going to laugh when she reads this.  She would have started cutting and sewing immediately and finished the skirt in a day.  I, on the other hand, need to research, ponder, mull, consult the Internet, and only THEN can I proceed.  Since I have only ever made one garment that ended up wearable (and I was disappointed with the fit), I started by purchasing a new book to teach me the basics.  I picked the Threads Magazine Sewing Guide because, having subscribed to Threads in the past, I know that Threads is all about garment sewing as an art form, with the goal of achieving couture quality garments with the best fit possible.  The frustrating thing about trying to learn to sew from a monthly magazine is that each issue has a random assortment of articles that never seem to mesh with the project I have in mind.  So, for instance, I have studied articles on how to contour princess seams, underlining with silk organza, and how to do a hand-picked zipper from reading Threads magazine, but I don't know what to do first when I open a new pattern.  The Threads Sewing Guide seems to be a compilation of articles from the magazine, but arranged logically so that a beginner like me can start reading at the beginning and know what to do.


The Skirt Pattern: New Look 6708
At this point I should probably explain that my goal for this project is not to have another skirt in my closet.  I already have a bunch of skirts in my closet, and if I really needed another one I could go to the store and buy one faster and probably for less money than it will cost me to make this one myself: $5 pattern, $45 for 3 yds of floral print fabric, $1.50 zipper, $1.30 twill tape, $3.35 thread, $17.25 for 3 yards of lining fabric, and $4.30 for an 8-yard bolt of fusible interfacing that I got with a 50% off coupon...  It is costing me about $78 to make this skirt.  Gone are the days of sewing for thrift!  But the skirt is not the goal, and saving money on a skirt is not the goal.  The whole point of making this skirt is to teach myself garment sewing on a simple project that is easy to fit, so I can learn the basics of reading and following a pattern and constructing a garment from start to finish, and then work my way up to more difficult garments like blouses and dresses -- again, not to save money, but because I have a horrible time finding anything in the stores that fits me well.  I took some great classes on pattern alterations and fitting when I went to Atlanta in March for the Sewing & Quilt Expo, but I think I need to get more comfortable with the basics before I tackle something that will require pattern alterations.  I want to take my time, learn as much as I can from this skirt, and do everything in my power to ensure that this garment is a "win" -- meaning that it fits well and looks good enough that, if it was a ready-made item in a store, I would have liked it enough to purchase it.

The Fabric: Pretty Potent Echinachea on Cotton Voile
So in answer to Quandary #1, yes, I did prewash my fabrics, both the print fashion fabric and the lining fabric.  They are 100% cotton voile fabrics of slightly different weights, so two concerns: First of all, when I establish the finished length of this skirt, I want that to be the REAL finished length of the skirt.  I do not want it to shrink two inches the first time I wash it.  Second, what if the print fashion fabric shrank more than the lining fabric and I ended up with the lining hanging out at the bottom of the skirt?  That actually happened to me with a ready-to-wear skirt from Ann Taylor, and after shortening the lining and having the top layer of the skirt CONTINUE to shrink, I finally added crochet lace to the skirt hem to make up the difference.  But since I'm going to all the bother of sewing this skirt myself, it's worth the extra trouble to preshrink the fabric before cutting into it.  I washed the fabrics in the machine with the Very Warm temperature setting and dried them in the dryer.  I plan to wash the finished skirt in cold water and line dry.

As for Quandary #2...  My pattern calls for fusible interfacing, period.  As if there was only one kind of fusible interfacing out there, and everyone knows where to get it.  Hah!  There must have been twenty different kinds of fusible interfacing at JoAnn's, some of it tissue-thin, others that were stiff and reminded me of heavy weight cutaway machine embroidery stabilizer.  How am I supposed to know which one to use?  I consulted several different sources for this one.  According to my Threads book, the general rule of thumb is that you want to use an interfacing that is similar in weight or lighter weight than your fashion fabric.  That helps.  But then I consulted another great book, Sandra Betzina's More Fabric Savvy, which lists today's common garment fabrics alphabetically and gives sewing recommendations for each of them.  Betzina has a section in the book for Batiste & Voile, and she recommends interfacing with self-fabric.  Hunh?  But my pattern says FUSIBLE interfacing!  I consulted another resource, Shannon Gifford's sewing tutorial for Voile at EmmaOneSock (one of my favorite online garment fabric shops).  Gifford says, "If you prefer to use a fusible interfacing, use the thinnest fusible available... However, the best interfacing for this fabric is a coordinating solid colored silk organza."  When I went to JoAnn's for interfacing, they did not have any coordinating silk organza, and the lightest weight fusible interfacing they had was a Pellon Ultra Lightweight Fusible Interfacing By the Bolt.  It's 100% polyester and the care instructions are machine wash warm, tumble dry and warm iron.  Fortunately, I bought a little more fabric than the pattern called for, so I'll be able to experiment.  I'll try both ways, fusible interfacing and self-fabric interfacing, and see which one looks and feels better.

Fitting Class with Lorraine Henry
And finally, Quandary #3, which size do I cut out?  Well, the reason I picked a loose-fitting skirt for this project is that it should be fairly easy to fit, just as long as I go by my waist measurement when deciding what size to cut out.  Easy enough, right?  As long as I know WHERE MY WAIST IS...  I learned from Lorraine Henry's fitting classes to tie a piece of elastic around my middle and then bend at the waist from side to side, forwards and backwards.  The elastic naturally settles at the elusive Natural Waistline (nowhere near where the waist of today's clothing is generally located) and THAT'S where you take your waist measurement.  No sucking in your abs, just relax those tummy muscles or the skirt will be way too tight and I won't want to wear it!  I got 30 1/4" for my waist measurement, and then I looked at the back of the pattern envelope and saw that a 30" waist is a size 16 and a 32" waist is a size 18.  Panic!!  That can't be right!  The skirts in my closet that fit comfortably are size 6 or size 8.  I understand that pattern sizes and RTW clothing sizes are no longer comparable due to serious vanity sizing in ready-to-wear, but size 16 for my skirt sounds HUGE. 

So I decided to figure out how big the waist of the finished skirt would be if I made a size 16, so I could compare that to the waist of the skirts hanging in my closet.  I measured along the top edge of the skirt waistband pieces, and subtracted out the side seam allowances, and I got a finished waist band of approximately 32 3/4" for a size 16 skirt (not the same as the waist measurement for that size, because the pattern adds wearing ease and the skirt is designed to sit 1" below the natural waistline).  Then I went into my closet and discovered that the most comfortable skirts I own actually do measure around 32" at the waist.  Go figure!  It looks like I'll be making a size 16, after all.  I'm still a little nervous about that -- what if I made a mistake measuring the pattern pieces or subtracting out seam allowances?  Just to be on the safe side, I think I'll cut the waistband pieces out of muslin, stitch them together, and try it on before I cut into the real fabric.  Maybe I should make the WHOLE skirt out of muslin, since I don't really know what I'm doing? 

Ironing Pattern Pieces
Meanwhile, I did manage to cut the pattern pieces apart and iron out the folds and wrinkles (dry iron, medium setting).  But then I stalled out, remembering how I made Lars a cute pair of toddler pajamas (a long, LONG time ago) in size 2T, and then when he outgrew them I couldn't reuse the pattern to make him a larger pair because I had already cut out the smallest size, cutting off all of the larger sizes of the multi-size pattern.  What if I cut on the size 16 line to cut out my muslin, but then after sewing up the muslin I realize that a smaller or larger size would be better?  I'm making the 24" long version of the skirt this time, but what if I decide that I want to make the 29" long skirt someday in the future and I've already cut the extra length off my pattern?  Should I trace the original tissue pattern pieces onto butcher paper, Swedish Tracing Paper, or some other material before cutting them out?  Or is that silly for something so straightforward as this skirt pattern?  I haven't decided yet.

Today I spent some time straightening up and organizing my studio so I have room to work on this project.  I ordered a roll of the Swedish Tracing Paper from Amazon because, even if I don't use it for this pattern, I know I'll want it for when I'm ready to make a lot of pattern alterations to dress and blouse patterns.  I had hoped to make more progress on the skirt today, but I ended up writing about it here instead.  Which is fine.  Writing about it helps me to sort out all of the conflicting advice gleaned from various sources, and helps me to clarify what to do next:

1. I need to read through the pattern instructions and make sure I understand everything.  I may need to look some things up in my sewing books, like how to do a sewn-in self-fabric interfacing, if I decide to go that route.

2. I need to decide how I'm going to finish my seams.  My Fabric Savvy book suggests either French seams or a 3-thread overlock stitch. 

3. I need to trace off the pattern pieces (if I decide to do that) and make up a muslin to check that I like the fit and the style. 

...and THEN I can cut out the pieces from the fashion fabric and the lining!

I'm linking up with Esther's WIPs on Wednesday even though this one isn't quilting related (I hope that's okay).  Meanwhile, we're headed to Carowinds tomorrow to ride the roller coasters with Lars and Anders.  Fingers crossed for light crowds and clear skies!