Showing posts with label product reviews. Show all posts

Sunday, August 10, 2025

Stonefields Applique Prepped, Blocks 5-13 + Applipops vs Perfect Circle Templates

Good morning, my lovelies!  I have been having so much fun prepping my Stonefields Month One appliqué blocks this week!  You know, digging through scrap bins and working with scissors and something suspiciously similar to Elmer's School Glue to put these little blocks together makes me feel like I've been transported across space and time back to kindergarten arts and crafts.  It's magical and so cathartic.  If you are someone who admires appliqué from a distance but thinks "I'd never have the patience," I urge you to give it a try sometime.  It is so much like those school projects from decades ago where we dug through old catalogs and wallpaper sample books and construction paper scraps from other projects, cutting things out with our safety scissors (we were fussy cutting!) and trying to eat the paste when the teacher wasn't looking.  I know of no other pastime that can make me forget my arthritis and my wrinkles, dissolve all the cares of the world, and make me feel like a 5-year-old again.

Here are my Stonefields Blocks 5-13, prepped and ready for stitching:


Stonefields Blocks 5-13, Prepped and Ready to Stitch


When I say that my blocks are "prepped and ready for stitching," I mean that I've made heat resistant plastic templates for all of the applique shapes, selected the fabrics, traced the shapes onto the wrong side of my fabric scraps with a pencil, cut the shapes out with an eyeballed scant 1/4" turning allowance, and preturned those seam allowance/turning allowances by wetting them with starch and pressing them back over the edges of the heat resistant templates.  Then I used the pattern sheets and a light box to position the applique shapes on my background fabric and basted them in place temporarily using tiny dots of Roxanne's Glue Baste-It (this post contains affiliate links).  I put those drops of glue about an eighth to a sixteenth inside the edge of the patch so I won't be hand stitching through the glue.  By the way, this preparatory process is exactly the same regardless of whether I was planning to stitch the shapes down by hand or with my sewing machine using an invisible appliqué stitch.  If sewing by machine I would just need to slip scraps of tearaway embroidery stabilizer beneath each block before stitching to prevent puckering.  I'm not going to promise that there won't be any machine stitched applique on this quilt, but for now I'm going to stitch my applique by hand using my favorite YLI 100 wt Silk thread and my Bohin size 12 Applique Needles.  I love how these thin needles and thread create truly invisible stitches that just sink into my fabric and disappear.

Monday, January 9, 2023

Mary's Lumen Quilt, Jingle Binding + A Little Red Hen Named Zojirushi

Happy New Year, Y'all!  I can't believe I haven't posted anything since before Christmas.  Meanwhile, my camera roll has been filling up with quilt photos and my brain has been cluttering up with everything I wanted to say about all of those quilts, so here we are.  I considered writing a big reflection post rehashing the highs and lows of 2022.  I thought about doing a New Year's Resolution post, or one that plans out all the quilts I'll work on this year...  Remember the three Sarah Fielke BOM projects I was going to make in 2022?  👀   Hah!  Still haven't started any of them!  

So instead of dour reflecting on goals not accomplished or fantasizing about plans soon abandoned, I'm going to just plant myself here in this moment of this day and see what happens next.

And now, without further ado, the quilt I've selected to share with you to kick off the new year:

Mary's Spectacular Lumen Quilt

Mary's 60 x 60 Lumen Quilt with Celestial Spark Clam E2E Quilting


This quilt was made by my client Mary whom many of you know via her blog, Quilting is In My Blood.  I chose to share it today for several reasons: It reminds me of fireworks exploding in the night sky to welcome the New Year.  It's gorgeous.  And finally, Mary is on my mind right now because I've got her three temperature quilts scheduled for quilting this week!  Can't wait!

Mary used the Lumen Quilt foundation paper piecing pattern by Nydia Kehnle and Alison Glass, which you can find on Etsy here (this post contains affiliate links).  This is such a gorgeous minimalist design, and IF I was making a grand list of quilts to make this year, I would probably put this one on the list.  The pattern is for a throw sized quilt, but it could easily be enlarged to bed size by making more blocks.  Another interesting thing about this quilt is that this is the second Lumen quilt Mary has made, using the same fabrics as her first one!  In 2019, Mary made a Lumen quilt as a gift for her stepdaughter and she liked the quilt so much that she decided to make another one to keep for herself.

Sunday, April 5, 2020

Spirit Song Flimsy Finished + Streaks Motivation App Review: Harnessing Technology to Reach the Flow Zone Through Quiltmaking

Look what I finished yesterday!  My Spirit Song flimsy is finished!  (For those non-quilters or new quilters reading this, a "flimsy" is another name for a quilt top -- the pieced or appliqued top layer of a quilt, prior to being sandwiched with fluffy batting and a backing fabric that are all held together by quilting stitches that go through all three layers of the quilt).


My Spirit Song Quilt Top, 59 x 75, Ready for Quilting
My borders are nice and straight, too, not crooked as the appear in the photo above.  I slapped the finished quilt top on my design wall by myself, without a helper to assist in getting it up there straight.  I wanted to get a picture of the flimsy before loading it on the quilting frame that I can use to plan quilting designs on my iPad.  I am going to have SEW MUCH FUN quilting this one!!  If I hadn't already named it Spirit Song, I'd probably name it Pink Lemonade.


Getting the Job Done...  (Why Don't Berninas Come With Drink Holders?)
My blue inner border has a finished width of 1" and as of right now, the outer border will be 4 1/2" wide once the binding covers up the outer 1/4".  Or I might trim it down after quilting to be 4" like the Birds In the Air blocks.  You can always trim it down to make it smaller, but you can't trim it down to make it bigger if you cut it too small to begin with!


Borders In Progress
In that first photo on the design wall (taken at night with studio lighting), the outer border looks really dark and nearly red.  The progress shot above shows more accurate color -- hot pink with purple background and touches of orange and blue.  I think it "converses" nicely with the fabrics in the quilt top while containing the chaos of all those busy prints, and it achieves my purpose of steering the whole quilt back to a balance of pink, peach, coral, and orange.  It was feeling a bit too orange for me before I added the borders.  


Quick, Take a Picture!  Rebecca's Studio is Tidy Today!
The biggest hurdle I had to get over before I could finish this quilt top was that my workspace was constricted by a mess.  I need my whole cutting table cleared off in order to cut long strips of fabric accurately and I need my whole cutting table cleared off in order to pin those borders to the edges of the quilt, but prior to last week there were abandoned class projects, new fabric and tools not yet put away, and bits of pieces of other projects piled all over that table so that only about two square feet of it was available for cutting.  

Design Wall du Jour: Spirit Song on Left, Beware the Ishmaelites Sampler Blocks on Right
And yet, if I spend an hour in my studio tidying up and putting things away but didn't sew anything, I feel like nothing was accomplished.  I've decided that from now on, the unglamorous but essential time spent cleaning up from one task and getting ready for the next one counts as sewing time, at least for me.  And, speaking of keeping track of sewing time...


Artist Crystal Moody at Work in Her Studio

Crystal Moody and The Power of Daily Practice

I read an interesting article by Crystal Moody on the Craft Industry Alliance blog a few days ago entitled "The Power of Daily Practice."  Moody is a visual artist who challenged herself four years ago to build a habit of doing at least one line drawing or spending at least 20 minutes painting every single day in order to hone her craft.  Her article is very insightful about identifying the obstacles that get in the way of achieving these kinds of goals as well as how to track your successes, stay motivated, and best practices to keep from "falling off the wagon."  Having been in a slump of my own recently, and with a hulking longarm quilting machine that I have not spent enough time with to master, I couldn't help wondering whether Moody's method -- setting a goal of just getting in there and doing SOMETHING for only 20 minutes every single day -- might work better for me than trying to self-motivate with these larger task completion goals I've been setting each week (piece two blocks, borders attached, etc.) -- especially since I consistently, VASTLY underestimate how much time those tasks will complete, setting goals that I fail to reach week after week and month after month.  Not very encouraging!  

One suggestion Moody shared is that she tracked her progress -- how many days she got that 20 minutes of practice in -- by X'ing off those days on a wall calendar.  You start to see a "streak" that way, however many days in a row you did the thing you are trying to do consistently, and it motivates you to keep going so as not to break the streak of X's on the calendar.  But a wall calendar only motivates you if you're in the room that has the calendar on the wall, right?  If my wall calendar is upstairs in my studio, I'm not even going to see it if I don't go up there for a week.  

"Move Rings" on Apple Watch.  Rings Close to a Circle When Goals are Met
But then I remembered the "Move Rings" on my husband's and my sons' Apple Watches.  What you see above is an app that comes already installed on Apple Watches, with different colored rings to track things like the number of steps you take per day, how often you get up and stand throughout the day, and how many minutes out of the day your heart rate is elevated from cardio exercise of any kind.  Users can adjust those goals to their liking and then see a visual for how they are doing right there on their wrist every time they check the time.  The app also tracks "streaks" -- how many days in a row you met those goals -- a high tech version of what Moody suggests for staying on track with daily art practice, and a visual reminder that follows you around all day long.  The Apple Watch is able to track movement (steps), standing, and cardio (elevated heart rate) automatically, but surely someone has created a similar app to help people with non-exercise goals, right?  


Introducing My New Favorite Quilting App, Streaks for Apple Devices!

A bit of Internet research led me to the highly rated, Apple Design Award winning, highly customizable Streaks app that syncs across all of my Apple devices.  I've been using it for several days now and I'm loving it!


Streaks App for Apple Devices Lets You Track ANY Kind of Goal
With all of the Apple stores closed due to our state-wide Stay at Home order, I had to order my Apple Watch online and it won't arrive until April 9th.  (I had already decided to get an Apple Watch before discovering this app, so that I can play music on my earphones while out walking without lugging my phone around with me).  Meanwhile, here's what the Streaks app looks like on my iPhone 11 Pro Max:


Streaks App for iPhone, available here
As you can see, I've customized the appearance of the app by changing the background from the default orange to this purply color.  I've created four goals of three different types for myself:
  • The "Walk 5,000 Steps" goal is completely automatic because it ties into the information in the built-in Health app that is already tracking my steps throughout the day. I don't carry my phone around with me as I move around the house, so the total number of steps in the Health app isn't very accurate right now.  But I have been trying to remember to take the phone with me when I go for my walk, so that's where those 5,000 steps are coming from.  I will adjust that goal as needed get more out of it when my Apple Watch arrives.  This circle is solid white with a little star next to a 4 because I've completed my walking goal for four days in a row (and the goal was completed when I took the screen shot).
  • 30 Minutes Quilting and Read a Book are both TIMED goals.  Unlike the exercise goals that my phone and watch can track automatically, my devices have no way of knowing that I'm engaged in reading or quilting.  In the screen shot above, the Quilting icon has a white circle background and a star next to a 4 because I'd already met that goal for the day when I took the screen shot and I had a 4-day streak of meeting that goal every day.  But at the beginning of the day, the Quilting goal looks like the Reading goal just below -- the icon has a purple background and a start/play arrow that I can tap to start the timer.  I can also pause the timer if I'm interrupted.  Another cool feature with this app is that I was able to enable and customize Siri commands, so I don't have to open the app to start those timers -- I just have to say "Hey, Siri, start quilting timer."  And when I've reached my 30 minute goal, the app plays a happy noise and the circle changes to solid white for Complete.  Cool, right?!  This would also be a great way to track daily music practice -- and yes, there are violin and piano icons that you can select when you create a music practice task.  There are TONS of icons to choose from, for just about any habit you're hoping to create -- or trying to break.
  • The "No Food After 8 PM" goal is a NEGATIVE goal -- something that I would tap to mark off a failure rather than a successful completion.   I get acid reflux overnight if there's food in my stomach when I lie down to sleep, and stomach acid burning your vocal cords every night is not very helpful for singing!  I don't need to take medication for the reflux as long as I remember not to eat after 8 PM, so this is something I want to be mindful of.  Other negative goals you might want to track would be "no sweets," "no cigarettes," "no swearing," or "no whatever-it-is-you're-giving-up-for-lent."  In the screen shot above, my No Food After 8 PM circle is going to stay solid white and track each day as a successful completion UNLESS I tap that circle to tell the app I messed up and ate a pint of Ben & Jerry's ice cream at 11 PM...  Hypothetically, you understand, wink wink...
  • Not Shown: a Regular, Non-Timed Task to Check Off.  The other kind of goal, that I haven't happened to set for myself, would be the opposite of my No Food after 8 PM goal, something that I wanted to do each day that doesn't need to be timed, like "Physical Therapy Stretches" or "Feed the Dog."  I am sure I'll set goals like that at some point in the future, but wanted to start out with just these four for now.

What makes the Streaks app so useful is how well it integrates with your Apple device and how customizable it is.  You can set each goal for once per day, multiple times per day, or times per month, or a certain number of days out of the month.  I've set each of my goals for 29 days out of the month so, if something unexpected comes up and I just can't get in the studio or open a book that day, it can be like a "cheat day" on the diet and I won't fall off the wagon just from one or two missed days.  On the integration side, I also love that I was able to add the Streaks widget to my Today View screen on my iPhone so I can get to it quickly just by swiping to the right on my lock screen or home screen:

Streaks App on Today View Screen of My iPhone 11 Pro Max
I am looking forward to seeing these goals as "complications" on my watch face as well, so I can keep my goals front-of-mind even better:

Streaks "Complications" for Apple Watch
(For an explanation of Apple Watch "complications" and how they can be used to customize an Apple Watch, click here).  This Streaks app has definitely been beneficial in helping me get out of my slump and get the borders sewn onto Spirit Song, and it's gotten me outside in the sunshine every day for the past few days, too.  I'm hoping that it will help me to spend more of my time doing the things I want to be doing, rather than having these endless days of quarantine melt into one another and fritter away with endless hours of news-watching, social media surfing, or even too much time writing blog posts at the computer, cough cough...


A Final Note About My Goal Strategy and How it Relates to Flow Theory

Just to be clear, I am NOT using the Streaks app to track the TOTAL amount of time I'm quilting/reading, or even the total number of steps I'm taking throughout the day.  I'm using it to track whether I spend my MINIMUM amount of time doing those activities each day and whether I've taken the MINIMUM number of steps I've set for each day.  When I started using the app, I set my reading goal to one hour.  Several days went by of not meeting the goal, because I felt like "it's too close to bed time/I'm too tired/I don't have an hour right now."  So I revised that down to the ridiculously low 15 minute goal, because I'm never too tired to read for 15 minutes, right?  And what usually happens is that, by the time I've been reading for 15 minutes, I'm absorbed in my book and I'm probably going to keep on reading for a lot longer than 15 minutes.  Same thing with the 30 minutes quilting goal.  I knew I needed the goal to be longer than 15 minutes because it takes me that long to turn on the lights, plug in the iron, and oil and warm up the longarm machine without sewing a single stitch!  But I wanted to keep the time small and attainable -- like Moody's 20 minutes of painting every day -- so that I would be less likely to blow it off altogether on a busy day when I didn't have an hour or two to spend in my studio.  Every single day that I met my 30 Minutes Quilting goal, I actually spent much longer working in my studio, and that's the whole point.  I know that my biggest challenge is task initiation, or switching from one task to another.  Once I've been working in the studio for 30 minutes, I am in a "flow state" where I am enjoying myself and want to keep going without needing to keep track of time anymore.  Psychologist Mihaly Csikszentmihalyi described this experience in a 2015 NPR interview about achieving happiness, and what makes life worth living.  (You can listen to that interview or read the transcript here).  Here's Csikszentmihalyi discussing a composer's experience of getting lost in the crafting of a musical composition: 

"...This is so intense an experience that it feels almost as if he didn't exist. And that sounds like kind of a romantic exaggeration. But actually our nervous system is incapable of processing more than about 110 bits of information per second. And in order to hear me and understand what I'm saying, you need to process about 60 bits per second. That's why you can't understand more than two people talking to you. Well, when you are really involved in this completely engaging process of creating something new, as this man does, he doesn't have enough attention left over to monitor how his body feels or his problems at home. He can't feel even that he's hungry or tired. His body disappears. His identity disappears from his consciousness because he doesn't have enough attention - like none of us do - to really do well something that requires a lot of concentration and at the same time to feel that he exists, so existence temporarily suspended. Now, when that happens, the music just flows out. And so many of the people described this as a spontaneous flow that I call this type of experience the flow experience."
Let that sink in for a minute -- when you are intensely involved in creating something new, challenging yourself and pushing yourself to the limits of your technical and creative abilities, all of the troubles of the world outside and even your own body's aches, pains, hunger and fatigue disappear.  Who doesn't need some FLOW in their lives during a pandemic, right?!  

HIGH Challenge Level Plus HIGH Skill Level Leads to FLOW State
This theory also helps me to see my tendency to deliberately seek out challenges in amore positive light.  Perfectionism -- holding oneself to unattainable standards -- is unhealthy and destructive, yes -- and I do sometimes veer off in that direction if I'm not careful.  But  seeking out challenges is not automatically perfectionism, and setting challenges that push you to your limits is the only way you can ever reach that Flow state that Csikszentmihalyi discovered was common to creative people who report feeling happy and fulfilled in their lives (see visual above, shamelessly pilfered from Wikipedia).  So, consider that crazy-complex quilt block I shared here recently (Nancy Cabot's 1933 Cathedral Window, with 16 Y-seams in a single block):

High Challenge + High Skill Level (My Cathedral Window block, Designed by Nancy Cabot in 1933)
Several readers commented that I could redraft that block to eliminate the challenging Y-seams by subdividing eight of those triangles, and that would absolutely be an easier version of this block.  That's a great idea for someone who is on a time crunch, or for a beginner who isn't yet ready to tackle the challenge presented by this design.  That would absolutely make the block easier.  (Scroll back up to that "Flow Chart" and you'll see that combining a very high challenge level with very low, beginner skills leads to Anxiety instead of to Flow!)  

But for me, the original block design had that perfect combination of a high challenge level that would engage my highest skill levels, bringing me into the Flow zone.  If I had simplified the construction to where I could piece this block on autopilot, my mind could still be consumed by the scary headlines and worries of the day and I would not have enjoyed the process nearly as much.  There's definitely a time and place for "mindless sewing," which for me would be the needleturned applique that I take along for my quilting bee, something I can stitch automatically while engaging in six conversations at once (SERIOUSLY!!  We are a gabby bunch!!)

Another interesting takeaway is that you need to build up your skill level in a particular activity BEFORE you can get into a flow state with it.  That circles us back around to my beginner longarm skills, which have not been advancing in my sleep over the months and months of not practicing -- and it also bring me back Moody's article about creating a habit of daily practice in order to develop her skills as an artist.  That longarm machine is just a giant pencil that draws with stitches of thread, and the only way to get better at drawing with that machine is to actually spend time practicing on a regular basis.  

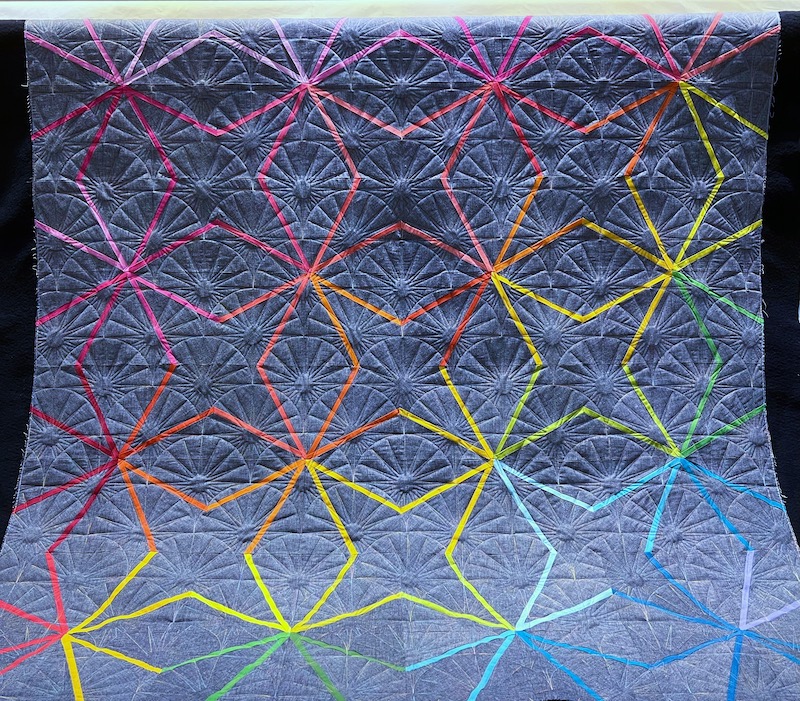
I thought about setting separate goals for actual longarm quilting practice versus my generic quilting goal that encompasses all of the processes that go into a quilt from cutting out the fabric to stitching down the binding, but I opted against being that specific.  There is always SOMETHING I can work on in the studio to further the process of quiltmaking (and get a work-in-progress closer to being a quilt on the frame), but there is not always a quilt already loaded on the longarm, ready to be quilted on for 30 minutes.  Blah, blah, blah -- are you bored yet?  Let's look at my finished quilt top again:

One Last Look at My Finished Spirit Song Flimsy Before We Go
Whew -- you know what else gets me "into my flow zone?"  Researching Flow Theory and habit formation and writing ridiculously long blog posts!  I ought to have cookies or something to reward those of you who are able to stick with these sagas and read them all the way through to the end.  :-). Hah!  

I'm linking up today's post with:

·       Slow Sunday Stitching at Kathy's Quilts  
·       Oh Scrap! at Quilting Is More Fun Than Housework
·       Design Wall Monday at Small Quilts and Doll Quilts  
·       Monday Making at Love Laugh Quilt
·       BOMs Away Katie Mae Quilts  
·       Whoop Whoop Fridays at Confessions of a Fabric Addict
·       Peacock Party at Wendy’s Quilts and More
·       Beauty Pageant at From Bolt to Beauty
·       Finished Or Not Friday at Alycia Quilts
·       Off the Wall Friday at Nina Marie Sayre
·       TGIFF Thank Goodness It’s Finished Friday, rotates, schedule found here: http://tgiffriday.blogspot.ca/p/hosting-tgiff.html  

·       UFO Busting at Tish in Wonderland

Wednesday, February 12, 2020

Doggie Detour: Introducing Samwise the Brave (with a Brief iPhone 11 Pro Max Review)

Introducing the newest member of our family, Samwise the Brave!

Baby Rottweiler Samwise at 13 Weeks
We lost our 9-year-old Rottweiler Otto the week before Christmas, leaving a giant hole in our hearts.  Although Otto can never be replaced and we still have his littermate Lulu, we decided that our home needed a puppy.  Even Lulu was miserable as an only dog for the first time in her life -- all the play went out of her when she lost her brother.  So we went back to Alice of Guardian Rottweilers in Indiana and selected this plucky little fella.  

Bernie and Samwise
After extensive family debate, my 16-year-old son Anders won all of us over with the idea of naming our new puppy after the Hobbit character Samwise the Brave from Lord of the Rings.  He's Frodo's loyal sidekick who rescues him from Mordor and is never corrupted by the evil power of the Ring...  Perfect name for a Rottweiler!

My Son Anders with Puppy Samwise
My 19-year-old son Lars, on the other hand, is beside himself.  He has not yet met this puppy because he is away at college (Appalachian State in Boone, NC).  I've been texting him photos and videos, and Lars is like, "BRING HIM TO BOONE!  HE MUST COME TO BOONE!  WHEN ARE YOU BRINGING MY NEW DOG TO BOONE?!!!"  Poor baby.  Spring break will be here soon enough!

Me Bonding With Sam During the 9 Hour Ride Home
Bargersville, IN is a long way from Charlotte, NC.  I rode in the back seat and snuggled with Sam the whole way home, which secured my position as The Most Important Human in his universe.


Interesting aside -- all of the previous photos in this post were taken with my new iPhone 11 Pro Max, which I bought primarily in hopes of taking better photos.  The photo below, the one of me holding the puppy, was taken on my husband's iPhone 8 Plus.  

Unflattering Photo of Me with Mister Adorable, iPhone 8 Plus
I am much happier with the photos I've been taking on my new phone.  I had an iPhone 6 before, so not only are my photos looking a lot better with the new phone, but I also have significantly better battery life going from a 6 Plus to an 11 Pro Max, my Bluetooth range is a lot bigger (so my earphones don't cut out when I walk too far away from my phone), and I now have wireless charging capability so I can take advantage of those wireless charging armrests that some of the airports have at the gates now.

SIT! Samwise at 15 Weeks, Same Lighting as Above, iPhone 11 Pro Max
This is how little dude Sam looks up at me when he wants some attention.  No jumping up!  One of the advantages of picking up Sam at 13 1/2 weeks instead of the 8 or 9 weeks that is typical for puppy adoption is that our breeder and her family gave us a fantastic head start on training.  When Sam wants to say hello, he plops his butt on the floor just like this and locks his eyes on me, waiting for instructions.  When it's time to eat, he's been trained that the food dish won't be set on the floor until he's sitting.  Who can resist that sweet little face?  Definitely not ME!  Again, comparing the previous two photos -- they were both taken in my kitchen, the one on Bernie's iPhone 8 Plus and the other on my iPhone 11 Pro Max -- the one on my new phone is so much crisper and clearer.

DOWN!  Sam at 15 Weeks
He already has a really good sit and a good recall (when we call "PUPPY PUPPY PUPPY"), courtesy of our breeder.  In the week we've had him, we've been teaching him to differentiate between "sit" and "down" (he initially thought that both positions were a sit), as well as Touch (to touch with his nose).  Dude weighed 32.5 lbs at 13 weeks but he was afraid to go down the deck stairs, so we've been having to CARRY him out the back door, through the screen porch, down the stairs and out into the middle of the grass every time he needs to go potty (hourly).  My back is KILLING me!  So I was very excited that I got him to go down stairs by himself three times yesterday.  

Samwise Loves His Toys
Sam is sleeping a lot, but when he's awake he's FULL of energy -- with bursts of excitement like a Tasmanian devil!  Of course he's teething, too, so we have dog toys strewn all over the kitchen.  I have an assortment of textures so that, when he chomps into something I don't want chewed, I try to swap out something that will feel similar.  The fuzzy plush toys get swapped out for chomping on clothing or upholstered furniture, the horns and antlers are swapped out for chomping on the metal or wood furniture, and the rubbery puppy Nylabones with a little "give" are handy when he wants to nibble on the hands that are rubbing his belly!

Lulu is Slowly Acclimating to the Newcomer

The biggest challenge is managing our two furbabies with an attitude of "separate but equal attention" as our 9-year-old Rottie, Lulu, is very gradually warming up to the little guy.  Samwise desperately wants to play with Lulu and will whimper and plop down right up against the gate to be near her, but Lulu isn't there yet.  She growled at him a few times initially to make her discomfort clear, hence the baby gates blocking off the kitchen.  She's doing a little better with him each day, and they even had about a minute of playtime yesterday afternoon in the back yard -- that's how I got Sam to get over his fear of going down steps.  Lulu was lying on the path at the bottom of the steps and he wanted SO badly to go to her.  His longing to visit Lulu was bigger than his fear of the steps!  But I kept the play-chasing brief to ensure that it would end on a positive note.  Both dogs looked happy with wagging tails and appropriate sniffing of unmentionables.  Baby steps!

Samwise Napping in his Nursery: the Puppy Play Pen
One of the best investments I've made is the puppy play pen pictured above, available on Amazon here (affiliate link).  The Carlson Pet Yard and Convertible Super Wide Gate has six 24" panels that hinge together, and I purchase the expansion pack with two additional 24" panels as well to get a decent size for my super-size cutie.  This gate/play pen is only 28" tall, though, so I would never leave him in the play pen if I was leaving the house.  He can jump up and put his paws on the top edge easily already, but it's very sturdy and there's no danger of him toppling it.  Even with my kitchen and family room gated off, there is still too much for Sam to get into unless someone is watching him like a hawk.  The play pen/nursery is a place where we can put him while we leave the room to use the restroom, and we've been moving him into his nursery pen whenever he falls asleep, as well.  That way we can open those other gates and let Lulu come and go as she pleases -- which is HUGE, because before we got the nursery pen Lulu was isolated in the rest of the house while Bernie and I were on puppy patrol in the kitchen.

Anyway, this is why I've not been posting anything (or sewing anything either, for that matter!).

WOOF!

Saturday, July 27, 2019

Sewing Machine Review: Meet Goldilocks, My Bernina 475QE!

Well, she's not brand-new anymore -- I bought this machine five months ago but I wanted to sew on it for awhile before posting a review.  I LOVE this little cutie!  I brought 'Nina, my 7-year-old 750QE to the Bernina dealer to have a minor part replaced back in February, and was the first person to play with their demo B 475QE sewing machine that they had just barely unpacked and set up on the sales floor.  By the time they had finished working on my 750 I had made up my mind to purchase this one.  I've been sewing on this machine for five months now, and it just might be one of the best machines I've ever owned.

Meet Goldilocks, My Bernina 475QE

My B 475QE is named Goldilocks because she's not too big to take to a class/bee/sit-and-sew, but she's not too small for large-scale paper piecing (like Lars's graduation quilt -- those foundation patterns would have to be rolled up inside the tiny throat of my Featherweights).  She has the same color touch screen, familiar interface, and all of the bells and whistles of my big 7 Series Bernina -- including the JUMBO BOBBIN, y'all! -- but no embroidery capability to jack the price up into the stratosphere.  I'd looked for a more portable "baby sister" machine before, but the 5 Series Berninas were priced beyond what I wanted to pay for a secondary machine and the 3 Series machines were a bit too small and were missing too many features that I use regularly.  Goldilocks is not too hard, not too soft, not too hot and not too cold -- she's the machine in the middle that was just right for me!  Here are my favorite features:

  • She weighs in at a reasonable 21 pounds (whereas my 750QE weighs 30 pounds)
  • This is a full-sized machine rather than a 3/4 compact size, so it doesn't feel cramped the way that the 3 Series machines did when I test sewed on them
  • She uses the same Bernina Hook system with Jumbo bobbins as my 7 Series machine, with the same exact INTERCHANGEABLE bobbins.  I can wind a bunch of bobbins for a project on one machine, and grab those bobbins when I switch to the other machine.  That is SO convenient!
  • The 475QE is a 5.5 mm machine, so the feed dogs are closer together for better control when piecing intricate patchwork than they are on my 9 mm machine.  Yet, unlike my straight stitch Featherweights, the 475QE can also do zigzag, blanket stitch, and invisible appliqué stitches
  • The 475QE has the Adaptive Thread Tension feature that was added to the 2nd generation 7 Series machines for even better stitch quality
  • This machine has the tie-off stitching and automatic thread cutter (love that feature when paper piecing)
  • It comes with the Bernina FHS Free Hands System, the knee lift bar to raise and lower the presser foot so I can keep both hands on what I'm sewing
  • Unlike the 3 Series machines, the 475QE has adjustable presser foot pressure
  • There are a total of 840 stitches in this machine, even more than the 837 stitches in my 750QE, and 40 quilting stitches (compared to 33 quilting stitches in the 750 machine).  The ones I'll use most often are the piecing straight stitch (#1303 on this machine), the invisible appliqué stitch, and the beautiful blanketstitch appliqué stitches
  • She comes with full size presser feet, not the snap-on soles, and Patchwork Foot #37 is included
  • Even though I have a longarm machine for quilting, it's nice to know that I can grab the BSR foot that came with my 750QE machine if I want to do free-motion quilting on something small on my 475QE.  The BSR foot is an optional accessory for this machine that I already own.
  • She has the same bright, cool LED lights for excellent visibility that I love on my 750 machine
  • The 475QE comes with the coolest zippered canvas accessory bag!!!  None of that silly Barbie Doll closet nonsense -- this accessory case is rugged, functional, and perfect for sewing on-the-go:
Bernina 475 QE with Zippered Canvas Accessory Bag
Interior Compartments of Zippered Accessory Bag
All of the accessories that came with the machine fit in the accessory case, with room for additional accessories as well (the above photo shows a couple of additional items that were not included with the machine).  I did purchase a few additional accessories for my new sewbaby up-front:
  • I bought the upgraded Bernina Foot Control that has the heel tap feature to raise and lower the needle.  That foot control comes standard on the 480 machine, but is an optional upgrade on the 475QE and the soon to be released 435 machine.  
  • I also purchased a Patchwork Seam Guide that screws into the bed of the machine (shown in the case in the photo above).  It's just like the one that came with the 97D Patchwork Foot for my 750QE, and just like the vintage seam guide that I use on my Singer Featherweight 221, and it's my tried-and-true favorite for maintaining a consistent, accurate 1/4" seam no matter which machine I'm using.  On the 475QE,  I'll use the seam guide in conjunction with the #37 Patchwork Foot that came with my 475QE.
  • I bought a straight stitch plate.  Did I NEED it?  Probably not -- but I'm in the habit to switching to the straight stitch plate for piecing on my 9 mm machine and I wanted one for this machine, too.  I've put my straight stitch plate on my 475QE, so the stitch plate shown in the photo above is the 5.5 mm plate that came with the machine.  
  • I also purchased Open Embroidery Foot #20 because I like to have maximum visibility when I’m sewing decorative stitches or doing machine applique, and I do have some machine applique planned for the imminent future.

As of this writing, MSRP for the Bernina 475QE is $2,399.  Compared to the other machines in the Bernina lineup, that is an amazingly affordable price for a brand new Bernina that comes with so many bells and whistles.  My dealer offered me a great deal on the machine at $1,899 but by the time I added on my personal "must-have" accessories and North Carolina sales tax, I ended up around $2,300 anyway.  Having sewn on this machine for five months now, I'm really happy with the purchase.  In fact, if I decided to give up machine embroidery, I would consider parting with my 750QE because the 475QE does absolutely everything else that I need it to do, stitches beautifully and reliably with any thread (including 50/2 cotton Aurifil and monofilament thread), and can handle everything from garments to fussy little quilt blocks to machine appliqué.  

After shopping around, I bought this DeNOA wheeled trolley case for transporting my Goldilocks 475QE:


Although the 475QE is light enough to carry by the handle, the rolling bag provides a little additional protection during transit.  The real advantage to the trolley is all of the other stuff that can be packed in there along with the machine -- threads, notions, fabrics, projects in progress, etc.

I've taken this machine to my quilting bee and to Karen Kay Buckley's machine applique class.  I also had it set up in a little SewEzi table downstairs by the TV for a few weeks when I was piecing the blocks for Lars's Mission Impossible quilt.  And now I have her set up in my studio at my secondary workstation, because I've discovered that it's really convenient to have multiple sewing machines when you're toggling between different types of projects.  Goldilocks is all threaded up with monofilament thread, a size 60 Microtex needle, and her Open Embroidery foot so I can work on my block from Karen's machine applique workshop, while my Big 'Nina 750 is threaded up with cotton piecing thread, a size 75 Quilting needle and foot 97D for piecing quilt backings and other odd jobs.  

Anyway, I highly recommend any of the 4 Series machines, either as a secondary machine like mine or as your One and Only, if you aren't interested in machine embroidery.  I'm definitely glad I got mine!