Showing posts with label Starch and Press. Show all posts

Sunday, August 10, 2025

Stonefields Applique Prepped, Blocks 5-13 + Applipops vs Perfect Circle Templates

Good morning, my lovelies!  I have been having so much fun prepping my Stonefields Month One appliqué blocks this week!  You know, digging through scrap bins and working with scissors and something suspiciously similar to Elmer's School Glue to put these little blocks together makes me feel like I've been transported across space and time back to kindergarten arts and crafts.  It's magical and so cathartic.  If you are someone who admires appliqué from a distance but thinks "I'd never have the patience," I urge you to give it a try sometime.  It is so much like those school projects from decades ago where we dug through old catalogs and wallpaper sample books and construction paper scraps from other projects, cutting things out with our safety scissors (we were fussy cutting!) and trying to eat the paste when the teacher wasn't looking.  I know of no other pastime that can make me forget my arthritis and my wrinkles, dissolve all the cares of the world, and make me feel like a 5-year-old again.

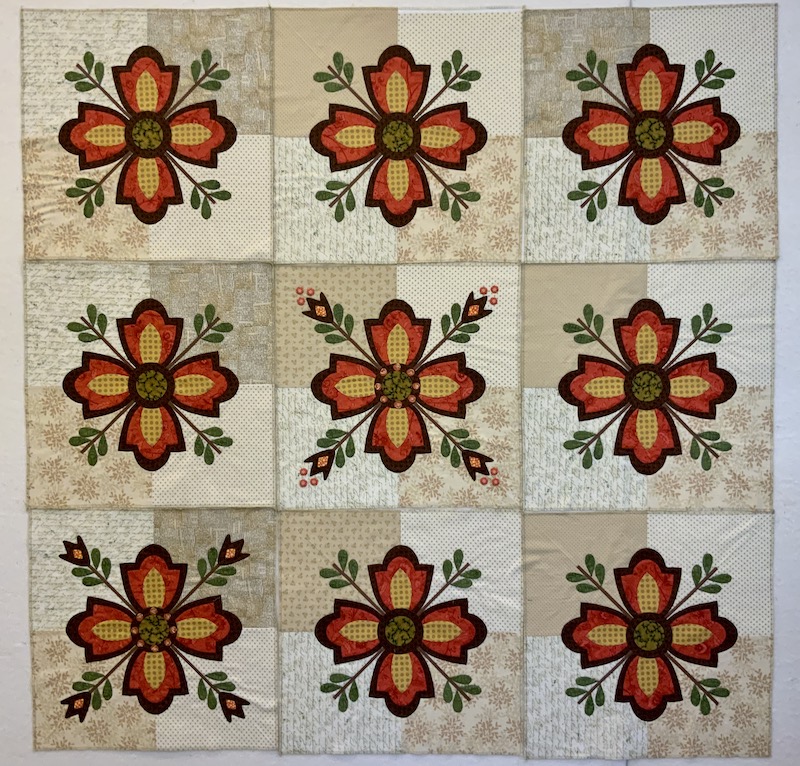
Here are my Stonefields Blocks 5-13, prepped and ready for stitching:


Stonefields Blocks 5-13, Prepped and Ready to Stitch


When I say that my blocks are "prepped and ready for stitching," I mean that I've made heat resistant plastic templates for all of the applique shapes, selected the fabrics, traced the shapes onto the wrong side of my fabric scraps with a pencil, cut the shapes out with an eyeballed scant 1/4" turning allowance, and preturned those seam allowance/turning allowances by wetting them with starch and pressing them back over the edges of the heat resistant templates.  Then I used the pattern sheets and a light box to position the applique shapes on my background fabric and basted them in place temporarily using tiny dots of Roxanne's Glue Baste-It (this post contains affiliate links).  I put those drops of glue about an eighth to a sixteenth inside the edge of the patch so I won't be hand stitching through the glue.  By the way, this preparatory process is exactly the same regardless of whether I was planning to stitch the shapes down by hand or with my sewing machine using an invisible appliqué stitch.  If sewing by machine I would just need to slip scraps of tearaway embroidery stabilizer beneath each block before stitching to prevent puckering.  I'm not going to promise that there won't be any machine stitched applique on this quilt, but for now I'm going to stitch my applique by hand using my favorite YLI 100 wt Silk thread and my Bohin size 12 Applique Needles.  I love how these thin needles and thread create truly invisible stitches that just sink into my fabric and disappear.

Thursday, January 13, 2022

Whig Rose Applique Progress, Christmas Tumbler Top + a Sizzling Star Quilt Finish

Hello, my friends!  How is your January shaking out so far?  Our Christmas decorations are packed away, my sons are out of my house and back at their respective colleges, and I've been sewing up a storm.  I won't get my hands on the first patterns for my Sarah Fielke BOMs until the LAST day of January, so I've been working on the backlog of client quilts in my queue and moving personal projects along so I'll be ready to kick off an Applique-Palooza on January 31st. Today I have two personal projects to share and one client's quilt to showcase.  I'll be linking up with all the usual suspects (favorite linky parties, listed on my blog sidebar).

FrankenWhiggish Rose Applique

Thanks largely to the Medici the Magnificent series on Netflix, I stitched the last of the leaves on my Whig Rose blocks last night.  Woo-hoo!  

FrankenWhiggish Rose Needleturn Applique In Progress

This is the first time I've had all nine blocks in progress on my design wall and I've gotta say, it's looking really encouraging!  The center block is the only one that's 100% finished, but I had forgotten that I had a second block (bottom left) that was nearly finished except for the stuffed berries near the corner tulips.  

Thursday, August 1, 2013

Of Itty-Bitty Applique Leaves

Ta-Da: Tiny Pomegranate Leaves!
 Jubilation!  I figured out how to successfully turn the edges of the tiny leaves on my pomegranates, and it wasn't as bad as I had made it out to be in my mind.  I used the same starch and press method I've been using throughout this Jingle BOM project, but I switched to a mini iron and a tinier turning allowance.  In case anyone else out there is struggling with this, here's what worked for me.

In the above photo, you can see how small this leaf is supposed to be, and how small I'm making my turn under allowance.  (You can also see that I chose very ugly nailpolish for my last manicure.  Mardi Gras, anyone?)  My template is out of that heat resistant plastic stuff, and the penny is just there as a size reference.  The only thing that makes the tiny leaves more difficult than the larger leaves is that you can barely hold onto them while you're starching the edges into position and the template wants to scoot around on the tiny scrap of fabric.  I should mention that I made sure each leaf was cut with bias edges along those concave curved edges.  So, first I fold those pointy ends to the center of the leaf, apply starch solution with a damp stencil brush, and press with a mini iron until dry, one end at a time.  (I found that the mini iron was much easier to work with for such tiny pieces).

Both Pointy Ends Starched and Pressed Towards the Center
Once the ends were pressed in, the template was held in position in the center of the fabric a bit better and did less sliding around.  Next, one end at a time, I wetted the edges on either side of those points with starch, used the tips of my fingernails to miter in a sharp, pointy corner, and then dried that into place with the mini iron.

Both Pointy Corners Mitered and Starched
Now that template wasn't going anywhere without my permission!  With the template "locked" into position at both ends, it was pretty easy to coax those convex curves into position.  Again, I used a damp brush to apply the starch (if you are too heavy handed, the corners get re-wet and start coming apart) and then I used the tips of my ugly purple sparkle nails to drag the fabric into position over the edge of the template, once side at a time, and pounced on it with the mini iron to dry it in that position.

First Curve Finished...
All Edges Turned!
Now you can see why that tiny turning allowance is so important.  When my turn under allowance was bigger, the fabric edges would be "glued" together with starch solution and not only did this create a big bump on the back of the leaf, but it would also make it very difficult to remove the plastic template.  In the above photo I have a couple of pleats where my curves aren't perfectly smooth, so I wetted them slightly with my damp starch brush and smoothed them out by just running the edge of the leaf against the bottom of the hot iron.  Once I was satisfied with the leaf, I allowed it to cool completely, gingerly opened it up to pull out the template, and then I eased the edges back into place and gave it a final press from the back side with my mini iron.

Success!
Isn't it adorable?  I suppose it's putsy, but it works.  When you get to the end and you have this tiny little leaf smiling up at you (yes, it's smiling) it's all worth it.

Block In Progress, With Mini Leaves.  Bliss!
I got five of the eight leaves needed for this block prepped between loads of laundry yesterday afternoon, and found time to stitch the first two mini leaves into position last night.  I'm really pleased with how they turned out, and I'm glad I stuck with it until I was happy with my results.  This block should be finished within the next day or two, and then I'll be moving right along to the next one!