Showing posts with label Artista. Show all posts

Thursday, March 21, 2013

MY TURN: Machine Embroidery Blog Hop and GIVEAWAY with Anita Goodesign Fantasy Birds


Happy Blog Hop, my fellow machine embroiderers!  Today it's MY turn to strut my feathers in the week-long Spring Machine Embroidery Blog Hop hosted by SewCalGal and I Have a Notion, and sponsored by the embroidery digitizing gurus of Anita Goodesign
 
I suggest that you get up right now and go to the bathroom, and then get situated with a cup of coffee and maybe even some snacks.  This is going to be one of those blog posts that rivals Tolstoy's War and Peace (in length and wordiness, if not in literary genius), but unlike War and Peace, my lengthy post will at least be broken up with lots and lots of PICTURES. 

NOTE: Those of you who soldier through this entire post will be rewarded with multiple chances to win the Special Edition design collection of your choice, valued at $99.95, from our generous sponsor, Anita Goodesign.  I am not going to tell you how to enter the giveaway until the end, though -- I'm gonna make you work for it!  ;-)
 
Tutorial Photo of Appliqued Quilt Block Technique
I was delighted when I was invited to participate in this hop even before I knew who the sponsor was, but when I found out it was Anita Goodesign, I was delighted!  I attended an all-day embroidery seminar with Anita Goodesign at my local Bernina dealer's shop several years ago, and not only was I wowed by their beautiful, high-quality designs (yep, I spent lots of $$ that day), but I was also impressed by the extent to which these folks work to make their designs and projects as accessible and hassle-free to home embroiderers as they possibly can.  In fact, despite how ornate and elaborate many of their projects and designs appear, Anita Goodesign is actually one of the best digitizers for those who are brand new to machine embroidery.  These collections are all designed with projects in mind, thoroughly tested so the designs work perfectly in the project application, and each collection comes with thorough instructions.  My Fantasy Birds collection came with a 72-page, full color PDF tutorial that thoroughly explains all aspects of the project from stabilizing your fabric all the way through assembly and the final binding stitches.  The tutorial PDF includes scores of full color photographs like the one above to guide you every step of the way.  All the guesswork and confusion is eliminated, and even beginners can easily achieve professional results.  I have not seen any other company do this, and it's a huge value add.
 
48" x 48" Fantasy Birds Tiled Quilt Project in Silk Dupioni
I chose to showcase Anita Goodesign's Fantasy Birds Special Edition Collection because this tiled quilt project is a perfect example of an embroidery project that looks impressive and intimidating, but is actually easy to create if you read through the tutorial PDF and follow the instructions.  Always keeping novices in mind, Anita Goodesign includes three different sizes of each design as well as mirror images of each design, so you don't need to have embroidery software in order to create the project, and there is a version of every design that will fit the hoop of any home embroidery machine without resizing.  (However, just in case a customer who doesn't own software wishes to tweak the size of these designs, Anita Goodesign includes a resizing program on the CD as an extra bonus). This collection allows even embroiderers with smaller hoops to achieve impressive, large scale designs by splitting the larger rectangular designs into two separate appliqued quilt block designs that fit together perfectly when seamed together.  How cool is that? 
 
Not only do I love the concept behind this design collection; I also really love the way these designs combine very realistically digitized birds with fanciful, stylized Jacobean floral and botanical motifs, amost as if a real bird flew in the window and alighted on an embroidered fabric branch.  I knew I would have fun playing around with that.  This time I'm using brighter jewel tones for the Jacobean floral motifs, but next time it would be fun to do the birds in full color but do the Jacobean motifs in grayscale.
 
The original project I had planned for this blog hop was a 16" x 78" quilted table runner using all four of the large rectangular bird designs as well as four smaller square bird designs, with the blocks laid out as you see them in the image at left.  Except, as great as I think the split bird block designs are for making the designs accessible to every home embroiderer, I'm not every home embroiderer -- I'm a home embroiderer who recently spent a good chunk of change on a fancy Bernina 750QE machine and a snazzy Jumbo Hoop to go with it, primarily because I have always longed to be able to embroider large, beautiful embroideries all in one hooping.  I am also a home embroiderer who has invested in the v6 Bernina Designer Plus Embroidery Software, and I almost NEVER stitch out a stock embroidery design without tweaking it in my software first.  No way was my first big embroidery project with the new machine going to have seams running right through the middle of the birdies!
 
So my grand plan was to stitch the square birdie blocks at the ends the way they were digitized, as applique blocks, but to sew out the larger bird designs seamlessly in my Jumbo Hoop.  In addition to the 25 quilt block designs in 3 sizes that are appliqued and embroidered in the hoop, Anita Goodesign also includes 48 individual embrodery designs from those blocks with the collection, each in 3 different sizes -- and including the four large bird and flower designs WITHOUT the split, in 3 different sizes, as shown below: 
 
Individual Blue Jay Design from Fantasy Birds Collection
The largest size of these individual designs is 6.75" x 11.75", so I planned to enlarge them in my Bernina software to fill the sewing field of my Jumbo Hoop, which is a little over 8" x 15" on a 7 Series machine (you can sew a design up to 10 1/4" x 15" on a Bernina 830 with the Jumbo Hoop due to the longer free arm on that machine).
 
Here's what this design looked like when I opened it up in my Bernina software, after enlarging it but making no other changes:
 
 
My Fantasy Birds look pretty ugly, don't they? That's because I imported the design in the commercial format EXP, which doesn't contain any information about thread colors so the software assigns colors randomly.  Bernina software will save an EXP design with an additional two files -- one contains the thread color information, and the other is an image file of the embroidery, like an icon.  If this was a simple two or three color monogram, I'd leave the design the way it was and disregard the colors shown at the machine during stitchout, but with a design of this complexity it's very easy to get confused about which color is going where and which portion of the design is stitching next -- I wanted to work out the colors ahead of time and have the correct color numbers displayed on my sewing machine's screen for each color change.
 
So my next order of business was to go through the thread chart for this design in my software and individually assign each of the Madeira rayon embroidery thread colors specified by Anita Goodesign for this design.  There are only 13 thread colors in the design, but there are 34 color changes in order for each component of the embroidery to stitch out in the correct sequence.  Although Anita Goodesign specifies Madeira thread, I already own almost every color Isacord makes and I wanted to use what I had on hand.  So, once I had manually entered the Madeira colors, I simply chose "Isacord 40 Numerical" from the drop-down menu, clicked "Match and Assign All" and, in seconds, all of my thread colors had converted automatically to the equivalent thread colors in Isacord polyester embroidery thread.  No need to hunt down a thread color conversion chart online or try to match up the colors manually!
 
I still wasn't finished with the software stage yet -- I spent another hour or so playing around with different thread colors for the Jacobean floral portions of the design.  I left the blue jays alone because I loved how realistic they looked and didn't want to mess that up, but I wanted to do something brighter and more vibrant with the "fantasy" part of the design, so the flowers wouldn't blend into the background as much and so the design would coordinate better with the assortment of silk remnants in my fabric stash.  This is what I finally came up with:
 
 
By this point, I was really getting really excited about the project!  I put my son Lars, the best 12-year-old embroidery assistant ever, to work digging through five large bins of embroidery thread until he had located all of the appropriate thread colors and lined them up for me in stitch order. (This task was assigned to him as penance for falling asleep with silly putty in his bed a few nights ago.  Laundry will be EXTRA fun this week!) 

So I was ready to start embroidering, and I was going to start with this blue jay design! I knew it would take awhile to stitch out, and I figured I could use that time to enlarge and edit stitch colors for the subsequent designs.  I had assembled all of my supplies and notions, cut out Jumbo Hoop sized pieces of silk fabrics, and prepared my fabric pieces as per Anita Goodesign's tutorial instructions. 
 
Silk Dupioni (above), My Kravet Glittered Silk Shantung (below)
My base fabric is a gorgeous, very unusual glitter-embellished 100% silk shantung drapery remnant from Kravet -- the pattern is called Sparkle, the colorway is Ivory, and it retails for a sickening $121 per yard.  I have several odd-sized scrap pieces of this fabric that were left over from one of my interior design clients' projects several years ago, and I have been saving them just for a special project like this! 
 
Silk shantung is a lightweight, flimsy silk that is similar to the silk dupioni that Anita Goodesign used for their quilt samples, except that it's a bit more refined, with a smoother surface, a tighter weave, and a much less pronounced slubbed texture than what is characteristic of silk dupioni, as you can see in the photo above.  So I thought it best to follow Anita Goodesign's recommendations for stabilizing my silk for these dense designs.  I fused Pellon Ultra Weft interfacing to the reverse side of my silk first.  Then I cut a piece of plain cotton muslin large enough to fit comfortably in my Jumbo Hoop, and adhered a piece of Pacesetter Midweight Tearaway embroidery stabilizer to the back of the muslin with my 505 spray adhesive.  I then sprayed the top of the muslin with 505 and adhered that to my interfaced silk.  Finally, I spray-starched the right side of my silk with Niagara Original spray starch.  My fabric sandwich was as crisp as cardstock when I hooped all of my layers.  I intended to use my sewing machine's hoop basting feature to secure all four layers around the perimeter of the hoop prior to stitching, but alas, I could not find the screen with that option, and I was impatient about getting started...
 
Well, I plugged that USB stick into my sewbaby, opened up my design, attached my hoop, and pressed the start button -- and almost fell on my ass when I saw that the estimated stitching time was 220 minutes.  I grabbed a calculator to check my math -- yep, this baby was going to take almost four HOURS to sew out, not counting the additional time involved in rethreading and trimming jump stitches between color changes, or the time I'd spend removing stabilizer and cleaning up the completed embroidery design once it had finished.  Eek! 

My enlarged design was 13 1/4" x 7 3/4", had 69,639 stitches, and was going to burn through an estimated 161 meters of bobbin thread and 4-6 hours of my time.  And, considering that it was already 5 PM on Tuesday evening when I made this discovery, I realized that not only would I be unable to complete my entire table runner project for this post, I wasn't even going to be able to sew out the entire first design in one evening.  Dinner and bed time stories with my children trump sewing projects any day in the week.  So I embroidered about half of the design after I put the kids to bed on Tuesday night, and when I stopped at 11 PM I put my sewing machine in Eco Mode to conserve power while ensuring I could pick up right where I left off on Wednesday morning. 
 
Finally, around 2 PM yesterday, my blue jay design had finally finished stitching:
 
Ta Da!
 
Well, I now truly appreciate the value of owning a machine that can embroider up to 1,000 stitches per minute.  Even if my old Artista 200E/730E could have embroidered a design this size (which it couldn't), at its maximum embroidery speed of 680 stitches per minute it would have taken approximately FIVE hours and forty minutes to stitch this design.  (I've been practicing Pre Algebra with Lars -- this would make a good word problem for him!)  Uff da!  Clearly, a large, densely-embroidered quilt project like this is a major time commitment, not the quilt-in-a-day scenario I had envisioned.  After all, other than embroidered quilt labels, occasional monogram projects, and quilting "in the hoop" with speedy outline quilting designs, I really don't have much embroidery experience, and I've certainly never tackled any designs of this size before.
 
I really love how beautifully this design stitched out, and I'm looking forward to continuing my project.  Above are some of the other silk fabrics I'm considering for borders and/or for the appliqued fabric strips on the smaller blocks.  Wouldn't it be fun to cut out the big butterfly from that silk Robert Allen print and fuse it into this design as an applique, secured by satin stitching? 
 
After unhooping the design, I carefully tore away most of the tearaway stabilizer.  Then I sat down with a bright Ott light and tweezers and painstakingly removed the stabilizer from all of the nooks and crannies.  Next, with a duck-billed applique scissors for safety and holding my breath the entire time, I trimmed away most of the cotton muslin fabric from the back of the design, as though the muslin was a cutaway stabilizer.  I really wanted to restore the soft hand and drape of the silk now that the embroidery process was complete.  When I was finished, the back of my design looked like this:
 
Back of Design, Tearaway Removed and Muslin Cut Away
 
Now that I've stitched out this design, I keep thinking of other applications besides table runners, quilts, or pillows.  Wouldn't this design be gorgeous on the flat sections of a box pleated or pelmet-style window valance? 
 
Can You Imagine These Designs on a Window Treatment?
Of course, as soon as I got that idea, I had to import the photo of my completed embroidery design into my interior design software to try it out.  Why do I suggest embroidery for the valance, but not for the drapery panels?  Well, with a top treatment, you wouldn't have to embroider 15 yards of continuous fabric and drive yourself nuts trying to space the designs with an accurate pattern repeat like you'd have to do for a pair of drapery panels.  You would just overcut each flat section, embroider the design, and then trim the piece to the appropriate size afterwards.  If you're really ambitious, you could even use some of the other standalone designs in this collection, maybe some of the Jacobean floral elements, to embroider banding for the lead (inside vertical) edges of your drapery panels in place of the solid brown banding in my rendering. 
 
You know, embroidered silk drapery fabrics that look like this go for hundreds of dollars per yard, yet you're limited to the thread colors chosen by the mills.  By embroidering your own silk base fabric, you can have your dream fabric with embroidery thread colors custom selected to match your oriental carpet, your other fabrics, or anything else that tickles your fancy.  Just add English bump interlining, a heavy cotton sateen drapery lining, and you'll have a gorgeous custom window treatment unlike anyone else's, anywhere.
 
It's probably a good thing I didn't finish my table runner project, because I've been going on forever and I still have dozens of photos and three more pages of notes that I had planned to include in this blog post, just from sewing out the first design.  So, expect a follow-up post within the next few days where I will share the Trouble-Shooting Journey to Eliminate Thread Loops with an Unusual Needle, my Three Favorite Embroidery Tools that Don't Come With Your Machine, and My Final Verdict on the Final Steam Pressing of Embroidery Designs.  In all honesty, I probably won't finish my project until several months from now, considering that it was just last week that I finished the project I began for the Fall Machine Embroidery Blog Hop I participated in back in November!
 
So, have I lost everyone, or are you still with me?  Because I did promise a giveaway!  Anita Goodesigns is giving away FREE Special Edition design collections worth $99.95 each (winners choose which of the 15 Special Edition collections they want to win). 
 
For the Cheeky Cognoscenti giveaway, you can earn ONE chance to win by visiting Anita Goodesign's website here, drooling all over your keyboard at their gorgeous designs, and then commenting on this post to tell me which Special Edition design collection you would choose if you won and what ideas you have for using those designs in your own project. 
 
You can earn a SECOND chance to win by following Cheeky Cognoscenti via either Networked Blogs or Google Friend Connect (on the side bar at the right side of this page, scroll up) and then leaving a second comment telling me that you're followingImportant: If you are a "No Reply" blogger or an Anonymous commenter, be sure to leave your email address [eg. Sally(at)hotmail(dot)com] in your comment so that I can contact you if you're the winner! 
 
That's right -- not only am I giving away a free Anita Goodesign Special Edition design collection, but each of the other eight bloggers in the hop is also giving away a free Special Edition design collection this week as well.  If you haven't done so already, be sure to stop by each of the other blogs before the end of the week so you can see more beautiful embroidery projects, pick up more embroidery tips and tricks, and collect even more chances to win.  Each blogger sets their own rules for when they will choose a winner, so if you missed any of the blogs from Monday through Wednesday you might not be too late to enter!

I plan to select a random winner from all comments on this post on Monday the 25th.

Here's the lineup with links, one last time:

Monday, March 18th:

Tuesday, March 19th:

Wednesday, March 20th:

Thursday, March 21st:
ME! ME! ME! ;-)
Rebecca Grace - Cheeky Cognoscenti

Fri., March 22nd
 
Once again, I want to extend a HUGE thank-you to SewCalGal and I Have A Notion for organizing this hop and for inviting me to participate, and an even bigger thank-you to Anita Goodesign for graciously agreeing to sponser the event, for supplying the designs featured in all of our blog hop projects, and for donating such generous prizes for our lucky winners.

Well, folks, I had glorious plans of not only finishing the entire table runner yesterday, but I also planned to complete this blog post before my kids got home from school and schedule it to publish automatically at 7 AM.  Since it is now after 2 AM on Thursday morning.  I'm going to do one thing AHEAD of schedule -- I'm going to go ahead and publish it right now and then head straight to bed.  Happy Thursday, everyone, and good luck in the giveaways!  May the best stitcher win.  ;-)

UPDATED 6/17/2013: I didn't make this into a table runner, but I did finally layer it with batting and quilted the piece, and it came out so beautifully that I was doing a happy dance all over the sewing room!  You can see those results in this post.

Friday, June 22, 2012

The Cheater's Ultimate Guide to Quilting With Your Embroidery Module

Decorative Quilting the Easy Way: Quilting "In the Hoop" with an Embroidery Module

They say that it takes, on average, 80 hours of practice to learn free motion machine quilting.  That's what "they" say.  I say that it's like learning to draw all over again -- with your feet.  Still, it's a skill worth learning, because free motion quilting allows home sewers to quilt just about any design with almost any domestic sewing machine, in a fraction of the time that hand quilting would require.  The method I'm going to describe today is totally cheating -- like reading the Cliff Notes instead of reading the book -- but for me, it's a good way to get complex decorative quilting designs on my quilts NOW while I'm still working through the FMQ learning curve.  I have about 79 more hours of practice to go...  ;-)

Disclaimer:  I do not claim to be an expert on quilting, embroidery, or Bernina machines.  I'm going to share what has worked the best for me, but as they say, "your mileage may vary."  If you know of any tips or tricks that I haven't mentioned, or if you have a better method, please share in the comments!  I'm always willing to learn more. 

Speaking of learning more (from quilters who actually know what they're talking about!): Check out Wendy Sheppard's "Pretty Pillow, Quilted Heirloom" article in Bernina's Through the Needle magazine, Issue 28 from November 2008; I highly recommend it.  Wendy's pillow project is small and manageable, and it combines decorative embroidery module-stitched designs with begginer-friendly free motion quilting for stunning results.  Another resource I consulted was Jennifer Gigas' and Marlis Bennett's "Quilting In the Hoop" article for Bernina, and you can get a full PDF of that article right here.  Again, I consulted that article, but I did not follow their recommended method (they say to hoop just the quilt top with the batting, before adding the backing fabric, so the decorative quilting motifs are not stitched through all three layers of the quilt sandwich) because it wouldn't have given me the finished look that I wanted for my quilts, and because quilting with exposed batting underneath would create a lint nightmare for my sewing machine.

Artista 730E with Embroidery Module Attached, photo from Bernina USA
In order to quilt "in the hoop," you need to have a computerized sewing machine with an embroidery module.  Mine is a Bernina Artista 200E, upgraded to the equivalent of the current model Artista 730E.  However, any embroidery machine can do this technique.  With the embroidery module attached and a digital design file loaded into your sewing machine, exquisite and flawless decorative quilting designs are as easy as snapping a hoop onto your quilt, threading the machine, and pushing the start button.  The embroidery module, guided by the sewing machine's internal computer, moves the quilt around beneath the needle to ensure perfect placement of every stitch, every time.  It's so easy that I almost feel guilty!

Actually, it's easy NOW because I have finally worked the kinks out of my method. 
  • First of all, ideally, you should plan your quilting at the very beginning, before you cut the first piece of fabric for your quilt top.  Why?  Because you will not be able to stitch out an embroidery-assisted quilting design that is larger than the maximum stitchable area of your machine's largest hoop.  Most quilt blocks are squares, which means that the maximum WIDTH of your largest hoop is going to determine how big your quilt blocks should be.  For my machine, the biggest round or square design I can stitch in one hooping is about 5 1/2" x 5 1/2".  So, next time I'm planning to quilt by embroidery module, I'll keep my block sizes 6" or smaller so I won't have to fill in and improvise to fill the rest of the space.
Planning Pays Off: This design fits the block properly in "Anders' Froggy Quilt of Many Colors," 2006

  •  This method only works for small to medium quilts -- do not attempt this on a King or Queen bed quilt!  My Drunken Dragons quilt is 70" x 105," and thankfully, the quilting design I chose was non-directional so that I never had more than 35" of quilt crammed to the right of my needle under the sewing machine at once.  I feel like that was the outer limit.  Why?  Because the embroidery hoop moves when the design is stitching out, and when the left-most portion of the design is stitching, the right side of the hoop is almost touching the inside part of the sewing machine, leaving nowhere for all that 35" of quilt to go.  I had it sort of rolled up and bunched above the hoop during stitchout of the motifs in the center of my quilt, and had to be very careful to keep the excess out of the way of the needle and the moving hoop.  Quilting "in the hoop" will work well for throw or crib sized quilts, table runners, and other small or narrow items.
  • Choose your quilting design carefully.  Sources for professionally digitized quilting designs include your machine dealer, where you can purchase design collections such as OESD Crafter's Collection #007, Quilting Whimsy by Diane Gaudynski, as well as online sources such as Amazing Designs or Oklahoma Embroidery Supply & Design (although OESD doesn't have a category for quilting designs, so you'll have to scroll through lots of not-what-I-wanteds before you find what you're looking for).  Anita Goodesign has some beautiful quilting designs as well.  If you own embroidery design software, you can easily digitize any design your heart desires -- it's just an outline stitch, after all.  Personally, I've had the best results with continuous designs that don't have any backtracking (sewing over a previously-stitched line to get to the next place in the design).  In the picture below from my 2003 "Celestial Double Nine Patch" quilt, the first time I quilted "in the hoop," you can see how the backtracking didn't always land exactly on the previously stitched line.  Could I have corrected this with better hooping and/or stabilizing?  Perhaps -- but for less headaches, just choose a different design!
Even if the second line of stitching had landed right on top of the other stitches where they belonged, the variegated thread I was using would have drawn attention to the backtracking because it always ends up being two different colors of thread.  This quilt is also a great example of What Not To Do because my quilt blocks were much bigger than my maximum embroidery hoop could stitch the designs, and I ended up with too much empty space around the designs. 
The nine patch blocks and borders of this quilt were grid quilted (crookedly) with a walking foot, and I was terrified of free motion quilting so I added some lame looking straight lines radiating from the corners and center points of the design, to meet the batting manufacturer's guidelines for how far apart the quilting lines should be spaced.  Yuck!  One of these days I'm going to go back and add more quilting to make that look better.  It will count towards those 80 hours of practice, and I couldn't possibly make it look any worse!
My "Celestial Double Nine Patch" quilt for Anders, completed in November 2003
[UPDATED March 4th, 2014: After writing this post and looking at that quilt again, I DID finally go back and fill in the blank space around the embroidered motifs with some free motion squiggle quilting.  It's wobbly and imperfect, but it looks a lot better than it did before.]

Celestial Double Nine Patch with FMQ Filler Around Embroidered Design added in 2012

  • A Word About Tension: As soon as you snap that embroidery module onto your sewing machine, your machine tension is automatically altered to deliberately pull the loose needle thread underneath to the tighter bobbin thread.  If you were doing a regular embroidery design with satin stitches, this is exactly what you would want to ensure that none of your ugly black or white bobbin thread showed on the top of your embroidery, especially along the edges of narrow satin stitched columns.  This is why Gigas and Bennett recommend adding the backing afterwards, to hide the ugly unbalanced tension on the back of the quilt, which can look like this:
Unbalanced Tension, Backing Side
Who wants to see that ugliness on the back of a quilt they've worked hard to create?  Fortunately, the solution to this problem is simple.  Just manually change the needle tension back to normal before you stitch your design.  On my machine, with the threads I've been using on the Drunken Dragons quilt, I get perfectly balanced stitches with tension set at 4.0, but the tension drops down to 2.0 when I engage the embroidery function.  I just have to remember to change the tension back to 4.0 in the Edit screen before I stitch the design, and then the back side of my quilt comes out just as pretty as the front.  I put a Post-It note on the front of my sewing machine to remind myself to check the tension every time.  If you don't know how to adjust the tension for your machine, check your owner's manual or pester your sewing machine dealer until they show you how.  That's what they're there for!
  • Speaking of thread, the first couple of times I quilted "in the hoop," I used heavy 40-weight YLI variegated machine quilting thread in the needle as well as in the bobbin.  For the Drunken Dragons quilt, I experimented with a much thinner 60-weight Mettler 2-ply cotton embroidery thread in the needle and bobbin, and found that the quality of stitching on both sides of my quilt look much better with the finer thread.  I can use a #60 Sharp or #75 Quilting needle with this fine thread, which makes for a very tiny hole in the quilt.  Moreover, there are some pretty short stitch lengths in the tight curves of these intricate designs, and the heavier thread just looks too thick and clumsy for my taste.  The bulk of any backtracking and tie-offs in your designs will be much less obvious on the back of the quilt when you're using a finer thread, too.  Quilting thread is a subject of murderous contention, though, and every quilter will savagely defend her favorite brand to the death, so I suggest you try different threads in secret, see what works best for you, and then quietly use your favorite one no matter what other people tell you!
  • In my meager experience, using embroidery stabilizer was not necessary as long as I hooped the quilt (rather than hooping tearaway stabilizer, basting the quilt to the stabilizer, and then tearing the stabilizer off afterwards).  I used stabilizer for that first quilt, and it didn't stop the design from shifting slightly -- but it used up a LOT of stabilizer, and that stuff isn't cheap!  It also took longer to fuss with the extra steps of basting and removing the stabilizer, and as I'm thinking about it now, it's also possible that when I pulled the stabilizer off the back of the quilt, it exaggerated the tension problems by pulling the threads even more out of whack.  Now I'm just hooping the quilt "naked," (naked quilt, not naked me!) and I'm getting much better results.
  • Hooping gets easier, I promise!  The hardest part of quilting "in the hoop" is getting the quilt hooped nice and straight, with everything lined up properly so the design will stitch out exactly where you want it to on your quilt.  My sewing machine can stitch out one of these quilting motifs in under 2 minutes, but at first it was taking me 15 minutes to get the hoop in place prior to each stitch out.  The good news is that I got faster and more accurate with my hooping as I worked my way through the quilt, until I was finally able to get the hoop in place almost as quickly as my machine was stitching the designs.  Use the plastic gridded template that came with your hoop and line it up with seamlines in your quilt top, if possible.  Draw horizontal and vertical center lines on your block prior to hooping (with chalk pencil or something else you know you can remove easily) if you have to.  Once you have the hoop attached to your machine, check the center point of the design (my machine has a button that will move the needle to the center point of the design).  Use the on-screen editing features of your machine to shift your design slightly if needed so that it is perfectly centered on every block.  Note that, if your hoop has hit anything that impeded its movement while stitching, it could have been knocked out of alignment like mine was when I started embroidering quilting motifs on my "Drunken Dragons" quilt.  I was able to go into my Embroidery Settings screen and recalibrate that on my own after a quick, panicked phone call to my Bernina dealer.  If you are sure you have centered your block perfectly but your design is still stitching off-center, look in your owner's manual and try recalibrating your hoop.
Hoop in Position, Quilt Block Perfectly Centered Using Seamlines and Gridded Template


So, what's next for Lars's "Drunken Dragons" quilt, now that all of the "in the hoop" designs have been stitched out?  Since I did not follow my own advice to plan the quilting designs at the beginning, I ended up yet again with skimpy little designs that do not adequately fill my blocks. 
See all that "dead" space around the fancy quilting design in the center of the circle?

That's okay, because I'm going to add some REAL free motion quilting around the designs I stitched with my embroidery module this time.  It won't be perfect, and I'm going to have to experiment to find something that looks good with the existing design AND isn't so difficult that I can't execute it successfully.  Wish me luck!

Saturday, May 26, 2012

High-Tech Quilting: Editing a Digitized Quilting Motif with Artista Embroidery Software

Bernina Artista v6 Embroidery Software
Well, I finished my last mastery class today for the Bernina Artista version 6 embroidery design software.  Today's class went over the quilt design program within the embroidery software.  I don't think it's as powerful as the Electric Quilt 7 software, but the Artista quilting program would be a good "test drive" to see if I like designing quilts on the computer.

The embroidery software is really cool, and does so much more than I'll ever use it for.  We really just got an overview of the software in the mastery classes.  Bernie printed out the 586 page PDF online help manual for me, and I know I'll be marking it up with notes and referring to it often.  The most immediate benefit I got out of taking these embroidery software classes right now was that I figured out how to delete half of a professionally digitized quilt motif so I can use it on the half blocks at the edges of Lars's Drunken Dragons quilt.

The design I selected for the center of the circles on this quilt is from from retired OESD Collection 788, Quilting Inspirations by Keryn Emmerson, and I've enlarged it to completely fill the width of my largest embroidery hoop.  Then I edited the design, deleting everything on the right half, one node at a time:

Deleting the unwanted portion of the design in my Artista software, one node at a time

This is what I ended up with:

Ta Da!  Half Design Completed
As you can see, the design has a heavy vertical line at what is now the right edge.  That's because the design consisted of closed objects that wanted to remain closed objects.  I went in and deleted lots of individual stitches, so now that heavy line is more like long jump stitches that I'll be able to trim as I go.  If everything is positioned correctly, the quilt binding should line right up at the edge of this design.

Sample Stitched in Invisible Nylon Monofilament
I saved the designs to a USB stick, plugged it into my sewing machine, and stitched out both versions, the full circle and the half circle.  (I used the ugliest fabric in my stash, John Deere Tractors from Lars's preschool tractor phase).  Both versions stitched out beautifully with the needle tension reduced to 1.5 for the monofilament nylon thread in the needle.  Here's the thing, though -- it was so disappointing to have the design stitch perfectly on my sample, and only be able to SEE it on the BACK! 

Same Sample, Back Side Showing 60 wt Cotton Bobbin Thread
I'm now considering using one of my pretty variegated quilting threads in the needle for the quilting inside the circles, staying with the 60 weight cotton Mettler embroidery thread in the bobbin that I've been using all along.  I'll have to stitch some more samples and play around with that before I start stitching this design on the quilt, one circle at a time.  The variegated threads come in 40 weight, which is a lot heavier than the 60 weight thread in my bobbin.  I could just use a pretty blue or orange solid thread in the needle instead, to reduce potential tension issues.  Since this portion of the quilting process is going to be completely computerized, there shouldn't be any "oopses" that need to be hidden with invisible thread.

Have a wonderful Memorial Day weekend, everyone!

Monday, May 14, 2012

Plodding Along, In Circles

Hello, friends and family!  I hope everyone had a wonderful Mother's Day yesterday. 

I think I'm about halfway done with the free motion ditch quilting around the circles on Lars's "Drunken Dragons" Drunkard's Path quilt.  Thanks to the invisible nylon monofilament thread, the stitching is practically invisible on the front of the quilt -- oopses and all -- but on the back of the quilt you can see the grid of straight stitching that I did along the straight seamlines and the outlines of the circles.  I'm not using that BSR thing to control the stitch length, but I feel like I'm doing alright without it for this task.  The hardest thing is controlling the bulk of the big, heavy quilt while I try to move it in a big, huge circle without any jerks or tugs.  I have lots of jagged spots on my circles if you look closely on the back, so we won't be posting any more close ups of the back from here on out.

One of the sales ladies at the Bernina dealership has agreed to give me a one-on-one lesson on Thursday to show me how to stop and start the expensive BSR Bernina Stitch Regulator contraption and how the different modes work, because the directions that came with the darned thing are atrocious.  People look at me like I'm crazy when I say I can't get the BSR to work for me, which means there must be something REALLY EASY that I'm missing.  My issues are:
  1. I'm unclear about how to start and stop a line of quilting stitches in each of the two stitching modes of BSR.  I need the first 5-7 stitches and the last 5-7 stitches of every line of quilting to be really tiny so they don't pull out when I clip the thread tails.  How do I secure my stitches in Mode 1 if the sewing machine is going to make all of the stitches the same length? 
  2. I'm trying to stitch 11" diameter circles, but I can only control an area of about 4-6" at a time.  That means I slowly sew for a few inches, then need to stop to reposition my hands.  When I pick up my hands to reposition them, the fabric always moves just a smidge, and the BSR laser contraption picks up on the fabric movement and starts sewing again before I'm ready.  How do I disengage the BSR long enough to move my hands?
  3. I tried to use my needle stop down function to make sure nothing shifts when I use my hands, but that's a problem, too -- with BSR, the machine starts stitching when the fabric MOVES, but when I'm ready to start sewing again I can't move the fabric when the needle is sticking down into it.  Am I supposed to use needle stop down, and then manually raise the needle again when I'm ready to stitch?  Then I have to take one of my hands off the quilt to raise the needle, and then the fabric shifts again and my quilting line gets a crooked little snag.
  4. Finally, on  my 18" practice sample, I was not getting even stitches with my BSR at all.  For one thing, most of the stitches were much shorter than the length I had set the machine to.  Then there would be random LOOOONNNNG stitches here and there.  Maybe I was moving the fabric too fast at that point?
Anyway, I'm keeping an open mind about the BSR until I have the dealer walk me through it on Thursday.  Then on Friday I'm taking a beginner machine quilting class at a store about an hour away from me while the kids are in school, and that class won't have anything to do with the BSR because it's a Brother dealership, not Bernina hosting the class.  One way or another, I'm going to learn how to do this.  Saturday morning I have another embroidery software mastery class.  The irony is that, with all these sewing classes, there isn't much time left over for actual sewing!

Have a wonderful week.

Sunday, May 6, 2012

Bernina Embroidery Software v6: Manual Digitizing Homework


Bernina Embroidery Software Homework Completed!

Ta da!  Behold, my completed manual digitizing homework for my Bernina Artista Embroidery Software v6 class!  We started with this palm tree artwork (seen below) in the background, and built the embroidery design one object at a time, with right-clicks and left-clicks and stitch angles, oh my!  This simple exercize took me several hours to complete, both inside and outside the classroom.  I have new appreciation for the talents and abilities of professional digitizers!

Palm Tree Artwork Used in this Exercize
I am not going to bother with stitching my wonky palm tree out on the machine.  Truth be told, I doubt I would ever go to all the trouble of creating an embroidery design completely from scratch.  The software manual is almost 600 pages long; it's pretty complicated stuff.  I mostly use my embroidery software for combining or editing professional designs, or for embroidering with lettering.  Still, it's good to go through all the classes because you never know where you might pick up a useful morsel of information.  For instance, on the Drunken Dragons quilt that I'm temporarily avoiding, I was planning to use my embroidery module to quilt fancy designs in the center of each pieced circle, but wasn't sure how to handle the half circles on the edges of the quilt.  I learned that I can open the professional quilting design in my embroidery software, convert the embroidery design to vectors, use the eraser tool to erase half of the quilting motif, and then reconvert it to embroidery and save as a new design to use on those half circles.  So that's one hurdle that I can deal with -- if only I can get the free motion quilting down so I can stitch in the ditch on the curved circular seamline!

I should send my kids to the classes and have them learn how to use the software.  They'd be scanning in pictures of Lego Ninjago warrios and filling them in with all kinds of funky stitch patterns!  Speaking of Lars and Anders, they have been busy performers lately.  They were in four performances of Beauty and the Beast Jr. at their school last week, and their piano recital was earlier this afternoon.  They will be performing on their recorder (Anders) and trombone (Lars) with their classes again on Tuesday evening for the school's annual Night of the Arts, and I understand they will each have artwork for sale prior to the concert.  Busy, busy boys!

Sunday, April 15, 2012

Welcome to Rebecca's Ugly Quilting Blog!

"Regulated" Stitches?
You know all those other quilting blogs, where beautiful projects with exquisite workmanship are showcased on a regular basis?  This is not one of those -- not today, anyway, and probably not tomorrow, either.  Just take a gander at the lovely free motion quilting in the photo above.  Since I used invisible nylon monofilament thread in the needle, we're looking at the back side of the quilt in this photo.  The straight lines were stitched with a walking foot, stitch length set to 2.5, and then I attempted to stitch in the ditch around the curved seam of a drunkard's path block using the BSR Bernina Stitch Regulator contraption for my Artista 200/730 machine.  This magical machine footsie is supposed to count the fabric threads with a "laser" as I'm moving the quilt with the feed dogs down, automatically adjusting the needle speed so that I get nice, even stitches despite my relative inexperience. 

Dr. Evil explains the "Laser" Technology of the Bernina Stitch Regulator
Hmmm...  Do you think Bernina would like to use MY quilting sample to advertise their technology?

Bernina Stitch Regulator, courtesy Bernina USA
There are two different "modes" for the BSR foot, and since I got wretched results with Mode 1, I'm going to see if Mode 2 works better for me.  I got herky-jerky hiccups each time I tried to reposition my hands on the quilt because the machine kept stitching when the fabric moved slightly.  What most annoys me, though, is that the stitch length does not look ONE BIT "regulated" to me.  They are all way smaller than the 2.0 length the machine was set for, and each stitch is its own unique length, many of them tiny little locking-stitch length that will provide me with HOURS of fun as I attempt to unpick them with a seam ripper.

Well, when all else fails, there's always education, right?  I've signed up for a machine quilting class at a quilt shop in Concord next month.  Drastic times call for drastic measures!  All of my quilting books and blogs to read are all well and good, but there's nothing like having someone who knows how to do it looking over your shoulder to tell you exactly what you're doing wrong.

Not that I'm going to just put this quilt aside for the next few weeks!  I'm going to try wearing those kooky rubberized quilting gloves.  I'm going to try BSR Mode 2, and I'm going to try flinging the BSR contraption across the room and doing it the old fashioned way, with a plain old darning foot and no training wheels.  I may even try to use the walking foot and turn the quilt around under the needle, although I doubt that will work.

In case you're interested, here's what I accomplished so far, the straight lines quilted with the walking foot:

Straight Seamlines Quilted, Except for Circles

I quilted the seam line and two additional quilting lines to either side of the seam lines, both vertically and horizontally, except for the seam lines transecting my circles.  Next I want to quilt just the circular seams, before going on to do something pretty in the center of each circle. 

And now, a special treat to reward those who have stuck with me throughout this whole whining post:

Little Bald Lars with his Roman Square Quilt
That, friends, is the first quilt I ever made, a Roman Square for Little One Lars's "big boy bed" back in 2002.  It has school buses, doggies, sailboats, and all sorts of other I Spy fodder, and it is still on his bed today where it shall remain, until the new quilt is finished!

Happy Sunday!

Tuesday, March 20, 2012

Taking the Terror Out of Invisible Nylon Monofilament Thread: Best Practices Borrowed from the Experts


Set up and Ready for Machine Quilting
Welcome to my sewing studio, bloggy friends!  No, I haven't started quilting yet, but I did spend some time in the studio yesterday, clearing the mountains of fabric, rulers, sewing magazines, tools, and mending off this folding table so I could move it in front of my sewing cabinet.  I would have moved the table even closer to my chair, except the back end of the table is already hitting my mammoth cutting table and that's way too heavy for me to move.  I already had another folding table set up behind my red sewing machine cabinet (which is a Bernie-Built exclusive, in case you're wondering), so now the weight of the quilt will be supported on all sides while I'm quilting.  It's really important that the quilt isn't hanging onto the floor, so you don't have to fight the force of gravity while you're trying to quilt.  My sewing machine is lowered so it's flush with the top of the cabinet, with a clear acrylic piece filling the gap between the machine and the table top.  I ordered the acrylic insert from one of the major sewing machine cabinet manufacturers, made to fit my machine make and model, and then I had Bernie cut the hole in the cabinet top to fit the acrylic insert.

Nylon Monofilament Thread on Thread Stand
I wanted to share some tips for working with nylon monofilament "invisible" thread, since so many people seem to struggle with it.  Because I prefer to learn from the mistakes of others whenever possible, I did a little research into the best practices others have come up with for working with this thread.  Most of what I'm about to tell you came out of either Harriet Hargrave's Heirloom Machine Quilting book or out of Diane Gaudynski's Guide to Machine Quilting.  I strongly recommend both books.

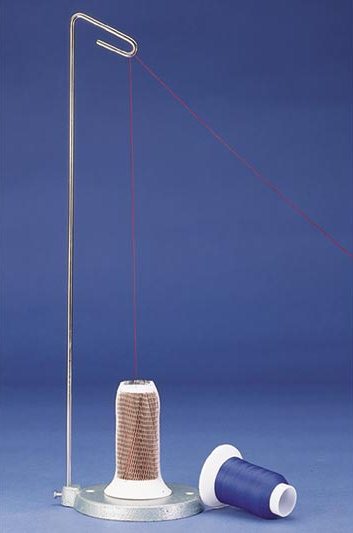
I'm using a high quality invisible thread from SewArt International, which is always the first step towards success.  Cheap thread is never worth the grief it causes, and neither is old, brittle thread.  Second, I've put the invisible nylon thread on a silly thread stand contraption that hooks onto the back of my sewing machine, the Multiple Spool Holder accessory.  The thread stand is silly only because it holds a ridiculous number of thread spools, and the sewing machine only has one needle -- at most, you might use three spools at once with a triple wing needle.  It's supposed to facilitate machine embroidery work, and I bought it thinking that I would line up different color threads in order of stitching for embroidery designs, but in reality, I rarely ever embroider designs with enough color changes to warrant the stand.  So the Multiple Spool Holder is overkill for quilting, but I'm using it so the nylon monofilament thread can sit vertically on the stand and, although it comes off the spool kind of curled and kinky, the thread has plenty of opportunity to relax and learn some manners as it travel up to the loop at the top of the thread stand, then back down to the machine and its tension disks, preventing the snarling and kinking problems that can sometimes happen with this thread. 


Photo Courtesy Clotilde
If you don't have a funky thread stand like mine, you can get a simple cast iron cone thread stand online here from Clotilde for less than $10, and just set it on the table next to your sewing machine; it will work just as well.

Invisible Nylon Thread in the Guide Attached to my Sewing Machine
Next, one of my books recommended taping a little safety pin to the edge of the sewing machine as an additional thread guide for monofilament nylon thread.  Lo and behold, my Bernina Artista 200E/730E sewing machine already has a little metal guide loop already attached in exactly the right spot!  Never noticed that before!  I love it when my sewbaby is one step ahead of me!  So my invisible thread is going straight up off the spool to the top of my thread stand, down to the little metal loop guide on the right side of my sewing machine, just above the hand wheel, and from there it follows the regular thread path.  My horizontal spool pin is holding the Mettler 60 weight 2-ply cotton embroidery thread that I'm using in my bobbin.  Remember, if your machine doesn't have this extra thread guide, just tape a small safety pin in the same spot on your machine and use that as your thread guide. 

As I'm editing photos for this post, trying to adjust the brightness so you can actually SEE the invisible thread, I feel like one of the bogus tailors in The Emperor's New Clothes.  It's the most beautiful thread in the world, but alas, fools cannot see it...  ;-)  Don't feel too bad -- I can't see it, either.

Okay, now for the tension samples!  Did you think you could thread your machine up with magical invisible nylon thread and sew beautiful stitches without having to make any tension adjustments?  Think again, sister!  Invisible nylon thread stretches as it goes through the tension disks of your machine, so you are going to need looser needle tension than the standard setting, which is calibrated for sewing with regular weight cotton or polyester construction thread in both the needle and the bobbin.  I can't tell you exactly what setting you should use, because the tension numbers are completely arbitrary and vary widely by machine, even within the same brand.  The only universal tension truths are that higher numbers equal tighter tension, and nylon thread is going to need looser tension than whatever your standard setting is.

Monofilament Tension Sample, Top Row is Normal Tension, Gradually Reduced to Bottom Row at 1.25
When I used the invisible nylon thread a few weeks ago to blind applique the Scrabble quilt label to the backing fabric, I just dropped my needle tension down to 3.0 and that seemed fine.  So I thought 3 was my magic monofilament number, until I started stitching parallel test rows down a sandwich of backing fabric and batting scraps.  The bobbin thread on the back of this sample is very easy to see and looks great at every setting.  It's really tough to tell what you're looking at on the invisible nylon side, though.  I couldn't get this to photograph well, either, but I finally determined that I needed to reduce my needle tension all the way down to 1.25 with this thread.  With higher/tighter tension, the nylon monofilament was laying in a flat line across the top of the fabric, pulling the bobbin thread all the way to the top to lock and form the stitch, instead of meeting the bobbin thread halfway in the middle.  When my needle tension is too tight, the invisible nylon looks really shiny because it's a straight, unbroken line of thread reflecting the light.  When I reduced the tension sufficiently, the shiny effect was greatly reduced because the nylon thread was bending between each stitch and disappearing into the quilt sandwich instead of laying tautly across the top of the fabric.  Does that make sense?  If your monofilament thread looks too "shiny," which is a common complaint from those who don't want to use it, I suggest you lower your needle tension until you can tame the shine.  You can keep reducing needle tension as long as the bobbin thread still looks good on the back.  If you start to have a "line" of bobbin thread on the back instead of individual stitches, you'll know you've gone too far.

Another point about the bobbin thread: Looking back at my sample stitches again, I can see a tiny dot of bobbin thread between each stitch on the top of my quilt sandwich.  This effect was more pronounced when my needle tension was too tight and pulling the bobbin up to the top, but it doesn't completely go away even once my tension is balanced.  I'm using a #60 sharp needle to make the smallest hole possible, and that should help, but it's a good reason to select a bobbin thread color that will blend with fabrics in your quilt top instead of a thread color that only looks good with the backing.

I also happily discovered that my sewing machine has a built in quilting straight stitch programmed with 5 tiny little stitches at the beginning and end to lock off stitches.  I don't think I've used that in the past, I've just manually turned the stitch length adjuster at the beginning and end of each line of stitching.  I'm not sure if I'll use the built in stitch or not -- it's nice at the beginning of the row, because you just tap the "pattern begin" button on the touch screen and start sewing, and the machine automatically increases to the correct stitch length after locking in the stitches without having to take your hands off the fabric.  The annoying part is at the end, when my foot is on the pedal and I reach up to hit the "pattern end" button to tell the machine to go back to the tiny stitches to end the row.  If I don't tap the button just right with my fingertip, the machine keeps sewing the longer stitch length while I tap it again and again, waiting for the chime that means "yes, Master" in Sewbaby Speak.  We'll see how that goes.

So much for the "quick blog post" I planned to write this morning!  Hopefully next time I post, I will have made some progress with the actual quilting. 

UPDATED February 18th, 2014: I did some quilting with monofilament nylon on my Bernina 750 QE for the first time a couple of days ago.  She handled it beautifully, with cotton thread in the bobbin and top tension reduced to 2.0.  I did place the monofilament nylon on my thread stand behind the machine and did everything else the same way I did on my previous Artista 200/730 E.

PSST!!  I'd Love to Quilt for YOU!

By the way, if you or any of your quilty friends has a quilt top or two that needs quilting, I'd be delighted to quilt for you!  My turnaround for edge-to-edge quilting is currently running about 2 weeks, and you can click here to find out how to book your quilt with me.