Showing posts with label Erin Russek. Show all posts

Thursday, December 15, 2022

"Ars Longa, Vita Brevis": My Jingle BOM is Finally a Finish!

So, did anyone want to see how my Jingle quilt turned out?  Ta da!  Woot woot!  Bring on the eggnog and pop the champagne!  Party in the streets!!!  Before getting into this, I want to give credit to pattern designer Erin Russek for creating this beautiful patchwork and appliqué design, for teaching me how to applique through her clear, well-written pattern instructions and tutorials, and for releasing this pattern as a mystery Block of the Month back in 2012 so I wouldn't know what I was getting into until I was too far in to give up!  Erin's blog is called One Piece At a Time and that's pretty much how she walks you through this quilt.  First we're going to make one leaf.  Then we're going to make one little bird...  If you just focus on learning one piece at a time, you can do anything, right?  Erin's Jingle pattern is now available in book form from C&T Publishing and you can get it directly from the publisher here or on Amazon here (this post contains affiliate links to defray the cost of the thousands of yards of thread that went into this quilt, wink wink).  Erin has lots of great applique tutorials and free projects currently available on her blog here and I can't recommend her patterns more highly, especially if you're someone like I was who admired appliqué but thought it would be "too hard."

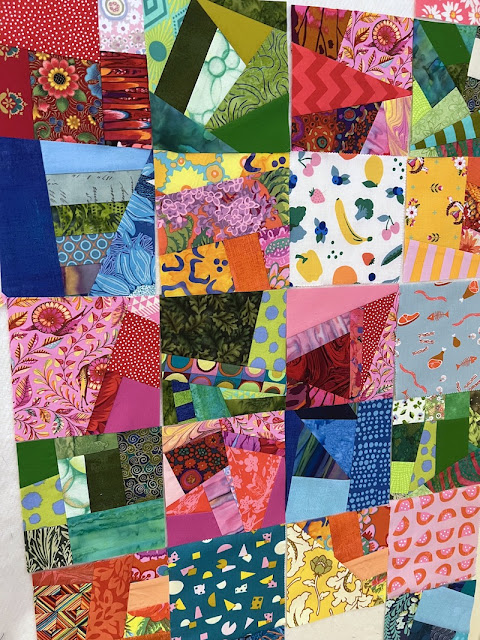
Without further ado, here's my finished Jingle quilt:

68 x 68 Ars Longa, Vita Brevis (Jingle) Totally Finished

Tuesday, June 28, 2022

Delicious Distractions: Slicing Through Scrap Bins, Sidetracked by Improv Piecing!

Hopefully, none of you have read my recent posts about my previous Weekly To-Do Lists or my June One Monthly Goal, because I haven't been working on any of those projects recently.  Instead, I went off on a wild scrap-slicing, improv piecing tangent and I'm blaming it all on Kelly Young for seducing me with her book Scrappy Improv Piecing: 22 Mini Quilts to Make With Easy Piecing!  (By the way, this post contains affiliate links.  This helps me to pay for Band-Aids, the importance of which you will appreciate in a moment).

5" Scrappy Improv Blocks For No Reason Or Purpose

What with the crazy news cycle last week, I was suffering from a bit of Fuzzy Brain syndrome and couldn't muster the concentration to follow any of the project instructions in Kelly's book, so instead I was just loosely following her method of sewing random bits and pieces together and then cutting them down into regular shapes.  This resulted in an assortment of 5" scrappy improv blocks for which I have only the vaguest of plans.  I had some of those red/pink sections left over from the Valentine's Day mini quilt I made for the blog hop to promote Kelly's book last year and I cut them down to 5" squares, like charm squares from a precut package.  And then I pulled out my blue and green scrap bin and started randomly slicing, sewing, pressing, slicing, sewing, pressing...  Making a glorious mess along the way, listening to the news and to podcasts and only barely paying attention to what I was doing...  

Making a Mess: The Scene of the Injury

The whole while I was off on this little tangent, I was singing "Slicing Through Scraps" in my head to the tune of "Dancing Through Life" from the musical Wicked.  Yes, it's all fun and games until you slice your rotary cutter right into your finger.  As this type of injury goes, mine was pretty minor -- no stitches, just an annoyance for several days while the Band-Aid wrapped fingertip got in my way and impeded my typing accuracy.  All better now, though.  

Thursday, November 28, 2019

Name Your Goliath: My Giant Is Named JINGLE, So I'm Quilting It Anyway

Oh my gosh, you guys -- I'm so glad I went to church last Sunday!  The sermon at Christ Lutheran was PERFECT for helping me get over my fear of "messing up" my Jingle quilt by quilting it poorly!  


If you have ever felt intimidated by something (sewing related or otherwise) that seems too big, too complicated, or too difficult for you, then today's post is for you.


Center Appliqué Medallion for my Big, Scary Jingle Quilt, Erin Russek's Pattern Available here
The text for the sermon was I Samuel 17, the story of the young shepherd boy, David, who defeated the mighty warrior giant Goliath despite being completely outmatched and out of his league by all outward appearances.  Pastor Scott talked about fear, courage, loss, bravery, and faith, and about the difference between how we tend to judge people (by outward appearances) versus how God judges people (by their hearts).  He asked us to visualize and silently name the "giants" in our own lives that may be holding us back, holding us captive: a divorce that makes us feel we will never know love again?  The death of a loved one that has taken all of our joy?  A financial failure, job loss, a terrifying medical diagnosis, or feeling that we can never measure up to the impossible standards of this world?  Seriously, this was a great sermon and if you're interested, you can listen to it online here.  The sermon begins about 23 minutes into the worship service.


David With the Head of Goliath by Caravaggio, Ca. 1600 (Photo Courtesy Museo Nacional del Prado)
So, what does this have to do with my Jingle quilt top?  Well, I have so much to be thankful for this Thanksgiving  -- and on Sunday, as my pastor was ticking off the different kinds of giants we have to face throughout our lives, I realized that I'm currently "between major giants," so to speak.  Right this minute, I'm not dealing with any life catastrophes, and the first "giant" that popped into my mind that has been paralyzing me with fear and robbing me of joy is this Jingle quilt top that has been languishing in my closet, unfinished, because I'm so afraid to "ruin" by quilting it poorly.  


Behold, the Vicious Giant From Whom I've Cowered In Fear!
SERIOUSLY?!!  When other people have REAL problems?!  I sang at all three services last weekend, so I got to listen to this sermon three times.  What makes it a really great sermon in my opinion, is its universality -- its ability to speak to men, women, and children of all ages, from all walks of life, empowering each of us to apply the power of Scripture to whatever we may be struggling with in that moment in time.  That's why I spend my Sunday mornings at church instead of sleeping in, going out for brunch or reading the Sunday papers in my pajamas.  There is no better antidote to the negative messages we're all bombarded with in the modern world than communal worship and music coupled with a really good sermon.


Stitching the Appliqué By Hand, Thousands of Tiny Stitches, One Piece At a Time
Machine quilting is scarier to me than hand quilting -- or any kind of hand stitching -- because a needle in my hand always lands exactly where I want it to pierce the fabric (provided I'm wearing my glasses, that is!).  If I make an ugly stitch, I can pull just that one stitch out and keep going with a hand needle.  Sewing machines, whether domestic sit-down or longarm machine on a frame like mine, are less forgiving, more difficult to control with precision, and stitches that take 30 seconds to make can take an hour and a half to rip out!  However, the look that I want for this quilt is custom machine quilting over a double batting, with fairly dense background quilting behind the appliqué to give it a three-dimensional "pop."  And I've never attempted a quilt like that before.


One of My Favorite Appliqué Blocks From My Jingle Quilt

Today, in this moment, my giants are Crippling Perfectionism and Fear-of-Failure.  My giant taunts me by holding up the masterpieces of nationally-renowned quilters who have decades of experience behind them -- as though this was a reasonable standard of comparison for a beginner like me.

Yes, I love this quilt top; yes, I spent a very long time making it, and no, I really don't want to mess it up.  -- BUT --

  • This was my first appliqué project.  I love it, but it's not perfect -- despite the hundreds of hours that went into making it, this is likely the WORST hand appliqué quilt I will ever make.
  • If I can't practice custom quilting on my own worst, first appliquéd quilt top, whose quilt am I ever going to practice on?  
  • I wanted to try hand appliqué for at least 10 years before pattern designer Erin Russek's Jingle Block of the Month (as well as her inspirational blog posts and tutorials at One Piece At a Time) encouraged me to give it a try -- not worrying about the whole quilt all at once, just taking it one piece at a time.  Think of what I could have created in the last 10 years if I hadn't been so afraid to try!
  • If I put it back in the closet and wait until I'm "good enough" to quilt it, it will probably NEVER get quilted at all.

Now, I'm not going to go so far as to say that the Almighty Creator of the Universe is up there on His throne, organizing a host of angels specifically to help me defeat this quilt as part of His plan for eternal salvation...  However, I DO believe that our human capacity for creativity is part of what it means to be Imago Dei, created in God's image.  Compared to the awesome complexity and breathtaking beauty of every plant and creature in an ecosystem, the majesty of a crashing waterfall or a mountain skyline, ALL of our human artwork must look like preschool macaroni projects to God Almighty, even the works of a master like Michelangelo.  Yet I don't see dogs, frogs or potatoes out there making art; do you?  Human beings are unique in our capacity to create.  It's a gift from our Creator that we're meant to use and enjoy, and the fear of messing up or not being good enough is just a lie that gets in the way.


Creation of Adam (Detail) by Michelangelo, 1508-1512, Sistine Chapel of the Vatican in Rome
Another interesting point Pastor Scott made in his sermon was that God had already started preparing to help David defeat that giant long before David was even born -- in the creation of the Jordan river alongside the battlefield, putting those rocks in place and washing them smooth through thousands of years of abrasion from the silt, sand, and other rocks in the flowing water.  God always shows up, God is never taken by surprise, and God is always ready to help us by giving us the tools we need and putting people in our lives who can help us defeat our giants.  If we can just strip away the fear that blinds us with lies of inadequacy and weakness, we will find that we have had the strength to move mountains all along. 


One of the Pieced Blocks in my Jingle Quilt
That got me thinking.  I absolutely have the resources, the time, and the equipment I need for this.  I have taken classes with nationally renowned longarm quilters to learn 
the techniques for this project, and I am blessed to have one of the best quilting machines on the market sitting up in my studio, ready to go.  I have the right needles, the right threads, the right battings, all the best marking utensils, quilting rulers and templates.  I have people in my life who can help me if I run into trouble and get stuck, and the skills I lack can only be developed through practice.  If a little shepherd boy named David can take on a nine foot, heavily armored, full-grown warrior with nothing but a slingshot, then I should be able to tackle the quilting of my own appliqué quilt!


Embroidering the Dates on the Birdie Block
I'm planning to load my Jingle quilt on my frame and start quilting it as soon as the Thanksgiving festivities are behind us, and then I'll take it one step at a time, without rushing to meet a December 31st deadline.  I am looking forward to blasting Christmas music in my studio while I'm working on it, too!  

Thanks to all of you who weighed in on this one on both sides.  To those in the United States who are celebrating, have a Happy Thanksgiving!

I'm linking up today's post with:

·       Midweek Makers at Quilt Fabrication

·       Needle and Thread Thursday at My Quilt Infatuation  
·       Whoop Whoop Fridays at Confessions of a Fabric Addict
·       Beauty Pageant at From Bolt to Beauty

·       Finished Or Not Friday at Busy Hands Quilts


Thursday, November 21, 2019

Oh, Crap! I Only Have 5 Weeks to Quilt Jingle BOM Before It EXPIRES!

Just when I was relaxing away without a deadline, an awful realization slammed into my peaceful reveries while I was driving home from choir practice last night.  Do you guys remember my Jingle BOM (Block of the Month) quilt, the one I started way back in 2013?  This is my first-ever appliqué quilt, designed by Erin Russek of One Piece At a Time.  The appliqué was a huge learning curve. Learning to piece the blocks accurately so they all finished the right size was a learning experience.  Dealing with the Crisis of the Bleeding Fabric Dye was an ordeal in and of itself.  Figuring out how to set the center medallion straight instead of on point like the original pattern, with inner borders sized correctly for the appliqué block border to fit was challenging.  Am I forgetting anything?  And after all of that, I absolutely adore how this quilt top ended up when I finished it back in February of this year.


My 72 x 72 Jingle Quilt Top, Completed in February of This Year
I knew my longarm skills weren't ready to tackle this special quilt quite yet, so I carefully packed it away in Quilt Purgatory (the closet in my guest bedroom).  But before doing so, I had the idea of embroidering the dates "2013-2019" on one of the quilt blocks.  Because I'd definitely get it quilted by the end of the year, right?


Expiration Dates!
AAAAAHHHH!!!  I embroidered the dates on the very first applique block that I made in 2013.  Before you tell me to just remove those stitches and change the date to 2020, I should confess that I traced the dates onto my fabric using a permanent yellow Pigma pen.  Those dates must remain.  I really, REALLY wanted this quilt to get finished before the end of the year -- but the end of the year has snuck up on me and taken me completely by surprise.

What do you guys think?  Jingle needs custom quilting, and I have very limited skills in that arena.  Just stitching in the ditch around the appliqué and embroidered dates is going to be challenging.  After my ruler work on my son's Mission Impossible graduation quilt, I feel like I could manage some ruler work crosshatching if I marked it ahead of time, but the traditional feather motifs I'm envisioning in my mind are likely to come out looking like strings of ogre toes if I try to quilt them on this quilt.  I wonder if I could quilt decent feathers in the setting triangles if I marked them first and had lines to follow?

Any and all suggestions appreciated.  I just got a new longarm ruler from Lisa Hagstoz Calle that is designed to facilitate stitch in the ditch around appliqué, so that almost seems like a message from the Universe telling me to give this a try and at least get it on my frame before the end of the year, even if I don't finish it by New Year's.  I just need to come up with a quilting plan within my current skill set that does the appliqué justice.  Oh, and I had planned to quilt this one with a double batting (wool over 80/20) to really emphasize the quilting, but I've never tried a double batting before, either.

Tuesday, December 4, 2018

Jingle Is Definitely On Santa's Naughty List! In Which It Becomes Clear That I Have No Idea What I'm Doing

UGH, y'all...  I am remembering why my Jingle BOM project stalled out in the first place.  :-(

With new resolve to get this top assembled and off my design wall, the first thing I did was to trim away the backing fabric from the largest applique shapes on the center medallion.


Oh, YES, I Trimmed That Backing Away!
I know quilters have mixed opinions about whether to trim away the backing fabric, with some saying the longevity of the finished piece is compromised by trimming backing away from beneath the applique and others saying it reduces bulk for more quilting possibilities and a softer finished quilt.


Is My Applique Stitched, or WOVEN INTO the Background Fabric?
However, with this first-ever applique attempt, I was overly neurotic about my hand stitches being small enough and I'm afraid there was a bit of overkill on that end.  (I have eased up and am no longer weaving my applique into the background fabric like this!).  Anyway, as you can see in the above photo, there is no way this stitching is going to come out, and my hand stitched applique seams are way more secure than my machine pieced quilt seams.  I only trimmed behind the center poinsettia and the layered pomegranates, though, because it was taking too long and I was on a mission to get this thing DONE.  And so I dug out those pattern directions and found the place where the designer tells you to cut down this 30" applique medallion to a finished size of 26 1/2".  Just "trim it down," she says, with no advice or instruction as to HOW to do this.


My 30 Inch Applique Medallion, Before Trimming
Well, folks -- I struggled.  I measured carefully, and tried my best to trim off the same amount from all four sides, and I ended up with TWO sides measuring 26 1/2" as they were supposed to, and the OTHER two sides measuring only 26".  Also the corners were no longer square.  Did you hear me screaming all the way at your house?!  

I'm convinced that the stuffed berries are what did me in.  Normally I'd lay my acrylic ruler on top of my block and trim away the excess fabric with my rotary cutter, but these stuffed berries near the edges of the medallion lift the ruler up off the fabric so the ruler can't hold the fabric in place while you're cutting.  Instead, I tried to place the ruler over the outside edge of the block that I was trimming away.  Didn't work so well.  :-(  I trimmed again and managed to get all four sides of the block to measure the same 26" with square corners again, but now I'd lost the seam allowances and some of my outer leaves are awfully close to where the border seams are going to  be stitched.  I'm going to have to finesse that with my borders.  If I was planning to diagonally set this medallion as Erin did in her quilt, I would be in deep trouble because it would be too small.  Thankfully I'd already decided to set the medallion straight and add inner borders rather than setting triangles.  So those inner borders will be next.  That's my To-Do for Tuesday! (Linking up with To-Do Tuesday at Stitch ALL the Things: http://stitchallthethings.com).


My Border Print Fabric
Nothing like a royal screw-up to sap your motivation!  What really kills me is that my medallion was so straight and square to begin with, since I tore instead of cutting to keep the edges perfectly on grain.  Thinking ahead to my next applique project with a large medallion, I'm thinking that maybe I should machine baste the final cutting line onto my block background in a contrasting thread color before I start stitching, and then use that thread line as a cutting guide at the end.  What do you all think?  

If anyone knows the magical secret of how to trim completed applique blocks without ruining them, PLEASE TELL ME IN THE COMMENTS!  The only gadget I've seen to help with this is pricey, Karen Kay Buckley's Perfect Adjustable Square set:


Karen Kay Buckley's Perfect Adjustable Square Set
The suggested retail is $75 and the best price I've found is on the AQS web store, $56Amazon also has it for $65 with Prime "free" shipping.  My understanding is that this tool wouldn't have helped with my Jingle medallion because it only goes up to 26", not 26 1/2" like my block was supposed to be.  Does anyone have this tool, and if so, is it worth it?

Okay, so writing about a quilt actually does NOT help it get closer to being finished...  Have a wonderful Tuesday, everyone!  I'm linking up with WIPs On Wednesday at Esther's Quilt Blog.

Monday, June 4, 2018

My Jingle Applique BOM is Back On the Design Wall

I'm going to be BRIEF today, I promise.  I've got a lot on my agenda for this week, but managed to sneak in an hour in the studio yesterday to cut some new setting triangles for my Jingle BOM (Block of the Month) from 2013.  Jingle is my oldest work in progress and it bothers my son Anders that I started it five years ago and haven't finished it yet, but now that I've resolved the bleeding red dye dilemma I'm looking forward to finishing this quilt this year.  That's right, you heard it here first -- Finishing my Jingle quilt is a GOAL for 2018!


New Setting Triangles for My Jingle BOM!
Brief recap to bring you up to speed: Jingle is a free BOM designed by Erin Russek of One Piece At A Time in 2013, and as of this writing, the patterns and instructions are still available for free on her blog here.  All of the border block patterns are free; the only pattern you need to purchase is the large center medallion and that's just a $10 download from Erin's etsy shop here.  Totally worth it, IMO.  This is my very first applique project of any kind, and all of the applique is needle turned and hand-stitched according to the excellent, amazing, unbelievably awesome instructions and video tutorials on Erin's blog.  


So this is the way blocks for this quilt are set in Erin's original design:


Erin Russek's Layout for Jingle
I love the blocks, but I don't really love setting the center medallion on point with those gigantic plain setting triangles.  I want to set my center medallion straight and fill in with some pieced inner borders.

It took me awhile to pick up where I left off, by the way.  I had cut out all of the setting triangles from the red poinsettia fabric originally, but now I've decided that I like it better with alternating red and green triangles, hence the green triangles that I cut out this morning.  There was a moment of panic, thinking that my triangles might have shrunken severely when I was soaking all the excess red dye out of them -- and then I remembered that I have Kaye England's special setting triangle ruler for Nifty Notions, and that's what I had used to cut my poinsettia setting triangles.  I really need to leave myself better notes when I pack projects away in "time out!"


Specialty Ruler for Cutting Setting Triangles
What I love about this ruler is that you can use it to cut both your setting triangles AND your side triangles from the same cut width of fabric, with the fabric grain oriented properly on both triangles, and it does the math for you based on the finished size of the blocks you're setting on point.  So in my case, these blocks are finishing at 9" and the ruler is clearly marked to indicate that 9" blocks require a 7 1/4" strip.  Easy-peasy, fairly fast once I refreshed my memory on how to use the ruler (instructions are available here), and more accurate than trying to cut out gigantic squares that are bigger than my rulers and then attempt to cross-cut them diagonally into QSTs and HSTs.  I do love my fancy toys...

The other thing I needed to refresh my memory on was how I am supposed to sew these oversize triangles to my blocks once I've cut them out. There are lots of tutorials out there explaining the math for cutting out side triangles and corner triangles from cross-cut squares, and explaining why the setting triangles need to be QSTs (with the straight of grain on the LONG side) and why the corner triangles need to be HSTs (with the straight of grain on the SHORT sides), but this is the video I found that also explained how to sew these oversized triangles to your quilt blocks once you've cut them out:


I know this is a "no brainer" for some of my readers, but one of the main reasons I document these things in my blog is for my own benefit -- so I can find those instructions and tutorials again six years from now, when I can't remember how I did it the last time!

My next step for Jingle -- and this is my To Do on Tuesday goal for the week -- is to assemble the on-point block borders with the setting triangles and corner triangles, trim the excess fabric from the setting triangles, and measure them.  My center applique medallion has an oversized, untrimmed block background, and I think it's best to see what side the borders will finish at first and then work backwards to figure out what size borders will fit between that on-point block border and the center medallion.  

Maybe I will even be able to use one or more of my Accuquilt GO! Baby dies to cut out those inner pieced borders! 

Today I'm linking up with:

Monday, April 23, 2018

Jingle Update: The Bloody Quilt Wrecker Has Been Apprehended and Disarmed!

Good happy morning to you, stitchy friends!  Look who survived the bloodbath of Friday the 13th and is back on my design wall, ready to become a quilt top again!  It's the Jingle BOM (Block Of the Month) designed by Erin Russek, my first-ever applique project, which I started back in 2012.  In Quilters' Terminology, that makes it my oldest UFO (UnFinished Object) or WIP (Work In Progress).


YESSS!!!!  My Jingle Blocks Aren't Bleeding Anymore!
fabric haemophilia. /ˌhiːməʊˈfɪlɪə; ˌhɛm-/ noun. 1. an unpredictable disease, usually affecting only dark fabrics but lethal to any light colored fabrics sewn adjacent to them in a quilt, characterized by loss or impairment of the normal clotting ability of commercially dyed or hand dyed fabric such that a minor splash of water or the gentlest of laundering may result in fatal bleeding of loose fabric dye all over the white and light colored fabrics in your quilt.  Can be fatal if not treated immediately.

I just realized I never followed up with my scary nightmare post about the quilting bloodbath.  I am happy to report that there were NO casualties!  It turned out that my favorite Hoffman poinsettia fabric was the bleeder after all.  These are seriously haemophiliac flowers, you guys, but ordinary Dawn Ultra dishwashing liquid was the Rasputin who saved my bleeding quilt.


The Villainous Bleeder: Hoffman "Winter Magic" Style G8562
So, when I wrapped up my last post about this I had successfully eliminated all of the loose, shedding dye from my pieced and appliqued blocks as well as from the appliqued center medallion of this languishing UFO, but I still didn't know which of my red fabrics was the bleeder.  

I had already cut all of my setting triangles out of this red poinsettia fabric (also used in some of my pieced blocks that bled) but was reluctant to soak and agitate the triangles for fear of fraying and distorting the bias edges.  Yet all the work I did to eliminate the dye bleed in the blocks would be for nothing if I sewed the non-bleeding blocks to red fabric that was still bleeding.  

I confirmed that the poinsettia fabric was definitely the bleeder by soaking a small scrap of this prewashed fabric in a bowl of hot, soapy water.  The water turned dark red almost immediately.  


Just a Scrap Of Poinsettia Fabric Turned the Soapy Water Red
No way could I use those setting triangles with that much loose red dye in them, so I proceeded to soak all of them in the dishpan the same way I had done with my blocks.  I have to show you how much dye released from the setting triangles into the dishpan in the first soak:


Yikes!!  My Fabric Bleeds Chicken Blood!
Isn't that gross?  My husband said it looked like sudsy Kool-Aid, but I think it looks like chicken blood!  I just kept dumping the water and refilling the dishpan with fresh hot, soapy water, squeezing the suds through my blocks or cut triangles or yardage or whatever I was dealing with, until the water remained clear after several hours of soaking.  Then I rinsed them under cool running water, gently squeezing to remove the suds, and laid them flat to dry on white bath towels.


The Setting Triangles Survived Their Bloodbath!
But the main takeaway is that Vicki Welsh's method of prolonged soaking in hot, soapy Dawn dishwater was really easy, and it successfully removed all excess dye from the bleeding fabrics in my blocks, and now even if the finished quilt gets thrown into a boiling lake full of angry demons, I am confident that the dye won't run.  Yippee!  

I had to use the blue Original Dawn Ultra dish soap for my first go at this, because that was the "plainest" Dawn dish soap that my local grocery store carried.  I wasn't thrilled about that, though, because blue Dawn tints my soapy water blue and that makes it harder to tell whether blue or green fabrics are bleeding.  Also, the manufacturer of Dawn is only intending for customers to use their product on dishes, so they won't have tested whether their blue dye would transfer to or interact negatively with fabric in any way.  So I was delighted to discover that Dawn makes a Free and Gentle version of their Ultra dish soap that is completely dye free, and that's what I'm using from now on.  I found it on Amazon here, two 21.6 oz bottles for $12 with free Prime shipping, and I stocked up so I can test and treat every new fabric that comes home with me.  


Yes, there are plenty of other chemicals and soaps that quilters swear by for dealing with bleeding dyes in commercial fabrics, but they are all much more expensive harder to find.  

So, back to the Jingle quilt.  Here is designer Erin Russek's original setting for these blocks:


Designer Erin Russek's Setting for Jingle, Finished Size 76" x 76"
I want to do mine differently, with the center medallion set straight rather than on point.  


Tweaking the Setting On My Design Wall.
This would eliminate the giant green setting triangles around the medallion, and give me the opportunity to add a border or multiple borders between the center medallion and the on point pieced and appliqued blocks.  I may also eliminate or reduce the size of that outer green border, since I'm intending this quilt for seasonal wall display and don't need it to be quite as big as Erin's 76" x 76" design. 

I'm currently considering replacing the inner red poinsettia setting triangles with green ones to accentuate the zigzag effect of the on point block border, as well as ensuring that I have  a nice Christmasy balance of red and green in the finished quilt.  I found a mottled tonal green fabric nearly identical to one of the fabrics I used for some of my appliqued leaves, and I prewashed it AND checked it for color fastness, so it's ready to go.


New Emerald Green Fabric for Inner Setting Triangles
I LOVE IT!!  I am going to have SO MUCH FUN quilting this on my longarm machine, and I can't wait to enjoy it as part of my Christmas decor in 2018.  That's right, you heard me -- I am setting another goal.  Jingle is going to be finished by Thanksgiving of this year so I can hang it up when I decorate for Advent!

But meanwhile, I'm nearly finished with Pineapple Log Cabin Block #36 of 42:


Block 36 of 42 Currently In Progress
...and I've got a fantastic idea ready to test out for quilting some fancy feather designs on my Tabby Mountain quilt:


Auditioning Feathers for Felines
This quilt is intended for a dear friend whose birthday is coming up soon, so once I wrap up Pineapple Block #36 I'll be focusing on Tabby Mountain again in order to get it done on time.

Have a wonderful, productive, and beautiful day!  I'm linking up with:

Thursday, April 12, 2018

Nightmare On Quilter's Corner: "There's SO MUCH BLOOD!!!!!"

That sounds like something out of a horror movie, doesn't it?  And it should, because what I'm about to share with you is a quilter's most gruesome nightmare.  This blog post might not be appropriate for young quilters, or for squeamish quilters, or for quilters who faint at the sight of bleeding fabric dye threatening to destroy hours and hours AND HOURS of painstaking hand stitching.  But I think it's gonna have a happy ending, so bear with me!


My Freshly Bathed Jingle Applique Blocks This Morning.  So Far, So Good!
Quick recap: You are looking at my very first applique project, a BOM (Block of the Month) project designed by Erin Russek of One Piece At a Time back in 2012.  I spent hours studying Erin's awesome tutorials for preturned, hand stitched applique, more hours carefully selecting the fabrics for every block, and it took me an unbelievable amount of time to stitch these blocks because I was paranoid about having my stitches too far apart and made them very, very tiny instead.  I was so excited about being able to make three-dimensional PICTURES out of fabric!  I was so proud of my nice little points and smooth curves!  

I struggled with many of the pieced blocks for this project, too.  My seam ripper and I became besties, but I persevered and ended up with an assortment of blocks that I was really happy with.  Seriously, I must have had at least a hundred hours of time invested in these blocks by this point.  You can read through the trials and tribulations of this project in my older posts about it by clicking here.


My Jingle BOM WIP, Last On the Design Wall in June of 2014
But alas! -- As my final blocks neared completion and I got ready to cut out my setting triangles so I could join those blocks into an honest-to-goodness quilt top, this lighthearted romantic film took a turn for the worse.  I happened to set my red poinsettia setting triangle yardage down on top of the edge of a piece of white paper, and noticed that my selvages were PINK instead of white.  


Pink Selvages?!  NOOOOOO!!!!!  MURDER, She Wrote!!!
Like the good little beginner quilter that I am, I had followed the directions and prewashed all of my fabrics for this quilt before cutting out a single piece, thinking that would take care of shrinkage as well as rinsing away any excess fabric dyes.  I prewashed all of my reds in the same warm water laundry load, and apparently at least one of those fabrics was a bleeder.  The thought of spending additional time setting the blocks into a quilt top, and then even MORE time quilting the whole thing, only to have it come out of the first wash with all of my off-white backgrounds turned pink, was just too much for me to bear.  So I put all of my finished blocks, setting triangles, and the finishing directions in a lovely wire drawer bin and stashed it away under my cutting table for...  FOUR YEARS.  


Hidden Away For Four Long Years
However, enough time has passed now that I feel like I have more to gain than I have to lose by getting Jingle out again.  I mean, blocks in a drawer are worth nothing, but if I take them out, I can use them for educational purposes, to experiment with bleeding dye issues.  Even if the ivory background fabric all turns pink and I can't stop the bleed, I can still get good practice with all kinds of custom longarm quilting, including stitching around all the applique shapes.  My overall quilting objective for 2018 is to become proficient with my longarm machine so my husband doesn't make me sell it (Yes, Lover Ducky -- I know what's going through your mind!).  And so, my Jingle blocks were ready for their blood bath!

There are quite a few methods out there on the Internet for addressing the problem of excess dye leaching out of quilting cottons when wet, everything from Color Catcher laundry sheets to Synthrapol and other chemical fixatives.  My blogging buddy Karen at Quilts... etc. recommended Vicki Welsh's Save My Bleeding Quilt method using ordinary Dawn liquid dish soap, and that's the method I'm using on my Jingle blocks right now.


Can Vicki's Method Save My Bleeding Quilt Blocks?
I used the blue Dawn Ultra, Original Scent, this time because that was the most "plain" Dawn that my local grocery store stocked.  However, because I'm using more more dish soap than I would use for washing dishes, the blue dish soap annoyed me by tinting the soapy water blue.  That would make it a lot more difficult to tell if blues, purples, or deep greens were shedding dye into the sudsy water.  Plus, the whole reason we're doing this is to get RID of extra dye, not add MORE dye!  So I was very excited to find this colorless version of Dawn Ultra called Free & Gentle, with no added dyes or perfumes, on Amazon.  I got a nice, big bottle of it and I'll be using this clear Dawn Ultra next time:


Notice that's TWO bottles of Dawn, each of them 21.6 oz, for just $12 and free shipping with Amazon Prime.  And that's ALL I needed for this method - no Synthrapol, no vinegar, no Retayne, no Color Catchers.  It's cheap and it does the job, leaving more money in my pocket for fabric shopping.  

Vicki's Save My Bleeding Quilt tutorial walks you through her process for dealing with dye that's bleeding on a finished quilt, and she recommends a 12-hour soak in a bathtub full of hot, soapy Dawn dish water.  Since my quilt blocks haven't been assembled into a top yet, much less quilted, I was able to use a dishpan instead.  First I soaked my 8 applique blocks together.  I put them in their hot bath first thing in the morning, and left them there until after dinner time:


Applique Blocks After a 12-Hour Soak
An hour or two after I put the blocks in the hot, sudsy water, I dumped out all the water and refilled the pan with more hot sudsy water, to get rid of the excess dye that had leached out fairly quickly.  I was surprised to see that one or more of my emerald green leaf fabrics was leaching out more excess dye than any of the red fabrics in these blocks.  


First Bloodbath Finished!
Just as Vicki promised, the Dawn detergent prevented any of the excess dye from readhering to my off-white background fabric.  Interestingly, you can see that the hot soak in soapy water did NOT wash away the little dots of Roxanne's Glue Baste-It that I used to position my applique leaves and petals when stitching them down.  I didn't agitate much, though, because I'd already trimmed these blocks to size and I was afraid of fraying the raw edges of the fabric.  I just stirred them around gently with a wooden spoon.  I'm sure the glue will wash away when I wash the finished quilt (and if it doesn't, I don't care).  I laid the sopping wet blocks out on a fluffy white towel and pressed down from above with another towel, then allowed them to air dry overnight.  When I picked them up this morning, there were no pink or green marks on the white towel, so it looks like the blood bath was a success.  HOORAY!!!


These Blocks Survived Their Bloodbath!
I am sure that I did not get all of the Dawn soap out.  I rinsed them as best as I could without overhandling them, draping each one over the back of my hand while I sprayed it with water.  Again, the quilt will be washed as soon as it's finished and any dish soap left in the quilt will be removed at that point, when there are no more raw fabric edges in danger of unravelling!

So, feeling greatly encouraged, I set up another boiling, soapy bloodbath for the nine pieced blocks after dinner.  This time, the red dye started to leach out into the bathwater right away.


AHA!  Pink Bathwater!!
I dunked a clear plastic beverage cup into my sudsy water after about an hour of soaking, and it looked like pink zinfandel with foam on top!  I dumped out that tub of water and refilled the bloodbath with fresh, hot, sudsy water, stirred it up for a few minutes with my wooden spoon, and then headed up to bed, hoping for the best.


Good Morning, Blood Bath!
Happily, this is what I discovered in my sink this morning.  That water looks pretty clear to me, so I must have gotten all the excess dye out in that first couple of hours, before I refilled my tub of water.  


Post Blood Bath, Drying On the Towel
I was more worried about the applique blocks, but actually the pieced blocks are more of a pain in the butt because all of my nicely pressed seam allowances have unpressed themselves and I'm going to have to fiddle a bit to figure out which way they're supposed to go when the blocks are dry and I have to press them back into shape.  But the main thing is that NOTHING IS BLEEDING ANYMORE.  My third and hopefully final blood bath for this quilt is the large center applique medallion, which is soaking in the dishpan right now.  

The thing is, I thought for SURE that one of my red batik fabrics was the bloody culprit, either the fabric I used for my stuffed berries or one of the batiks that I used for my red cardinals.  But if that was true, I should have seen red dye running in the applique blocks' bath water.  I only saw green dye in that bath.  It was the pieced blocks' bathwater that turned pink from loose red dye.  I am such a sleuth, you guys.  I feel like Nancy Drew!


Nancy Drew and the Case of the Bleeding Quilt Fabric
I have five or six different red fabrics in my pieced blocks besides the applique batiks, so perhaps I have already solved the problem for this quilt...  Unless the bleeder was that poinsettia fabric with the pink selvage that first clued me in.  
Hoffman Winter Magic, How Could You Betray Me?
This is my favorite fabric in this whole quilt.  It's in several of my pieced blocks, but not in any of my applique blocks.  And it's the fabric for my setting triangles, which are all cut out and ready to go.  I hope it's not the bleeder!!  I need to go find a scrap of it to test.  If it bleeds, there's no way around it -- I'm going to have to soak all of my setting triangles, too.  I'm using those setting triangles, come hell or high (hot, soapy) water, because that's how much I love it.

By the way, I sat down at the computer to write this "quick" blog post update at 8 AM, and have only stepped away from the computer to make tea, throw the tennis ball for my dogs for a bit, and to check on my soaking quilt blocks.  It's NOON already...  Ah, the SHAME!!!  Just think how much sewing I could get done if I didn't feel compelled to chronicle every single step on this blog!

Today I'm linking up with: 
·       Needle and Thread Thursday at http://www.myquiltinfatuation.blogspot.com/