Showing posts with label Long Arm Learning. Show all posts

Thursday, July 6, 2023

Aurifil 40/2 vs Forty3 Cotton Quilting Thread: Mary's My Happy Place, Ramona's Escher Connected + A Sneak Peek of Mary's Mid Century Mod Quilt

Good morning and welcome to the sultry, sweaty, swampy month of July!  Today I'm sharing two beautiful but very different quilts (and giving you a glimpse of a third gorgeous quilt) that were all quilted with "forty-weight" Aurifil cotton threads.  I'll be showing you the enormous difference between forty weight TWO-ply versus forty weight THREE-ply thread.  

When comparing two spools of thread that are labeled with the same weight but different ply, the 3-ply thread is a full 50% thicker than a 2-ply thread of the same exact weight.

There's a common misconception that if two cotton threads are both labeled "forty weight," they should be approximately the same thickness and should look and behave the same when stitched out.  In reality, that weight designation only refers to the weight and thickness of a single "ply" or strand of that thread, and the cotton threads we use for piecing and for quilting are typically either 2-ply (two strands twisted together) or 3-ply (three strands twisted together).  This explains why Aurifil's popular 50/2 cotton thread (the one on the orange spool) creates less bulky seams and performs better with smaller needles and sometimes different tension settings compared to 50 weight 3-ply threads such as Mettler, Gutermann, etc.  When comparing two spools of thread that are labeled with the same weight but different ply, the 3-ply thread is a full 50% thicker than a 2-ply thread of the same exact weight.  (This post contains affiliate links).

Aurifil 40/2 (Green Spool) Natural White Blends and Disappears Across Applique

In the photo above, I've quilted the Chantilly Lace E2E design across a client's appliqué sampler quilt using Aurifil's 40/2 cotton thread in Natural White.  This is their popular 2-ply forty weight thread that comes on a green spool and is widely available in quilt shops.  Although Aurifil 40/2 is a thicker, more pronounced thread than the Aurifil 50/2 that comes on orange spools (confusingly, bigger weight numbers indicate skinnier and finer individual strands or plies), 40/2 cotton is still what I consider a lightweight blender thread for long arm quilting.  Notice how the quilting stitches take on a greenish tint where this thread crosses green fabrics, but the thread seems to be a pale pink where it's stitched across the pink petal fabric.

Aurifil Forty3 Black Stands Out Dramatically, Even Against Busy Print Fabrics

In the photo above, I've quilted the Wishbone E2E design using Aurifil's Forty3 cotton thread in Black.  Aurifil has created this thread specifically for long arm quilters, it’s only available on giant yellow cones (not spools), and it’s not as widely available at quilt shops as their 50/2 (orange spool) and 40/2 (green spool) cotton threads.

I selected Aurifil Forty3 cotton thread for Ramona’s Escher Connected quilt because busy prints like these are notorious for rendering quilting designs all but invisible and we wanted a thread that would disappear against the black background fabric but show up more dramatically against the prints.  

Thursday, July 8, 2021

TGIFF is At My Studio This Week! Modern Scrap Petal Garden Baby Quilt

 Hello, and happy (almost) Friday! I'm delighted to be hosting this week's TGIFF (Thank Goodness It's Finally Finished) Friday linky party, because I am head over heels in love with this sweet modern baby quilt that I just finished quilting for a client.  

36 x 42 Scrap Petal Garden Baby Quilt with Jessica's Abacus Chevron E2E

The machine appliqué pattern for this quilt is called Scrap Petal Garden, from Cabin in the Woods, and it's available on Etsy here if your local shop doesn't carry it.  I love the fresh, bright flower petals against my client's low-volume background fabrics, don't you?  I know everyone loves the before and after quilting photos, so here's what the top looked like before quilting:

Tuesday, January 26, 2021

Channeling Aristotle: Using Ancient Design Principles for Better E2E Quilting

Good morning, Lovelies, and Happy Tuesday!  

I often see quilters -- even seasoned professional longarm quilters with years of experience -- crowd-sourcing ideas for quilting designs on social media and in online forums.  You know, "how should I quilt this," "which thread would you choose," and "which panto design would look good on this quilt?"  If the quilter has a computerized machine, there are additional questions about what size to scale a particular design for quilting as well.  My interior design background kicks in whenever I'm faced with these kinds of choices, so I thought I'd take a moment today to explain how the principles of color, pattern, line, and scale influenced the way I quilted this Disappearing 9-Patch baby quilt.  

39 x 53 Disappearing 9-Patch Baby Quilt

Choosing a Quilting Design: Always Start with Function

When meeting with a new interior design client, the first questions I'd ask were always about their functional needs for the space.  How many people live here?  What are their ages?  Do you have young children or pets?  Do you entertain frequently, and how often do you think you'll redecorate?  The answers to these questions influence every recommendation I will be making to ensure that the finished project not only looks amazing, but is also going to work for their lifestyle and hide pet fur if they have pets, with stain resistance/washability if someone sits on a juicebox that the toddler left in the couch cushions, etc.  I look at a client's quilt top the exact same way, so my first consideration is always the quilt's intended function.  

Thursday, January 21, 2021

Odds and Ends: All the Amazing Things I Forgot to Tell You This Week

 Hello, my lovelies, and Happy Friday!  We made it to the end of another week!  Yay!

So, you know that drawer in your house, probably in your kitchen, that is full of random things that don't belong anywhere else?  That is your frame of reference for today's blog post.  I have a "junk drawer" full of loose ideas in my head that I meant to share with you in earlier posts.  For instance:

A Ball of Feed Sack String, Next to a Golf Ball

Feed Sack String!!!

In a recent post about a vintage quilt repair that I was working on for a client, I shared this photo of the hand piecing seams that the original quilt maker stitched in a very thick, heavy thread:

This Quilt was Hand Pieced with Feed Sack String!

I shared the same photo in a Vintage Quilting group that I belong to on Facebook, and several members identified the mystery thread as feed sack string that they remember being carefully removed from the seams of feed sacks, flour sacks etc., rolled into balls (one of the group members sent me the above photo of her own ball of feed sack string), and reused for everything from tying quilts to wrapping packages.  As someone who will get in her car and drive 30 minutes away to get exactly the right fiber, weight, and color thread for a project, that level of thrift and resourcefulness is just awe-inspiring.

Thursday, December 10, 2020

More Squirrels: Multiple New Christmas Quilts, the Quilt to Perpetuate the Patriarchy, and Not Nearly Enough Thread

 Ah, if only the Squirrel of Distraction didn't bring along so many friends...


So the last time I checked in here, I was telling you how I got this "squirrel" of an idea to drop all ongoing projects to make a festive Christmasy tumbler quilt.  But then I bought a bit more Christmas fabric than was absolutely necessary...  So I cut out all of the tumblers I'd need:

6 inch Tumblers Cut Out and Ready to Sew

But then, instead of folding the leftover fabric and storing it away for another day, I grabbed my rotary cutter and ruler and cut lots and lots and LOTS of 5" squares.  I was talking on the phone through my Airpods while I was doing this, not keeping count, and I kind of got carried away.  

So one "quick and easy" detour to make a Christmas throw quilt has segued into something that looks more like a 5-point intersection without any street signs.  I had this idea that I was going to make a Disappearing 9-Patch quilt from my 5" squares.  These are the first two blocks:

Disappearing 9-Patch Blocks

Y'all, the blocks are cute, but this is NOT the way I usually roll.  I was good with cutting out my perfect 5" squares and sewing them together into perfect 9-patch blocks, but when I got to the part in the directions where it says to just chop the block in half down the middle, I wished I'd just cut out little squares and rectangles in the beginning instead of following the directions!  I think this method is better suited to someone with a different personality than mine.  :-). But it's fine, and I'll keep making enough blocks until it's big enough for a throw, or for a bed.  Maybe all red, or maybe I'll use some solid green, too, to set off the red Christmas prints in my stash?

Even so, like I said, I cut way too many 5" squares for just one quilt.  What can I do with the rest of them?  Let me know in the comments if you have a favorite pattern for 5" charm squares!

Meanwhile, I've been shopping and wrapping and shipping like a crazy person...  Or like a MOM in the final weeks before Christmas.  The digital pattern companies have been running sales on their quilting patterns, so I've been building and curating a nice selection of designs for R2D2 (my computerized long arm machine).  I'm looking forward to quilting these new designs as we move into a new year!  

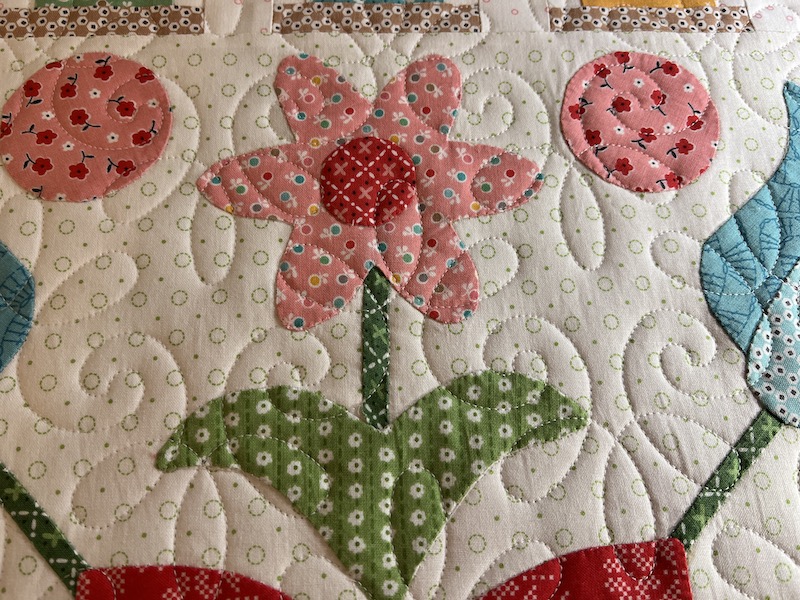
The Charity Quilt to Perpetuate the Patriarchy, According to My Snarky Son

I'm about to get a charity top loaded onto my long arm frame, one which my snarky teenaged son is calling the Quilt to Perpetuate the Patriarchy because it has a fabric that says "FireMEN" instead of "Firefighters."  I didn't even notice that before he pointed it out!  He's only teasing me, but secretly I am glad that he is aware that women can also be firefighters, that little girls might also like to be fire-fighting heroes when they grow up, and that gender-specific job titles can make some people feel like they "don't belong."  But most of these charity tops I get from our guild are made of older fabrics that have been donated to us as part of an inherited stash.  The "firemen" fabric might even be older than my 17-year-old son.  I'm curious whether the fabric companies are more sensitive to this nowadays -- has anyone noticed?

Anyway, regardless of the political correctness of the fabric, this Firemen quilt top is about to get quilted with Jessica Schick's Fantasy Flame E2E design:

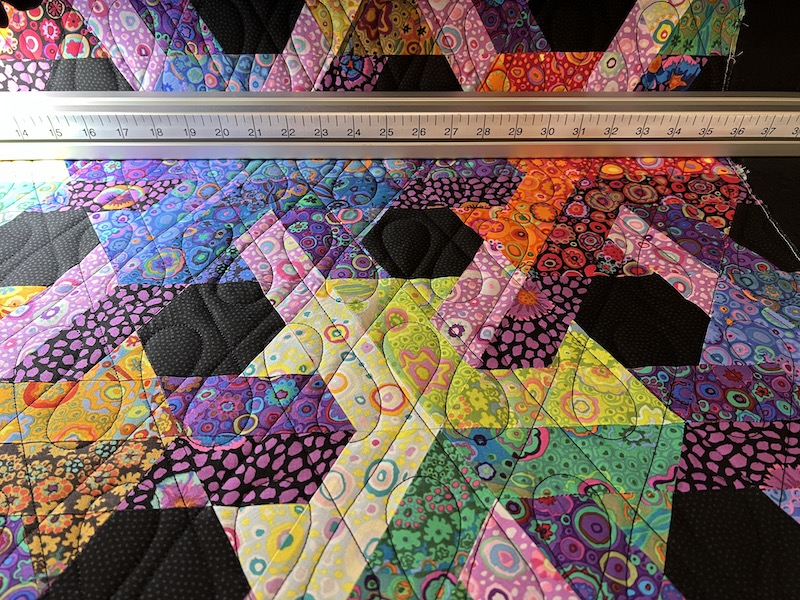
Pantograph Laid Out and Ready to Sew

[Side note: How do you like those magnetic Wonder Woman bracelets that my R2D2 is wearing? I stumbled across them on Amazon while I was gift shopping.  They have Velcro closures and 10-15 super strong magnets sewn into the tough mesh fabric, strong enough to hold nails, screws, a wrench or a screwdriver on your wrist to keep them handy.  I am using them to hold my thread snips, my IQ stylus, maybe a couple of pins, and even my bobbin case so I don't misplace it while I'm brushing out lint and oiling my hook.  The magnets are strong enough that there's no risk of the scissors falling off while the machine is stitching.  If you have anyone on your gift list this holiday season who works on cars, fixes computers, etc., this might be a big hit. You can find it on Amazon here].

Although I purchased these magnetic wristbands with the idea of using them on the handles of my long arm machine, I'm finding that I like them even better wrapped around the end of my 2" diameter quilt top roller bar, just off to the side of the quilt I'm working on.  I only wish I could find one in a pretty purple or hot pink!

My Newest Favorite Long Arm Accessory: Magnetic Tool Wristband

Do you have any favorite items in your sewing room that were designed for some other use?  Let me know in the comments!

Back to the project at hand!  So this is how I set up the Fantasy Flames pantograph for this 40" x 45" quilt top.  Since my quilting design is non-directional, I'll be loading the top sideways for greater efficiency.  The green rectangle on my IQ tablet screen represents the full size of my quilt top with an additional 1" buffer on all four sides, just to be on the safe side.  I altered the pattern's row height to get a quilting pattern density (the average length of stitching lines within  one-square-inch) of .92", with a pattern height of just under 13 1/2".  On my APQS Millennium, that should be a good size to maximize the "real estate" of my machine's throat space without running into problems.

Fantasy Flames Pantograph Resized and Mapped Out

I've deliberately adjusted the gap between the pantograph rows to disguise where one row ends and the next row begins, and it's hard to tell from this screen, by my little robot assistant will be able to quilt this out in four passes, stopping between rows for me to clip threads, advance the quilt on the frame, baste the edges of the quilt, and then realign (re-orienting the computer to know where it is on my quilt that I just moved before asking the computer to start stitching again).

After auditioning a few different thread options on the quilt top, I decided on a pale yellow Glide thread called Lemon Ice.  And, by the way, that's another thing I've been up to since the last time I blogged.  I inventoried and reorganized my long arm quilting thread by color instead of by brand/type so I could see where I had "holes" in my rainbow of options, and then I placed thread orders.  Clearly, I just did not have enough thread:


This is What Not Enough Thread Looks Like

Okay, so I picked the Lemon Ice Glide thread for my Firemen quilt and I don't have any similarly colored prewound bobbins in stock, so I wound a couple of bobbins the old fashioned way and threaded up my machine...  But then I got interrupted because my Bernina dealer called and my Main Squeeze 750QE was finally ready to be picked up after waiting her turn for her bi-annual Spa Maintenance for over a month! I'm glad I left her to be serviced despite the pandemic-related backlog, because she had a broken foot, something not right with the bottom cover, and needed some kind of an upgraded grounding cable or whatever.  The broken foot at the bottom of the machine -- who knows how that happened or how long it's been that way -- but it might have been behind my problem with the embroidery module disconnecting from the machine while it was stitching.  Anyway, now that my Big 'Nina is back home and ready to sew, I gave them my Goldilocks 475QE travel/backup machine that hasn't been in for service since I purchased it in February 2019.  Gotta take good care of my machines if I want them to keep perform flawlessly.  Now is a good time to service the little machine, too, because I'm not taking her to classes or traveling with her during this blankety-blank pandemic.

Alright; that's all you're getting from me for tonight!  More Christmas packages showed up on my doorstep that need to be wrapped for snarky boys who have strong opinions about quilting fabric!

PSST!!  I'd Love to Quilt for YOU!

By the way, if you or any of your quilty friends has a quilt top or two that needs quilting, I'd be delighted to quilt for you!  My turnaround for edge-to-edge quilting is currently running about 2 weeks, and you can click here to find out how to book your quilt with me.

I'm linking up today's post with the following linky parties:

THURSDAY

Needle and Thread Thursday at My Quilt Infatuation  

FRIDAY

Finished Or Not Friday at Alycia Quilts

Off the Wall Friday at Nina Marie Sayre


SATURDAY

UFO Busting at Tish in Wonderland

SUNDAY

Frédérique at Quilting Patchwork Appliqué

Oh Scrap! at Quilting Is More Fun Than Housework


Tuesday, October 13, 2020

LAL#11: The Season Finale

 Hello, machine quilting friends, and welcome to what I've decided will be the last Long Arm Learning linky party.  I have so appreciated those of you who've been linking up with me here for the past 11 weeks, and I've learned a lot from all of your posts.  However:

  • I enjoy lots of other aspects of quilting besides the actual machine quilting part.  Even though that's my strongest focus these days, I'm finding that I struggle to come up with a long arm quilting themed post every single week.  Some weeks I've been exploring English paper piecing or quilt design or hand stitching and would rather write about that.  So the linky party focus is feeling constraining to me as the host.
  • I enjoy visiting and being inspired by a wide, varied range of quilters, whether they are hand quilters, machine quilters, or masterful appliqué artists who "quilt by check."  If I'm going to host a linky party, I'd rather cast a wider net and include EVERYONE in the party rather than just those who've written about machine quilting in a particular week.
  • Finally, I'm noticing that a lot of us -- myself included -- are linking up the same posts in several different linky parties that we all participate in.  It's like we're all on the same linky party bus doing a bar crawl together!  So I'm wondering whether there is actually a need for me to be hosting yet another linky party here on my blog at all?


Where Can We Link Up Together Going Forward?

These are the linky parties where I currently enjoy linking up on a weekly or monthly basis, where I see a lot of you linking up as well:

SATURDAY

·       UFO Busting at Tish in Wonderland

SUNDAY

·       Frédérique at Quilting Patchwork Appliqué

·       Oh Scrap! at Quilting Is More Fun Than Housework

·       Slow Stitching Sunday at Kathy's Quilts

MONDAY

·       Design Wall Monday at Small Quilts and Doll Quilts  

·       Monday Making at Love Laugh Quilt

TUESDAY

·       To-Do Tuesday at Home Sewn By Us

WEDNESDAY

·       Midweek Makers at Quilt Fabrication

·       Wednesday Wait Loss at The Inquiring Quilter

THURSDAY

·       Needle and Thread Thursday at My Quilt Infatuation  

·       Free Motion Mavericks with Muv and Andree

·       Sew and Tell Thursday (on BerninaLand Groups.io)

FRIDAY

·       Whoop Whoop Fridays at Confessions of a Fabric Addict

·       Peacock Party at Wendy’s Quilts and More

·       Finished Or Not Friday at Alycia Quilts

·       Off the Wall Friday at Nina Marie Sayre

·       TGIFF Thank Goodness It’s Finished Friday, rotates, schedule found here: http://tgiffriday.blogspot.ca/p/hosting-tgiff.html


MONTHLY:

·       One Monthly Goal at Elm Street Quilts. Link up your goal at the start of each month and link up your finish during the last 6 days of the month 

·       Tips and Tutorials on the 22nd, open 22nd through end of each month: Kathleen McMusing

The easiest linky parties for me to participate in are the ones that are pretty open-ended, where I can link up any kind of quilting project, in any stage of completion.  The goal setting linkies are helpful as well (Roseanne's To-Do Tuesday and Elm Street Quilts' One Monthly Goal) although I don't always get my goal post written up in time and I'm not great about finishing the goals by the end of the week or month.  The "finished" linky parties are ones I enjoy visiting to see what others have made, but I don't crank out finishes fast enough to have one to share at the end of every week.

I'm not opposed to continuing to host a linky party, now that I've set up the account with InLinkz and figured out how to do it.  But if I start up a new party, it would need to be open to all stages and techniques of quilt making, all styles, so that I'm not stressing out about needing to come up with a post each week on a specific topic even if I'm in a different place creatively that week.  And when I look at my roster of other bloggers' linky parties, I see that there are already so many great linky parties like that going strong.  Go ahead and share your feedback and opinions in the comments, but right now my inclination is to call it a wrap and let other bloggers be the Hostesses With the Mostesses.  If anyone is disappointed that my machine quilting themed linky party is ending, I want to encourage you to check out Free Motion Mavericks, cohosted by Muv and Andree on Thursdays.  Whether you're on a domestic machine or a long arm, quilting with rulers or working on freehand designs, all of that is welcome at Free Motion Mavericks.  I'll be linking up with them there when I do have machine quilting to share!

And now, without further ado, here's your LAST CHANCE to link up with Long Arm Learning!  I can't wait to see what you've all been up to this week!


You are invited to the Inlinkz link party!

Click here to enter

Tuesday, October 6, 2020

LAL#10: Creating a Manual "No Sew Zone" for Appliqué in a Hand-Guided Pantograph Design

 Good morning, my lovelies!  Welcome to another episode of Long Arm Learning, where the focus is on honing our machine quilting skills, regardless of what kind of machine you're using.

As for myself, although I spent much of the week mired in English paper piecing of another baby quilt top, I did finally get around the impasse of procrastination and got about 2/3 of my Modern Baby Clam Shells quilted yesterday.  The hardest part was starting; I really did not want to mess it up after spending so much time on the curved piecing and the appliqué.  I know a lot of quilters feel that way -- worried that they will "ruin" the quilt tops they worked so hard to piece, so they just never quilt them at all.  That's where the adage "finished is better than perfect" comes in handy.

Daisies Galore Pantograph, Quilted Around Butterfly Appliques 

In this case, I was nervous about whether or not my bright idea for quilting an edge-to-edge pantograph design WITHOUT quilting on top of my butterfly appliqués was going to work out.  I got the idea from how, in a computerized long arm quilting setup, you can program No Sew Zones in embroidered or appliquéd areas and tell the computer to sew an allover design everywhere else EXCEPT the area you've masked off.  The computer robotics package I've ordered for my machine won't be shipping until the end of the month, and this quilt needed to get done YESTERDAY.  

When quilting an edge-to-edge pantograph design with a hand-guided long arm machine setup, the quilter is at the back of the table, guiding a laser light along a printed paper pattern on a table that sits just below the quilt surface.  To do this successfully, you have to keep your eyes on the paper pattern just ahead of your laser light, kind of like how you have to keep your eyes on the road while driving to avoid ending up in a ditch.  You can't actually look at your quilt at all while you're quilting -- which means I can't see when I'm coming up to one of my butterflies that I don't want to cross over with quilting stitches.

Extra Fabric Butterfly Taped In Position on Pantograph Plastic

My idea was to create my own equivalent of a No Sew Zone on the pantograph pattern so I could stop the machine, move around to the front of the frame, stitch in the ditch around the appliqué  and then resume quilting the pantograph design from the back.  I positioned the butterfly by moving my needle to points on the edges of the applique on the quilt surface and nudging the butterfly into position on the pantograph shelf so that the butterfly on top of my pantograph plastic was positioned as closely as possible to the butterfly on the actual quilt top.  Then I stuck a couple pieces of Scotch tape to the edges of my spare butterfly to ensure it stayed put while I quilted that row.


I altered the stitching path a little to go around one wing and marked where I wanted to stop when I was approaching the edge of the butterfly.  I knew that my positioning of the butterfly on the template plastic was as good as I could get it, but not as exact as it would be if I was marking its location with a computer from the front of the quilt frame.  I also knew that fabric shifts as it draws up during quilting, so I was nervous about whether the edges of my butterfly would be in the same place by the time I reached them in my stitching path.  The last thing I wanted to do was accidentally stitch up over the edge of the butterfly.  My palms were sweating quite a bit when I began quilting that first row!

One Butterfly Down, Two to Go!

It worked!  It really helps that this pantograph is such an easy pattern.  I was able to stop quilting from the back about a centimeter or so away from the butterfly and then scootch right up to the edge of it from the front without any noticeable deviation from the pattern.  Whew!

I am using a new hopping foot and a new ruler for the first time with this quilt, too:

APQS Clog Foot with White Arbor Lotus Ruler for Appliqué SID

This APQS "clog foot" is a true 1/4" ruler foot with an open toe for greater visibility.  That made it the perfect choice for quilting "in the ditch" around my applique, especially because I was able to use my Lotus Lines Appliqué Aid ruler from Bethanne Nemesh's Garden Lines collection.  This ruler has a hopping foot "entrapment" -- so I can slide the ruler on over the ankle of the hopping foot and it locks onto my hopping foot, allowing me to guide the needle very precisely with my left hand by dragging the ruler along the edge of the appliqué   It's like having the control of holding onto the hopping foot itself, but without risking the emergency room visit!  LOVED how this ruler worked and I'm looking forward to using it for the other appliqué WIPs in my to-be-quilted pipeline.

Using Bethanne Nemesh's Lotus Ruler to SID Applique

So...  The verdict?  This is definitely doable, but fussing around to position the spare butterfly just right on the pantograph and stopping to SID around the butterfly from the front definitely slowed down the process of pantograph quilting.  If I wasn't taking pains to quilt around the butterflies, I'd have finished the whole quilt today instead of getting 2/3 of the way through.  If you're quilting as a business and thinking about doing this on a customer's quilt, you'll want to factor in an upcharge for the extra time involved.


If you wanted to use this technique on an area of machine embroidery or regular applique (not broderie perse like mine, where I was able to just cut out extra motifs from the applique fabric), I think the easiest method would be to photocopy the areas of the quilt top with the embroidery or applique designs (making sure your copier was set to Actual Size, 100%) and then cut out the photocopied motifs to position on your pantograph table.  I do like the effect for this quilt.  After I finish the pantograph quilting, I'm going to want to go back and add some very minimal quilting inside each butterfly appliqué as well, to prevent it from sagging.  Still mulling the possibilities for that "icing on the cake."

My weekly Tuesday To-Do list for Roseanne's linky party is to finish quilting this quilt, AND get it labeled and bound, AND get my Letter Home baby quilt top finished and ready to load on my frame.  Wish me luck!  I'm also linking up with:  Midweek Makers at Quilt FabricationWednesday Wait Loss at The Inquiring QuilterNeedle and Thread Thursday at My Quilt Infatuation, and  Free Motion Mavericks with Muv and Andree.

And now, without further ado -- it's time to link up YOUR latest adventures in machine quilting!  I can't wait to see what you've been up to.


You are invited to the Inlinkz link party!

Click here to enter