Showing posts with label Baby GIfts. Show all posts

Thursday, March 4, 2021

Party At My House, Y'All! C'Mon and Link Up your TGIFF Finishes!

Hello and HAPPY FRIDAY, everyone!  If you've come looking for the Thank Goodness It's FINISHED Friday Linky Party, welcome -- you're in the right place.  I'm delighted to be hosting this week's finish party.  

I'm so excited to share my finish this week.  I know I say this a lot, but I found another new favorite edge-to-edge quilting design that I am crushing on this week: 

37 x 37 HST Baby Quilt with Echo Bubble Meander E2E

This 37" x 37" quilt top was pieced by a fellow member of the Charlotte Quilters' Guild for our Outreach Committee, and it will be donated to one of the NICUs at our local hospitals.  When I was first given this top for quilting, I considered custom quilting it with individual motifs in each of the white triangle units.  However, once I had the quilt top in my studio and was thinking about where this quilt was headed and it's job of comforting and encouraging a tiny, fragile baby and his worried parents, custom quilting just seemed too formal and too stiff -- literally too stiff, potentially, if it was heavily custom quilting, but too rigid psychologically as well.  I wanted this quilt to be soft and cuddly, playful and fun.   And then I found this Echo Bubble Meander E2E (Edge-to-Edge) quilting design by Joyce Lundrigan of Methodist Hill Quilt Studio, and knew it would be perfect to bring positive energy and love to the family who receives it.

Monday, December 28, 2020

More Square Drama for a NICU Cuddle Quilt

 Good Monday morning!  

More Square Drama E2E on a 39 x 42 Baby Quilt

I quilted a new E2E design yesterday on a 39" x 42" outreach top that was pieced by a fellow member of the Charlotte Quilters Guild.  Kind of fun, don't you think?  The digital design is called More Square Drama from Wasatch Quilting and it's dense but not thready because there's no backstitching.  I see marshmallows, or melting ice cubes, or roses, or Flintstone wheels, or fried eggs...  

Sunday, December 20, 2020

Someone Pinch Me! My Mission Impossible Quilt was Juried Into QuiltCon Together 2021!

You guys, I got the acceptance email two days ago, but I couldn't tell anyone about it at first because it seemed so unreal.  I had to go to bed, wake up in the morning, and check my email again to make sure it was still there.  My Mission Impossible quilt was accepted by the jurists into QuiltCon Together 2021!

Just a Glimpse of My Mission Impossible Quilt

This quilt is my original design, made for my oldest son's high school graduation in 2019 and sized to fit his XL Twin dorm bed when he went off to college.  I was definitely NOT thinking that I was making a show quilt when I started...  I'm just sharing a glimpse of it in today's post so as not to spoil the fun for those who want to see all of the quilts for the first time when the virtual show rolls around in February.  (If you're someone who can't wait, you can scroll back through all of my posts about this quilt by clicking here).  I loved the design when I created it in my EQ8 software, and I loved it more and more as I brought the concept to life in fabric and thread.  The idea of entering the quilt into QuiltCon 2020 snuck quietly into my mind while I was quilting it, but if I'd entered it in 2020 and it had been accepted, I would have had to take the quilt away from my son to send it off to the show.  That wasn't going to happen -- this mama wanted her quilt to be wrapped around her 6' tall "little boy" in his dorm room far from home.

But then the pandemic happened and The Modern Quilt Guild announced that in 2021 they would be hosting a virtual version of the show online, QuiltCon Together.  I checked the rules for entry: The quilt must have been made in 2018, 2019, or 2020.  Check!  I was glad to see that, in the unlikely event that my quilt was chosen to be in the show, I would NOT have to send the actual quilt away, since the event is online only.  Good!  That means the quilt can stay with my son!  To enter, I needed to send in 5 pictures of the quilt, including one straight-on shot of the entire front of the quilt, one straight-on shot of the back of the quilt, one shot of the binding, and two detail shots.  Hmmm...  I had not taken all of those shots when I photographed the quilt upon completion.  So my husband and I drove up to Boone a couple of months ago and I borrowed the quilt back from Lars, hoping it was still presentable after spending a year in his college dorm... Whew!  Bless his heart, my son knows how to take good care of a quilt, and it looks just like it did the day I gave it to him.  No rips, stains etc.  It didn't even stink.  Hah!

So we took the photos, put the quilt right back on his dorm bed, and I submitted the pictures with my entry form.  I felt a little silly writing an "Artist's Statement" about my quilt, because I'm not really an artist, am I?  Looking at my close-up photos of the quilt, I see all the things we quilter's always see when we examine and critique our own work: Oh no, THAT's not perfect!  Neither is THAT!  If only I'd done a better job with this bit or with that bit...


This is my first time entering ANY kind of quilt show, let alone a major show like QuiltCon that draws entrants and visitors from all around the world.  I didn't even enter a quilt in my own local guild's show in 2020 -- because I didn't have any finished quilts to enter that I hadn't already given away.  Considering the calibre of work I've seen in QuiltCon in years past -- and the amazing quilts that have not been accepted (check out #QuiltConRejects on Instagram to see what I mean), I'm not expecting a ribbon or anything.  Just knowing that my quilt was deemed worthy of inclusion by the jurists is extremely validating.  I'm also going to get feedback from the judges, I think, and I'm looking forward to that, too.  I wonder if they will mention the same shortcomings that I see when I scrutinize my quilt, or if there are other opportunities for improvement that I'm not even aware of?  Regardless, I am on Cloud Nine!  

One last bit of happiness to share: I got this picture from the recipient of my most recent quilt finish:


LOVE LOVE LOVE LOVE LOVE!!!

My heart is full, my cup runneth over, and I haven't even opened any Christmas presents yet!  As for my personal quilting To-Do list this week, I'll be continuing to work on those Disappearing 9-Patch Christmas blocks in between baking cookies and wrapping the last-minute packages that have yet to arrive on my doorstep.  Wishing all of my friends and fellow quilters a blessed holiday season and a happy new year!

I'm linking up today's post with the following linky parties:

MONDAY

Design Wall Monday at Small Quilts and Doll Quilts  

Monday Making at Love Laugh Quilt

TUESDAY

To-Do Tuesday at Home Sewn By Us

WEDNESDAY

Midweek Makers at Quilt Fabrication

Wednesday Wait Loss at The Inquiring Quilter

THURSDAY

Needle and Thread Thursday at My Quilt Infatuation  

Free Motion Mavericks with Muv and Andree

FRIDAY

Whoop Whoop Fridays at Confessions of a Fabric Addict

Peacock Party at Wendy’s Quilts and More

Finished Or Not Friday at Alycia Quilts

Off the Wall Friday at Nina Marie Sayre

 TGIFF Thank Goodness It’s Finished Friday, rotates, schedule found here: TGIF Friday

Friday, December 18, 2020

Study In Softness: Marybeth's Flannel-Backed Baby Quilt

I just finished quilting this sweet and snuggly-soft baby quilt for my friend Marybeth.  Her #1 priority was keeping the quilting light enough so the quilt would be as soft as possible for tucking around a little one in a stroller.  Isn't it sweet?

Marybeth's Snuggly-Soft Baby Quilt

We chose the pantograph Gingersnap from Urban Elementz and I adjusted the pattern density in my IntelliQuilter to where the scale of the double circles complemented the scale of Marybeth's pieced squares and HSTs.  The thread is Glide in a pale blue color called Cloud.  

Gingersnap Pantograph from Urban Elementz, 8" Row Height

Here's what this sweet 32" x 39" top looked like prior to quilting:

32 x 39 Top Prior to Quilting

And here it is, fresh off the frame:

Fresh Off the Frame

I just love how a quilt top comes to life through the texture of the quilting stitches, don't you?  Gingersnap is a versatile quilting design that complements so many different aesthetics.  The soft curves, loops, and "double bubbles" add are an excellent counterpoint to straight piecing lines, and it would be impossible to quilt a design like this with such smooth, consistently round circles without the assistance of R2D2 (my computerized machine).  Gingersnap allows the fabric prints to shine without overpowering them.  Marybeth chose such cute fabrics, too, especially that whimsical navy print with fairies, unicorns, bunny rabbits, and little mushroom houses, and the gray print that looks like gently falling snow against a wintry sky.

Backing is a Super-Soft Flannel

The backing is a velvety-soft flannel with little duckies that quilted up beautifully.  I love how quilting stitches sink into even the slightest pile fabric as if the design were carved or embossed.

Thanks for choosing me to quilt this for you, Marybeth!

PSST!!  I'd Love to Quilt for YOU!

By the way, if you or any of your quilty friends has a quilt top or two that needs quilting, I'd be delighted to quilt for you!  My turnaround for edge-to-edge quilting is currently running about 2 weeks, and you can click here to find out how to book your quilt with me.

I'm linking today's post with the following linky parties:

FRIDAY

Whoop Whoop Fridays at Confessions of a Fabric Addict

Peacock Party at Wendy’s Quilts and More

Finished Or Not Friday at Alycia Quilts

Off the Wall Friday at Nina Marie Sayre

 TGIFF Thank Goodness It’s Finished Friday, rotates, schedule found here: TGIF Friday

SUNDAY

Frédérique at Quilting Patchwork Appliqué

Tuesday, November 10, 2020

Monogram Baby Quilt Finish + IntelliQuilter Computer Robotics Installation

C is for Charlie, 42 x 42 prior to washing

First Big News: A Quilt Finish!

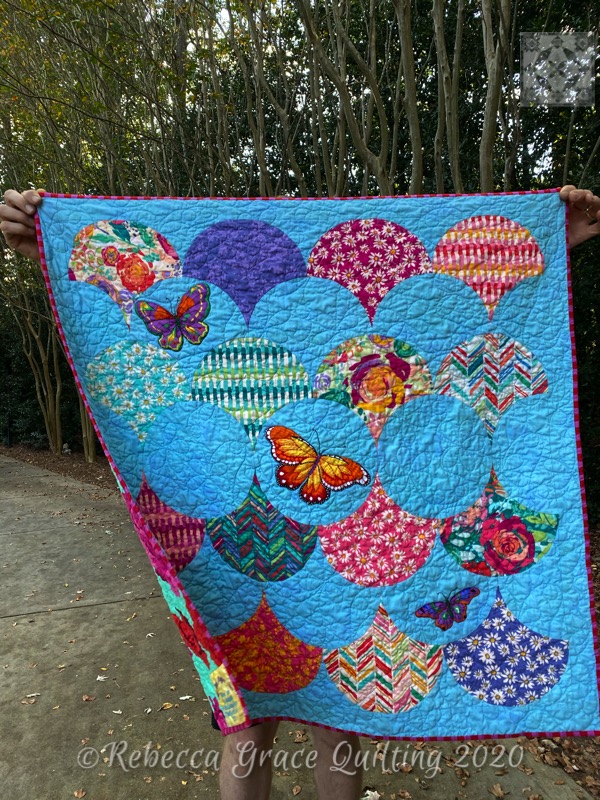
My AQS Letter Home QAL (resized, recolored, and with EPP monogram block added) is finished!  I wrapped it up last night, carefully packed it in a box along with big sister Margot's butterfly/clam shell quilt, and Bernie just entrusted the package to the safekeeping of UPS for its journey to New Mexico.  Godspeed, little quilts!  May you arrive safely and be literally loved to pieces!


Letter Home Monogram Baby, Quilting Completed

I ended up really liking how the the custom quilting came out with the Superior Fantastico variegated thread in shades of pale green.  All of the quilting is hand guided free motion or ruler work and SID.  For that center monogram block that was English paper pieced, my seam allowances are pressed open rather than to one side, so instead of quilting in the actual ditch where I would have risked piercing the piecing thread and breaking the seam, I shifted my quilting slightly inside the seam line onto the green fabric instead.

Letter Home Monogram Baby Quilt Trimmed

The larger-scale meandering against that white background fabric reminded me of jumbo marshmallows and Caspar the Friendly Ghost as I was quilting it.  ðŸ‘»

Applying Binding with my Bernina 475QE

My 750QE started throwing tantrums in the middle of embroidering Charlie's quilt label, and I skipped her annual Spa Visit last year, so I dropped her off at the Bernina dealer for a good cleaning and servicing.  I love having my 475QE as a backup machine that can do everything the 750 does except for embroidery, using all the same feet and bobbins, with all of the features I'm used to on the big machine.  

Should Have Done Machine Binding...

My IntelliQuilter had already arrived by the time I got to the binding stage of Charlie's quilt, making me REALLY wish I'd gone with a machine binding so I'd be done with it already!  I wanted these two baby quilts to be finished and out the door so I could focus on the new computerized quilting system!  It took me two days, probably somewhere between 4-6 hours total, to hand stitch the binding on this 42" x 42" baby quilt, and that does not include the time it took to cut the strips, join them, press the strip in half, machine stitch it to the front of the quilt, and join the ends of the binding.

Hand Stitching is 3/4 of the Way Completed after 4 Hours

C is for Charlie After Washing, 39 x 39

Here's what "C is for Charlie" looked like after washing and drying (above).  The quilt was SO much softer after washing out all of the starch!  This quilt started out at 42" x 42" just like Margot's quilt, has roughly the same quilting density, and the same 80/20 batting.  However, Margot's quilt was made with unwashed fabrics and all of Charlie's fabrics were prewashed in "Very Warm" water to shrink them ahead of time.  Margot's quilt finished at 38" x 38" after washing, for a shrinkage rate of roughly 10%, whereas Charlie's quilt finished at 39" x 39" for a shrinkage rate of approximately 7%.  

My Binding Looks Ruched After Washing!

The biggest post-laundering surprise with Charlie's quilt is how my binding appears to be ruched after washing it!  Apparently I did an excellent job of getting all the shrinkage out of the binding fabric prior to cutting the strips, so the binding stayed the same size even though the quilt it was attached to still had some shrinking to do.  I need to remember this, because it would be interesting to recreate this effect deliberately with some projects -- but I think that next time I make a quilt with a cotton or a cotton blend batting, I'll use UNwashed fabric for the binding regardless of whether or not the fabrics in the quilt top were prewashed.  The ripply-textured binding is fun on a baby quilt for little fingers to explore, but on most quilts I'd prefer a flat, smooth binding and allowing the binding to shrink in the wash along with the batting would minimize the rippled effect.  

THIS Arrived on Wednesday!!!  FINALLY!

Second Big News: The IntelliQuilter System Arrived!

Oh my gosh, you guys -- I ordered my IntelliQuilter computer robotics for my APQS Millennium long arm machine at the end of August, and it finally arrived last week.  My husband installed motors and tablet for me on Thursday.

My In-House Tech Guy, Working on My IntelliQuilter Installation

Thursday is the day I was having trouble embroidering my quilt label and taking my 750QE in for service, and when I got back from the Bernina dealer I wanted to get my label stitched to my quilt and get the binding sewn to the front of the quilt, so I didn't get a chance to run the software tests on the IntelliQuilter system until Friday.  Bernie did a fantastic job with his installation so the X and Y motor engagement strengths, calibration, and drift tests went perfectly the first time without requiring any additional adjustment to the motor positioning.  Whew!

My Robot!  THIS is the Droid I Have Been Looking For!

Doesn't Millie look like a robot now?  The 12" tablet is her face and the machine handles look like arms.  The IntelliQuilter makes cute little beeping noises that remind me of R2D2 from Star Wars, but my teenaged sons tell me she sounds "like an evil alien space ship that decides the human crew is expendable."  ðŸ˜’

IQ's X and Y Motors Mounted to Machine Carriage

Besides the tablet that mounts to the front of my machine head, the only other hardware to the IQ system are the two motors that drive the machine on the X and Y axis.  One motor rides along the machine's carriage to control vertical movement of the machine, and the other motor rides along the edge of my frame to control horizontal movement.  No belts or pulleys and no giant computer hanging off the end of my frame.  It's very streamlined, and the motors engage and disengage with the touch of a single button on the tablet so it's easy to switch back and forth between manual, hand guided quilting and computerized work.  Very cool.

Friday was the last day of the big semi-annual 25% off sale at Urban Elementz, a site that sells thousands of fabulous digital quilting designs that I can use now that my long arm is computerized, so I spent a good deal of time (and money!) stocking up on a variety of edge-to-edge, block, sashing, and border designs that I am SUPER EXCITED to start playing with.  On Saturday, I figured out how to upload my installation logs to IQ's Support page, the final step in the self-installation instructions, and then I spent some time downloading all the digital designs I'd purchased, transferring them to my IQ tablet, and organizing them all in Evernotes on my iPad/Mac computer so I can pull up all of my E2E feather designs, or all the designs with florals, or all of the geometrics, etc and find what I want quickly.  I still need to do that for the designs that came preloaded with my IQ system.  I stepped away from the IQ for all of Sunday, since it was Bernie's birthday and we had Important Birthday Things to do with our Important Birthday Boy.  I got a lot of hand stitching done on that binding while "watching" football with Bernie on Sunday.  Yesterday I finished the binding, washed the quilt, took the photos, and wrapped everything up for shipping...  And here we are again on Tuesday!

Tuesday's Weekly Goals

My two goals last week were to finish Charlie's quilt and to install my IQ system, both of which are completed.  Here's what I'm hoping to accomplish this week:

  • Back to Anders' Nanu Nanu quilt!  This is the next block to be foundation paper pieced (on my 475QE, since Big 'Nina 750QE is away at the Bernina spa):

Next 15 inch Block for Nanu Nanu!


My Queen Nanu Nanu! Sampler (Adapted from Moda Modern Quilt Blocks)

  • A little bit of Secret Sewing that also involves paper piecing, to be revealed at a later date
  • Continue learning my new IntelliQuilter system.  I need to rethread the machine, incorporating the new IQ thread break sensor wheel, and play around in manual mode to readjust my tensions to accommodate for the additional "pull" on the top thread from the altered thread path of IQ.  I also want to experiment with different speed settings for IQ and the APQS machine, since they work together to determine stitch length rather than using the stitch regulator built into my APQS machine.  
  • Once I've got nice, pretty stitches on both sides of my quilt sandwich, I want to go back through the hands-on IQ lessons provided by my dealer, Angela Huffman of Quilted Joy.  I went through all 6 hours of training videos while I was waiting for my IQ system to ship and found them extremely helpful for learning the interface and the various tools available within the software, but now I want to cement that knowledge by following along with my machine for each of the exercises.  Angela's excellent video classes cover all the basics for setting up and stitching out E2E/pantograph (edge-to-edge) designs as well as custom quilting blocks, borders and sashings, and I love how she filmed the classes in 10-minute segments so it's easy to find the bit you want to review quickly without having to rewatch or fast-forward through an hour-long class when you need a refresher.

That should be plenty to keep me busy this week, don't you think?  Considering that I also need to start planning and shopping (and baking and freezing) for Thanksgiving...

I'm linking up today's post with the following linky parties:

TUESDAY

·       To-Do Tuesday at Home Sewn By Us

WEDNESDAY

·       Midweek Makers at Quilt Fabrication

·       Wednesday Wait Loss at The Inquiring Quilter

THURSDAY

·       Needle and Thread Thursday at My Quilt Infatuation  

·       Put Your Foot Down at For the Love of Geese

·       Free Motion Mavericks with Muv and Andree

FRIDAY

·       Whoop Whoop Fridays at Confessions of a Fabric Addict

·       Peacock Party at Wendy’s Quilts and More

·       Finished Or Not Friday at Alycia Quilts

·       Off the Wall Friday at Nina Marie Sayre

·       TGIFF Thank Goodness It’s Finished Friday, rotates, schedule found here: http://tgiffriday.blogspot.ca/p/hosting-tgiff.html

Tuesday, November 3, 2020

Goal Posts for November: The IntelliQuilter is Coming!!

Good morning!  It's Election Day in the United States, but we've already voted early so there's nothing to do about that except wait and see what happens...  With civic duties already completed and no further power to affect the election outcome, I may as well shift my focus to what I CAN control: Quilting goals for the week and for the fresh, crisp month of November!

This Week's Goals:

Letter Home Monogram Baby Quilt Nearly Quilted

1. I'm still working on finishing up the last of my October goals, my Letter Home Monogram baby quilt.  I've finished quilting another row since the photo above; just didn't get a picture when I left the machine for the night.  This would have been finished yesterday, had I not spent THREE HOURS on the phone with Apple Tech Support yesterday afternoon, attempting to resolve the Mystery of Why My iPad Can't Install an iOS Update Without a Factory Reset...  Anyway, with just a couple more hours of quilting today, then trimming, labeling, and binding, this little quilt will be ready to ship off to the one-month-old baby for whom it's intended.  

Look What's Coming TOMORROW!!!!!!!!!!

2. OH MY GOSH, you guys -- today is Quilter's Christmas Eve at my house, because FINALLY after waiting for over two months since I placed the order, I have a tracking number for my IntelliQuilter computer robotics system that has been put on a truck in Ohio and is cruising down the highway, headed straight to ME!  According to the tracking number, it should arrive by noon tomorrow.  We'll be self-installing the system, so that's my second goal for this week: Installing, adjusting, fine-tuning and testing the new computer robotics system for my APQS Millennium machine.


One Monthly Goal for November

Getting comfortable with the new iQ system is my OMG for November.  I've already gone through all six hours of training videos that my dealer provided, but once I have my system installed I'll want to go back through those lessons hands-on and work through the exercises with my machine.  I'll be quilting up some practice e2e/computerized pantograph designs and playing with the density and scale as well as experimenting with some computerized custom quilting.  Woo-hoo!  

I'm linking up today's post with:

TUESDAY

·       To-Do Tuesday at Home Sewn By Us

·       One Monthly Goal at Elm Street Quilts

WEDNESDAY

·       Midweek Makers at Quilt Fabrication

·       Wednesday Wait Loss at The Inquiring Quilter

THURSDAY

·       Needle and Thread Thursday at My Quilt Infatuation  

·       Put Your Foot Down at For the Love of Geese

·       Free Motion Mavericks with Muv and Andree

Saturday, October 31, 2020

Goodbye, October 2020! Baby Quilt Update (and Happy Halloween)

 Well, October is officially a wrap.  The trick-or-treaters have gone home and my husband, younger son, and I have set ourselves to the task of finishing off the leftover candy.  I've powered off my long arm machine for the night, even though I'm only 2/5 of the way through quilting the baby quilt that was supposed to be Part Two of my One Monthly Goal for October.  Here's what Charlie's quilt looks like so far:

My Letter Home Monogram Baby Quilt is 2/5 Quilted

I loaded this quilt on my frame upside-down, so I'm actually quilting it from the bottom up.  There are five rows of 8" blocks in this quilt and the first row took me awhile because I only had a fuzzy idea about how I was going to quilt this one.  I wanted to keep the quilting fairly light and open, similar to the density of the pantograph design I quilted on my October OMG Part One quilt (below), but this baby brother quilt is getting SID, light ruler work, and a little bit of free motion rather than E2E pantograph quilting.  

Big Sister's Quilt, Aiming for Similar Quilting Density in Baby Brother's Quilt

I don't normally quilt such a large scale meander freehand, though, so keeping the size of that pattern big and somewhat uniform is challenging, and I'm also reminding myself that LARGE quilt blocks with LONG ruler lines to quilt are a lot harder than quilting the exact same designs on smaller blocks.  So my "quick and easy" quilting plan has evolved to require a bit of marking, which is helping to keep lines straighter and more evenly spaced.

Doubting Design Choices After the First Row

One thing that slowed me down was that, since we took the machine head off the frame to install the interchangeable hopping foot upgrade, my horizontal channel lock hadn't been holding as securely as it had previously.  I use my horizontal and vertical channel locks to keep my seams straight and square as I'm quilting, and this was bugging me, so there was an interruption of troubleshooting that yesterday with Bernie and the folks at APQS Tech Support (One little washer was all it took to snug that wheel back up to the carriage and correct the problem).  But, while I had Bernie and Anders available, I had them lower my frame about 3 1/2" so I could quilt from the front of the machine more comfortably.  I'd been wearing high heel platform sandals the day before, since we'd raised my frame a few inches for quilting pantographs from the back side of the machine.  We also moved my laser light from the back of the machine to the front, where it will be more useful to me once my IntelliQuilter gets installed.  But I digress.  Back to the quilt at hand:

40 wt Fantastico in #5007 Wales (Lime, Bright Green, Turquoise, Green Variegated)

I selected a cone of Superior Thread's Fantastico variegated 40 weight trilobal polyester thread in shades of Lime, Bright Green, Turquoise and Green, which I auditioned against the Kona Bone background as well as on the Indigo and the green fabrics.  I wanted to use one thread color throughout to "keep it simple," but knew that a white or off-white background thread might look really harsh against the dark blue.  I was excited about the variegated thread until I started quilting with it, and then I second-guessed myself midway through the first row.  

Superior's Fantastico Thread in #5007 Wales

I was tempted to start ripping out all the quilting I'd done so far, because I felt like the quilting was just screaming at me instead of playing a supportive role to the piecing design...  But the next day, when I came back to it, I reminded myself of my self-imposed deadline and how I wanted most of all to have this finished, so I soldiered on.  And, you know what?  I'm glad I kept going rather than reaching for my seam ripper, because the more I got quilted, the more the thread began to grow on me.

By the End of the Second Row, My Thread Felt Like the Right Choice

This is a good reminder to TAKE A STEP BACK before making rash decisions involving seam rippers!  With my face 8" away from the quilt surface, the green pastel threads seemed like they were too loud and fighting with the quilt, but from a distance it's much more subtle.  If I'd ripped out all the variegated thread and switched to yellow, green, navy and white, not only would I have slowed myself down considerably, but the quilting designs would have disappeared into the fabrics more -- and I might have been disappointed that I couldn't see my quilting designs well enough!  Knowing how the quilt will soften and smoosh and crinkle once it's finished and washed for the first time, I think this thread will be just fine.

So now my only question is whether those giant green 8" HSTs have enough quilting in them.  I mean, I know they have enough quilting to meet the requirements of the batting.  I kind of like the way they look right now, but maybe I'll come back and add something when everything else is finished.

Speaking of finished, I did finish the big sister's quilt, which you can read about here.  Here's a glimpse of how that one turned out, freshly washed and ready for gifting:

October OMG Part One Was Finished On Time!

That's it for me for tonight.  I'm going to eat too many Twix bars with my husband and son while we watch Saturday Night Live.  I just realized that this is probably the last Halloween that I'll have a kid at home with us, since Anders is a high school senior this year.  They don't come home from college for Halloween, so this will be an Empty Nester Holiday for us from now on.  So strange to think about that!  Okay, I lied.  I'm leaving you with one more picture, from my favorite Halloween in 2006 when the boys were 3 and 5 years old:

Halloween 2006: Anders is Batman, Bernie is Aquaman, and Lars is Spiderman


Anders is in the Batman costume on the left, Lars is Spiderman on the right, and my wonderful, amazing husband is wearing what is supposed to be an Aquaman costume.  I did not have an Aquaman pattern, so I made this costume from a Jalie men's figure skating costume pattern, out of green stretch velvet for the figure skating pants (more revealing in real life than they appear on TV during the Olympics) and an orange sequined lycra figure skating top, because the sequins were the closest thing I could come up with at JoAnn fabrics that looked like scales.  Bless his heart; he got more than a few catcalls from the neighbor ladies as he was out trick-or-treating with the kids, but my sons were SO HAPPY to be their own little Justice League with Daddy!

Happy Halloween, everyone!  I'm linking today's post with:

SATURDAY

·       UFO Busting at Tish in Wonderland

One Monthly Goal at  Elm Street Quilts

SUNDAY

·       Frédérique at Quilting Patchwork Appliqué

·       Oh Scrap! at Quilting Is More Fun Than Housework

·       Slow Stitching Sunday at Kathy's Quilts

MONDAY

·       Design Wall Monday at Small Quilts and Doll Quilts  

·       Monday Making at Love Laugh Quilt