Showing posts with label Charlotte Quilters Guild. Show all posts

Monday, October 2, 2023

Margaret Willingham's Reverse Appliqué Workshop, Charlotte Quilters' Guild + My Deco Quilt Progress

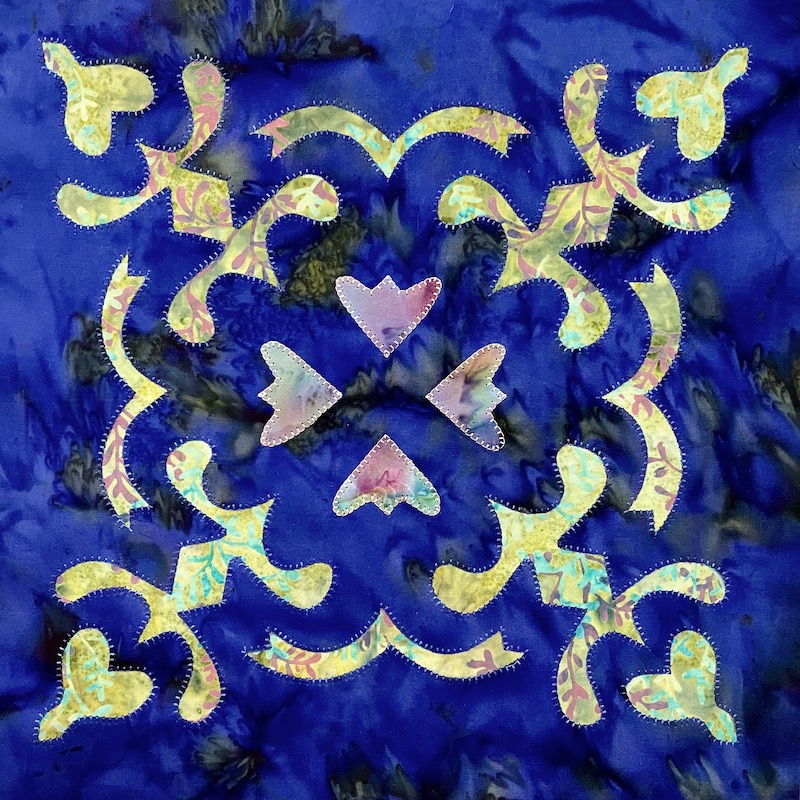
Happy Fall, Quilters!  Guess what -- I took an actual, in-person workshop with the Charlotte Quilters' Guild last month AND I finished my workshop block after I got home!  I'm so proud of myself for 1. Taking a day off, 2. Trying something new, 3. FOLLOWING DIRECTIONS during the workshop 😬, and then 4. Adapting what I learned in class to suit my personal preferences once I got home to my own studio.  

My 12 x 12 Block from Margaret Willingham's Reverse Appliqué Workshop


I'll tell you more about the workshop in a minute.  First, I have other news to share -- I've made some progress and gotten over the Cutting and Kitting Hurdle with my Deco Quilt that has been in-progress/abandoned for the past two years!  Well, better late than never.  I am supremely pleased with my clear plastic tote bag containing all of the pieces for all of the blocks, neatly organized and labeled in little Ziplock bags.  Our guild has lots of social sewing opportunities throughout the month and, as President of the guild, I try to attend as many of them as possible.  Having a project packed up and ready to go (versus strewn around my studio!) is my biggest challenge, but now I'll just be able to grab a Ziplock bag of block pieces and wheel my travel machine out the back door.  I have a feeling this project is about to pick up STEAM!

My Deco Quilt Completely Cut Out and Kitted, Block One Variations In Progress

Now that I've finished ALL of the cutting for my Deco Quilt, I am officially caught up with Week Two of the Deco QAL (Quilt-Along) that I committed to in the Fall of 2021!  😂. Week Two was cutting out all of the fabric pieces for the entire quilt.  I am like that last straggling marathon runner who crosses the place where the finish line used to be, two years after the race has ended...  Not only am I caught up with Week Two, but I'm also about a third of the way through with Week Three of the Deco QAL, which is the week where you piece all of the Block One log cabin variations.  All 16 blue/green log cabin blocks are finished and all 12 of the half blocks in both colorways are finished and I have 32 blue/purple log cabin blocks remaining to be sewn. The cutting for this quilt was monotonous, but the actual sewing is pretty easy.  I think that completely finishing this quilt top was supposed to be my OMG (One Monthly Goal) for November of 2021; maybe I can get it finished by November of 2023 instead!

Sunday, May 7, 2023

Quilt Finishes for Mike, Kim, Jane, and Carrie + Halo Progress

Happy Sunday and Happy Spring!  I have four clients' quilts to share with you today and then I'll wrap up with a couple photos of how my Jen Kingwell Halo Quilt is coming along.  Lots of ground to cover and I know you're all here for the eye candy anyway, so I'll try to keep my comments brief!

Mike's Thank-You Quilt: Cherrywood 9-Patch with Amoeba Quilting

Detail of Amoeba Quilting on Cherrywood 9-Patch Quilt

This first quilt I'm sharing began as a very traditional pieced top that was donated to our guild from the estate of a former guild member.  The quilt top and backing are all Cherrywood hand dyed fabrics, with a suede-like look and rich but muted colors (this post contains affiliate links).  The Cherrywood hand-dyed fabrics are fabulous; I've heard of this line but never worked with them before.  I love how understated they are, and the quilt top reminded me of Amish quilts.  I could have played that up by quilting a traditional feather design in an inconspicuous blending thread.

However...  I was asked to quilt this top so that it can be gifted to Mike, the young man who sets up the room for our monthly meetings at the Tyvola Senior Center and stays late on the first Wednesday each month for our meetings.  Mike doesn't give off an Amish vibe!  Given free reign, I choose Karlee Porter's Amoeba edge-to-edge quilting to inject some youthful, modern energy into this quilt.  I love it and I hope Mike will enjoy it, too!

60 x 60 Cherrywood Quilt for Mike

Not sure what batting is in this quilt as it was provided to me along with the quilt top.  I used King Tut 40 wt variegated cotton thread in Saint George for this quilt, with shades of caramel and rusty coral that were perfectly matched to the Cherrywood fabrics and the matte luster of cotton that I am loving lately.


Monday, April 24, 2023

Halo Blocks, Quilty Hearts for Olivia, and Quilty Friends Who Lead Us Into (NewFO) Temptation

Hey there, quilty peeps!  In the ten days since I last posted about this project, I have completed exactly FOUR more Halo quilt blocks.  Don't let my slow progress discourage you from attempting this pattern, though -- I've also quilted three pretty intense quilts for clients, prepared music and sang at a funeral, and drove up to the mountains to visit my son in the past 10 days.  I am fitting these blocks in here and there when I have time, not at all chained to the sewing machine for hours at a time.  You can read more about this project and find links to the Jen Kingwell pattern, templates, and other must-haves for making this quilt in my previous post here.

My Latest Favorite Halo Block


Since this quilt will be a gift for my mother-in-law, I'm thinking about her favorite colors (light pink, medium pink, and hot pink!) as I'm picking out the fabrics for each block.  Looking at the ten blocks I've finished so far on my design wall, I don't know if there's ENOUGH pink?  😂

10 Halo Blocks Down, 26 Blocks (Plus Border Blocks) to Go

One thing that really helped me make some progress was packing up my machine and prepped block pieces and taking the project "on the road" to the Charlotte Quilters Guild's monthly Sit & Sew.  

Monday, February 27, 2023

Jane's Floating Triangles + Charlotte QUILT SHOW This Weekend!

Good morning, my quilty-loves!  Since many of you may be experiencing Modern Quilts Withdrawal Syndrome now that QuiltCon has wrapped up, I thought I'd share Jane's Floating Triangles quilt with you to make that modern quilting magic last a little longer.  Also, I just finished it a few days ago and I am so excited about how it turned out.

Jane's 43 x 55 Floating Triangles with Spiral 3A Quilting

I stitched Donna Kleinke's Spiral 3A design on Jane's quilt, a design we selected to play up the feeling that the pieced triangles are swirling around in constant motion.  I am always on the lookout for digital quilting designs like this one that are unusual and that can create a custom quilted look when paired with the right quilt top.  I am just delighted with how this turned out for Jane.  

Quilters Dream Bamboo/Silk/Cotton blend batting was used for this quilt (this post contains affiliate links).  I chose lightweight So Fine thread in Blizzard to ensure that areas of overstitching remain inconspicuous and to maintain the uninterrupted color of Jane's saturated Grunge fabrics (skinny threads tend to take on the color of the fabric, so the bright white So Fine thread appears to be orange, yellow or pink where it crosses over colored fabrics.  Thicker white thread would create more visibly white lines of stitching across those fabrics).

Spiral 3A Design Stitched in So Fine Thread, Color Blizzard

Thursday, February 16, 2023

Nanette's Brinton Hall Quilt + Charlotte Quilters Guild Happenings

Hello, Happy February, and Happy Belated Valentine's Day!  The quilt I'm sharing today was meticulously pieced by my client Nanette of Do It Right Quilter and you can read about her journey making Brinton Hall on her quilting blog here.  Check out the fabulous English paper pieced central portion of the quilt, featuring larger scale Asian floral print fabrics framed by hand stitched hexagons in glowing batik fabrics:

Detail of Baptist Fan Quilting on Nanette's Brinton Hall Quilt

The Brinton Hall Quilt is a pattern by Leigh Latimore that is based on an historic antique quilt made by Anna Brereton between 1803-1805.  Patterns for making the quilt were published in Quiltmania magazine issues #107 and #108 in 2015, and you can still purchase those back issues (either digital or print versions) from Quiltmania's web site here if you're interested in making your own version of Brinton Hall.  This is one of those quilts that can take on radically different personalities depending on the fabric prints and color palette selections.  Doesn't this look like a FUN project?  This is one of the chief dangers of professional long arm quilting -- I keep getting all of these gorgeous quilts from my clients and I think I wanna make THIS one and THIS one and THIS one..  😍

Nanette's 77 x 77 Brinton Hall Quilt with Baptist Fan Quilting

So, let's talk about the quilting!  

Friday, May 14, 2021

Spring Forth: One More Cuddle Quilt Ready for Outreach Drop-off This Weekend

Happy FRIDAY!!!  The Charlotte Quilters' Guild Outreach committee is doing a drop-off this weekend for charity quilts, and I managed to squeeze one more in for quilting so that I'll have three to turn in this month.  I took advantage of the opportunity to try out a new quilting design called Spring Forth.  It shows up really nicely on the pieced backing side of the quilt: 

Spring Forth E2E in Tabriz Orchid Glide Thread, Backing Side

I knew the quilting design wouldn't show well on the front of this heavily pieced quilt, and I didn't really want the quilting to stand out on the front of this one, so I tried to pick a design and thread color that would blend in and let the piecing shine.  Not every quilt is all about the quilting!

Tuesday, May 4, 2021

Spring Daffodils, Sunshine, and Abundant Feathers "for the Babies"

In addition to my personal quilting projects and the quilting I do for clients, I also quilt tops for our Charlotte Quilters' Guild's charity outreach program.  Our guild donates to the NICU and Pediatric wards at both the Atrium and Novant hospitals in Charlotte, in addition to the women's cancer units and veterans' hospice.  Many of our guild's members make donation quilts from start to finish, but others will bring in piles of pieced quilt tops for other members like me to quilt.  

The quilt I'm sharing today is one of nearly SIXTY quilt tops that were made and donated recently by a single person, a guild member's mother who is ninety years young.  Every morning she sits down at her vintage Singer sewing machine and sets to work on making "quilts for the babies and children in the hospital."  Just imagine how much love and compassion this one woman has sent out into the world over the decades of her lifetime, working one day and one stitch at a time!

39 x 39 Cuddle Quilt with Abundant Feathers E2E

The sunny color palette and daffodil print fabric are so cheerful, perfect for the Spring season.  

Thursday, April 15, 2021

Sesame Street Quilting With a Playful Floral Swirl E2E Design

Hello, hello, and happy Thursday!  Is it a "sunny day, sweeping the clouds away" where you live today?  If not, don't despair -- "I can tell you how to get, how to get to Sesame Street..."  

Seriously; by the time I finished quilting this one, I could NOT get the Sesame Street songs out of my head.  "C is for cookie, it's good enough for me. Cookie cookie cookie starts with C!"

4 inch Tumbler Quilt with Floral Swirl E2E Quilting Design

This is the second of two donation quilt tops that my mom pieced for me to quilt and donate to a local hospital pediatric patient, using the leftover Hibiscus Kona Solid background fabric from Lars's Mission Impossible graduation quilt (finished in 2019 and juried into QuiltCon Together 2021).  There was a ton of that Hibiscus purple fabric left over, and my mom kept me company in the studio while I was custom quilting Mission Impossible and she was using my AccuQuilt GO! cutter with the 4" tumbler die to cut up all of the leftover purple fabric into tumblers.  The print fabrics were pulled from my scrap bin and my stash, except for those fabulous Sesame Street prints -- I spotted those at a local quilt shop and they were a complete impulse buy.  I knew it would be great for The Charlotte Quilters Guild's Pediatric Outreach efforts.  

Thursday, March 4, 2021

Party At My House, Y'All! C'Mon and Link Up your TGIFF Finishes!

Hello and HAPPY FRIDAY, everyone!  If you've come looking for the Thank Goodness It's FINISHED Friday Linky Party, welcome -- you're in the right place.  I'm delighted to be hosting this week's finish party.  

I'm so excited to share my finish this week.  I know I say this a lot, but I found another new favorite edge-to-edge quilting design that I am crushing on this week: 

37 x 37 HST Baby Quilt with Echo Bubble Meander E2E

This 37" x 37" quilt top was pieced by a fellow member of the Charlotte Quilters' Guild for our Outreach Committee, and it will be donated to one of the NICUs at our local hospitals.  When I was first given this top for quilting, I considered custom quilting it with individual motifs in each of the white triangle units.  However, once I had the quilt top in my studio and was thinking about where this quilt was headed and it's job of comforting and encouraging a tiny, fragile baby and his worried parents, custom quilting just seemed too formal and too stiff -- literally too stiff, potentially, if it was heavily custom quilting, but too rigid psychologically as well.  I wanted this quilt to be soft and cuddly, playful and fun.   And then I found this Echo Bubble Meander E2E (Edge-to-Edge) quilting design by Joyce Lundrigan of Methodist Hill Quilt Studio, and knew it would be perfect to bring positive energy and love to the family who receives it.

Monday, December 28, 2020

More Square Drama for a NICU Cuddle Quilt

 Good Monday morning!  

More Square Drama E2E on a 39 x 42 Baby Quilt

I quilted a new E2E design yesterday on a 39" x 42" outreach top that was pieced by a fellow member of the Charlotte Quilters Guild.  Kind of fun, don't you think?  The digital design is called More Square Drama from Wasatch Quilting and it's dense but not thready because there's no backstitching.  I see marshmallows, or melting ice cubes, or roses, or Flintstone wheels, or fried eggs...  

Friday, September 18, 2020

Fresh Off the Frame: Patriotic Star Quilt with E2E Confetti Parade Quilting

I tried out one of my new pantographs yesterday on this veteran's outreach quilt, and I love how it came out!  This top was pieced by a fellow member of the Charlotte Quilters' Guild and I volunteered to do the quilting.

70 x 80 Veterans' Hospice Outreach Quilt, "Flirty Bubbles" Pantograph

Now, I know that some kind of star pattern would be the first choice for many quilters, but to me, that felt too matchy-matchy.  Instead, I chose the Flirty Bubbles pattern from Timeless Quilting, because this design reminds me of baloons, confetti and streamers filling the air during a parade to honor returning soldiers.  I used Glide thread in a creamy ivory color, top and bobbin, and I don't know what kind of batting they gave me except that it was SUPER linty and it had a scrim.


Operation Welcome Home Parade, June 1991

This was my first time using the Flirty Bubbles pantograph, and I'm really happy with how it turned out.  You wouldn't expect anything "flirty" or "bubbly" to be appropriate for a soldier's quilt, but that just goes to show how the name of a pattern can sometimes limit our imagination as far as which quilting designs "belong" on which quilts.  Clever names make it easier to remember the name of a great panto design when we see something we like, and that's why pattern designers rack their brains trying to come up with catchy and unique names for each of their designs.


How I Use Channel Locks To Maintain a Straight, Square Quilt with the Fully Floated Loading Method 

I did a full-float load with this quilt, as I do with almost all of my quilts.  That means that although the backing fabric is pinned to the belly bar at the front of my frame and to the takeup roller at the back of the frame, the batting and the quilt top are not attached to any rollers at all.  Instead, they "float" on the surface of the loaded backing and are basted in place along the perimeter each time I advance the quilt.  Now, I know some quilters recommend and prefer doing a partial float, where the quilt top is attached to the quilt top roller, and this is supposed to give one "better control" so the quilt will come out straight and square.  However, in my own experience (YMMV!) I have tried pinning quilt tops to the quilt top roller several times, and I felt like I had LESS control over what was happening with the quilt tops that I pinned and rolled up for a partial float load.  Especially with a top that has "personality," I just could not get a not-quite-perfectly-flat, not-quite-perfectly-square top to roll up evenly on that bar in the first place.  By doing a full float with that quilt top bar totally removed from my frame and out of my way, I have maximum visibility of the entire quilt top throughout the quilting process, and I have full access between the three layers of the quilt to double check that everything is smoothed nicely and situated properly with every advance of the quilt.  If you're a new long arm owner, definitely try both methods to see what works best for you.

"Full Float" Loading Method, Quilt Top Roller Removed From Frame

(Note that the batting I was given for this quilt was NOT quite wide enough!  Definitely "cut too close for comfort," pun intended!!)

So as you can see in the photo above, I maintain a straight, square quilt by ensuring that my vertical and horizontal seam lines are all perfectly straight each time I advance the quilt, before basting the sides and proceeding to quilt.  I am visually checking any seam that falls near my belly bar, where the needle of my machine cannot reach.  Then I use my machine's horizontal and vertical channel locks to check that the sides of the quilt, the vertical seams, and the horizontal seams between blocks are all positioned as straight as can be, and scootch those seams as needed.  I just hover my needle above a seam line, engage the channel lock, and then drift the machine head along the seam line without stitching.

Basting a Generous Block to Maintain Straight Seam Lines

On this particular quilt, I discovered some manageable but definitely unwanted fullness in the "Home of the Brave" text print block shown in the photo above.  After adjusting the seams above and below this block to be perfectly straight, I used big flower head pins to distribute the fullness evenly along the raw edge before basting the side of the quilt.  That ensures that my hopping foot doesn't "snowplow" the fullness as I'm basting down the side.  There is no risk of hitting a pin with my needle because I'm taking these half-inch basting stitches manually, one at a time, rather than running the machine at a regulated stitch length that might result in hitting a pin.  After basting the side of this one wonky block, I just pull out those pins and then continue basting the rest of the way down the side of the quilt.


By taking the time to check and align each and every seam line with my channel locks throughout the quilt, I get a nice, straight edge when I get to the bottom of the quilt rather than the dreaded "smile effect."  

Note: I've got a couple of magnet bars from Harbor Freight securing the bottom edge of the quilt in the photo above, just because it was a convenient place to put them.  I use those magnet bars to temporarily attach a sample quilt sandwich off to the side of the quilt I'm working on, whenever I want to tweak or adjust tension for better stitch quality mid-quilting.  Normally I'd have an extra 4" of batting and backing on both sides of the quilt where I could lay down a scrap of fabric and test stitch quality.  That's the ideal way to do it, since the specific batting and backing fabric can affect tension and stitch quality in different ways, but I didn't have any extra batting to practice on with this quilt so I had to make do!

Fellow long arm quilters who DO use your quilt top roller to do partial float loading: Can you help me understand how you load a pieced top onto the quilt top roller, especially how you deal with areas of fullness in the quilt top?  I know about twisting along vertical seam lines to accommodate for their bulk, but what I could not figure out was how tightly the top is supposed to be wound on the quilt top roller in the first place and, specifically, how to roll up areas of a quilt that have excess fullness while keeping seam lines nice and straight.  My full float method is working well for me so far, but it would be nice to have more than one method in my "toolbox."

Next on the Frame: 42 x 42 Modern Baby Clam Shells

Next up for quilting is my Modern Baby Clam Shells quilt -- I can't wait!!  Originally, I was thinking of finishin up this long-overdue quilt quickly with simple E2E (Edge-to-Edge) pantograph design like what I quilted on the veteran's quilt.  But...  After putting so much time and energy into the design, the curved piecing, and the broderie perse appliqué, I just can't bring myself to do that.  Instead, this is going to be a custom quilt job incorporating my ProCircles rulers.  I know I want to accentuate my curved piecing and appliqué with SID (Stitch In the Ditch) quilting, but beyond that I'm just going wait and see where inspiration leads me.  Stay tuned!  Hopefully I'll have some progress to show with this quilt in time for my Long Arm Learning linky party on Tuesday.

Meanwhile, I'm linking up today's post with my favorite blog party girlfriends:

FRIDAY

·       Whoop Whoop Fridays at Confessions of a Fabric Addict

·       Peacock Party at Wendy’s Quilts and More

·       Finished Or Not Friday at Alycia Quilts

·       Off the Wall Friday at Nina Marie Sayre

·       TGIFF Thank Goodness It’s Finished Friday, rotates, schedule found here: http://tgiffriday.blogspot.ca/p/hosting-tgiff.html

SATURDAY

·       UFO Busting at Tish in Wonderland

SUNDAY

·       Frédérique at Quilting Patchwork Appliqué

·       Oh Scrap! at Quilting Is More Fun Than Housework

·       Tips and Tutorials on the 22nd, open 22nd through end of each month: Kathleen McMusing

Friday, March 6, 2020

Charlotte Quilters' Guild Annual Carolina Lily Quilt Show is TODAY and TOMORROW ONLY!

I just got back from our Charlotte Quilters' Guild's annual Carolina Lily Quilt Show.  WOW!  If my mom hadn't needed to get back home to her puppy, I'd STILL be there oohing and ahhing over all those gorgeous quilts, and spending money at vendor booths.  They have fabulous items for sale in the boutique as well.  The show will be open until 4 PM today and then again on Saturday from 9 AM to 4 PM, and I highly recommend that you try to get over there if you're at all local.  The quilt show is at the Union County Agricultural Center in Monroe, and here's a link with directions.  

Carolina Lily Quilt Show 2020 Best of Show and 1st Place Applique: Tulips for Oma by Christa Smith

My friend Christa Smith -- the one who helped me diagnose my longarm quilting machine issues -- won 1st Place Appliqué and Best of Show for the original quilt design pictured above, Tulips for Oma.  She designed the pattern, did all the piecing and hand stitched needleturn applique, and custom quilted it on her APQS Millennium longarm machine.  I love everything about this quilt!  If you love it, too, you can purchase the pattern from Christa's Etsy shop here.  This is Christa's first-ever pattern release and, after seeing this beauty, I can't wait to see what she comes up with next.

Detail, Tulips for Oma by Christa Smith

I love how how the two alternating appliqué blocks have quilting designs that use similar shapes and elements, yet are completely different.

Detail, Tulips for Oma by Christa Smith

Another one of my friends, Judy Morganthall, won 2nd Place in the Pictorial category for an original design based on a photo she took on vacation in South Africa.  She uses a glued collage technique with a sheer mesh overlay and thread painting that secures the layers and adds detail.

Carolina Lily Quilt Show 2020 2nd Place Pictorial, Sabi in the Sun by Judy Morganthall
The photos don't even do this justice; you have to see it up close:

Detail, Sabi in the Sun by Judy Morganthall
I am so amazed by how much talent, skill, and creativity we have in our guild. I don't have time to share all of my photos from today's show, but wanted to get this post up while there's still a chance for readers to get to the show before it closes.  There are SO MANY gorgeous quilts to see, plus Bernina, APQS, HandiQuilter, Innova, Poppy the Featherweight guy, and fabrics and notions and tools galore to shop for in the vendor mall.

Okay, I'm showing you ONE LAST QUILT before dragging myself away from the computer, because I just loved this one by Valeria Rainey:

Carolina Lily Quilt Show 2020 Judge's Award, Most Loving Portrait: Nurturing by Valeria Rainey

Valeria's Nurturing quilt (shown above) was adapted from Debra Cartwright's artwork.  

I myself have ZERO quilts entered in the show, because ZERO is the number of quilts I've finished (other than a few charity donations) since completing Lars's high school graduation quilt last spring.  I didn't have the heart to take his quilt off his dorm bed while his school is blanketed in snow and ice!  Maybe I'll have something finished by NEXT year.

Our Guild's New Blocks On the Move Portable Display for Community Education

My only contribution to this year's show is our new Blocks on the Move portable display, based on a program I learned about from the Country Crossroads Quilters Guild of Modesto, California.  The folks in California were kind enough to supply the plans for building these versatile display units that can be configured in different ways to fit different spaces, and the idea is to move them around the city and set them up in public libraries, hospitals, and other venues where we can reach people and share what our guild is all about.  My husband built our display units, and I solicited the 16" mini quilt donations from our talented guild members.  I love that I got so many different types of quilts for our display; it really shows the diversity of the quilting styles and techniques that we have in our guild.

Have a wonderful weekend, everyone!

Tuesday, February 18, 2020

Spirit Song Quilt: Are We Done Yet? (NO). But Blocks On the Move is Ready to Debut at Quilt Show!

My progress on the Spirit Song Dress Code quilt has slowed way down because I'm at a tedious point in the construction.  After spending so much time planning my mix of colors and prints in my design software, I barged ahead with my piecing without bothering to create  a pressing plan...  So now as I'm joining the 4" inch Birds in the Air blocks together to form the large 16" composite blocks, none of my seam allowances "nest" where the blue triangle points touch one another.  As you can see in the completed block below, that happens EIGHT times in every single block.  Therefore, every time I'm joining two units together with blue triangles that need to touch, I've got six layers of fabric stacked up on one side of those triangle points and only two layers of fabric on the other side, and the nasty little triangles want to slide apart as they pass under the presser foot, and even pinning them is a vicious business involving savage stick pin wounds and a fair amount of swearing.  UGH. Therefore it's taking me a lot longer than expected to join 16 four inch units into one 16" block -- about 2 hours or more per block, including pinning, stabbing myself with the pins, seam ripping, fudging, swearing, pressing...


Block 6 of 12.  This is Getting Tedius.
I left this project in Time Out for a week while focusing on the needs of our new puppy, but I started piecing again a few days ago and I'm feeling better about it now that I'm past the halfway point!  

Yesterday I decided that, for the remaining blocks, I should just bite the bullet and stitch every one of the blue points together by hand first before machine stitching the rest of the seams.  I think it's the only way to get them to line up precisely without shifting when that mountain of bulk passes under my presser foot, and that hand tacking up front will save me a lot of time in the long run, ripping and restitching over and over again!  


NOTE TO SELF: ALWAYS MAKE A PRESSING PLAN FOR THE WHOLE QUILT BEFORE I START PIECING IT!

The best explanation of how and why to create a pressing plan is in Donna Lynn Thomas's book Quiltmaking Essentials 1: Cutting and Piecing Skills.  When I'm looking at a quilt block, or an entire quilt that I've designed on the computer, trying to decide the best way to press seams in order to get crisp points, matched seam intersections and a flat quilt top free of speed bumps, I always consult this book for a refresher.  Highly recommended!


I should be back to smooth sailing with nesting seams at every intersection once I'm assembling those big blocks into rows, if I can only get the rest of these stinking blocks pieced together...


Eight 16 inch Blocks Completed, Four Left to Piece
The Spirit Song quilt was meant to be a "quick detour" project, just to try out the Accuquilt GO! half square triangle dies, before loading and quilting my Jingle appliqué quilt.  And here we are, several months later, with nothing finished and one more work-in-progress!

Meanwhile, Thoroughly Modern Millie (my APQS Millennium longarm machine) is going to be awakened from her deep slumber within the next day or two, because I need to quilt and finish a couple of 16" mini quilt tops that other guild members made to contribute to the Blocks On the Move program I'm launching as Community Education chair of the Charlotte Quilters' Guild.  (I got this idea from Donna Shervington's blog where she mentioned making a 16" block for the Modesto California Country Crossroads Quilters' Guild Blocks on the Move program).


One of Two Blocks On the Move Displays Built by Bernie
Loisann and husband Sig, the geniuses behind the Country Crossroads Quilters' Guild in Modesto, have been so unbelievably kind and generous, providing detailed plans and photographs of exactly how their display units were built so that my handy husband Bernie could recreate them for our Charlotte Quilters' Guild in North Carolina.  Pictured above is one of our two display units, designed to hold mini quilts of 16 to 16 1/2" square.  Because these displays will be set up and left unattended in public spaces, the quilts are mounted with sleeves on dowels that screw into the sides of the display unit and you can't get them out without a screwdriver -- that will significantly reduce the chance of mischief/theft of the beautiful donated mini quilts.  Isn't that COOL?!  We're going to "debut" our Blocks On the Move display at our upcoming Carolina Lilies Annual Quilt Show on March 6-7.  


My Husband Bernie, Fixer of Longarm Machines and Builder of Quilt Displays
The idea behind Blocks On the Move is to move this display throughout the city, setting it up for a month at a time at venues such as assisted living facilities, libraries, hospitals, museums, etc.  I think this will be a great way to raise awareness about who we are and what we do in the community.  Readers who are members of quilt guilds, I'd love to hear what YOUR guild does for community education -- please share those great ideas in the comments!


To-Do List for Tuesday:

This week I'm hoping to accomplish the following:

  • Finish piecing all of my Spirit Song blocks
  • Quilt the two 16" Blocks On the Move flimsies that were pieced by another guild member
  • Go through all of the tax receipts (blech!) and fill out my accountant's tax prep packet
  • Work on an assignment that's due March 1st for a seminary class I'm taking

Well, that puppy isn't going to nap all morning -- if I want a shower today, I'd better get off the computer and do that right now!  Have a wonderful week.
I'm linking today's post with:

MONDAY

·       Design Wall Monday at Small Quilts and Doll Quilts  
·       Monday Making at Love Laugh Quilt
         BOMs Away Katie Mae Quilts  

TUESDAY

·       Colour and Inspiration Tuesday at Clever Chameleon
·       To-Do Tuesday at Home Sewn By Us

WEDNESDAY

·       Midweek Makers at Quilt Fabrication
·       “WOW” WIPs on Wednesday at Esther's Blog

THURSDAY

Needle and Thread Thursday at My Quilt Infatuation

Saturday, September 7, 2019

F. Schumacher Gone Quilting? Quilting Inspires Interior Design Inspires Quilting...

Those of you who have been with me for awhile know that I am more of a designer than a maker.  For every 10-15 quilt ideas that I sketch out on my iPad or in EQ8, only one or two of them ever makes its way into the tangible reality of fabric and thread.  I spent 20 years in the interior design industry, where I used to pass my window treatment, bedding and pillow design sketches off (along with bolts of gorgeous fabrics and trims and detailed work orders) to the amazingly talented hands of my custom drapery workroom.  Then the makers in the workroom would turn my designs into reality while I got started dreaming up new ideas for another client.  

So anyway, because of my interior design background, this glossy, oversize design magazine from F. Schumacher called The Bulletin appears regularly in my mailbox.  And I had to share with you guys that, according to the tastemakers at F. Schumacher at least, "American Folk Art" is #2 on the list of up-and-coming interior design trends:


This is a Hot NEW Trend, According to F. Schumacher
Now, how cool is that?  We quilters have all just been so ahead of our times...  Those two fabrics pictured above are jacquard woven matelasses.  Although the one on the right is named Tristan Patchwork, it's not actually patchwork -- or quilted -- at all.


76762 Tristan Patchwork from F. Schumacher, Retail $236/yd
Naturally, as a designer AND a quilter, I love this fabric.  It would be fabulous for light duty upholstery, throw pillows, or a structured window treatment.  It comes in Yellow, Charcoal, or Indigo and the scale of the "blocks" is a good deal smaller than they would be on an actual quilt -- the pattern repeat is 13.5".  So that's interesting -- modern quilters are playing with scale by making quilt blocks that are larger in size, while textile manufacturers are playing with smaller-scale versions of the same traditional block patterns.  I also love how the traditional 2-color quilt idea is kicked up a notch by adding a second, paler yellow to the mix that almost reads as a visual echo or a shadow.  


My Pea Soup Paint Strip Challenge
Hmmm...  Our guild is doing a "paint strip challenge" for next spring's quilt show, and I had the misfortune to draw a very BORING strip of sage greens that doesn't feel challenging AT ALL.  I'm supposed to use at least two of the greens from my paint strip in my challenge quilt but I am sick of those greens already because they are in my Frankenwhiggish applique project, my Pineapple Nostalgia, even in Lars's Mission Impossible quilt.  I guess I misunderstood the challenge -- I thought they were going to have two or more "difficult" colors in each envelope, or colors that you don't typically think of as "going together" or something.  When I saw that Tristan Patchwork fabric in the Schumacher magazine this morning, I realized that I could definitely do something similar using my two shades of green where they are using yellows, but I'm not sure that's going to be interesting enough to hold my attention all the way through to a quilted and bound finish, you know what I mean?  I'd rather do a color challenge based on THIS story in the same magazine:


I Want THIS to Be My Color Challenge!
How much fun would it be to come up with a quilt based on THOSE two pages?  This is fashion designer Johnson Hartig of Libertine, and I absolutely adore his new interior fabrics collaboration with F. Schumacher.  I love how Hartig has taken this uber-luxurious, high-end cotton viscose velvet fabric and decorated it with goofy, campy Tibetan tigers.  It just makes me smile.  


77231 Jokhang Tiger Velvet from F. Schumacher, Retail $700/yd
Even MORE fun?  Check out this 3" wide trim, also from Johnson Hartig's collection for F. Schumacher, adorned with SAFETY PINS.  This is so delightful to me that it ALMOST tempts me to return to interior design, just so I can talk someone into decorating their living room draperies with a wide band of safety pins down the lead edges: 
77270 Punk Rock Mix Tape from F. Schumacher, Retail $198/yd

(Attention, DIY Fashionistas -- anyone with a sewing machine can recreate this look by sewing a bunch of safety pins to ordinary 3" wide grosgrain ribbon from JoAnn's...)

So my own PERSONAL interpretation of our guild's color challenge is going to be: How can I incorporate my boring greens into the weirdest and most unexpected quilt possible???  

But that challenge piece is WAY down on my list of priorities at the moment.  At the moment, I'm focused on:

  1. Getting back to my longarm machine to try out a different thread combination and hopefully get one of my two outreach tops quilted
  2. Working on a commission to finish a Double Wedding Ring UFO
  3. Anders' sampler quilt, Beware the Ishmaelites

Have a wonderful weekend, everyone!

I'm linking today's post with:

MONDAY

·      Design Wall Monday at Small Quilts and Doll Quilts 
·      Monday Making at Love Laugh Quilt

TUESDAY

·      Colour and Inspiration Tuesday at Clever Chameleon

·       To-Do Tuesday at Home Sewn By Us