
Showing posts with label Modern Baby Clam Shell. Show all posts

Saturday, October 31, 2020

Goodbye, October 2020! Baby Quilt Update (and Happy Halloween)

 Well, October is officially a wrap.  The trick-or-treaters have gone home and my husband, younger son, and I have set ourselves to the task of finishing off the leftover candy.  I've powered off my long arm machine for the night, even though I'm only 2/5 of the way through quilting the baby quilt that was supposed to be Part Two of my One Monthly Goal for October.  Here's what Charlie's quilt looks like so far:

My Letter Home Monogram Baby Quilt is 2/5 Quilted

I loaded this quilt on my frame upside-down, so I'm actually quilting it from the bottom up.  There are five rows of 8" blocks in this quilt and the first row took me awhile because I only had a fuzzy idea about how I was going to quilt this one.  I wanted to keep the quilting fairly light and open, similar to the density of the pantograph design I quilted on my October OMG Part One quilt (below), but this baby brother quilt is getting SID, light ruler work, and a little bit of free motion rather than E2E pantograph quilting.  

Big Sister's Quilt, Aiming for Similar Quilting Density in Baby Brother's Quilt

I don't normally quilt such a large scale meander freehand, though, so keeping the size of that pattern big and somewhat uniform is challenging, and I'm also reminding myself that LARGE quilt blocks with LONG ruler lines to quilt are a lot harder than quilting the exact same designs on smaller blocks.  So my "quick and easy" quilting plan has evolved to require a bit of marking, which is helping to keep lines straighter and more evenly spaced.

Doubting Design Choices After the First Row

One thing that slowed me down was that, since we took the machine head off the frame to install the interchangeable hopping foot upgrade, my horizontal channel lock hadn't been holding as securely as it had previously.  I use my horizontal and vertical channel locks to keep my seams straight and square as I'm quilting, and this was bugging me, so there was an interruption of troubleshooting that yesterday with Bernie and the folks at APQS Tech Support (One little washer was all it took to snug that wheel back up to the carriage and correct the problem).  But, while I had Bernie and Anders available, I had them lower my frame about 3 1/2" so I could quilt from the front of the machine more comfortably.  I'd been wearing high heel platform sandals the day before, since we'd raised my frame a few inches for quilting pantographs from the back side of the machine.  We also moved my laser light from the back of the machine to the front, where it will be more useful to me once my IntelliQuilter gets installed.  But I digress.  Back to the quilt at hand:

40 wt Fantastico in #5007 Wales (Lime, Bright Green, Turquoise, Green Variegated)

I selected a cone of Superior Thread's Fantastico variegated 40 weight trilobal polyester thread in shades of Lime, Bright Green, Turquoise and Green, which I auditioned against the Kona Bone background as well as on the Indigo and the green fabrics.  I wanted to use one thread color throughout to "keep it simple," but knew that a white or off-white background thread might look really harsh against the dark blue.  I was excited about the variegated thread until I started quilting with it, and then I second-guessed myself midway through the first row.  

Superior's Fantastico Thread in #5007 Wales

I was tempted to start ripping out all the quilting I'd done so far, because I felt like the quilting was just screaming at me instead of playing a supportive role to the piecing design...  But the next day, when I came back to it, I reminded myself of my self-imposed deadline and how I wanted most of all to have this finished, so I soldiered on.  And, you know what?  I'm glad I kept going rather than reaching for my seam ripper, because the more I got quilted, the more the thread began to grow on me.

By the End of the Second Row, My Thread Felt Like the Right Choice

This is a good reminder to TAKE A STEP BACK before making rash decisions involving seam rippers!  With my face 8" away from the quilt surface, the green pastel threads seemed like they were too loud and fighting with the quilt, but from a distance it's much more subtle.  If I'd ripped out all the variegated thread and switched to yellow, green, navy and white, not only would I have slowed myself down considerably, but the quilting designs would have disappeared into the fabrics more -- and I might have been disappointed that I couldn't see my quilting designs well enough!  Knowing how the quilt will soften and smoosh and crinkle once it's finished and washed for the first time, I think this thread will be just fine.

So now my only question is whether those giant green 8" HSTs have enough quilting in them.  I mean, I know they have enough quilting to meet the requirements of the batting.  I kind of like the way they look right now, but maybe I'll come back and add something when everything else is finished.

Speaking of finished, I did finish the big sister's quilt, which you can read about here.  Here's a glimpse of how that one turned out, freshly washed and ready for gifting:
October OMG Part One Was Finished On Time!

That's it for me for tonight.  I'm going to eat too many Twix bars with my husband and son while we watch Saturday Night Live.  I just realized that this is probably the last Halloween that I'll have a kid at home with us, since Anders is a high school senior this year.  They don't come home from college for Halloween, so this will be an Empty Nester Holiday for us from now on.  So strange to think about that!  Okay, I lied.  I'm leaving you with one more picture, from my favorite Halloween in 2006 when the boys were 3 and 5 years old:

Halloween 2006: Anders is Batman, Bernie is Aquaman, and Lars is Spiderman


Anders is in the Batman costume on the left, Lars is Spiderman on the right, and my wonderful, amazing husband is wearing what is supposed to be an Aquaman costume.  I did not have an Aquaman pattern, so I made this costume from a Jalie men's figure skating costume pattern, out of green stretch velvet for the figure skating pants (more revealing in real life than they appear on TV during the Olympics) and an orange sequined lycra figure skating top, because the sequins were the closest thing I could come up with at JoAnn fabrics that looked like scales.  Bless his heart; he got more than a few catcalls from the neighbor ladies as he was out trick-or-treating with the kids, but my sons were SO HAPPY to be their own little Justice League with Daddy!

Happy Halloween, everyone!  I'm linking today's post with:

SATURDAY

·       UFO Busting at Tish in Wonderland

One Monthly Goal at  Elm Street Quilts

SUNDAY

·       Frédérique at Quilting Patchwork Appliqué

·       Oh Scrap! at Quilting Is More Fun Than Housework

·       Slow Stitching Sunday at Kathy's Quilts

MONDAY

·       Design Wall Monday at Small Quilts and Doll Quilts  

·       Monday Making at Love Laugh Quilt


Friday, October 30, 2020

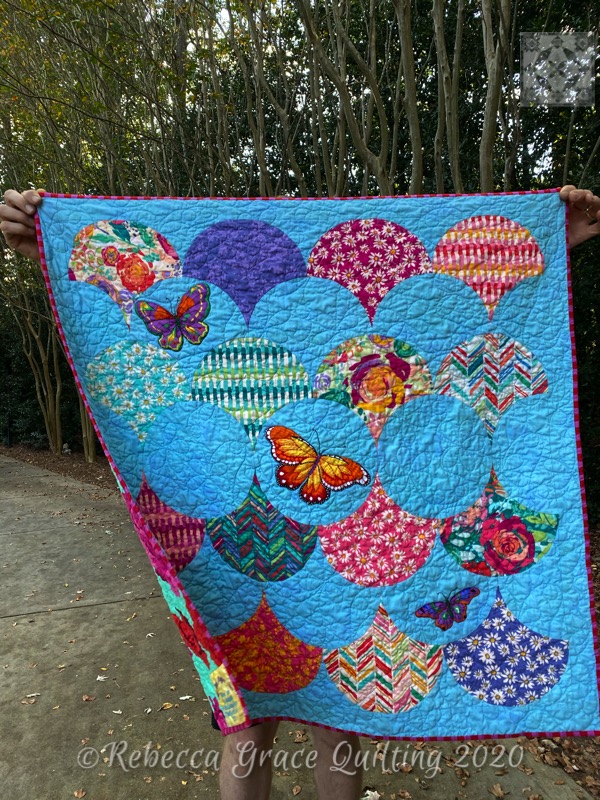
Butterflies in Margot's Garden (Modern Baby Clam Shells) Ta-DONE!

I'm finally able to share my Modern Baby Clam Shells finish with you!  Its final name is "Butterflies in Margot's Garden," named after the little girl for whom it was made.  (This quilt is my original design; no pattern currently available).

Butterflies in Margot's Garden, Before Washing, 42" x 42"


I have always washed my finished quilts prior to gifting them, for a number of reasons: I want to remove any skin oils, hand lotion, dust, quilt markings, washable basting glue, spray starch, etc that may have been applied to the quilt during the process of making it.  I also want to be the one to discover any disastrous issues that a quilt might have (like a dye bleed) BEFORE I give the quilt away, so I could correct the problem and save the recipient the heartbreak of thinking that they had done something wrong to "ruin" the quilt.  I have also always felt like the quilt isn't 100% finished until it comes out of the dryer all soft and snuggly, ready for cuddling, and I want to be able to assess the quilt's changes in size and in texture to better inform my batting selections for future quilts.

I'm ESPECIALLY glad that I washed this particular quilt, because when I took it off the frame initially I was a little disappointed by the extent to which my E2E quilting (Daisies Galore pantograph) seemed to compete with and obscure the smooth curves and crisp points of my clam shell piecing.  Maybe it's just the change in the natural lighting from when I took the unwashed photo (above) and when I took the post-laundering photo (below), but even in real life I feel like the washed quilt is much closer to my intention.  Upon close inspection you can see the daisy quilting design, but the impact from a distance is of the pieced clam shells and the appliquéd butterflies, with soft, crinkly quilt texture throughout that is no longer screaming "LOOK AT ME!  

Butterflies in Margot's Garden, After Washing, 38" x 38"

Also of note: The quilt top measured 42" x 42" when I loaded it on my frame for quilting.  I did not measure it after quilting, before washing it, but after washing it in cold water and then tumbling dry with low heat, the finished quilt measures closer to 38" x 38".  That's nearly 10% shrinkage!  I used leftover 80/20 cotton/polyester batting, most likely Hobbs Heirloom, so some of the shrinkage is from the cotton in the quilt batting.  There is also some shrinkage that happens from the quilting stitches drawing up the quilt.  However, most crucially, I did not prewash any of my fabrics for this quilt because I was using a layer cake for the 9 1/2" clam shell prints.  

Pieced Backing, Butterflies in Margot's Garden

This is my first time piecing a quilt backing from two different fabrics.  I know everyone else has been doing this forever.  I was short on the giant scaled Kaffe Fassett floral print I'd purchased for the backing when I was first planning this quilt in December of 2018, and decided that I really liked how this leftover strip of backing trimmed from a previous quilt looked with the florals.  Look at that, you guys -- maybe I'm becoming THRIFTY after all these years!  ("Unlikely," says my husband...)

Detail of Hand Quilted Butterfly on Backing


I was a little worried that the heavy hand quilting stitches that I added to the butterflies might look weird from the backing side, but they blend in rather nicely (Can you see them in the photo above?).  I was grateful that the red dye in the cotton perle #5 thread did not bleed.  The skein was marked "colorfast" but sometimes they lie, especially with red.  ;-)

The Binding Shot


I remembered to take a picture of my binding this time.  I cut my strips at 2" wide, sewed them to the front of my quilt with a 1/4" seam allowance, and then stitched them to the back by hand with regular 50/3 Mettler cotton thread.

Butterfly Detail, Before Washing

Another interesting observation: The butterfly print fabric that I used for my broderie perse butterfly appliqués does not appear to be 100% cotton like the quilt shop cottons that were used for the rest of the quilt.  It was an eBay remnant that I purchased online, so I didn't have access to the bolt information and, frankly, I didn't care because the style, scale, and colors of the print were exactly what I wanted for this project.  The hand of the fabric felt slightly thicker and stiffer when it showed up in the mail.  The butterflies still feel slightly stiffer after washing and they didn't shrink as much as the background fabric, but this is actually a GOOD thing because it makes them puff up slightly for almost a trapunto effect after washing, helping to create the illusion that the butterflies are flying across the surface of the quilt rather than being stitched down.  Let's pretend I meant to do that! 

Butterfly Detail, After Washing


So, in my experience, an 80/20 cotton/polyester batting gives a very traditional, crinkly cotton batting look after quilting and washing, with just a bit more loft and less flattening in the larger spaces between quilting stitches than I'd get with 100% cotton batting.  That little bit of loft helps the machine quilting stitches look better on both sides of the quilt, and gives a little more definition to the quilting design.  But what I really like about 80/20 batting over 100% cotton is that the polyester fibers help a quilt with 80/20 batting to resist holding creases where it's been folded.  It's a little lighter weight than 100% cotton, too.

Butterflies in Margot's Garden, 38 x 38, Completed October 2020


All the Juicy Details:

I started this quilt in December of 2018, a few weeks before Margot was born, and it was supposed to be something "quick and easy."  I got bogged down in technical difficulties and design dilemmas, and then had to set it aside to make my son's high school graduation quilt, after which I took a detour with my Spirit Song/Sermon Scribbles quilt...  It feels really good to finally get this project finished and shipped off to its final destination!  I hope it gets heavy use as a snuggling blanket, superhero cape, living room fort, etc.  

I'm linking up today's post with the following linky parties:

FRIDAY

·       Whoop Whoop Fridays at Confessions of a Fabric Addict

·       Peacock Party at Wendy’s Quilts and More

·       Finished Or Not Friday at Alycia Quilts

·       Off the Wall Friday at Nina Marie Sayre

·       TGIFF Thank Goodness It’s Finished Friday, rotates, schedule found here: http://tgiffriday.blogspot.ca/p/hosting-tgiff.html

·       UFO Busting at Tish in Wonderland

SUNDAY

·       Frédérique at Quilting Patchwork Appliqué

·       Oh Scrap! at Quilting Is More Fun Than Housework

·       Slow Stitching Sunday at Kathy's Quilts

MONDAY

·       Design Wall Monday at Small Quilts and Doll Quilts  

·       Monday Making at Love Laugh Quilt

TUESDAY

·       To-Do Tuesday at Home Sewn By Us

WEDNESDAY

·       Midweek Makers at Quilt Fabrication

·       Wednesday Wait Loss at The Inquiring Quilter

THURSDAY

·       Needle and Thread Thursday at My Quilt Infatuation  

·       Put Your Foot Down at For the Love of Geese

·       Free Motion Mavericks with Muv and Andree


Tuesday, October 20, 2020

Yes, I'm Still Here, Working On Baby Quilts...

 Hello, my lovelies!  It felt good to step away from the blog for a few days.  

We brought our 19-year-old son home from college for the weekend so he could cast his very first vote in a Presidential election during Early Voting rather than having to change his voter registration to his college address.  My 17-year-old son has strong opinions about the election that he believes we're all entitled to hearing, and he is not pleased to be the only nonvoting member of the family.  ;-). Hah!

I made more progress on my baby quilt version of the AQS "Letter Home" September QAL:

Monogram Baby Quilt In Progress

Those are 8" finished blocks, center monogram block that I added is English Paper Pieced, and the finished size of this quilt with narrow borders will be 42" x 42".  None of the blocks are sewn together yet, but I'm nearly finished piecing all of the blocks now.


I did get my Modern Baby Clam Shell quilt finished -- COMPLETELY FINISHED!! -- a couple days ago, but haven't taken the final photos of it yet.  Still debating whether or not to wash it first.  And, since my October goal is to completely finish BOTH of these sibling quilts and get them mailed off by the end of the month, I figured I might as well wait and photograph both of them together.

Final Stretch of Binding on Modern Baby Clam Shells

As usual, I'd be farther along with the baby quilts if I hadn't been busy working on other things.  I spoke with a potential new client about a vintage quilt made by his grandmother that he's looking to have restored.  I've been researching and crowd sourcing about quilt battings in order to finalize which ones I want to stock for clients.  I also worked on a Double-Top-Secret Surprise design for a friend in EQ8 and sourced special fabrics to bring that idea to life.  The fabrics I needed showed up in yesterday's mail and they are AWESOME -- it is going to be SO HARD not to show you this one until after I surprise my friend with it!  

I have also been working my way through all of the IntelliQuilter training videos provided by my dealer, all SIX hours' worth, covering both computerized edge-to-edge as well as computerized custom quilting.  I am SO excited by the possibilities!  The system that I ordered in late August is finally ready to ship and install on my APQS Millennium, and I finished the last of the training videos last night so I'm raring to go.  I absolutely cannot wait to start putting everything I've learned into practice on my quilts!  My IntelliQuilter should be up and running by Halloween.

Speaking of Halloween, my furry little beefcake puppy Samwise will turn one year old on Halloween!

Samwise Turns One Year Old on Halloween!

That's all you get for today, folks!  I'm linking up with the following linky parties:

WEDNESDAY

·       Midweek Makers at Quilt Fabrication

·       Wednesday Wait Loss at The Inquiring Quilter

THURSDAY

·       Needle and Thread Thursday at My Quilt Infatuation  

·       Put Your Foot Down at For the Love of Geese

Monday, October 12, 2020

Tuesday's To-Do List: Still Slogging Along With Butterflies and Clam Shells

 Might as well just get to the meat and potatoes this week!  Last week's goals turned out to be overly ambitious:

✅ finish quilting Modern Baby Clam Shells, AND 

get it labeled and   

❌ bound, AND  

❌ get my Letter Home baby quilt top and ready to load on my frame.  

After quilting the pantograph design over most of my Modern Baby Clam Shells quilt and stitching in the ditch around my butterfly appliqués  a quilter who was more goal oriented and focused than I am would have finished up the quilting with some monofilament or color matched thread to machine quilt along the butterfly veins.  I decided to haul out all of my yummy hand stitching threads instead.  I ended up quilting my butterfly veins with Perle Cotton #5, which would probably have looked better with a longer stitch length, but I like it anyway:

Perle Cotton no. 5 for Hand Quilted Butterfly Veins

I like the idea of combining machine quilting with hand stitched details, and think I might explore more of that in future.  


Best of all, since my butterflies are turned edge appliqué with the backing trimmed away behind them and no fusible web or anything like that to add stiffness, they are super soft and smooshable and were very easy to needle for the hand quilting.


The purple butterflies got green stitching.  It's subtle, but I love the vintage hand stitched vibe it gives my butterflies.

All Quilting Completed, Ready to Trim

You know, I was really tempted to custom quilt this one, if I hadn't been up against a time crunch to get it finished.  But I have to say, the less densely quilted pantograph design makes this baby quilt SO soft and cuddly!  Custom quilting might have made for a stiffer quilt, and if I'd gotten too carried away with it, the baby's mom might have felt like the quilt was "too fancy" for everyday use and stuck it in a closet.  😱😱😱. Heaven forbid!  So all's well that ends well!

Attaching the Machine Embroidered Label

My bee group that used to meet in person Pre-Plague has been meeting on Zoom instead on Monday afternoons, and I used that time today to get this quilt trimmed and to attach the machine embroidered label I'd digitized and stitched out on Sunday.  I tried something new this time, using Aurifil 50/2 Cotton threads in the needle and also in the bobbin to embroider my quilt label.  I am really happy with how it came out!  That extra thickness to the thread (compared to regular embroidery thread and bobbin thread) gave the stitching more prominence, yet I had zero issues with puckering or thread breaks.  And although I love the sheen of trilobal polyester or rayon embroidery threads for other projects, I liked the matte lustre of the 100% cotton thread for this quilt.  I used one layer of water soluble topping, one layer of tearaway stabilizer in the hoop, with a second layer of tearaway stabilizer floated beneath the hoop.  I used my built-in basting stitch around the perimeter of the design as well, both to reduce the tendency of the embroidery to draw up and pucker, but also because the basting stitches form a nice, straight rectangle around the label design that I can use to trim the excess fabric and turn the two edges of the label that won't be caught in the binding.

My local chapter of the Modern Quilt Guild will be doing its first in-person stitch-together next Saturday, in the parking lot of the church where we usually meet, with masks and social distancing in place.  I'm planning to get the binding machine stitched to my clam shell quilt tomorrow and then set it aside to be finished with hand stitching at my guild's outdoor gathering. I sure hope the weather cooperates!

And then I can turn my attention back to the baby brother's quilt, based on the AQS Letter Home QAL.  So, that's what I'll be up to for the rest of this week!

Rebecca's To-Do List for This Week:

  1. Attach binding to clam shell quilt by machine
  2. Finish piecing Letter Home blocks
  3. Assemble Letter Home quilt top
  4. Piece Letter Home backing
  5. Load Letter Home on the long arm frame

I'm tempted to put more on that list, but there's so much SHAME when I have to put red X's next to everything at the end of the week!  😉. Best to quit while I'm ahead!  I'm linking up today's post with the following linky parties:

MONDAY

·       Design Wall Monday at Small Quilts and Doll Quilts  

·       Monday Making at Love Laugh Quilt

TUESDAY

·       To-Do Tuesday at Home Sewn By Us

WEDNESDAY

·       Midweek Makers at Quilt Fabrication

·       Wednesday Wait Loss at The Inquiring Quilter