Showing posts with label Diane Gaudynski. Show all posts

Sunday, June 16, 2013

Better Late Than Never: February 2012 FMQ Challenge Completed, Feathers With Diane Gaudynski

Embroidery Disaster Saved by Free-Motion Quilting!
Remember the 2012 Free-Motion Quilting Challenge hosted by SewCalGal?  Each month last year, a different free-motion quilting expert provided an online tutorial with a practice exercise.  We were supposed to complete all twelve by the end of the year, but I didn't even find out about the challenge until June I only managed to complete seven by year's end.  Although I was brand-new to free-motion quilting at the beginning of this challenge, I found that setting aside a couple of hours once a month to practice quilting motifs has made a HUGE difference -- like the difference between drawing with a pen in my hand versus trying to draw with a pen clasped between my toes.  Well, SewCalGal recently announced a "second chance" for those of us who did not meet the goal in 2012, and I now have until October 31st to finish the remaining challenges. 

So, back in April I spent something crazy like 6 hours embroidering this enormous Jacobean bird design, only to have it shrink up and pucker when I attempted to press the finished piece from the back side?  (I have a theory about that, by the way -- I had layered a piece of unwashed muslin beneath the silk shantung prior to embroidering for extra stability, then trimmed away the excess when the embroidery was complete.  I think the muslin backing shrank when I ironed it).  

Ruined Embroidery Project, Ripe for FMQ Practice
I decided to use this ruined embroidery project for FMQ practice, to see whether I could quilt out those ugly puckers and ripples between the embroidered areas.  I spent several hours yesterday and today working on Diane Gaudynski's February 2012 feather tutorial, and I could not be more thrilled with the results.  I have admired Diane's machine quilting, and the machine quilting of her students, for years, and I own both of her wonderful books.  Still, I've not felt up to the challenge of trying to quilt feathers until now.  This is the first time for me just sitting down at the machine and quilting feathers over and over again.  They're far from perfect up close, but much better than I ever thought I would be able to do.  And, thanks to the FMQ challenge, I now know that my quilting skills WILL get better and better, the more I practice.  If I can do this, ANYONE can learn!
 
So yes, I was able to quilt out all of the puckers in this embroidery design, and what's more, I managed to quilt some passable feathers and lumpy-but-acceptable pebble background quilting.  I have long struggled with both of those designs and have been practice-doodling feathers on my iPad for months.  Wahoo!
 
 
Can you believe this is the exact same project as the ugly wrinkled mess in the previous photo?  I almost threw this away!  Now I like it so much that I have to come up with something to do with it.  The finished piece is 16" x 20."  Any ideas?  I suppose I could just square the edges, bind it, and call it a "mini wall quilt." 
 
I'm Quilting Feathers! 
I attempted several different feather styles, but even though the traditional, backtracked feathers are supposed to be the most difficult to quilt, those were the easiest for me -- probably because that's the way I've been doodling them.  However, I was NOT doodling the stem correctly, so all of my stems are a bit wonky.
 
My fabric is a glitter-flecked silk shantung layered with Hobbs Tuscany Silk batting and muslin backing.  I used #100 silk thread in the needle and 60/2 Mettler cotton embroidery thread in the bobbin, with a size 60 Microtex needle, tension reduced to 1.50, and BSR stitch length set to 1.5.
 
It even looks cool from the back, see?
 
Back View
 
So now that's one more down, and only four more to go.


Sunday, September 2, 2012

11 Months Later, Lars's "Drunken Dragons" Quilt is Finally FINISHED!

"Drunken Dragons" Drunkard's Path Quilt for Lars, 66" x 97"
Are you sick of reading about my Drunken Dragons drunkard's path quilt for Lars yet?  Well, good news -- it's FINALLY FINISHED!!  This quilt is my first attempt at piecing curved seams, my first go at free-motion quilting, and the most densely-quilted project I've ever completed.  You can really see the wonderful bumpy-quilty texture from the back side of the quilt, where I appliqued the Scrabble label and then quilted it in. 

Backing Side, with Quilted-In Scrabble Label

The oversized twin quilt top measured 70" x 105" originally, and it finished at 66" x 97" after it was densely quilted and allowed to shrink up in the wash.  The extra length was planned so that the quilt is long enough to tuck under securely at the bottom of my son's extra-thick mattress.

Binding In Progress At Last!
This picture was taken early last week, when I'd just started stitching the backside of the binding by hand.  I had several more evenings of hand stitching ahead of me, and then the quilt went in the washing machine this morning (with a little quilt soap on the gentle cycle) to get rid of the starch, hand lotion, and whatever dust and grime the quilt had accumulated over the past 11 months while I was working on it.  It actually took me longer to make Lars's quilt than it took me to make LARS.


Avatar photo from Sci-Fi Heaven
By the way, the reason I look so flushed in that binding picture is that my husband has been playing around with the settings on his fancy camera and decided that "extra vivid" colors would make for better pictures than a "normal" color setting.  My quilt fabrics are certainly bright and colorful, but they aren't as garish as they look in this picture.  My hair isn't really this dark, my skin isn't really red, but in some of the other pictures he took I look BLUE like the creepy Avatar people.  Trust me; this is not a good look for me.

So, a few quick notes about the binding, not because I'm an expert, but so I can remember for next time:  This is the first time I used bias-cut binding.  Lots of sources recommend bias binding for quilts with scalloped or zigzag edges, or for those with rounded corners, but Diane Gaudynski swears that bias binding lays smoother without rippling and she recommends it for every quilt.  I also found a couple of other sources advocating that bias binding would wear better over time.  Since I knew this quilt was going to be in and out of the washing machine many times over the years, I decide to give the bias binding a try.  Once I had cut my bias strips on a 45 degree angle and sewn them into one long, continuous strip of binding, the process of attaching it to the quilt was no more difficult than it would have been to use lengthwise or cross-grain strips of binding fabric. 

Machine Stitching the Binding with 1/4" Patchwork Foot #37
In the past, with my 100% cotton battings, I've always cut my binding strips 1 7/8" wide, machine stitched them to the front of my quilts with my 1/4" patchwork foot, and the double layer of binding would wrap snugly around the edge of the quilt, completely covering the machine stitching line on the back of the quilt when I sewed it down by hand.  Diane's Guide to Machine Quilting book suggests a 2" cut width for 1/4" finished width binding, so I went with that this time.  The trouble is, my seam allowance with my Patchwork Footsie #37 is more of a scant 1/4", so I had to go back and resew it a little wider in order to end up with a binding that was approximately the same width on the front and back sides of the quilt.  Especially with this Hobbs Tuscany Silk batting, which got pretty flat where it was densely quilted near the edges, I would have been better off with a 1 7/8" cut width on my strips like I usually do.  Hopefully I'll remember that next time!

So now here it is, on Lars's bed:

Despite the appearance of Lars's bookshelves, we have not recently been robbed.  Lars insists that this is a highly specialized organizational system and that he alone knows EXACTLY where each and every book, LEGO, trading card, and candy wrapper is located.   Yeah, I'm not buying it either.  But at least now we will always be able to find his bed!  By the way, if Lars had won the decorating battle, all four of his walls would be the same bright orange as the brightest fabric in his quilt.  I compromised with hyper-bright orange wallpaper in his en suite bathroom, and a more restful shade of blue for his bedroom walls.  The Day-Glo quilt is primarily light blue and orange to tie those two areas together.  The last project on my list for Lars's bedroom is a window treatment, because the window looks too bare to me with just shutters.  I'll probably eventually do some kind of rectangular cornice above the window rather than drapery panels, but nothing too wild.  We already have quite a bit going on in this bedroom visually!


Tuesday, March 20, 2012

Taking the Terror Out of Invisible Nylon Monofilament Thread: Best Practices Borrowed from the Experts


Set up and Ready for Machine Quilting
Welcome to my sewing studio, bloggy friends!  No, I haven't started quilting yet, but I did spend some time in the studio yesterday, clearing the mountains of fabric, rulers, sewing magazines, tools, and mending off this folding table so I could move it in front of my sewing cabinet.  I would have moved the table even closer to my chair, except the back end of the table is already hitting my mammoth cutting table and that's way too heavy for me to move.  I already had another folding table set up behind my red sewing machine cabinet (which is a Bernie-Built exclusive, in case you're wondering), so now the weight of the quilt will be supported on all sides while I'm quilting.  It's really important that the quilt isn't hanging onto the floor, so you don't have to fight the force of gravity while you're trying to quilt.  My sewing machine is lowered so it's flush with the top of the cabinet, with a clear acrylic piece filling the gap between the machine and the table top.  I ordered the acrylic insert from one of the major sewing machine cabinet manufacturers, made to fit my machine make and model, and then I had Bernie cut the hole in the cabinet top to fit the acrylic insert.

Nylon Monofilament Thread on Thread Stand
I wanted to share some tips for working with nylon monofilament "invisible" thread, since so many people seem to struggle with it.  Because I prefer to learn from the mistakes of others whenever possible, I did a little research into the best practices others have come up with for working with this thread.  Most of what I'm about to tell you came out of either Harriet Hargrave's Heirloom Machine Quilting book or out of Diane Gaudynski's Guide to Machine Quilting.  I strongly recommend both books.

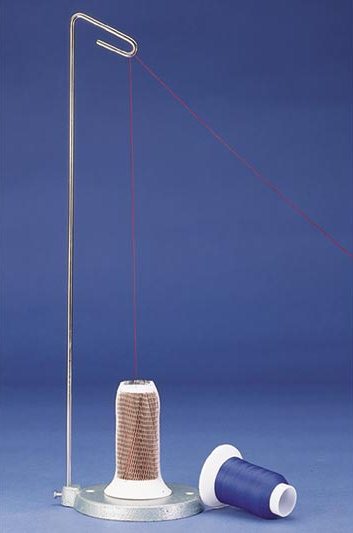
I'm using a high quality invisible thread from SewArt International, which is always the first step towards success.  Cheap thread is never worth the grief it causes, and neither is old, brittle thread.  Second, I've put the invisible nylon thread on a silly thread stand contraption that hooks onto the back of my sewing machine, the Multiple Spool Holder accessory.  The thread stand is silly only because it holds a ridiculous number of thread spools, and the sewing machine only has one needle -- at most, you might use three spools at once with a triple wing needle.  It's supposed to facilitate machine embroidery work, and I bought it thinking that I would line up different color threads in order of stitching for embroidery designs, but in reality, I rarely ever embroider designs with enough color changes to warrant the stand.  So the Multiple Spool Holder is overkill for quilting, but I'm using it so the nylon monofilament thread can sit vertically on the stand and, although it comes off the spool kind of curled and kinky, the thread has plenty of opportunity to relax and learn some manners as it travel up to the loop at the top of the thread stand, then back down to the machine and its tension disks, preventing the snarling and kinking problems that can sometimes happen with this thread. 


Photo Courtesy Clotilde
If you don't have a funky thread stand like mine, you can get a simple cast iron cone thread stand online here from Clotilde for less than $10, and just set it on the table next to your sewing machine; it will work just as well.

Invisible Nylon Thread in the Guide Attached to my Sewing Machine
Next, one of my books recommended taping a little safety pin to the edge of the sewing machine as an additional thread guide for monofilament nylon thread.  Lo and behold, my Bernina Artista 200E/730E sewing machine already has a little metal guide loop already attached in exactly the right spot!  Never noticed that before!  I love it when my sewbaby is one step ahead of me!  So my invisible thread is going straight up off the spool to the top of my thread stand, down to the little metal loop guide on the right side of my sewing machine, just above the hand wheel, and from there it follows the regular thread path.  My horizontal spool pin is holding the Mettler 60 weight 2-ply cotton embroidery thread that I'm using in my bobbin.  Remember, if your machine doesn't have this extra thread guide, just tape a small safety pin in the same spot on your machine and use that as your thread guide. 

As I'm editing photos for this post, trying to adjust the brightness so you can actually SEE the invisible thread, I feel like one of the bogus tailors in The Emperor's New Clothes.  It's the most beautiful thread in the world, but alas, fools cannot see it...  ;-)  Don't feel too bad -- I can't see it, either.

Okay, now for the tension samples!  Did you think you could thread your machine up with magical invisible nylon thread and sew beautiful stitches without having to make any tension adjustments?  Think again, sister!  Invisible nylon thread stretches as it goes through the tension disks of your machine, so you are going to need looser needle tension than the standard setting, which is calibrated for sewing with regular weight cotton or polyester construction thread in both the needle and the bobbin.  I can't tell you exactly what setting you should use, because the tension numbers are completely arbitrary and vary widely by machine, even within the same brand.  The only universal tension truths are that higher numbers equal tighter tension, and nylon thread is going to need looser tension than whatever your standard setting is.

Monofilament Tension Sample, Top Row is Normal Tension, Gradually Reduced to Bottom Row at 1.25
When I used the invisible nylon thread a few weeks ago to blind applique the Scrabble quilt label to the backing fabric, I just dropped my needle tension down to 3.0 and that seemed fine.  So I thought 3 was my magic monofilament number, until I started stitching parallel test rows down a sandwich of backing fabric and batting scraps.  The bobbin thread on the back of this sample is very easy to see and looks great at every setting.  It's really tough to tell what you're looking at on the invisible nylon side, though.  I couldn't get this to photograph well, either, but I finally determined that I needed to reduce my needle tension all the way down to 1.25 with this thread.  With higher/tighter tension, the nylon monofilament was laying in a flat line across the top of the fabric, pulling the bobbin thread all the way to the top to lock and form the stitch, instead of meeting the bobbin thread halfway in the middle.  When my needle tension is too tight, the invisible nylon looks really shiny because it's a straight, unbroken line of thread reflecting the light.  When I reduced the tension sufficiently, the shiny effect was greatly reduced because the nylon thread was bending between each stitch and disappearing into the quilt sandwich instead of laying tautly across the top of the fabric.  Does that make sense?  If your monofilament thread looks too "shiny," which is a common complaint from those who don't want to use it, I suggest you lower your needle tension until you can tame the shine.  You can keep reducing needle tension as long as the bobbin thread still looks good on the back.  If you start to have a "line" of bobbin thread on the back instead of individual stitches, you'll know you've gone too far.

Another point about the bobbin thread: Looking back at my sample stitches again, I can see a tiny dot of bobbin thread between each stitch on the top of my quilt sandwich.  This effect was more pronounced when my needle tension was too tight and pulling the bobbin up to the top, but it doesn't completely go away even once my tension is balanced.  I'm using a #60 sharp needle to make the smallest hole possible, and that should help, but it's a good reason to select a bobbin thread color that will blend with fabrics in your quilt top instead of a thread color that only looks good with the backing.

I also happily discovered that my sewing machine has a built in quilting straight stitch programmed with 5 tiny little stitches at the beginning and end to lock off stitches.  I don't think I've used that in the past, I've just manually turned the stitch length adjuster at the beginning and end of each line of stitching.  I'm not sure if I'll use the built in stitch or not -- it's nice at the beginning of the row, because you just tap the "pattern begin" button on the touch screen and start sewing, and the machine automatically increases to the correct stitch length after locking in the stitches without having to take your hands off the fabric.  The annoying part is at the end, when my foot is on the pedal and I reach up to hit the "pattern end" button to tell the machine to go back to the tiny stitches to end the row.  If I don't tap the button just right with my fingertip, the machine keeps sewing the longer stitch length while I tap it again and again, waiting for the chime that means "yes, Master" in Sewbaby Speak.  We'll see how that goes.

So much for the "quick blog post" I planned to write this morning!  Hopefully next time I post, I will have made some progress with the actual quilting. 

UPDATED February 18th, 2014: I did some quilting with monofilament nylon on my Bernina 750 QE for the first time a couple of days ago.  She handled it beautifully, with cotton thread in the bobbin and top tension reduced to 2.0.  I did place the monofilament nylon on my thread stand behind the machine and did everything else the same way I did on my previous Artista 200/730 E.

PSST!!  I'd Love to Quilt for YOU!

By the way, if you or any of your quilty friends has a quilt top or two that needs quilting, I'd be delighted to quilt for you!  My turnaround for edge-to-edge quilting is currently running about 2 weeks, and you can click here to find out how to book your quilt with me.

Monday, February 6, 2012

Ice Berg, Dead Ahead! Approaching the Perils of the Quilting Phase, and the Band Plays On

The Titannic, image found here
Well, Lars's Drunken Dragons quilt top is nearly complete.  (If you missed the earlier posts about this project, click here to catch up).  I just have to assemble the last of the 15 rows of blocks, then attach that row to the others.  I decided to assemble the quilt top in thirds (five rows per section) to minimize fraying along the raw edges, so I'll have to join the three sections together, and then the piecing stage of the 70" x 105" twin bed quilt will be complete.  After that, I'll join my two widths of the backing fabric together and make and attach the quilt label to the backing so it will be quilted in securely. 

Scrabble fabric from Quilting Treasures, photo from Fabric.com

I am excited about the quilt label; I'm going to spell out "MOMMY LOVES LARS" in Scrabble fabric, cutting out each letter with a seam allowance so I can stitch them together like a Scrabble board. 

The scary part comes next. Depending on the quilting design, I may have to do some marking on the quilt top -- always a terrifying prospect, because what if the marks don't wash out afterwards like they're supposed to?  "They" tell you to test the washaway marking pen on every fabric in your quilt to be sure it will wash out afterwards, but I used so many fabrics...  Also, I would have needed to make up my little marking pen tests on fabric scraps a couple of weeks ago to do this, because it's going to take me at least that long to do the quilting.  Just because the ink comes out after it's been on the fabric for a day doesn't mean that it would come out after three weeks.  Anyway, I'm not marking anything until I know for sure how I want to do the quilting.

So far, this quilt has been pretty smooth sailing, like the Titannic, speeding across the Atlantic Ocean with its sparkling chandeliers and happy passengers, but we're about to enter dangerous waters...  Nothing like a positive attitude, don't you agree?  Here's what's going through my mind as I stare out into the frigid, frosty darkness of the quilting voyage that lies ahead:

Machine Trapunto by Anita Shakelford
My first thought is to stitch a grid of diagonal lines as background quilting everywhere except inside the circles.  The circles would have concentric, fairly wide spaced circle quilting for emphasis.  To make the circles stand out even more, I could add trapunto to the circles (an extra layer of batting just under the circles for added dimension) using the method that Diane Gaudynski describes in her books.  I'd use my walking foot for the background grid, but the circles?  Well...  I can't very well turn my quilt around 360 degrees under my sewing machine needle to quilt each circle with the walking foot, not on this oversized twin bed quilt.  The line of quilting that goes right in the circular seamline would be challenging to execute even with a walking foot -- do I really think I can do that accurately with the feed dogs down and the training wheels off?  Am I really going to be able to quilt perfect circles with FMQ?  I've jokingly dubbed this the Drunken Dragons quilt because the block pattern is called Drunkard's Path, but I don't want people to look at the finished quilt, covered with wobbly, crookedy lumpy-non-circular blobs and think I was drunk when I was quilting it!

I've been telling everyone how I'm going to do free-motion quilting (FMQ) on this project in hopes that I won't chicken out, but I feel a cold sweat coming on. For those who don't know, normally the feed dogs on the sewing machine pull your fabric through at a steady pace beneath the stationary needle going up and down to create stitches of exactly the same length.  When you do free-motion quilting, you disengage those feed dogs so you can control the fabric movement with your hands, enabling you to go back and forth, diagonally, sideways, all without turning your fabric.  It's like trying to draw a picture or sign your name by moving a piece of paper around underneath a stationary marker, except that you also have to be careful to move the quilt at a steady speed so you don't end up with a mess of some really long stitches, some really short stitches, and a bunch of knots.  With a lot of practice, people like Diane Gaudynski and Wendy Sheppard are able to quilt the most exquisite designs using this method, but my experience with FMQ so far looks like I tried to doodle with my left hand, blindfolded. 

Bernina Stitch Regulator, from Bernina USA
I have a gizmo for my fancy computerized sewing machine that is supposed to help -- the BSR function (Bernina Stitch Regulator) has a little Doctor Evil laser thingy that scans and counts threads next to the needle as I'm moving the fabric, speeding up or slowing down the needle movement as needed to keep stitches around the same length.  But BSR doesn't improve my ability to "draw" by moving fabric, it only helps to keep stitch length more or less consistent.  If I'm really going to drop those feed dogs and quilt without training wheels, then I'd better set the quilt top aside and do at least a week of practice quilting before I even mark the quilt top. I'd hate to mark an overly ambitious design on my quilt top and then realize I'm not skilled enough to execute it well. I'm looking at this quilt top, and not really coming up with a lot of FMQ ideas that would look good on this quilt and that I'm likely to be able to do well.  I mean honestly, circles?  I really WANT circles, though.  I may have to plan a smaller project, like a table runner, for FMQ practice.
Anders' Froggy Quilt of Many Colors, Decorative Quilting Motif Stitched with Embroidery Module, 2006

So there's this cunning little voice in the back of my head, and I can't tell for sure if she's an angel or the Devil. She says there's no shame in using all the high-tech gadgetry at my disposal in order to finish the quilt and get it on Lars's bed, looking the way I want it to look, and finished within this lifetime. I have several design collections of Keryn Emmerson's outline quilting designs that I could use with the embroidery module of my sewing machine to insure good looking results using fancier designs than I could manage free hand.  When I've used this method in the past, most notably for Anders' Froggy Quilt of Many Colors above (I know, I should have done more quilting on the Flying Geese patches and I still might add more later), I got annoying little thread knots on the back of the quilt (which, thanks to Diane's book, I now know could have been minimized by using a lighter weight quilting thread).  I just found a Bernina Through the Needle: Quilting in the Hoop article that suggests using these outline embroidery designs on just the quilt top and batting for the decorative stitching, then adding the backing fabric before doing the background quilting through all three layers, so that any tension snafus or knots gets hidden between the layers of the quilt.  I guess I'd need to use an adhesive basting spray to adhere the quilt top to the batting if I'm going to do some of the quilting before I layer and pin-baste all three layers together, though -- ugh, this is getting complicated again!  I wonder if this is like that moment when Captain Edward Smith ordered his crew to increase the Titanic's speed just as they were approaching the ice they'd been warned about?  I mean, is this going to make my project go more smoothly, or will this plan of action come back to haunt me in my dreams? 

Here are a couple of the quilting designs I'm considering for the circles on this quilt:

Keryn Emmerson's Continuous Quilting Designs collection for Bernina

 I like that Celtic knot circle design shown on the cover of the design collection packaging, but it's too small so I'd want to enlarge it and then add some additional wide-spaced circle outlines.  This particular collection is on one of those design cards that plugs directly into my sewing machine rather than on a CD, and although I can resize the design directly on my sewing machine, I'm pretty sure I need to use my PC software to add additional outline circles.  I may be able to do this if I open the design on my sewing machine, save it to the sewing machine's memory, and then copy it from there to a thumb drive that I take downstairs to my PC. 

Another Keryn Emmerson design from her Quilting Inspirations 788 Collection for OESD

The design shown above is another possibility, and even though it's also too small to fill the big circles on my quilt, perhaps I could stitch them out as-is and then add some FMQ echo quilting.  Since this design is so angular and irregular, the echo quilting wouldn't need to be perfect in order to look good.  But I really, really want circles...

I did some browsing over at Embroidery.com (even though I hate to buy more embroidery designs when I have SO MANY that I already own and have never used), and found another possibility:
Rangoli design from Embroidery.com, get it here
I like the circles in the Rangoli design at left from Embroidery.com, and even though at 3.5" it's again, a little on the small side, I could easily resize it larger to fit, and the stitching looks like it would be open enough to allow the quilt to puff up between the stitches.

Alternatively, I should also be able to digitize my original concentric circle idea myself fairly easily with my Bernina Embroidery Software, but I upgraded from Version 4 to Version 6 last year and have not been able to take classes from my dealer yet to learn how to use the new version.  It's completely different than the older version, because Version 6 has a baby version of CorelDRAW for digitizing from scratch and when I fooled around with it last night I wasn't able to figure out how to use the circle tool.  However, I was able to find the handouts for the Version 6 Software Mastery classes online, which I printed out, and I also managed to send the colossal on-screen software owner's manual PDF to my iPad so I can read it in my Kindle app -- but it doesn't navigate as easily as a Kindle book would, and I'm not able to use the hilighting or annotating functions.  This is so irritating -- I want a real, physical owner's manual that I can highlight, write notes in, and cover with Post-It flags to help me find the right information quickly when I need it again!  I know some users have paid to have a local printer print the whole thing out in multiple spiral bound volumes...  Ugh.  Bernina, are you listening?  I want an owner's manual next time!!!  So anyway, there is going to be a little software learning curve, and I have a few hundred pages of boring technical reading ahead of me, but it's doable -- and I need to learn how to use that software anyway or else it will be a huge waste of money.

Monofilament Nylon Thread from SewArt International
Finally, just when you thought I was finished with this smorgasbord of anxiety-inducing possibilities, we come to the question of thread.  I wasn't thrilled with the look of the heavier-weight "machine quilting thread" I used on Anders' quilt.  I've considered using the lighter-weight cotton or silk threads recommended by Wendy Sheppard and Diane Gaudynski.  But I'm leaning toward a .004 nylon monofilament quilting thread from Sew Art International for this project.  I have a lot of busy fabrics in this quilt, and I don't think I want the quilting thread to stand out and scream at anyone.  Plus, invisible nylon should hide my oopses and glitches better than any other thread, and it will enable me to quilt in that Scrabble label without scribbling all over it with the quilting thread. I have this thread in both clear and a smoke color, and I haven't decided which color to use yet.  I've never used the monofilament nylon thread before (it's a maiden voyage -- just like the Titanic!), and I'm nervous about the thread snarling, snapping, or otherwise misbehaving, but I'm going to do my research as far as tension settings and practice before I tackle the Real Deal.

Ready to Go: Final Blocks Awaiting Assembly
I can worry about all of this some more while I stitch those remaining blocks together today, since they aren't going to sew themselves.  After all, it's not a real quilt until somebody gets an ulcer.  Isn't that what they always say?  Well, that's what they should say.  Meanwhile, the band plays on...