
You guys, if this was the year 2021 instead of 2023, I would be SO AHEAD OF SCHEDULE for my Deco QAL!! Here it is, only October 14th, and I have finally finished all of my log cabin blocks for Week 3 (Nov. 1-8, 2021) of Lo & Behold Stitchery's Deco Quilt Along.
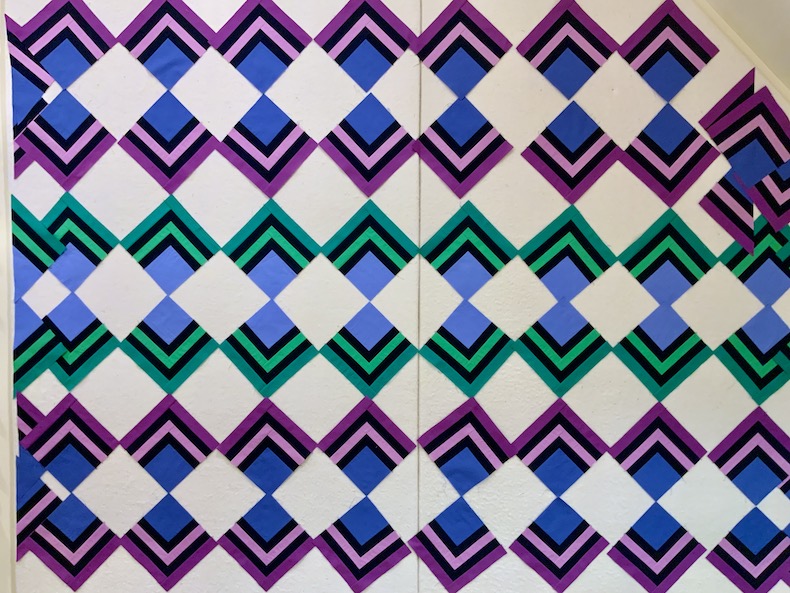 |
| 16 Blue-Green Blocks, 32 Blue-Purple Blocks, and 12 Half Blocks |
Unfortunately, it is NOT 2021, so instead of being ahead of schedule I'm actually 705 days behind schedule, or 100 weeks plus 5 days behind schedule. Sadly, I am no longer eligible for winning any of the prizes. 😆. Good thing I still like this quilt!
 |
| My 102 x 102 Deco Bed Quilt, pattern available here |
In case anyone out there is interested in making a Deco Quilt of their own, the pattern from Lo & Behold Stitchery is available as an instant PDF download on Etsy here (this post contains affiliate links).
I'm making the largest 102" x 102" bed sized version of Deco, but the pattern also has instructions for making the more manageable baby and throw sized versions and those are striking, too. I quilted a baby sized Deco for my client Liz back in 2021 and a throw sized Deco more recently for my client Megan. I've seen this quilt made up in so many different color combinations and I haven't seen any that I didn't like. I had a great time coming up with my own color palette of Kona Solids and then tweaking it to complement my Anna Maria Horner floral print backing fabric (it's Hindsight "Honorable Mention" in Turquoise from Free Spirit Fabrics, available on Etsy here).
(Note to Self: It would have saved a lot of time to pick the backing print FIRST and then just pull the solid colors from the selvedge instead of coming up with a custom palette first and then trying to find a print that had exactly the same colors in it!)

 |
| My Deco Quilt Fabrics with Anna Maria Horner Backing Print |
I'm just glad I don't have to make any more log cabin blocks! I find it so monotonous to make the same exact block in the same exact fabrics over and over and over again. The only reason I got these blocks finished at all is because I had them all cut out and packed up in Ziplock bags, ready to sew, and I took them to a couple of guild social sewing events last week. It's amazing how much you can get done when you are gabbing away with other quilters!
 |
| My Personal Patchwork Assembly Line |
It would have been faster to sew the log cabin blocks without pinning, but taking the extra time to match the ends of each strip to the edges of the block units and pin them in place ensured that the blocks would all finish at 8 1/2" without any "squaring up" butchery. My favorite pins for most patchwork piecing are the Clover Extra Fine Patchwork Pins. I don't like the distortion created by thicker pins, and I like that I can sew right over these extra fine pins (slowly!) without risking damage to my sewing machine. Super-skinny pins are less likely to land right in the spot where the needle is coming down, and usually they will just deflect if the needle comes too close. On the very few occasions where my needle has landed right smack on one of these pins, it just bent instead of breaking and my sewing machine survived unscathed. Disclaimer: if you sew fast and furious like you're in a NASCAR race, you may not be as lucky! Sew over pins at your own risk! 😉
 |
| Clover Extra Fine Patchwork Pins Are My Friends |
So, what's next on my personal quilting agenda? Well, Week 4 (Nov 8-15 of 2021) of the Deco QAL schedule calls for sewing all of Block 2 for the quilt using strip piecing and "stitch-and-flip" methods.

Back to FrankenWhiggish Rose...
Meanwhile, I've been itchin' for some hand stitchin'! I'm not starting any new appliqué projects until finishing the FrankenWhiggish Rose blocks I started in 2014, but unfortunately I have strayed so long from that one that I'm scratching my head and looking up my old blog posts, trying to remember how the heck I did the first block.
 |
| The Mystery of the Broderie Perse Rosebuds |
When I started this project I made one complete block as an experiment and then decided to make eight more blocks just like it, assembly line fashion so I appliqued the stems on all the blocks, then the large flower petals, smaller petals, center circles, leaves, etc. The very last elements to be stitched to the blocks are the broderie perse rosebuds that go around the center of the big flower (broderie perse just means that the rosebuds were isolated and cut out from a print fabric to be rearranged and stitched to a different fabric) and the stuffed berries beyond the tulips at the four corners of each block. It has been a LOT OF YEARS since I did the rosebuds and berries on the first test block, and I do not remember exactly how I did them!
 |
| Complete 16 inch Block with Rosebuds and Stuffed Berries |
Searching back through my older blog posts, I only found this one post mentioning the rosebuds. The only help that Rebecca-From-Nine-Years-Ago had to offer me was that she backed those little rosebuds with Jeanne Sullivan's Patch Back product, used fabric glue stick to preturn the fabric allowance around each shape, and then used Roxanne's Glue Baste-It to position the tiny rosebuds onto her block before stitching them down, following the instructions in Jeanne Sullivan's book Simply Successful Applique. Fortunately I found my pack of Patch Back sheets in the tub of fabric and other supplies for this project, because I can't find this product for sale anywhere anymore! My Jeanne Sullivan appliqué book was in the tub of FrankenWhiggish supplies, too, along with the leftover length of Vervain "Monado" drapery fabric from which I'm cutting out my rosebuds -- and thankfully YES, there were enough rosebuds left on that remnant to cut out the 56 that I need to finish my blocks. Rebecca-From-Nine-Years-Ago definitely did not count the rosebuds on her fabric remnant before launching into her overly ambitious project. All kidding aside, I really wish I'd taken some in-progress photos of how I prepped the rosebuds and posted them here on my blog for my future self to refer back to. I got one measly little rosebud prepped last night and I had a tough time turning the edges. I am guessing that I need to cut a narrower turning allowance and/or use more glue, but it would really be nice to see how I did it last time to refresh my memory since the rosebuds on that first block turned out so nicely!
That's all you get from me for today. My goals for the coming week are to make some progress on my Deco Block 2s and my FrankenWhiggish rosebuds. Next time I'll show you some pretty quilting, pinky promise! For now, I'm linking up with my favorite linky parties as listed below and then I'm going to have another go at those rosebuds with my Patch Back and my glue sticks! You know what is keeping me going with this FrankenWhiggish Rose Odyssey? I can't wait to get to QUILT IT when it's finished!! 😍. Have a wonderful weekend, everyone, and happy quilting!
MONDAY
Design Wall Monday at Small Quilts and Doll Quilts
TUESDAY
To-Do Tuesday at Quilt Schmilt
WEDNESDAY
Midweek Makers at Quilt Fabrication
Wednesday Wait Loss at The Inquiring Quilter
THURSDAY
Needle and Thread Thursday at My Quilt Infatuation
FRIDAY
Peacock Party at Wendy’s Quilts and More
Can I Get a Whoop Whoop? at Confessions of a Fabric Addict
Finished or Not Friday at Alycia Quilts
Off the Wall Friday at Nina Marie Sayre
Beauty Pageant at From Bolt to Beauty
TGIFF Thank Goodness It’s Finished Friday, rotates, schedule found here: TGIF Friday
SUNDAY
Frédérique at Quilting Patchwork Appliqué
Slow Stitching Sunday at Kathy's Quilts
14 comments:
I didn't realize that the Whiggish Rose was not done - I truthfully have forgotten about it and it was one of my favorites. Glad to see you are picking it up again to work on it - how close finish is it?
Franken Rosen is going to be so beautiful when she's finished, especially with your quilting! Sometimes making a quilt seems like climbing a mountain on one foot. Hopefully next week you can show us what you've accomplished with Deco, happy stitching!
You are making great progress. . .who really cares if it a couple of years or more than nine! All progress should be applauded! Both projects are going to be stunning!
Wonderful progress on both, they are equally challenging!
Every time I see your progress on your Deco quilt, I think I may finally choose some fabrics and redraft the design in EQ so as to avoid those outer bias edges -- and then I chicken out again. I bought the downloadable pattern two years ago and have procrastinated ever since. Yours is looking wonderful, though!
You can do it!!! These are great blocks and great colors - so you know you want to keep going!!
(Ps if you changed the anticipated finish date... you could go back to being ahead of the game Bwahh ahaha!!!!)
I look forward to your posts. I find them filled with real life experience as well as beautiful quilts. Can hardly ask for more. Keep it coming!
I like doing boring steps in a fun group chatty setting. Glad you found a way to finish the blocks. 700+ days sounds reasonable to me. LOL. I have an infinite tolerance of unfinished. The quilt will be great when finished!
I made the deco quilt shortly after the pattern was released. I was disappointed to find out that many of the edge blocks were made by cutting a whole block in half. That meant there was affectively no center seam allowance and when the binding was put on all the points would be cut off by a quarter inch.
I know; I saw that in the Deco quilt tops several of my clients brought me for longarm quilting. Instead of following the pattern instructions, I sewed strips to HSTs to create half blocks with quarter inch seam allowances. I think that Brittany writes her patterns with the assumption that customers’ goals are the fastest possible construction using the least amount of fabric. I’d rather go slower, use a little more fabric, and have a cleaner, more precisely pieced quilt when I am finished.
LOVE that backing fabric for your Deco quilt! Using it as a jumping off point for your quilt's colors was a really good ides, Rebecca.
The Deco quilt is coming along beautifully. Never mind its years later--if you wanted to keep up with the quilt along you would have because when you want something done, it gets done! Hopefully you'll figure out the trick with the FrankenWhiggish Rose blocks soon because they are very pretty. Thanks for sharing on my weekly show and tell, Wednesday Wait Loss.
https://www.inquiringquilter.com/questions/2023/10/18/wednesday-wait-loss-350
Oh I understand when you talk about repeating the same block again and again, I feel the same! I love your chain production line, it helps ;) Well done for being - two years after - ahead of the timing ;D
Your rosebuds are exquisite, well done for rewriting/reinventing the process!
Thank you so much for sharing your work in progress, and linking up.
I think your Deco quilt is fun and beautiful...despite being 101 weeks behind! I have faith you will have it completed before too long! Thanks for sharing on Monday Musings.
Post a Comment