Showing posts with label Broderie Perse Applique. Show all posts

Wednesday, August 14, 2024

FrankenWhiggish Rosebuds, Michele's Log Cabin Stars Quilt, Laundry Room Makeover, Swedish Pancakes + A 21st Birthday Celebration

Good Morning, Quilty Peeps!  As you can see by my way-too-long blog post title, I have lots of ground to cover today.  First things first, I am happy to report that I've finished prepping ALL of the remaining broderie perse rosebuds for my FrankenWhiggish Rose blocks, they are all glue-basted in position on the blocks, and the hand stitching to secure them is in progress.  That's right; I have a portable hand stitching project again FINALLY!

All FrankenWhiggish Rosebuds Are Prepped and Ready for Stitching!

In case anyone is interested in what's in my portable hand stitching "toolbox" for this project:

  • YLI 100 wt silk thread in color 256, matched to the rosebud fabric
  • Bohin size 12 Appliqué Needles (these are the only ones I've tried that don't bend or break on me)
  • Colonial Needle Company Leather Thimble Pad stickers (I use one on my right pointer finger to help grab the needle and pull it through the fabric, or to protect my fingertip when I need to exert a little pressure on the back end of the needle to force it through a spot where the glue dried stiff)
  • Thread Heaven (no longer available) or Thread Magic thread conditioner to help prevent snarling and knotting -- I don't need it when I'm using silk thread, but I have it in my hand stitching kit because it's a big help when I'm hand stitching quilt bindings with cotton thread
  • My new 2.75 magnification sewing glasses from Warby Parker, so I can thread the eye of my needle and see how many threads of fabric I'm grabbing with each stitch
  • That nail file in my kit is actually for my fingernails, because often I'll discover some little scratchy spot at the edge of a fingernail while stitching when the thread gets hung up on it
  • Not pictured, I also have a tube of Neutrogena Hand Cream in my hand sewing kit and another one in the drawer next to my sewing machine.  I like this kind because it's not greasy, has no fragrance or dye, and a tiny drop goes a long way to just barely moisten my fingertips so I can get a better grip on what I'm stitching without gooking it up with lotion
  • Either my Apliquick 4" Microserrated Scissors (pictured) or my Gingher Spring Action Thread Nippers (preferred if I'm just clipping thread and not trimming needle turn appliqué shapes while stitching).  If I'm planning to take my hand stitching kit on an airplane, I'll swap out for a cheap thread clipper (in case Airport Security confiscates it and throws it away) with a pack of dental floss that I could use as a backup thread trimmer in a pinch


(Those are affiliate links, by the way).   You probably won't see much of FrankenWhiggish for a couple weeks while I'm stitching the rosebuds to the blocks because, if you've seen one of my blocks get rosebuds, you've seen them all!  My Seven Sisters pattern and templates finally arrived from Australia and I'm planning to start on that project in September.

Instead of sharing FrankenWhiggish, I thought I might share some of the backlog of long arm quilting clients' quilts that I haven't posted about before, like Michele's version of Emily Dennis's Log Cabin Stars quilt.  Here's a teaser to whet your appetite; we'll return to this quilt later in today's blog post:

Michele's Log Cabin Stars Quilt, Pattern Available here


Tuesday, August 6, 2024

FrankenWhiggish Rosebuds + Random Happenings of Everyday Life

No, my Seven Sisters pattern and templates have not yet arrived from Australia, but I've been making progress on my languishing 10-year-old FrankenWhiggish Rose project while impatiently waiting for that package to arrive.  

Glue-Basting Prepped Rosebuds Prior to Stitching


In looking back through my earlier posts I realized that I never showed the step in between prepping the rosebuds and actually stitching them to the block, hence the photo above.  These rosebuds are too little to be pin-basted to my blocks and the Patchback stabilizer product I'm using makes them a little bit stiff, so I'm glue-basting them in place with tiny drops of Roxanne's Glue Baste-It (this post contains affiliate links).  I've had this particular bottle of glue for a LONG time; it lasts forever because you use so little of it on each appliqué shape.  Not sure whether you can see this clearly in the photo, but I'm putting my tiny drops of glue in the center of my turned seam allowance rather than right on the edge.  The glue spreads when I press the rosebud in place on the block and I don't really want it right on the edge where I have to push my needle through as I'm stitching.  Here's an update on where I am with this project as of today:

11 Rosebuds Glue-Basted to Blocks, Ready for Stitching

24 Rosebuds Need to be Prepped & Glue-Basted to Blocks

97 Stuffed Berries Need to be Made & Glue-Basted to Blocks

Speaking of the stitching part, I got a bit of a rude awakening when I resumed this project after a 6-month hiatus and discovered that my Magical Sewing Glasses (prescription reading glasses that I had my eye doctor order based on the distance I hold my work from my eyes when hand stitching) are no longer capable of banishing the blur!  So apparently my close vision has deteriorated significantly.  AAAARRRGH!  I went to my local Warby Parker store, hoping that I could select and come home with a cute new pair of stronger glasses for hand stitching.  I picked out these frames and ordered them in the 2.75 strength magnification, but instead of taking them home the same day I have to wait for them to be shipped to me in 7-10 days.  Probably should have just gone to the drug store instead.

Warby Parker Brady Frames, Desperately Needed for Blurry Hand Stitching!


I started stitching down my rosebuds with my old glasses even though I can't really see what I'm doing.  Hopefully my muscle memory is picking up the slack from my aging eyeballs!

Saturday, August 3, 2024

Actual Rosebud Progress for FrankenWhiggish Rose

Good morning, stitchy friends!  I am delighted to report actual PROGRESS on my FrankenWhiggish Rose appliqué project today!  Finishing the rosebuds is my One Monthly Goal for August.

Me Stitching an Actual Rosebud Onto an Actual Quilt Block


(In case anyone's about to ask, yes, that is a serger 3-thread overlock stitch on the edge of my quilt block in the photo above.  I oversized the block backgrounds (so I can trim them all to exactly the same size once the hand appliqué stitching is completed) and overcast the raw edges of my blocks before beginning, knowing that this project would be a long time in the making and that raw block edges would be prone to fraying as the blocks were scrunched up and manipulated in my hands during my stitching process.  The overlock stitching will be trimmed away prior to joining the blocks into a quilt top).

Four Little Rosebuds Where there Used to Be None

Each block gets eight rosebuds around that center circle but I only glue baste four at a time for stitching, to lessen the chance of my thread getting caught on an adjacent unstitched rosebud and ripping it off the block.

Sunday, October 15, 2023

Halloween Quilts for Paula and Mary + Broderie Perse Rosebud Secrets Rediscovered

Part One: The Halloween Quilts!

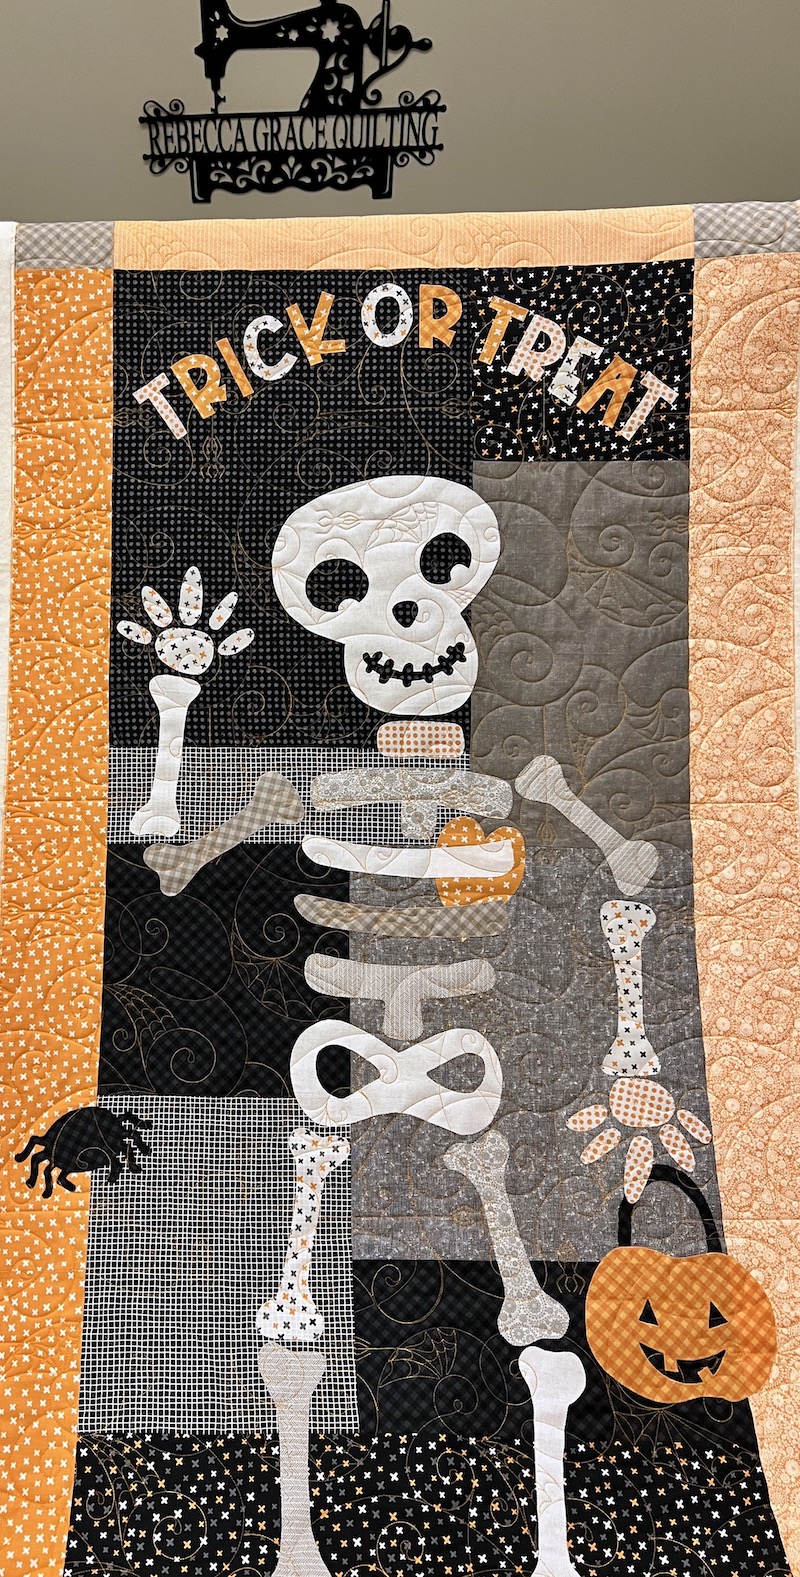
I recently had the pleasure of quilting a couple of really cute Halloween wallhangings for clients that I thought my readers would enjoy.  First up is Mr. Bones, an adorable machine appliqué project made by my client Paula.  This is a pattern from the Quilt Factory that is available on Etsy here (this post contains affiliate links).  

Paula's 32 x 60 Mr. Bones Wallhanging with Spider Spinners B2B

Wouldn't this be perfect to display on your front door on Halloween night, or in your entryway to greet trick-or-treaters?!  This pattern calls for some embellishments that you're not seeing in these photos -- fortunately, Paula knew to wait and add the buttons etc. after having her project long arm quilted.

We chose the Spider Spinners B2B design to play up the whimsy of the appliqué design.  I liked that it had playful spirals and spiders hanging down instead of just cobwebs alone, and I envisioned the whole quilt as an illustration in a children's book as I scaled the digital quilting design, trying to size the spiders and the cobwebs proportionately to the skeleton and Jack-O-Lantern the way they would be if the whole scene had been drawn by a single illustrator.  The perfect thread color turned out not to be gray, silver or white, but a true orange shade of Glide called -- what else? -- Halloween!  

Detail of Spider Spinners B2B Stitched in Glide Thread, Color Halloween

I'm so glad Paula trusted me on the orange thread!  If I'd used gray, silver, or white thread, the cobwebs would have blended in and disappeared against the gray background fabrics and the white and gray skeleton fabrics.  I really wanted those spiders and cobwebs to be "part of the scene" and visible in those areas, and I love how it turned out.  We used Quilters Dream Cotton Deluxe loft batting for that extra oomph to the quilting texture.

Saturday, October 14, 2023

Deco QAL Week 3, Completed Only 101 Weeks Behind Schedule!

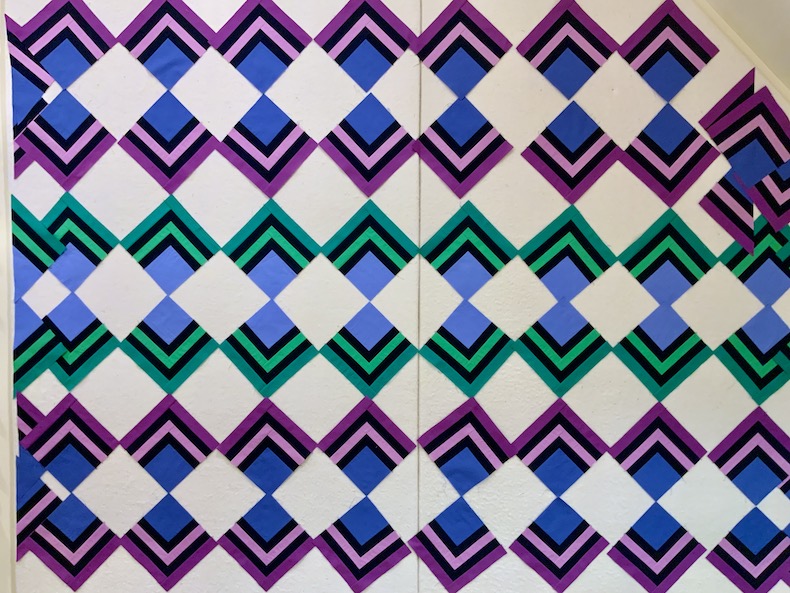
You guys, if this was the year 2021 instead of 2023, I would be SO AHEAD OF SCHEDULE for my Deco QAL!!  Here it is, only October 14th, and I have finally finished all of my log cabin blocks for Week 3 (Nov. 1-8, 2021) of Lo & Behold Stitchery's Deco Quilt Along.  

16 Blue-Green Blocks, 32 Blue-Purple Blocks, and 12 Half Blocks

Unfortunately, it is NOT 2021, so instead of being ahead of schedule I'm actually 705 days behind schedule, or 100 weeks plus 5 days behind schedule.  Sadly, I am no longer eligible for winning any of the prizes.  😆. Good thing I still like this quilt!

My 102 x 102 Deco Bed Quilt, pattern available here

In case anyone out there is interested in making a Deco Quilt of their own, the pattern from Lo & Behold Stitchery is available as an instant PDF download on Etsy here (this post contains affiliate links). 

I'm making the largest 102" x 102" bed sized version of Deco, but the pattern also has instructions for making the more manageable baby and throw sized versions and those are striking, too.  I quilted a baby sized Deco for my client Liz back in 2021 and a throw sized Deco more recently for my client Megan.  I've seen this quilt made up in so many different color combinations and I haven't seen any that I didn't like.  I had a great time coming up with my own color palette of Kona Solids and then tweaking it to complement my Anna Maria Horner floral print backing fabric (it's Hindsight "Honorable Mention" in Turquoise from Free Spirit Fabrics, available on Etsy here).

(Note to Self: It would have saved a lot of time to pick the backing print FIRST and then just pull the solid colors from the selvedge instead of coming up with a custom palette first and then trying to find a print that had exactly the same colors in it!)


My Deco Quilt Fabrics with Anna Maria Horner Backing Print

Wednesday, November 18, 2020

Foundation Paper Piecing + Needle Turn Appliqué: The Notorious R.B.G. is Ready to Join Her International Sisters

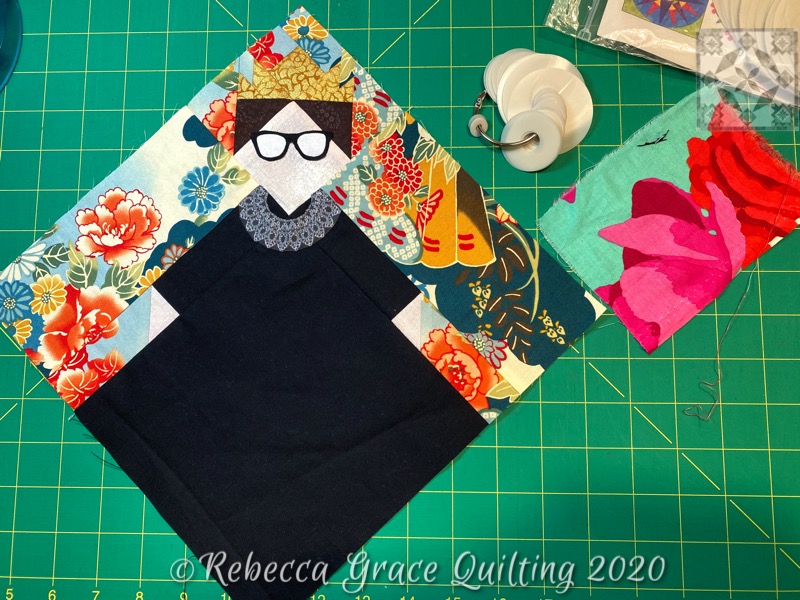
Do you remember seeing "a little secret sewing" on my to-do list last week?  I had SEW much fun making this "Notorious R.B.G." block for my quilting friend Preeti, based on her popular International Sisters Block Tutorial (find it on her Sew Preeti Quilts blog here).  

My Notorious Ruth Bader Ginsburg Block, Ready to Join Her Sisters

If you haven't seen Preeti's International Sisters blocks yet, you should pop over to Preeti's tutorial to read how the block came about.  Preeti stumbled upon a quilt block called African Queen a few years ago and drafted her own 10" finished version of the block when she was unable to find a pattern or instructions for making it.  Then she started experimenting with all different skin tones and it became an International Sisters block.  Here are some of Preeti's lovely International Sisters:

Four of Preeti's "Sunshine Sisters" (blocks and photo by Preeti Harris, Sew Preeti Quilts)

One of the great things about Preeti's International Sisters blocks is how fabulously they showcase wildly colorful print fabrics, and I think that is a big part of their appeal.  But of course R.B.G. needed to wear a plain black Supreme Court Justice robe instead, so I used a Japanese print from my stash for her background to set off the black dress and help her to work in a quilt with other sisters blocks, should Preeti choose that.  (She can do whatever she wants with it, or nothing at all.  There are no strings attached).

Justice Ginsburg at the 2015 Elle Women in Washington Power List Dinner

The red and orange Japanese print from my stash reminded me of this gloriously colorful embroidered Chinese silk kimono jacket that Justice Ginsburg rocked at Elle magazine's Women in Washington Power List Dinner in 2015.

My Foundation Paper Piecing Pattern, Created in EQ8 Software

In order for this international sister to be recognizable as The Notorious R.B.G., I needed to swap the head wrap for Ginsburg's trademark swept back hairstyle, topped with a crown.  I recreated Preeti's International Sisters block in EQ8 software, carefully following her tutorial specifications so the block would finish the correct size and with the correct proportions.  Then I just subdivided what would have been the head wrap with some additional seam lines. 

Foundation Paper Piecing Ruth's Crown

Foundation Paper Piecing Completed

Once I'd finished foundation paper piecing the four units that make up the whole block, I starched and pressed them nice and flat before trimming away the excess fabric 1/4" from the seam lines.  Then I removed the paper foundations and joined the units together.

Needle Turn Appliqué for the Broderie Perse Eyeglasses

I needed just a few more customizations for my R.B.G. block, and those were added with needle turn applique.  First, I cut out a pair of appropriately sized eyeglasses for my Supreme Court justice from Geekery "Spectacles" fabric (available from several Etsy sellers here).

Spectacles Fabric from RJR Fabric's Geekery Collection, Available on Etsy here

Back view of Appliqué Stitches

The white seam allowance was pretty skimpy in the deep V of the nose bridge, so there are LOTS of tiny stitches there to ensure it doesn't unravel.  For reference, those machine stitched foundation paper piecing seams have a stitch length of 1.5 and the seams sewing the sections of the block together are stitch length 2.0.

The "dissent collar" was done the same way, cut out of a Spoonflower RBG's Dissent Collar fabric (created by jbtsparkle, available from Spoonflower here) with a fat 1/8" seam allowance and then added to the already-pieced block by needle turn appliqué.

But something was still missing:

Tiniest Perfect Circle Template + Scrap of Kaffe Fassett Fabric = Jade Earrings

Justice Ginsburg Never Went to Work Without Her Earrings!

I used the smallest size of my Karen Kay Buckley Perfect Circles templates and a scrap of backing fabric from a recently completed baby quilt to recreate Justice Ginsburg's iconic jade statement earrings.

Properly Accessorized, Justice Ginsburg is Ready for a Day in Court

This block was a fun little diversion after wrapping up the two baby quilts.  I'm scheduling this post so it won't publish until after Justice Ginsburg has been safely delivered to Preeti.  I hope she likes it!

PSST!!  I'd Love to Quilt for YOU!

By the way, if you or any of your quilty friends has a quilt top or two that needs quilting, I'd be delighted to quilt for you!  My turnaround for edge-to-edge quilting is currently running about 2 weeks, and you can click here to find out how to book your quilt with me.

I'm linking up today's post with the following linky parties:

THURSDAY

Needle and Thread Thursday at My Quilt Infatuation  

FRIDAY

Whoop Whoop Fridays at Confessions of a Fabric Addict

Peacock Party at Wendy’s Quilts and More

Finished Or Not Friday at Alycia Quilts

Off the Wall Friday at Nina Marie Sayre

 TGIFF Thank Goodness It’s Finished Friday, rotates, schedule found here: TGIF Friday

SATURDAY

UFO Busting at Tish in Wonderland

SUNDAY

Frédérique at Quilting Patchwork Appliqué

Oh Scrap! at Quilting Is More Fun Than Housework

Slow Stitching Sunday at Kathy's Quilts


Tuesday, September 15, 2020

LAL#7: Inspired by Online Ruler Work Classes, Bathroom Tile Projects, and Chasing Butterflies

 Oh my gosh, you guys -- how is it Tuesday AGAIN?!  Last week, my big focus was on finishing up the quick and easy (NOT!) baby quilt top that I dreamed up in December of 2018.  It was for a baby who is now nearing two years old and who will become a big sister on or about October 1st.  I finished the curved piecing of these 9 1/2" giant clam shells last week and added a 2" outer border matching the background fabric, just enough so the clam shells float away from the binding when it's finished.  And then I went off chasing butterflies...


...Like, LITERALLY chasing butterflies, because I had this idea that I wanted butterflies to look like they were flying across the quilt top, as though the printed fabrics were flowers in a garden.  I considered machine embroidery and had a design all picked out to embroider, but I couldn't bring myself to do it for two reasons.  First, this is a baby/toddler quilt and form needs to follow function.  The 7" butterfly design I almost embroidered would have created large stiff areas in what I intended to be a smooshable, cuddly little kiddo quilt.  Second, I was concerned that machine embroidered butterflies might make the quilt appear more store-bought and commercial versus a handmade gift, and when I considered everything I know about this particular baby's parents, machine embroidery just didn't feel like a fit.  


And then I stumbled across this butterfly print online, took a chance and ordered a remnant of it on eBay, and then spent a ridiculous amount of time figuring out how to do a turned edge, broderie perse, blanket stitched appliqué.  I won't bore you all with the details.  I'm just glad the top is finally DONE, with nice, soft butterflies that are just as soft and supple as the rest of the quilt.  Edges are turned under for durability and to avoid the use of any kind of fusible web.  Backing fabric is trimmed away.  The butterflies were a much bigger hassle than anticipated, but the quilt looked like something was missing to me before.  Now it feels "done."


I love that big Monarch butterfly SO MUCH!!  The backing for this quilt is seamed and ready to go, but first I have that outreach top that I showed you last week, still waiting to be quilted.  Planning to load that one up and start quilting tomorrow, promise!

I also designed and ordered fabric for a second baby quilt last week, a quilt for the baby brother whose arrival is expected October 1st.  No curved piecing or appliqué in that one!  Oh, and I convinced my husband to rip up the kids' Jack & Jill bathroom and start laying new tile:


We figured that the pandemic is as good a time as any for a little renovating, since all of hubby's overnight work travel is on hold.  This bathroom was SO nasty before that I can't even bring myself to show you the before pictures!  White subway tile will go on all of the walls to just above the light switches, as well as on the side walls of the tub/shower.  Small black hexagon tile will go on the back wall of the shower, and the offending shower curtain that led to all of the mold etc. is getting replaced with a sliding glass door that will keep the water IN the shower, where it belongs!  I'm not actually in the bathroom with power tools (that would not be healthy for my marriage), but I am heavily involved in the selection of tile, shower doors, fixtures, etc.

Last Week's Quilting Goals:

  • ❌ Quilt pantograph on Veteran's Quilt
  • ✅ Finish borders & fix backing shortage for Modern Baby Clam Shells
  • ✅  design for baby brother quilt & purchase fabrics


To Do This Week:


Cheeky Cognoscenti is Now Rebecca Grace Quilting

Oh, I nearly forgot -- the other thing I've been working on is a name change for my blog and my social media accounts, from Cheeky Cognoscenti (that no one can pronounce or spell) to Rebecca Grace Quilting.  Because I'm Rebecca Grace, and I write about quilting...  It was time!  I still need to create a new banner image for the top of the blog with the new name.

Highlights From Last Week's Linky Party

But some of you came here today looking for some legit long arm learning, so let's get on with that!  We had lots of great posts linked up last week, everything from free motion skill building projects to Julie Stocker's fabulous custom quilt job combining computer assisted motifs with extensive ruler work that was all done by hand.  Totally swooning over that one but not reposting her images here since her client will be submitting the quilt for publication.  If you missed it last week, be sure to check that one out on Julie's Pink Doxies blog here.


Next, I wanted to sprinkle some quilty love on Karin of The Quilt Yarn and CAMapleLeaf on Instagram (don't know her/his name!).  That's Karin's raspberry and plum block that you see above, and CAMapleLeaf's block pictured below.  They are both working through the same online ruler work class with Natalia Bonner right now, the 9 Patchalong.  


If you're looking for an online machine quilting skill builder, the 9 Patchalong Quilt Along looks like a really fun option.  It just started at the beginning of September and it's completely free.  You know, top notch quilting teachers like Natalia Bonner all around the world have had their teaching schedule upended by this pandemic and they are all being forced to explore new ways of leveraging technology to teach from their homes and studios.  This could end up being a silver lining for the quilting industry, because once these teachers have invested in the necessary equipment and worked out the kinks of this teaching model, I don't expect virtual quilting workshops to completely disappear once the COVID-19 crisis has passed.  And that means MORE options for quilting teachers to make a living with less time on the road and away from their families, as well as more opportunities for us quilting students to take classes with top-notch instructors.  

I know that Bethanne Nemesh and Lisa Calle are also experimenting with some different models for paid online classes.  Are any of you readers signed up for either of those?  Have you discovered any other terrific online learning resources for machine quilters that I should know about?  Please tell me about it in the comments.

I'm linking up today's post with the following linky parties:

TUESDAY

·       To-Do Tuesday at Home Sewn By Us

WEDNESDAY

·       Midweek Makers at Quilt Fabrication

·       Wednesday Wait Loss at The Inquiring Quilter

THURSDAY

·       Needle and Thread Thursday at My Quilt Infatuation  

FRIDAY

·       Whoop Whoop Fridays at Confessions of a Fabric Addict

·       Peacock Party at Wendy’s Quilts and More

·       Finished Or Not Friday at Alycia Quilts

·       Off the Wall Friday at Nina Marie Sayre

·       TGIFF Thank Goodness It’s Finished Friday, rotates, schedule found here: http://tgiffriday.blogspot.ca/p/hosting-tgiff.html

Long Arm Learning Linky Party #7

Now it's YOUR turn to link up and share your machine quilting projects from the past week!  Remember that all machine quilting counts, whether it's a domestic, sit-down mid arm, or a long arm on a frame.  If you, like me, were busy doing other things last week, feel free to link up an older post about machine quilting that you haven't linked here before.  Have a great week, and happy quilting!



You are invited to the Inlinkz link party!

Click here to enter