
Part One: The Halloween Quilts!
I recently had the pleasure of quilting a couple of really cute Halloween wallhangings for clients that I thought my readers would enjoy. First up is Mr. Bones, an adorable machine appliqué project made by my client Paula. This is a pattern from the Quilt Factory that is available on Etsy here (this post contains affiliate links).
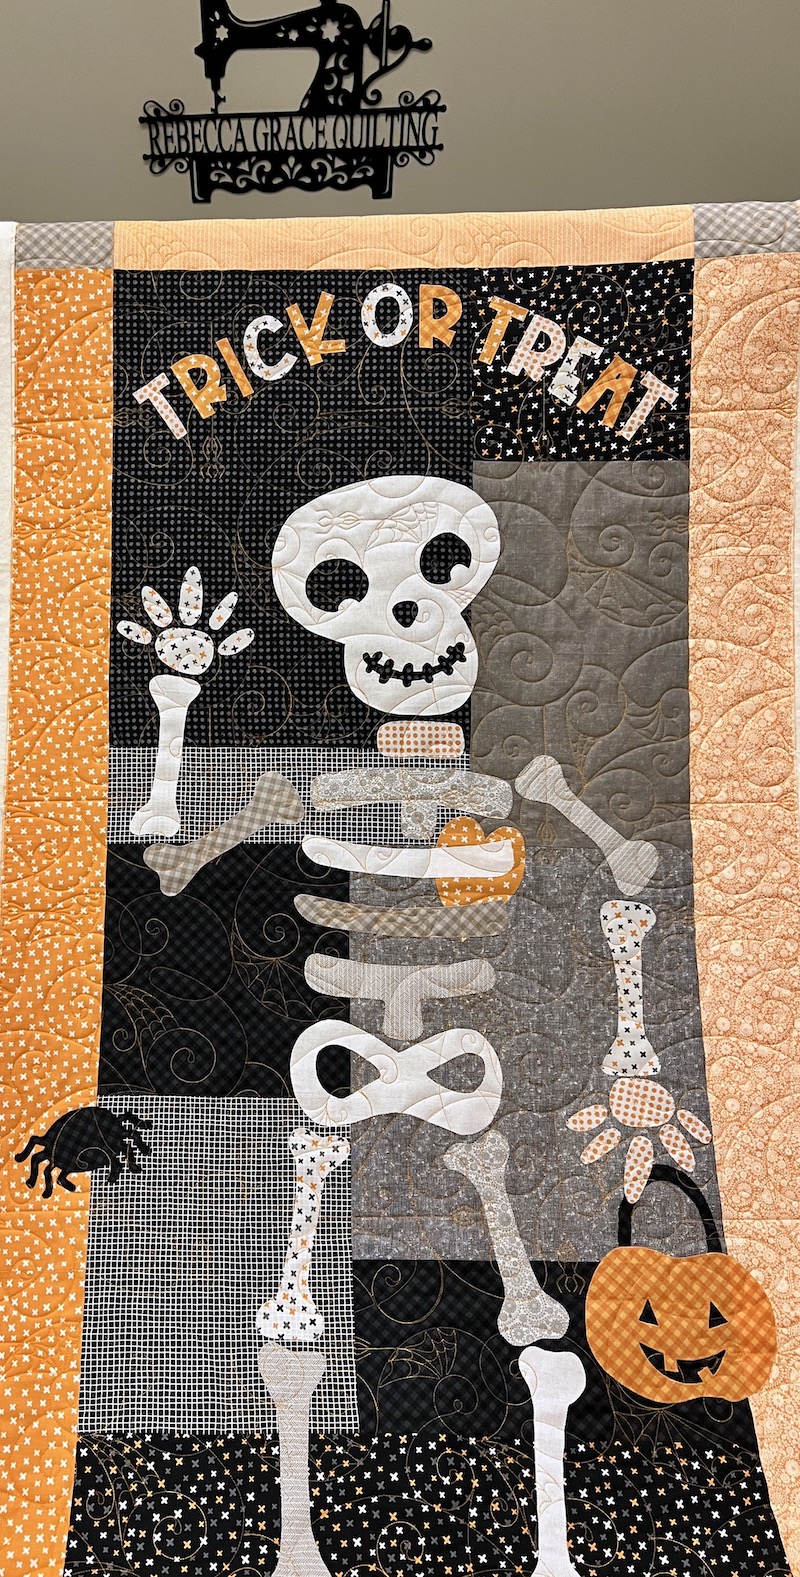 |
| Paula's 32 x 60 Mr. Bones Wallhanging with Spider Spinners B2B |
Wouldn't this be perfect to display on your front door on Halloween night, or in your entryway to greet trick-or-treaters?! This pattern calls for some embellishments that you're not seeing in these photos -- fortunately, Paula knew to wait and add the buttons etc. after having her project long arm quilted.
 |
| Detail of Spider Spinners B2B Stitched in Glide Thread, Color Halloween |
I'm so glad Paula trusted me on the orange thread! If I'd used gray, silver, or white thread, the cobwebs would have blended in and disappeared against the gray background fabrics and the white and gray skeleton fabrics. I really wanted those spiders and cobwebs to be "part of the scene" and visible in those areas, and I love how it turned out. We used Quilters Dream Cotton Deluxe loft batting for that extra oomph to the quilting texture.I believe Paula said she was planning to add button eyes to the skeleton and to her appliqué spider in the lower left corner of the quilt once she got it back from me. My favorite detail is that the skeleton's heart is there inside his rib cage, so you know he's a friendly skeleton.
 |
| Paula's Mr. Bones Wallhanging |
Next we have another, equally adorable Halloween wallhanging made by my client Mary. Were you admiring Paula's skeleton but you're just not up for all of that appliqué? Mary's Tic Tac Cat is a patchwork pattern by Melissa Mortenson for Riley Blake patterns and you can get it here on Etsy. One great thing about this pattern is that it's not just for Halloween, either -- there are other block options that you can substitute for the pointy witch hats to make a Valentine's Day version or a non-holiday version. But I love the Halloween version -- the tic tac toe concept with kitty cat faces and pointy hats is so clever and fun.
 |
| Mary's 51 x 51 Tic Tac Cat Halloween Quilt with Charlotte's Web B2B |
We went with an allover spiderweb quilting design called Charlotte's Web B2B for Mary's quilt, a better choice for this quilt (in my opinion) because Tic Tac Cat is more abstract than pictorial -- this is not a scene with whole cats to which I'm adding details, and a "fussier" design like Spider Spinners might have detracted from the strong geometry and pared-down modern appeal of this quilt.
 |
| Charlotte's Web Quilting Stitched in Glide Thread, Warm Grey 4 |
Mary's thread request for this quilt was "silvery gray, gossamer." Well, when I auditioned several cool gray thread options against the fabrics in her quilt top, they were clashing horribly with the warm pumpkin orange toned fabrics, so the surprise winner ended up being Glide thread in color Warm Grey 4, which is definitely a gray but it has warm beige/brown undertones. On Mary's quilt, Warm Grey 4 reads as the perfect gray "cobweb" color against the black hats and the background fabric, but it just looked SO much better against all of her orange cat fabrics than the cool grays did! This is why I stock literally hundreds of cones of thread in my studio -- there is no way I would have picked Warm Grey 4 for this quilt from a thread color swatch chart. I had to actually unspool 18" or so of thread off multiple color cones and puddle the thread against the various fabrics in the quilt to see how each color option would either detract from or enhance the beauty of the fabrics in the quilt. The same exact thread can often look like a different color on one fabric than it does on another. I used Quilter's Dream Poly Select Loft batting for this quilt.
 |
| Mary's Tic Tac Cat Quilt Top Prior to Quilting |
Thank you so much for choosing me to quilt these for you, Paula and Mary!
PSST!! I'd Love to Quilt for YOU!
By the way, if you or any of your quilty friends has a quilt top or two that needs quilting, I'd be delighted to quilt for you! I have a few remaining openings for quilts in December of 2023. Click here to learn how easy it is to book a quilt with me!
Part Two, for the Benefit of Future Rebecca: Secrets of the Teeny, Tiny Rosebud Appliqué
 |
| Fabric Glue Stick, Dovo Applique Scissors, Manicure Orange Stick, Mechanical Pencil |
Supplies Needed:
- Jeanne Sullivan's Patch Back is what I'm using but I don't think it's sold anymore. Mark Sherman's Remarkable Machine Appliqué Stabilizer is a similar product that my friend Jeri uses, and Esther Aliu recommends Floriani Stitch N Wash Machine Embroidery Stabilizer. I'm having trouble locating any of these products online -- try your local quilt shop or sewing machine dealer. I know I've seen other appliqué stitchers recommending Hugs & Stitches Appliqué Paper for this method and C&T Publishing (the publisher of Jeanne Sullivan's appliqué book) now sells a Wash-Away Applique Paper that I found for sale on Etsy -- maybe it's the same product I bought from Jeanne's web site 9 years ago?
- Washaway Fabric Glue Stick such as June Taylor shown above. I also like the Bohin and Sewline temporary fabric glue pens.
- Ordinary mechanical pencil
- Light box for tracing (or improvise with your tablet or smart phone)
- Small, sharp, highly functional precision cutting scissors (not the pretty-but-cheap imitations that barely cut) such as Dovo scissors pictured above. My Appliquick 4" microserrated scissors would be another good choice but they weren't handy for the photo. Karen K. Buckley's Perfect 4" Scissors with microserrated blades are another good option, with larger, more comfortable handles for long cutting sessions.
- Roxanne's Glue Baste It
- Bohin Size 11 or 12 Applique Needles
- YLI 100 wt Silk Thread
Step One: Rough cut the desired motifs from your print fabric so they're easy to handle and work with. I'm isolating individual rosebuds from a lightweight, 100% cotton high end Vervain drapery fabric ("Monado" in Havana colorway) that has a high thread count similar to a batik you'd find in a quilt shop, by the way -- most home dec fabrics are way too stiff and thick for this technique. (I zoomed in for these photos). Notice how the rosebuds are not identical? I love that! That's why I have to trace each rosebud individually.
 |
| Rough Cut Rosebuds, Freed from Vervain Drapery Fabric Print |
Step Two: Because these shapes are so small and simple, I didn't bother getting out my light box. I just used my iPhone screen as a mini lightbox, with the screen brightness turned all the way up and an app with a mostly white background open on the phone. I trace the shape of one rosebud onto my Patch Back stabilizer with my mechanical pencil.
Step Three: Using my small, sharp Dovo embroidery scissors, I rough cut around the traced stabilizer shape to free it from the big sheet and make it easier to work with, and then I cut right along the pencil line to cut the rosebud shape from my Patch Back stabilizer. I find I get the smoothest cuts if I hold my scissors with the blades pointing straight up at the ceiling and turn the scrap of stabilizer rather than holding the stabilizer sheet steady and trying to turn my scissor hand as I'm cutting.
Step Four: Again with the small, sharp scissors, it's time to cut away the excess fabric around my rosebuds, leaving a very small turning allowance. The goal is for the excess fabric to wrap smoothly and securely around the edges of the Patch Back stabilizer, following the shape of the rosebud as closely as possible. I'll be hand stitching the rosebuds to my quilt blocks using very small stitches spaced closely together to ensure that my itty bitty seam allowances don't fray.
 |
| One Broderie Perse Rosebud, Ready to Stitch to My Quilt Block |
My initial try at recreating the rosebuds from 9 years ago is the one pictured on the left in the photo below. See the pronounced pleats in the turning allowance fabric and how those create jagged points along the edges of the rosebud shape? Yuck! That's because I cut my turning allowance too wide (and perhaps also because I was trying to glue the edge of the fabric around the stabilizer using just my fingers on a lap desk in front of the TV).
 |
| The One On the Right Is the Goal! |
Step Five: I got the best results working at my kitchen counter, with a cardboard notepad backing as my work surface. I coated the entire wrong side of my rosebud fabric with the glue stick, using the orange stick to keep it from sticking to my fingers, and then I carefully positioned the cut-out Patch Back rosebud onto the back of the fabric so it aligned as closely as possible with the rosebud printed on the fabric.
Step Six: This requires working slowly and patiently -- don't try to do this in a rush! I used an ordinary manicure orange stick, like you can get at the drug store or beauty supply, to turn the glued raw fabric edges back over the Patch Back shape, one little pinch at a time, working to keep the outer edge smooth. Appliquick sells a set of Applique Rod tools for doing this kind of work, but I haven't tried them so I can't say whether they work any better than my orange stick. The orange sticks are definitely less pricey!
 |
| The Right-Sized Seam Allowance is Scary-Tiny! |
As with every other skill, this gets easier and more automatic with practice.
 |
| Another Happy Little Rosebud Ready to Stitch Down! |
Step Seven: These tiny rosebuds are too small to secure to my quilt block with pins, so I use dots of Roxanne's Glue Baste It to position them on my block for hand stitching. Note that this method would work equally well for machine stitching the applique; hand stitching is just the method I've chosen for this project. The Patch Back product (and the substitute products listed above) are made of a mixture of fibers, some of which dissolve in water and wash out and some of which remain in the finished project to give a little added dimension to the appliqué without creating unwanted stiffness. The fabric glue stick and the Glue Baste It products are also water soluble and wash out of the finished piece, if you choose to wash it.
Step Eight: Hand stitch your applique as usual, perhaps with more stitches spaced more closely together than you'd use to stitch down a larger applique shape that had a more generous allowance turned under to prevent fraying. I'm using YLI 100 wt silk thread in a color that matches my rosebuds, with a size 11 or 12 Bohin applique needle.
And that's all there is to it. I made eight of these little rosebuds last night, enough for one block, so I need to make 48 more of them to finish all of my remaining blocks. And then I will have to try to figure out how to recreate the stuffed berries from my initial block (the burning question? Which batting did I use, the wool batting scrap in the project tub or the polyester batting scrap in the tub?! Aaargh!!!)
I hope you all enjoy a wonderful week with lots of time for quilting in it! I'm linking up today's post to my favorite linky parties, listed below:
MONDAY
Design Wall Monday at Small Quilts and Doll Quilts
TUESDAY
To-Do Tuesday at Quilt Schmilt
WEDNESDAY
Midweek Makers at Quilt Fabrication
Wednesday Wait Loss at The Inquiring Quilter
THURSDAY
Needle and Thread Thursday at My Quilt Infatuation
FRIDAY
Peacock Party at Wendy’s Quilts and More
Can I Get a Whoop Whoop? at Confessions of a Fabric Addict
Finished or Not Friday at Alycia Quilts
Off the Wall Friday at Nina Marie Sayre
Beauty Pageant at From Bolt to Beauty
TGIFF Thank Goodness It’s Finished Friday, rotates, schedule found here: TGIF Friday
SUNDAY
Frédérique at Quilting Patchwork Appliqué
Oh Scrap! at Quilting Is More Fun Than Housework
Slow Stitching Sunday at Kathy's Quilts
15 comments:
Such cute Halloween quilts and the perfect quilting design for them.
did you find the wash away paper that you need. I know I said of the stuff Ester Alui was using someplace but I didn't like the stuff and only used it a little and then gave up on it. It made the item very stiff and that was why I didn't like it, I tested it and it barely washed out in my opinion but that was a long time ago and I might be remembering it wrong. I could look for it and try a test on it again if you wish
Those rosebuds are amazing! The detail and smoothness. . .WOW! Well done!
Great pantos!!! Those rosebuds!!! Adorbs!!!
Your thread color and design choices are -- as always -- spot on! What adorable quilts! As for the rosebuds, congratulations on figuring out your process -- they are amazing.
Super cute Halloween quilts, Rebecca!!
Those little roses are incredible. Thanks for sharing in my Sew and Tell party.
Love the Halloween quilts! So cute. And I'm so glad you discovered the secret of the rosebuds! I knew you would. Thanks for sharing on my weekly show and tell, Wednesday Wait Loss.
https://www.inquiringquilter.com/questions/2023/10/18/wednesday-wait-loss-350
Amazing little rosebuds, so perfect!
Fun Halloween quilts, I love the skeleton, his heart, and the orange spirals and spiders hanging down!
Wow for the tiny tiny rosebuds, it requires so much precision and patience!
Thank you for sharing your process and linking up.
Great quilting on the Halloween quilts!
What great Halloween quilts!! Love the way you chose the quilting to match the designs. And definitely understand on the thread part. I haven't gotten a huge stash of quilting thread yet, I need to do a big stash buy! Thanks for linking up with TGiFF
Great quilting, Rebecca! And, my, such tiny rosebuds! Thanks for sharing with us on Monday Musings!
Super cute Halloween quilts
Mr. Bones quilting is great. I also love the spider webs stitched into the other one. Halloween quilting designs are so much fun! Choosing the perfect design as well as thread color is so critical.
Post a Comment