
Happy Fall, Quilters! Guess what -- I took an actual, in-person workshop with the Charlotte Quilters' Guild last month AND I finished my workshop block after I got home! I'm so proud of myself for 1. Taking a day off, 2. Trying something new, 3. FOLLOWING DIRECTIONS during the workshop 😬, and then 4. Adapting what I learned in class to suit my personal preferences once I got home to my own studio.
 |
| My 12 x 12 Block from Margaret Willingham's Reverse Appliqué Workshop |
 |
| My Deco Quilt Completely Cut Out and Kitted, Block One Variations In Progress |
Now that I've finished ALL of the cutting for my Deco Quilt, I am officially caught up with Week Two of the Deco QAL (Quilt-Along) that I committed to in the Fall of 2021! 😂. Week Two was cutting out all of the fabric pieces for the entire quilt. I am like that last straggling marathon runner who crosses the place where the finish line used to be, two years after the race has ended... Not only am I caught up with Week Two, but I'm also about a third of the way through with Week Three of the Deco QAL, which is the week where you piece all of the Block One log cabin variations. All 16 blue/green log cabin blocks are finished and all 12 of the half blocks in both colorways are finished and I have 32 blue/purple log cabin blocks remaining to be sewn. The cutting for this quilt was monotonous, but the actual sewing is pretty easy. I think that completely finishing this quilt top was supposed to be my OMG (One Monthly Goal) for November of 2021; maybe I can get it finished by November of 2023 instead!
Just a quick aside -- I don't want my "failure to progress" on my Deco quilt to discourage anyone else from starting this project. Typically for me, I've made creative choices that complicated matters:
- My plan to use many more colors than the pattern calls for rendered the yardage and cutting charts useless for me, so I had to recalculate all of that on my own. Every time I stepped away from the project for a couple of weeks or months and came back to it, it was a struggle to decipher my pages of scribbled notes and figure out where I left off and what needed to be cut next, etc.
- Brittany's instructions for this quilt incorporate time-saving construction methods like strip piecing and sub-cutting units, but I decided to use AccuQuilt GO! dies to cut out every single patch individually instead. This made more work for me up front, and possibly less frugal use of fabric, but I find that my patchwork is more accurate and I enjoy the process of sewing more when all of the cutting is behind me.
A Quick Refresher on Setting Triangles
One of the appealing things about Lo & Behold quilting patterns for beginner quilters especially is that Brittany's instructions don't require any specialty rulers or other equipment beyond a rotary cutter and a basic rectangular ruler with 45 degree angle lines. That makes her quilts accessible and affordable. However... If you're thinking of making a Deco quilt of your own, I have one suggestion that can make your life a lot easier, and that's to disregard the pattern's cutting instructions when it comes to the setting triangles.
 |
| My Version of Deco Quilt |
In the design rendering above, you can see that this quilt pattern requires setting triangles cut from background fabric all along the top and bottom edges, with two more setting triangles on each side (in addition to half log cabin blocks that function as side triangles).
If you cut out these setting triangles by cutting squares diagonally from corner to corner per the instructions, you get HSTs (Half Square Triangles), which are right triangles with the stretchy bias on the hypotenuse (long side of the triangle). Look at the picture again -- which side of the triangle is going to be the outside, raw edge of your quilt top if you do it this way? The stretchy, bias hypotenuse edge! You can save yourself a LOT of grief and frustration if you cut yourself some QST (Quarter Square Triangles) instead, because when triangles are created by cutting a square from corner to corner twice like an X to get four triangles instead of two, you get four right triangles that have stretchy bias on the short legs of each triangle and the straight, stable grain of the fabric is on that long hypotenuse side that ends up being the raw outer edge of your quilt top.
Susan at Quilt Fabrication has a great tutorial including a formula for calculating and cutting side setting triangles using an ordinary ruler and rotary cutter on her blog here. (Thank you, Susan!). That is the "old school," traditional way of cutting setting triangles for on point quilts. If you're looking for an easier method, I highly recommend adding a specialty setting triangle ruler to your tool arsenal like this Full Triangle Large Diagonal Set Ruler by Marti Mitchell (this post contains affiliate links). Other ruler manufacturers likely have a setting triangle ruler as well; the one I own is from Kaye England's Cut for the Cure ruler line from Nifty Notions (I looked but wasn't able to find that one anywhere online). Ask for a setting triangle ruler at your local quilt shop and if they don't have one in stock, I'll bet they can order it for you.
The advantage of specialty rulers for cutting out setting triangles is that one ruler will enable you to cut setting triangles sized to fit lots of different quilt blocks, and rulers cost a lot less than cutting dies so they are a much better value in terms of pure dollars and cents. However, the Deco quilt is made up of 8" finished quilt blocks, and when I bought my AccuQuilt GO! cutter it was a package deal at the Paducah quilt show and it came with the 8" GO! Qube, an assortment of mix-and-match dies for creating hundreds of different 8" quilt blocks. Since I'm likely to make more on point quilts using 8" blocks in the future, I splurged on the 8" setting triangle die from AccuQuilt for cutting my side and corner setting triangles. Cutting my setting triangles with this die ensured that each and every one of those triangles was exactly the right size, with the most stable lengthwise grain on the hypotenuse edge -- no math involved, no danger of miscutting mistakes if my ruler slips mid-cut or my mind wanders and I accidentally align my fabric with the wrong line on my ruler... The only downsides are the expense of the dies and the limitation that each die can only cut setting triangles for one size block.
Okay, back to our regularly scheduled programming...
 |
| YOU GUYS!!! I Can See My Cutting Table Again! |
You have no idea how proud I am of my empty cutting table! Remember what it looked like a few months ago?
 |
| With Halo Quilt In Progress, Layered Over Abandoned Deco Cutting |
And Now, the Appliqué Workshop:
 |
| Social Sewing with Charlotte Quilters' Guild Before Our September Meeting |
By the way, you do not need to be a senior citizen to participate! I wish I knew that 20 years ago when I was a new quilter! We meet at the Senior Center because of its fantastic SouthPark location near the center of the city, it has abundant free parking, it's easy to get to from just about anywhere, and we're delighted that Charlotte Mecklenburg Park & Recreation lets us use this space for our meetings free of charge. All ages, genders, and skill levels are welcome.
 |
| Show and Tell at the September Guild Meeting |
...And then, at 7 PM, our featured speaker kicks off! In September, we flew Margaret Willingham in all the way from Colorado and hosted her in Charlotte, North Carolina for a lecture and trunk show of her gorgeous appliqué quilts followed by an all-day workshop the next day.
 |
| Margaret Willingham's Live Trunk Show, Also Broadcasting on Zoom |
In order to accommodate those of our members who are out of town, ill, uncomfortable driving at night etc., all of our guild meetings are broadcast on Zoom. But there's nothing like seeing the quilts in person! That's our former President Kathy holding Margaret's quilt in the photo above. Kathy has perfectly normal sized feet, but she left GIANT SHOES for me to fill! 😘
 |
| Margaret Demonstrates her Hand Stitched Reverse Appliqué Method |
If your guild is looking for a great speaker, I highly recommend Margaret. Not only was she delightfully informative and entertaining, but we also appreciated that she included actual teaching demonstrations in her lecture at the guild meeting rather than just doing the same old "my journey as a quilter" spiel. We had booked Margaret for a machine stitched reverse appliqué workshop on Thursday, and were thrilled when she gave the entire guild a demonstration of her hand stitched reverse applique meeting during her talk at the guild meeting the night before. Our Tech Team was able to zoom the camera in so everyone in person could see what Margaret was doing on the big screen and everyone on Zoom could see on their screens at home, and Margaret had step-by-step samples prepared that she passed around the room. I feel like we got instruction on both methods for the price of one workshop, and appreciated that so much educational value was there for those guild members who were not able to attend the workshop on Thursday.
 |
| Guild Members Cindy, Susan and Judy Watch Margaret Demonstrate |
Margaret's machine stitched reverse applique is a raw edge, fused, satin stitched technique. She divided us up into small groups for demonstrations of how to smoothly navigate inside and outside corners and curves.
 |
| Gathering Around Margaret for a Demonstration and Explanation |
What did I learn? Well... I gained a new appreciation for how perfectly my embroidery machine does satin stitched appliqué! This is my practice piece from the workshop. I went slowly and did my best, pivoting constantly around those sharp curves and circles, and those little blips and wobbles you see are the best I was able to accomplish.
 |
| My Satin Stitched Practice Piece From Margaret's Workshop |
Late in the workshop day, I finally got around to stitching on the 12" block I'd painstakingly traced and cut out in preparation for the class. I went slowly and carefully around one little cutout shape, and then when I pulled it out from under my machine to admire my work I discovered that my upper thread had gotten snagged and pulled the bobbin tension to the top in one area without me realizing it. 😭. (I was using a slippery machine embroidery thread on the horizontal spool pin of my travel sewing machine. When I sew with this kind of thread on my home machine, I use a thread stand with the cone situated vertically and it works great, and I'd totally forgotten that I needed a thread net with this thread). It looked awful, I wasn't going to live with it on my "real block," and I did not have it in me to rip out those teeny tiny satin stitches right then. I packed up my things and decided to revisit it at home.
 |
| Back at Home, Blanket Stitching with Foot 20D on my Bernina 790 |
The thread color I chose for the reverse appliqué is King Tut in color Lapis Lazuli, and I love how it looks against my batik fabric. Cotton thread is just so beautiful!
 |
| King Tut 40 wt Cotton, Lapis Lazuli |
Satin stitching versus blanket stitching for machine appliqué is a personal choice, for sure. I've never made a whole quilt with fusible raw edge appliqué, certainly have never made and washed one, and I don't know whether the satin stitched appliqué holds up better with use and laundering than blanket stitching. But I do know that I enjoyed the process of blanket stitching more and I think I was able to achieve smoother, prettier blanket stitching than what I was able to do with the less-forgiving, much more noticeable satin stitch.
 |
| Pretty Blanket Stitches Make Me Happy! |
And here's my finished block:
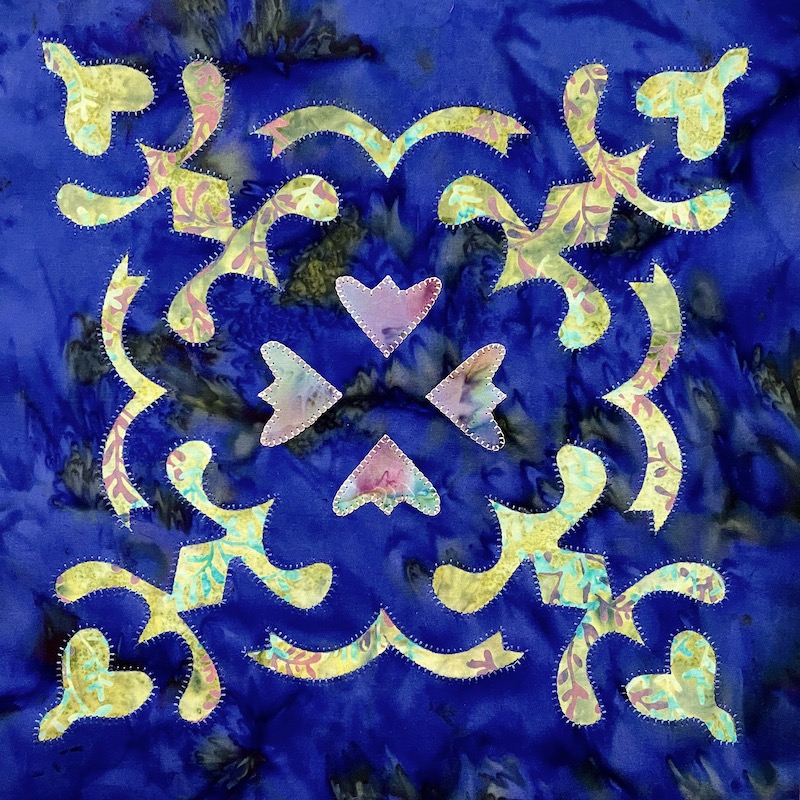 |
| Ta-Done! 12 Inch Reverse Appliqué Block Completed |
Those purple heart-like shapes in the center of the block are conventional applique, meaning that the purple hearts are cut off and placed on top of the blue background fabric for stitching. The lime green shapes are all reverse applique, meaning that a large piece of green batik fabric is placed underneath the blue fabric and the blue fabric was cut away to reveal the green fabric below. Mixing both methods in one block creates interesting depth that probably doesn't come through well in the photos. I used King Tut 40 wt cotton thread in Cotton Candy for my purple hearts.
Now, what will I DO with this finished block, you might ask? Um... I'm not making the whole quilt, that's for sure. This is the pattern we bought for the class, Tulips and Lace Quilt XI. The design is lovely but it doesn't align with my personal style and I'm beginning to realize that I am not going to live long enough to make all of the quilts on my bucket list. I'm starting to be choosier about which projects I undertake, especially since the projects I expect to whip up in a few weeks end up taking me six months, and the projects I expect to take me a few months sometimes drag out to an entire decade!
I'm setting this block aside for now, but I do have a plan for it. At our October 4th guild meeting, I'm going to ask whether anyone else has finished their block but doesn't plan on making the entire quilt. We were all using batik fabrics, and I'm thinking that I could combine several students' blocks into one small quilt that we could either donate to our guild's Outreach charities or possibly sell in our Quilt Show Boutique next Spring. With sashing and borders, even four or five blocks could be enough for a small quilt -- and this would be a great way to move out some of the batiks that have been marinating in my stash for far too long!
Speaking of our October 4th meeting, we have another wonderful in-person lecture and trunk show planned, this time from local textile artist Linda Keene who creates joyful portrait quilts using patchwork and appliqué techniques. You can read more about Linda and see examples of her work on her web site here, but if you're local to the Charlotte area I am inviting YOU to join us to see her work in person on October 4th! Even if you're not local, you can email info@charlottequiltersguild.org for a Zoom link to attend the lecture virtually as my personal guest.
Meanwhile, there is laundry waiting to be sorted and quilts waiting to be quilted... My personal quilting goal for this week is to make some more of those purple log cabin blocks for my Deco quilt. I'm not even going to throw out a number -- if ANY blocks get sewn, I'm calling it a win! I'm linking up today's post with my favorite linky parties, listed below. Happy quilting, everyone!
MONDAY
Design Wall Monday at Small Quilts and Doll Quilts
TUESDAY
To-Do Tuesday at Quilt Schmilt
WEDNESDAY
Midweek Makers at Quilt Fabrication
Wednesday Wait Loss at The Inquiring Quilter
THURSDAY
Needle and Thread Thursday at My Quilt Infatuation
FRIDAY
Peacock Party at Wendy’s Quilts and More
Can I Get a Whoop Whoop? at Confessions of a Fabric Addict
Finished or Not Friday at Alycia Quilts
Off the Wall Friday at Nina Marie Sayre
Beauty Pageant at From Bolt to Beauty
TGIFF Thank Goodness It’s Finished Friday, rotates, schedule found here: TGIF Friday
SUNDAY
Frédérique at Quilting Patchwork Appliqué
Oh Scrap! at Quilting Is More Fun Than Housework
8 comments:
Holy info-packed blog posts, Batman! First, I am celebrating your Deco progress and fun in-person workshop experience. Second, THANK YOU for the discussion on setting triangles. It's exactly what I needed to read today. (insert fist bump here)
sounds like you enjoyed your reverse applique by machine. I have never done it by machine but by hand where it is very much like needle turn applique which I enjoy. Looks like you have a large quilting group, and good luck on your deco quilt
The blanket stitch applique is beautiful! Looks like fun was had by all who attended the workshop!
Wow, so much information!!!! I agree with the side triangles, I always cringe when instructions tell you to have the bias on the outside. I also like blanket stitching better than satin stitching. I haven't done a lot of machine applique but I never use satin stitching, it's too obvious. I am also starting to be much more selective in projects I start, I really think the chances of me of living to be 350 years old are slim. Happy stitching!
Your appliqué looks lovely! I struggle with appliqué, even by machine, given that my cutting skills leave a lot to be desired. Congratulations on the clean cutting table and on your Deco progress -- it's looking wonderful!
Wow she sure gave a great lecture and workshop! Sounds like it was very informative. Love your Deco quilt and yep, I expect it'll move a lot faster now that you have the cutting sorted. Thanks for sharing on my weekly show and tell, Wednesday Wait Loss.
https://www.inquiringquilter.com/questions/2023/10/04/wednesday-wait-loss-348
Your blanket stitching looks perfect on the reverse applique! I love the extra detail it adds to the whole block. I like the addition of conventional applique, too, for that little extra depth.
Ooooh, that was a busy and satisfying week! Beautiful Deco blocks, and nice organization for sewing them everywhere and on all occasions. For sure it's going to be a 2023 finish! The appliqué class sounds like it was a great workshop, and I love your blanket stitches. Great idea to switch from satin to blanket stitch!
Thank you so much for sharing your work - and the great advice about setting triangles - and linking up!
Post a Comment