Showing posts with label Pineapple Log Cabin. Show all posts

Friday, July 24, 2026

(S)Crappy Celebration: Meh? + Stonefields Prep + Pineapple Log Cabin UFO

UGH.  You guys, I am sick of working on this project again!  I finished the blocks I was working on last week but it was such a chore coming up with a layout.  I really hate that I made 5 or 6 versions of each block in the exact same, or nearly the same fabrics, even though I thought that was a feature of the inspiration quilt that I liked and deliberately wanted to replicate when I was starting out.  I have begun mixing some stash fabrics in with the matchy-matchy Tilda prints, but it's not making me love it or anything.  

I find myself wishing this was two (or more) separate quilts.  I love a double 9-patch quilt with a white background and it would be pretty to have a rainbow version with each block a different dominant color.  The other blocks where I didn't use any white fabric, or very little white fabric, have a much heavier feel.  But I've made 42 of these 9" blocks already, enough for a 54" x 63" throw quilt with a 6x7 layout, and I feel like enough already.  Time to wrap this up and move on!

This is the best I could do on the layout, trying not to put identical blocks too close together if I could help it (sometimes I couldn't) and trying to balance out white background, lacy 9-patch blocks with the darker, not-enough-contrast blob blocks as best I could.  This is what we are dealing with:


54 x 63 (S)Crappy Celebration Layout


Checking value distribution in gray scale just to be sure:


Same Photo, in Gray Scale


Then I went to my EQ8 software to see whether adding sashing and cornerstones would improve the quilt at all:

Friday, April 14, 2023

Ramona's Pineapple Log Cabin, Betsy's Sea Glass Pinwheels + Pesky Little Halo Curves

Good morning and happy April, quilters!  I hope everyone who was celebrating enjoyed a wonderful Easter or Passover last week.  The Spring weather has arrived in Charlotte and there is a little gold butterfly fluttering around in the sunshine outside my window as I'm writing this.  It's so hard to stay inside and get work done on a day like today!  Of course, it helps when the work that keeps me indoors is as beautiful as Ramona's pineapple log cabin quilt!

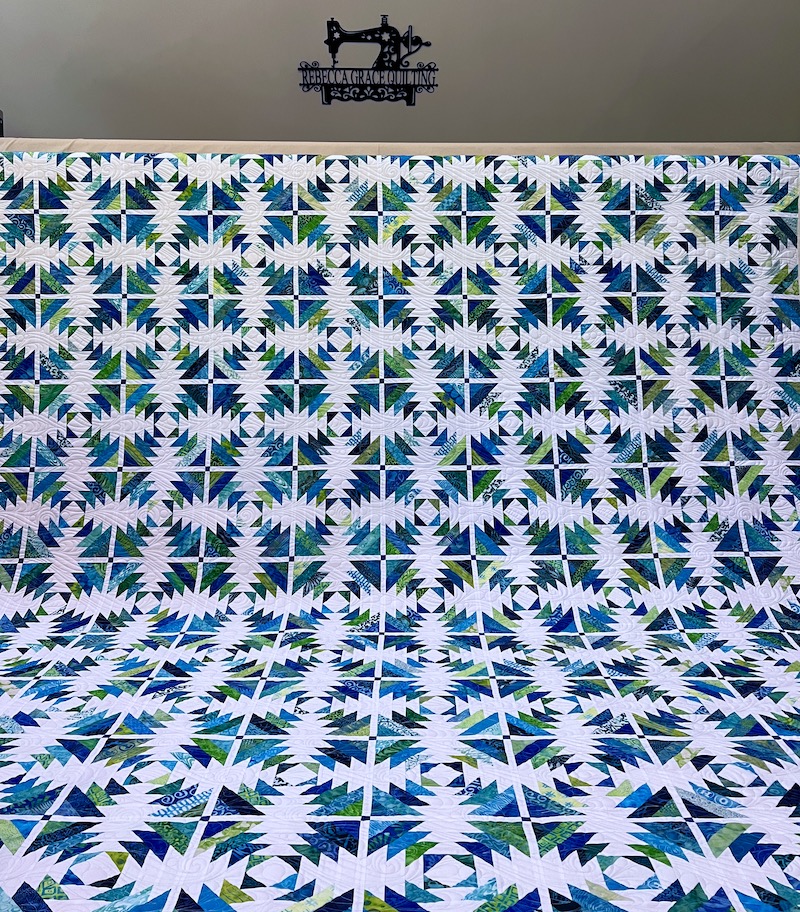
Ramona's Pineapple Log Cabin with Radiance E2E, Glide Thread in Sea Foam

I just love her watery blue and green batik fabrics against that crisp white background, and the skinny sashing with sapphire sashing posts is absolute genius.  It's a beautiful variation on the traditional pineapple log cabin that also eliminates having to match up all those seams when the blocks are sewn together.  Brilliant!  

Ramona's 95 x 95 Pineapple Log Cabin Quilt

We used Hobbs Tuscany 80/20 Cotton/Wool batting for Ramona's quilt, a luxury all-natural alternative to the more common 80/20 cotton/poly blend batting (this post contains affiliate links).  The Cotton/Wool blend has a little more loft, a little less weight, and breathes better than a cotton/poly blend.  

Tuesday, November 16, 2021

Sarah's Chevron Memory Quilt, Lazy Day Quilt Progress + Pineapple Nostalgia Quilt Back from the Cleaners

Good morning and happy Tuesday, friends!  I have so much to share with you today, so let's dive into it.  First up is a lovely, snuggly flannel-backed Chevron Memory quilt that my client Sarah made in remembrance of her grandmother.

Sarah's Chevron Memory Quilt

70 x 90 Chevron Memory Quilt with Filigree E2E Quilting

Sarah pieced this quilt while working through the flood of emotions following the sudden passing of her beloved grandmother, incorporating some of her clothing into the quilt top and pieced backing as well as new fabrics with novelty print themes that reminded her of her grandmother.  We chose the Filigree pantograph design because it reminded Sarah of her grandmother's lace tatting and I knew it would give Sarah the loosely quilted, old-fashioned feel she wanted for this project.

Sarah's Pieced Backing, Flannels and Regular Wovens, with Filigree E2E quilting

Okay, so when Sarah first reached out to me about this quilt, she warned me that it was only her second quilt ever when she started it three years ago, that it was "full of flaws" and learning experiences, etc.  I was bracing myself for there to be challenges for me to work around -- and then this beautifully pieced top and pieced backing showed up in the mail.  

Thursday, November 11, 2021

TGIFF: My Pineapple Log Cabin Quilt is Finally, FINALLY Finished!

Happy Almost Friday, y'all!  I'm hosting the TGIFF Thank Goodness It's Finished linky party this week and I have THREE "Big Quilt" finishes to share with you -- one made completely by yours truly over the past SEVEN years, and two large beauties that I recently had the privilege of quilting for clients.  At the bottom of this blog post you'll find the link up where you can share a recent finish that YOU'RE proud of, whether it's a finished top, a completely finished quilt, a finished garment/bag/home dec project, or just a finished quilt block.  

First, oh my gosh, you guys -- Colleen, are you still out there somewhere???  I have been posting about my progress (and lack thereof) with this monster of a pineapple log cabin quilt off and on since I started it in 2014, and I know some of you longtime readers thought I would never finish it.  One reader, Colleen, used to regularly encourage/nudge/plead with me to finish this quilt, but I haven't heard from her in awhile.  Colleen, if you're reading this right now, THANK YOU for keeping the faith!  

My 120 x 120 Pineapple Nostalgia, 2014-2021

You can learn more about this quilt from this previous post, written when I finished quilting it but before it was labeled and bound.  It was foundation paper pieced on my Bernina 750QE, the logs finish at 3/4" wide, there are 97 pieces in every block and 36 blocks in the quilt, and the batting for my Pineapple Nostalgia quilt is Quilter's Dream Wool to get some loft without weight, since the heavily pieced quilt top weighed a ton all by itself.

Monday, November 1, 2021

November OMMG, Lightning Round: One Million Monthly Goals for Rebecca

 Hello, friends -- I've missed you!  Happy November!  

The longer it's been since writing a blog post, the more I have to share, the longer it would take to write about everything I'm working on, and the less time to get anything finished.  I have a folder on my computer desktop where I keep photos of things I want to post about and if it was a REAL folder, it would be splitting at the seams and pictures would be falling off the desk and onto the floor.  I've been working on so many different quilts for clients lately that I'm dying to share with you, but since it's a brandy-new month I've decided to keep it personal and just share my own projects and plans with you today.  I'll be linking up today's post with One Monthly Goal (as if) and To-Do On Tuesday linky parties in addition to my other favorite parties. 

Deco Quilt-Along: Behind Schedule Already

The Deco Quilt QAL hosted by pattern designer Brittany Lloyd of Lo & Behold Stitchery is running from October 18th through November 29th, and I was hoping to keep up with the QAL schedule to prevent this project from turning into yet another languishing UFO (UnFinished Object) hanging around my studio.  I had a delay with the fabrics I'd ordered online, then when they got here I didn't love some of the colors with the Anna Maria Horner backing print I'd fallen in love with while waiting for the solid quilt top fabrics to show up.  But I finally made it out to a bricks-and-mortar quilt shop about 40 minutes away from me a few days ago, and now I'm happy with my "fabric pull."  (Side note: Pulling Fabric (out of quilt shops) is MUCH MORE FUN than Puling Teeth (out of your face).

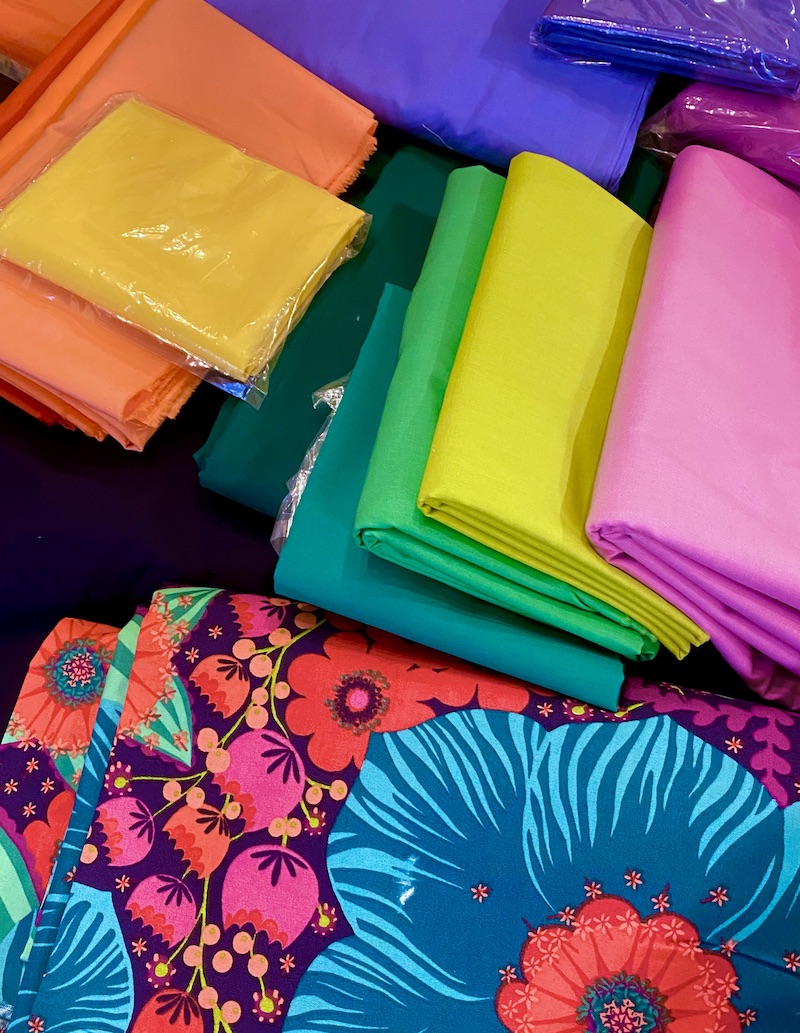
My Deco Bed Quilt Fabrics, Revised to Coordinate with Anna Maria Horner Backing Print

Obviously I could have saved myself a lot of aggravation and time if I'd chosen the backing print FIRST and THEN pulled solid fabrics to match colors in the print.  I'll still be using these fabrics more or less as shown below in my original color plan, with that inky dark Kona Solids Indigo as my background fabric.  I love bright colors with dark background fabrics!  

Deco Bed Quilt Will Finish at 102" x 102"

According to the Quilt Along schedule, I was supposed to be Planning the first week, then Cutting and Organizing ALL the fabric for the whole quilt last week, and this coming week is supposed to be making all of the Block One blocks (those are the ones that are like log cabin blocks -- in my version, they will have large dark or medium blue squares and logs of Indigo alternating with either purple or green).  In order to get back on schedule somewhat, and because of my track record in the past when cutting EVERYTHING out first, I think I'm going to just cut and piece as I go along.  

Sunday, August 22, 2021

My Pineapple Log Cabin Is Quilted, and I LOVE IT SO MUCH!

Oh my gosh, you guys -- I am so, SO pleased with how the quilting turned out on my longtime UFO pineapple log cabin quilt!!!  😍😍😍

Pineapple Log Cabin Quilt with Moulin Rouge E2E

Pineapple Log Cabin FAQs:

I was so relieved when I got to the bottom of this quilt without having to piece any extra batting on the sides!  The widest batting comes is a stated width of 120", and packaged batting usually gives you a few inches more than what it says on the package in the length, but the width of a roll is the width of a roll.  Whew!  Normally, I make sure to have at least 4-6" of extra backing AND batting on all four sides of a quilt.

Glide Thread in Sea Foam, Moulin Rouge E2E Quilting Design

Talk about playing "batting chicken!"  So, let's talk about this Sea Foam thread color!  My first instinct for this quilt was a more traditional off-white or ivory thread color, but I wanted to keep the focus on my piecing design and on my fabrics.  

Tuesday, August 17, 2021

It's FINALLY Happening: My Giant Pineapple Log Cabin Quilt is On the Frame for Quilting!

Some of my long-time quilting friends out there thought this day would never come, but there's no going back now -- I loaded my pineapple log cabin quilt last night and the quilting will commence TODAY!

Loading My Massive California King Pineapple Log Cabin Quilt at Last!

Here are the answers to the most common questions I've gotten about this project over the years:

  1. I paper pieced the blocks using a free foundation pattern that I downloaded from Fons & Porter here, but after taping just one block together I took it to my local FedEx shop and printed single page copies on their large format printer.  Although the foundation paper piecing pattern came from Fons & Porter, it's not their design -- it's a pattern for reproducing an antique pineapple log cabin quilt from the collection of the International Quilt Study Center.  You can see that quilt here.
  2. The blocks finished at approximately 17 3/4".
  3. The fabric strips are cut at 1 1/2" wide since I'm paper piecing, but the finished width of the strips is 3/4"
  4. Each block contains 97 pieces, and each block is taking me roughly SIX hours to piece.
  5. This quilt is for my own California King bed that measures 72" wide by 84" long.  It's a deep pillow top mattress, so I planned my quilt top to be 120" x 120" to ensure that even after the shrinkage of quilting and washing, the quilt will still completely cover the mattress when it's on my bed.
  6. I started this project in June of 2014, SEVEN years ago!

Thursday, February 4, 2021

The Fabulousness That Is February: One (or More) Monthly Goals

Hello, my lovelies!  Happy Thursday, and happy FEBRUARY!  Now that I have replenished my supply of Kona Solid in Ocean, I came close to finishing two more sampler blocks for my Retro '80s Building Blocks quilt last night.  The 10" block below wasn't quite done yet when I took this photo:

Progress on Another 10 Inch Sampler Block

All of my block sections had been foundation paper pieced and trimmed, but they still needed to be pieced together and, in order to nest the seams the way I wanted them for crisp, perfectly matched seam intersections, I designed my foundation paper piecing pattern so that the sections go together with partial seam construction.  I weighted the finished sections down with my acrylic square ruler just to keep it crisp and flat overnight.

Here it is, finished:

10 Inch Block Finished

As my dad used to say, "I think that's close enough for government work!"  (I have no idea WHY he used to say that, but he did).

Tuesday, March 19, 2019

Miscellaneous Musings On Borders, Backings and Bindings (Oh My!)

First off, I'm glad to report that my Pineapple Log Cabin quilt top is finally, FINALLY finished, a mere FIVE years after I started making it in June of 2014.  Unfortunately, I have no glorious "ta-da" photos to share because the quilt top is a massive 120" x 120" and, with all of those pieces (3,492 pieces not including border strips, but who's counting, right?) and three layers of fabric at every seam allowance, it weighs a ton.  I was concerned about the border fabric tearing from the weight of the quilt if I dragged my menfolk out to do a fancy photo shoot somewhere before the top gets layered and quilted.  So this is all you get today:

Pineapple Log Cabin Top is Finished!  120 x 120 with Borders
I am so, SO HAPPY with the my border choices.  That Kaffe Fassett floral print ties all of my scrappy strips together, just like I'd planned it all along.  


Here you can see the quilt top draped across my 12' APQS quilting frame:


This is What a 120 inch Quilt Looks Like On a 12 Foot Frame
This quilt was my catalyst for buying a longarm machine in the first place, the reason I ordered my APQS Millennium longarm machine with a 12' frame, and why I nearly went with a 14' frame instead.  My pineapple quilt top will fit, but just barely!  I got my binding strips all cut for this quilt and have purchased and prewashed the backing fabric.  


Backing and Binding for Pineapple Quilt
I just need to press my backing yardage, cut it into three widths, and seam it together...  But then it all gets folded and neatly hung in the guest closet.  I can't even think about quilting this until after Lars's graduation quilt is 100% finished, and that's not happening until I get back from my marathon of longarm quilting workshops with Lisa Calle and Judi Madsen at Spring Quilt Week in Paducah.

Speaking of Lars's Geese In Circles graduation quilt, it's coming along nicely, too.  I have 26 of the 48 flying geese arcs pieced, and I lucked out with the discovery of the PERFECT batik binding fabric in, of all places, my very own STASH!


Binding Fabric Discovered In My Fabric Stash!
Very excited about that discovery, because usually when I find the perfect fabric for a project in my stash, I don't have enough of it.  The half yard cut of this fabric was just enough to cut binding strips for Lars's XL Twin graduation quilt (72" x 96", sized for a college dorm mattress).    

While I was in Binding Mode, I also located an orangey-gold metallic fabric that I'd chosen to bind my Jingle quilt and cut that into strips.  This green swirly fabric is the intended backing fabric for that quilt, it's already been prewashed, so it just needs to be cut into lengths and seamed together before I can pack it away with the quilt top (Jingle needs custom quilting, so don't expect to see that one quilted right away, either).
Binding and Backing for Jingle Quilt

I made the jaunt to my not-quite-local quilt shop yesterday to select backing and binding fabric for the vintage quilt that I'm repairing and requilting for a friend, and I am really, really happy with what I came up with.  The challenges and objectives for this shopping trip were as follows:
  • This quilt was originally backed and bound with a cheerful and hyper-bright, Day Glo MOD orange solid fabric that gave me a strong 1960s vibe, and tied with matching orange yarn
    Vintage 1960s Leather Jacket in Exact Same Shade as Original Backing and Binding Fabric
  • The quilt's current owner is ready to part ways with the orange, but since the quilt's value is sentimental, I didn't want to introduce anything for the backing or binding that would substantially alter the color palette and make it seem less like the quilt that Grandma made
  • Since the current owner likes to use this quilt as a picnic blanket for concerts in the park, I wanted a print backing fabric that wasn't too light in color so that minor grass stains or soiling wouldn't stand out as much.  The goal here is to prolong the life of the quilt by minimizing the frequency of laundering.
  • I preferred a print backing fabric in case my quilting stitches and tension are not 100% perfect under magnification...  Print backings hide a multitude of sins, and if there's one thing I'm sure of during the season of Lent it's that I'm a wretched sinner!  ;-)
  • The fabrics in the quilt top are severely faded from their original vibrant hues.  This is challenging because I want any new prints to complement the originals, but although '60s and '70s inspired prints about in today's quilt shops, those fabrics all have bright, saturated colors that would draw way too much attention to themselves.

Backing and Binding Fabrics for Vintage Quilt Project
Since the quilt top fabrics have been subjected to many washings over the years, I prewashed my new backing and binding fabrics in HOT water with regular laundry detergent.  I don't think any bleaching is necessary, though -- these fabrics already blend right in with the quilt top.  The purple fabric with the swirls is the backing fabric and the soft coral orange will be the binding, so there's some continuity with the original orange but now it's in a much smaller dose and more subdued.


Purple Backing Print, Coral Binding Print
Best of all, I found both of these fabrics at the back of the store in the sale section for 30% off.  When does THAT happen?!

So, it being Tuesday, let's set some goals.  Here's what I hope to accomplish in the next week:


  • Finish piecing another 12 of the arced flying geese for Lars's graduation quilt (goal is 36 by week's end)
  • Press, seam, and store backing fabric for the Pineapple and Jingle quilts
  • Press and seam the vintage quilt backing and load it on the longarm frame
  • Press and cut coral binding strips for the vintage quilt
I'd really like to get the quilt top off the wall, patched, and loaded onto the frame for quilting this week, too, but that would be an awful lot to bite off in one week and the graduation quilt is still my primary focus.

I'm linking today's post up with:

TUESDAY

·      Colour and Inspiration Tuesday at http://www.cleverchameleon.com.au
·       To-Do Tuesday at Stitch ALL the Things: http://stitchallthethings.com

WEDNESDAY

·      Midweek Makers at www.quiltfabrication.com/
·      WOW WIP on Wednesday at www.estheraliu.blogspot.com

THURSDAY

·      Needle and Thread Thursday at http://www.myquiltinfatuation.blogspot.com/  

FRIDAY

·      Finish It Up Friday at http://www.sillymamaquilts.com
·      Whoop Whoop Fridays at www.confessionsofafabricaddict.blogspot.com
·      Finished Or Not Friday at http://busyhandsquilts.blogspot.com/

Tuesday, March 12, 2019

Pineapple Borders (Finally!) and More Flying Geese

I'll bet you thought you hadn't heard from me because I was sewing up a storm over Lars's graduation quilt, didn't you?  Well, progress has been made on that front, but we'll get to that in a minute.  For today, we're taking a little detour and revisiting the long-overdue borders for my pineapple log cabin quilt.


Look Who's Getting Borders Today!
First, I'm adding a 3/4" finished border (same size as the pineapple strips) in Kona Solids 196 Blue Jay, and after that I'm adding a wider border in a floral Kaffe Fassett print.

Why has it taken me so long to add these borders?  Well, first of all, I had to prewash the uncut border yardage, and I loathe the washing and the ironing and the folding and the cutting of the borders.  Then, I was trying to figure out where I could lay this gigantic quilt top flat to measure for the borders and pin them on.  I finally decided to use the rails of my longarm frame for this.


Using the Longarm Frame to Measure for Border Length
As you can see, I've draped the quilt top over the quilt top roller of my frame with the center seamline centered on the rail and smoothed it out nice and flat, but not stretched.  Then I smoothed one of my 1 1/2" (cut width) blue border strips all the way down that center seam, keeping one cut edge right on the seamline down the whole width of the quilt.  I marked the border strip with tailor's chalk on both ends right at the raw edge of the quilt top and then took the border strip to my cutting table to make clean perpendicular cuts with my rotary cutter and ruler.  (For those of you who are not quilters, the reason I'm measuring through the center of the quilt for the border length rather than measuring at the outer edges is to prevent Wavy Border Syndrome in the event that any of those raw bias edges misbehave and stretch on me.  We want a flat, square quilt when we're finished!)


Pinning Border at the Longarm Frame
Then I hung the quilt top off the longarm frame with the edge of the quilt along the quilt top roller and the bulk of the quilt top hanging off the back.  (The canvas wrapped around the roller bar grips the back of the quilt top to hold it in place the same way that a napped design wall will hold up quilting cottons without pinning).


Pinning for the 97D Seam Guide: Perpendicular Pins With Pin Heads to the Left
I'm inserting my pins perpendicular to the raw fabric edges with the pin heads facing to the left, so nothing will stick out and get in the way of my beloved seam guide at the sewing machine.  I thought about sewing with the borders on the bottom so I could "babysit" all the seam allowances and ensure none got flipped in the wrong direction as I was sewing, but decided against it.  As I mentioned earlier, although the neutral strips of fabric have straight grain at the outside of each pineapple block, the diagonal blue and green strips of fabric have stretchy bias edges at the outer edges of the blocks.  I've pressed and starched those seam allowances as flat as can be, so I'm just being really careful as I'm pinning them and checking frequently as I'm sewing.  I just felt like it was important to have the seam allowances and naughty bias edges in direct contact with my feed dogs and the stable, lengthwise grain of my border strips on top.  I've got two of the four blue border strips sewn on so far without having to reach for my seam ripper, so that's how I'll do the other two sides as well.


Oh How I Love Me Some 97D Foot!
It's been over a month since I proclaimed my love for the Bernina #97D Patchwork foot and Seam Guide all over the Internet, y'all, so it's time.  And no, Bernina doesn't pay me to say these things (unfortunately).  Why am I so smitten with this patchwork foot when there are so many other options to choose from?  For one thing, the wider left toe on this foot gives better contact with the widely spaced feed dogs on my 9 mm B 750QE, plus it has a cutout at the back of the foot so I can engage the Dual Feed Footsie for even smoother, more consistent fabric feeding as I sew these borders.  And the seam guide -- Ah, how I love thee! -- It screws right down to the bed of the machine in an instant, no measuring required, just slide it right up to the edge of the presser foot.  The seam guide remains FIRMLY in place until I remove it.  Zero wiggle, zero "play," impervious to vibration.  Unlike the patchwork feet that have a little barrier guide attached directly to the edge of the presser foot, the Seam Guide extends significantly in FRONT of the presser foot.  This is what makes it so awesome.  I'm not looking at the needle or at the edge of my presser foot when I'm piecing.  Instead, I'm watching in front of the foot to make sure that my raw fabric edges are right up against that seam guide.  I'm guiding the fabric through the machine with my left hand just as you see in the photo: my pointer finger is making sure that the fabric edges touch the seam guide in front of the foot, and the rest of the fingers of my left hand are behind the foot to ensure that the bulk of this ginormous quilt top doesn't drag it sideways as it feeds through the machine.  My right hand was holding the phone to snap the picture, but when I'm actually sewing I'm using my right hand to fluff and position the project in my lap so it feeds smoothly to the machine, check the seam allowances underneath, etc.  But the secret of the 97D foot + seam guide success is that, if the fabric is lined up precisely 1/4" seam allowance in front of the foot and it's feeding straight as you sew, the fabric edge will be precisely 1/4" away when it reaches the needle.  I find that I'm able to sew a bit faster with the 97D + Seam Guide combo, without losing accuracy.  And getting things done faster is a good thing!  That's why, when I bought the B 475QE "Goldilocks" machine for portable piecing, I purchased another Seam Guide separately to use with the #37 Patchwork foot that came with the 475QE.

Speaking of things that need to get done faster...  Yes, I've been working on the graduation quilt!  12 of the 48 curved flying geese arcs have been paper pieced.  That's 25% of them done at the end of the first week in March, so I'm on track to finish all of them by the end of the month, sort of.  I haven't touched them since Saturday and today is Tuesday...   


See Those Green Tag Board Templates On the Purple Fabric?
Meanwhile, I've ordered an 18" x 18" sheet of 1/4" thick acrylic from Amazon and informed my husband that he has been drafted as my Custom Template Maker for this quilt.  See those green tag board templates on top of the folded purple fabric in the photo above?  I need to cut 48 of each of those two shapes out of the purple fabric, and even if I had the time and patience to trace around the tag board and cut each piece individually, I'm concerned that the skinny ends of that one template will bend as I'm tracing around it.  I found an article on the Internet from Bob Vila about how to cut acrylic sheets with a saw and told my husband that if Bob Vila can do it, so can he!  Let's make it a family project, right?  All of my store bought acrylic rulers and templates for rotary cutting are only 1/8" thick, but Bernie says that's too thin for him to cut with a saw; it would shatter.  Hopefully I can still rotary cut around the thicker templates, and an added bonus will be that I can also use the thicker templates for ruler work on the longarm machine when it comes time to quilt this bad boy!  I'll let you know how that works out when the acrylic sheet shows up.  Fingers crossed!


In other grad quilt related news, look what showed up in today's mail:

This is the custom-printed backing fabric from Spoonflower, designed by C. Wren Leyland:

Kona Solid Backing Fabric, Custom Printed with Psalm 28:7
SO EXCITING!!  Now I need to decide whether or not to disregard the Spoonflower instructions to prewash this fabric.  It's printed onto Kona Solid fabric, the same as the (unwashed) quilt top fabrics, so leaving the backing unwashed until after quilting should ensure comparable shrinkage in all of the quilt fabrics.  However, I didn't think to check my sample swatch for colorfastness before I washed it and I have no idea whether there might be residual dye in this Spoonflower fabric.  I'm sure the dyes they use for their digital printing are totally different from what Kona uses to dye their solids at the mill.  Hmmm...  I think I'll snip off a sample to check for dye bleed and if I have to, I'll give it a COLD water wash to rinse loose dye with as little shrinkage as I possibly can.  It will be fine, right?

But first -- Gotta get these borders on the pineapple quilt, though, so I can store the finished quilt top safely out of harm's way (and free up the longarm frame for quilting the vintage quilt top that's mid-repair).


And so, without further ado, here are my To-Dos for Tuesday:


  • Complete solid blue and print borders for the Pineapple Log Cabin quilt
  • Piece 12 more geese arcs for Lars's Geese In Circles graduation quilt
That is PLENTY ambitious for me, since each of those geese arcs is taking roughly an hour and a half to an hour and forty-five minutes to piece!  Time to get back to work!

I'm linking up with:

TUESDAY

·      Colour and Inspiration Tuesday at http://www.cleverchameleon.com.au
·       To-Do Tuesday at Stitch ALL the Things: http://stitchallthethings.com

WEDNESDAY

·      Midweek Makers at www.quiltfabrication.com/
·      WOW WIP on Wednesday at www.estheraliu.blogspot.com

THURSDAY


·      Needle and Thread Thursday at http://www.myquiltinfatuation.blogspot.com/  

Wednesday, January 2, 2019

Hello, New Year 2019! Let's Set Some "Soft" Goals for January

Now, don't get all excited and think I'm going to join you on your 5 AM jog or give up wine and chocolate or anything as ridiculous as all that.  If sweating and starving is what makes YOU feel jazzed about 2019, more power to you!  No, I'm just setting out some "soft" goals for January, so I can link up with the January OMG (One Monthly Goal) linky party.


I am calling these "soft" goals because, for 2019, I resolve to remove all stress and anxiety from my creative hobbies, and that means no more deadlines, no more guilt, no more internalizing other quilters' goals and values around finishing UFOs, not buying new fabric, or not allowing myself to start anything new until I finish what I've already begun.  If I run out of room for my fabric, I'll buy more shelving or commandeer the guest room.  If I get bored with a project or run into a roadblock, I hereby give myself permission to set it aside and start on something else.  

However...  I do have a few works in progress that are well enough on their way for me to look forward to finishing them.  SOFT goals, see?  This is what I LOOK FORWARD to working on in my studio during the month of January:

  1. I look forward to finishing the borders and assembling my 2013 BOM Jingle quilt into a finished top!  The border stripe is slow going because I'm cutting it single layer and decided to "edit" that outer stripe by cutting away the small scale floral stripe in the middle and seaming the other stripes back together again.  My neck is still a little stiff and sore, so I only cut for 15-20 minutes at a time.  Hence the delay, even though I love how the "edited" stripe looks for that outer border:
    Jingle BOM, Finalizing Inner and Outer Borders
  2. I look forward to meeting new quilters and learning some new applique techniques at a workshop I'm taking this Saturday!  I opted for the No Fabric kit, so I need to pick out fabrics to work with from my stash and gather my supplies:
    Class Samples for Christa Smith's Applique Workshop
  3. I look forward to adding borders to my 2014 pineapple log cabin quilt so it's a completed top, too!
    Pineapple Log Cabin, Awaiting Two Borders
  4. Finally, I look forward to machine binding this outreach cuddle quilt so I can get it out of my studio and on its way to someone who needs it!  I've wanted to come up with a machine binding technique that I can live with and I'm hoping this will be the project to make that happen.  It's DEFINITELY not a quilt that needs or warrants a hand-stitched binding:
    Guild Outreach Cuddle Quilt Awaiting Binding

That's plenty for January.  I'm hosting an end-of-Christmas party for my church choir this Sunday afternoon and I'll be at that applique workshop all day on Saturday, so the next few days will be more about shopping, cleaning, and cooking than quilting.  My sons (also known as Hoodlum the One and Hoodlum the Other One) go back to school tomorrow (yay!).  Right now they are scrambling to complete all the assignments that they conveniently forgot about until the very last day of vacation.  Smirk.

Happy New Year!